Getting Started with JavaFX
Time to read:
September 03, 2019
Written by

JavaFX is a Java toolkit for making GUI applications which run on Windows, MacOS or Linux and mobile. It is the successor to the old Swing and the older AWT toolkits.
Since the release of Java 11 in 2018 JavaFX has been part of the OpenJDK project, so it is open-source and is developed by many people from many different companies. If you are interested in creating a desktop application today then I would recommend starting with JavaFX and not using Swing or AWT, but it can be hard to know how to get started.
This post will walk you through creating a JavaFX desktop application from scratch - the application will use JavaFX’s controls module to draw a label with some text, then we’ll move on to creating an interactive app that can send SMS messages.
What do I need in order to make a JavaFX Application?
Getting Started
The latest versions of JavaFX need Java 11 or later, and we will be using Maven for this tutorial. However, JavaFX does work fine with any build tool (there are examples in the JavaFX docs).
We will create a new project by hand. Normally we could use a Maven archetype, but for this project we’ll be building it up step by step and only adding things when necessary so we’ll start in an empty directory.
Create a file called pom.xml - this is Maven’s Project Object Model, which describes the build configuration and dependencies. All we need in this file for now is:
You can choose your own values for <groupId> and <artifactId> following the Maven naming guide if you’re not sure what to use.
We also need a directory structure like this:
After you make those empty directories you can import the project in your IDE.
Configuring the Maven Project
As mentioned above, JavaFX needs Java 11 so we need to tell Maven to use that. We’ll also set a property that defines how the source files are encoded to avoid cross-platform encoding issues. Add this xml before the closing </project> tag in pom.xml:
While we have the pom.xml file open we can add a dependency on javafx-controls. Add this into your pom.xml after the <build> section:
This is all we need to do in the pom.xml file for now - you can check that it matches the version in my project on GitHub.
Configuring the Java Modules
The Java Platform Module System was added in Java 9, and was a big change to the internal structure of the Java core libraries. It allows developers to better modularize their libraries and applications by specifying groups of packages that can be considered as a “public API”. It won’t take much for us to use modules in this project. Inside src/main/java create a file called module-info.java with the following contents:
This file declares that we require the javafx.controls module, and that our javafx.helloworld module will export classes from the package com.example.javafx - your IDE might show an error as that package doesn’t exist at the moment, so create it now by creating a new class called Hello in the com.example.javafx package. The code in Hello.java can look like this for now:
As long as there is a class in that package then our module-info.java is valid. The directory structure should now be like this:
If you want to double-check your project at this point, compare it with mine on GitHub.
Hello World for JavaFX
Now the Maven and Java Module configurations are done, we can close everything else and concentrate on our Java code in Hello.java.
The Hello class will be a JavaFX Application, so it needs to extend javafx.application.Application which is an abstract class containing a method called start. We need to implement the start method in our class, and we can also add a main method to Hello to make it easy to run:
Our “Hello World” JavaFX application has a Label with some text, added to a Scene, and the Scene is added to the Stage that is passed into the start method. The components are nested like this:
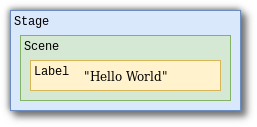
Change the start method to create those components and add them to the `Stage`:
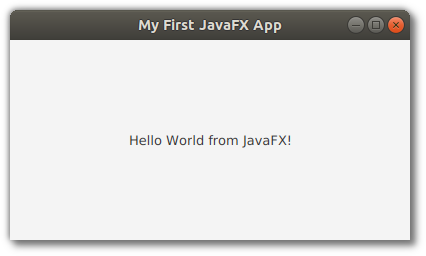
You can again check that your project matches mine on GitHub at this point. Then run your `main` method either through your IDE or from the command line with:
And behold! Your first JavaFX application looking glorious!
It’s time to pat yourself on the back, have a cup of tea ☕ and quickly recap what we have seen so far:
- JavaFX can be added as a regular dependency to a bare-bones Maven project
- Creating a
module-info.javamakes us a Java module defining what werequireand what weexport - Extending
javafx.application.Applicationmakes our class into a JavaFX app - The
startmethod in our application is passed aStagewhich we can add other controls to - Adding controls to the stage and calling
Stage.show()will start our app.
Building Interactions
“Hello World” is nice, but how about making our application do something a little more interactive? For this final step I’ll walk you through building up an SMS sender using Twilio’s SMS API.
For this you will need a Twilio account, if you don’t have one already then head to twilio.com/try-twilio for a free trial account. You will need a Twilio phone number to send the messages from.
The application will look like this:
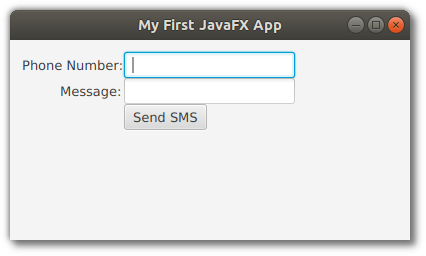
As you can see, we will need a few more controls in our Scene, and the way to add multiple components is with a Pane. There are many kinds of pane, depending on the layout you want. We’ll be using a GridPane, so the components will be nested like this:
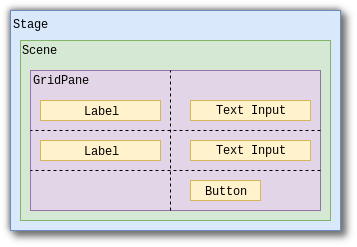
To make this happen, change the code in your start method to this:
Now you can run the application again, and you’ll see all the components, but nothing happens when you click the button. Let’s fix that.
After the sendButton is defined on line 27, add the following code:
Again, you can check that your code matches mine on GitHub at this point. Run the application and see that “Clicked” is printed when you click the button.
Again, congratulations! You’ve built an interactive JavaFX application and you’re only a step away from finishing the SMS sender. All we need to do now is put the right code in place for sending the message to your phone.
For this you’ll need to add the Twilio Java Helper to your pom.xml, in the <dependencies> section:
And add requires twilio to your module-info.java.
Put this code at the top of your main method:
For safety this doesn’t hard-code your account credentials but reads them from environment variables. I set these using the IntelliJ EnvFile plugin, you can also set them in Eclipse, on the command line or system-wide. You can find your account credentials at twilio.com/console.
Change the OnMouseClicked code for the sendButton to this:
Again, the code at this point can be found on my GitHub. I ran into this bug running this from within IntelliJ but it’s fine to run from the command line as before:
If you get the error that Username can not be null then double-check that your environment variables are set correctly. When you have done that, then...
🎉TA DA 🎉
One more rousing round of congratulations for you - you have created an SMS sender using JavaFX and Twilio!
What Next?
Now you know how to create the base of a JavaFX application, there are lots of directions you could take it:
- Build more complex application layouts with FXML using Gluon’s Scene Builder.
- Learn about how to build multi-threaded JavaFX apps to avoid making the UI unresponsive while background tasks happen.
- Explore JavaFX’s 3D graphics APIs and make a game
- Watch how Deep Space orbital trajectories are designed for NASA with JavaFX in this talk.
Whatever you build, I’d love to hear about it. Let me know in the comments, by email mgilliard@twilio.com or on twitter @MaximumGilliard.


Related Resources
Twilio Docs
From APIs to SDKs to sample apps
API reference documentation, SDKs, helper libraries, quickstarts, and tutorials for your language and platform.
Resource Center
The latest ebooks, industry reports, and webinars
Learn from customer engagement experts to improve your own communication.
Ahoy
Twilio's developer community hub
Best practices, code samples, and inspiration to build communications and digital engagement experiences.