How to Build an Interactive Voice Response System with Java and Gradle
Time to read:
November 17, 2023
Written by
Reviewed by
In this article, you will learn how to build an Interactive Voice Response system (IVR) using Twilio's Programmable Voice and Java with Gradle. The example call center demonstrated in this case is for a Party Cookie Dessert hotline.
Prerequisites
- IntelliJ IDEA Community Edition for convenient and fast Java project development work. The community edition is sufficient for this tutorial.
- Java Development Kit, Twilio Helper Library works on all versions from Java 8 up to the latest.
- Gradle version that matches your version of Java.
- ngrok, a handy utility to connect the development version of the Java application running on your system to a public URL that Twilio can connect to.
- A Twilio account. If you are new to Twilio click here to create a free account now.
- A phone capable of making voice calls to test the project.
Set up the project directory
Follow the tutorial on how to start a Java Servlets Project as a base for this project. Once you have the codebase described there, proceed.
Create a src/main/java/com/twilio/phonetree/servlet subdirectory, and inside that create the following subfolders:
- common
- commuter
- ivr
- menu
Add the Twilio dependencies
Open the build.gradle file and add the following line to the dependencies { } block:
Create an interactive voice response app
Delete the HelloWorldServlet.java file and create a WelcomeServlet.java file within the src/main/java/com/twilio/phonetree/servlet/ivr subfolder. Add the following code:
The WelcomeServlet class handles HTTP requests. The doPost takes in two parameters, HttpServletRequest servletRequest and HttpServletResponse servletResponse.
An instance of VoiceResponse is created using the VoiceResponse.Builder class. This object is used to construct a Twilio XML response, typically used for generating voice responses in telephony applications.
Inside the VoiceResponse object, the gather method is used to prompt the caller to enter input. It specifies the action URL to "/menu/show" and the number of digits to collect as 1.
After configuring the VoiceResponse object, the servlet sets the content type of the response to "text/xml".
The try block attempts to write the XML response generated by the VoiceResponse object to the servlet response. If there is a TwiMLException during this process, it is caught, and the servlet throws a RuntimeException. However as the TwiML we've written is hard-coded the TwiMLException shouldn't be thrown.
Create the menu for the interactive voice response app
Create a file named ShowServlet.java inside the menu subdirectory. Paste the following import statements to the file:
Write the class definition for the ShowServlet class right below:
The selectedOption string retrieves the value of the "Digits" parameter from the incoming POST request. In the context of a Twilio IVR system, the "Digits" parameter typically contains the user's response, which is the digit they pressed on their phone's keypad.
The switch statement checks the value of the user's input and determines the appropriate response based on their choice.
If the user pressed "1," it calls the getOptions() method to generate a TwiML response which requires the app to gather more input from the user.
If the user's choice doesn't match "1" it redirects the user to the main menu using the Redirect.toMainMenu() method.
The ShowServlet class handles incoming Twilio IVR requests, processes the user's input, determines the appropriate TwiML response based on their choice, and sends the response back to Twilio for further interaction with the caller.
Write a response for the interactive voice response to read aloud
Create the getOptions() functions underneath the doPost() function:
The Gather verb is used to collect our caller's input after they press "2". This time, the action verb points to the options route, which will switch our response based on what the caller chooses.
These separate functions will use the Twilio VoiceResponse object to build a response that will be read aloud over the phone. The object is built using TwiML attributes in order to make the response object loop 3 times and speak in the British English female voice, Amy.
To make this IVR more interactive, this app will redirect the user to new phone number lines when they press "2" or "3".
Write the default response redirect
Under the common subdirectory, create a file named Redirect.java and add the following code:
If the caller does not press the appropriate numbers, the app will redirect them to this response.
Connect caller response to another phone line
Under the commuter subdirectory, create a file named ConnectServlet.java and add the following code:
Another function handling HTTP POST requests is made to intake the caller's response. To store the directory of multiple phone numbers in your app, use a HashMap. Please remember to replace the phone number in E.164 format.
If the selectedOption exists in the optionPhones map it calls the dial method with the associated phone number. If the option doesn't exist, it redirects the call to the main menu.
The dial() function builds a VoiceResponse object using the newly collected phone number from the HashMap directory. The app redirects the caller on the line to the other phone number.
Configure the servlet
XML is used to interpret data so when used with a servlet, it can store and transport data for the web application, which is necessary for dynamic websites.
The servlet is named "welcome" and needs to be mapped to an associated set of URLs. That means every character between the url-pattern tag will be interpreted and matched up when interpreting the URL path on the web browser. For this project, the url-pattern is a forward slash, which is also the default match for mapping if not defined.
Clear the existing file and paste in the following XML for the project:
Compile and run the application
View the full code in this GitHub repository. Run the following command in your terminal to clean and compile the application. If you need to upgrade your version of Gradle, you can run the gradle wrapper beforehand.
As the app is running on http://localhost:8080, expose the application to a public port such as ngrok using the command ngrok http 8080.
Ngrok is a great tool because it allows you to create a temporary public domain that redirects HTTP requests to our local port 8080. If you do not have ngrok installed, follow the instructions on this article to set up ngrok.
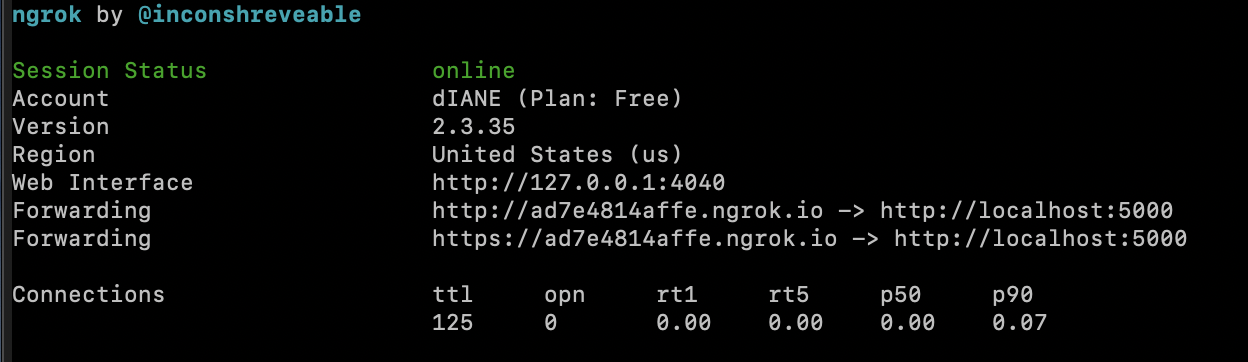
Your ngrok terminal will now look like the picture above. As you can see, there are URLs in the “Forwarding” section. These are public URLs that ngrok uses to redirect requests into our flask server.
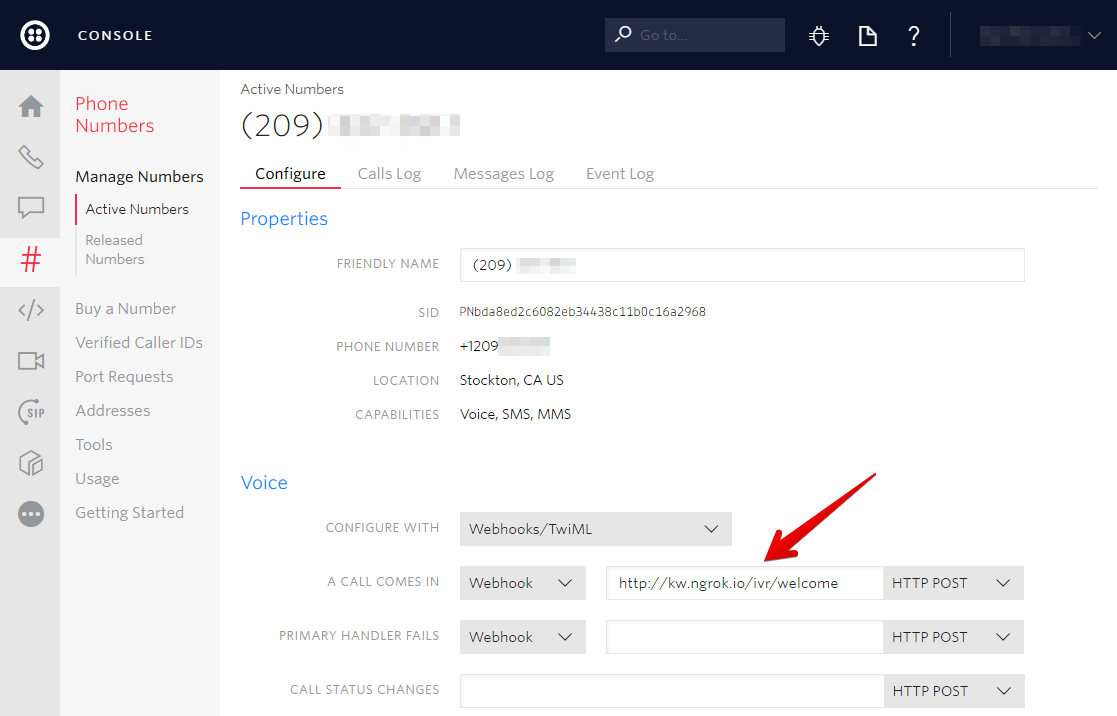
Configure Twilio service
Go to the Twilio Console and navigate to the Phone Numbers section in order to configure the webhook.
Test out the interactive voice response app
Grab your cellular device and dial the phone number to test out the Party Cookie Dessert hotline. It's time to fulfill your customers' sweet tooths by selling desserts to them!

What's next for interactive voice response applications in Java?
Congratulations on building a small call center for a local dessert shop!
Now that you have an IVR up and running, check out this article on how you can implement best practices for your call center.
If you are looking for a customizable product to use at scale and build faster, you can build with Flex.
For those looking to build faster with a team, consider building with Twilio Studio which requires no coding experience.
Diane Phan is a developer on the Twilio Voices team. She loves to help programmers tackle difficult challenges that might prevent them from bringing their projects to life. She can be reached at dphan [at] twilio.com or LinkedIn.


Related Resources
Twilio Docs
From APIs to SDKs to sample apps
API reference documentation, SDKs, helper libraries, quickstarts, and tutorials for your language and platform.
Resource Center
The latest ebooks, industry reports, and webinars
Learn from customer engagement experts to improve your own communication.
Ahoy
Twilio's developer community hub
Best practices, code samples, and inspiration to build communications and digital engagement experiences.