How to Find Your Classes with Twilio SMS, Python, and Airtable
Time to read:
August 08, 2022
Written by
Reviewed by

You can always count on the fact that I will get lost the first week of each college semester. I can have a physical copy of my schedule, my schedule set as my phone wallpaper, or a web page with my schedule pulled up. However, it can still take me a while to sift through webpages, find the building, search up the building, open up the directions, and then find the classroom.
With the new school semester coming around the corner, this problem came to mind during a coding workshop, and I programmed it in less than an hour. In this tutorial, you will learn how to use Twilio SMS, Python, and Airtable to send you an SMS message of your classes with directions for the day, so you can find your classes on time.
Prerequisites
To continue with this tutorial, you will need:
- Python 3.6 or higher installed on your machine.
- A Twilio account. If you haven’t yet, sign up for a free Twilio trial.
- A Twilio phone number. After having an account, you will need to obtain a Twilio phone number. Learn how to search for and buy a Twilio phone number here.
- An Airtable account.
- ngrok installed on your machine. ngrok is a useful tool for connecting your local server to a public URL. Sign up for a free account and learn how to install ngrok. If you aren't familiar with using ngrok, learn more about using ngrok here.
- A personal phone number to test this project.
Set up your project environment
Before you can dive into the code, you will need to set up the project environment on your computer.
First, you’ll need to create a parent directory that holds the project. Open the terminal on your computer, navigate to a suitable directory for your project, type in the following command, and hit enter.
As a part of good practices for Python, you'll also want to create a virtual environment. If you are working on UNIX or macOS, run the following commands to create and activate a virtual environment. The first command creates the virtual environment, and the second command activates it.
However, if you are working on Windows, run these commands instead:
After activating your virtual environment, you’ll need to install the following Python packages:
- Flask to build your application.
- python-dotenv to manage your environmental variables.
- Twilio Python Helper Library to interact with Twilio APIs.
- pyairtable to interact with Airtable.
To install these packages, run this command:
As a part of good programming practices, you’ll want to store sensitive information inside a secure location. To do this, you will store values in a .env file as environmental variables. In the school-schedule-project directory, open a new file named .env (notice the leading dot) and paste the following lines into the file:
Your project environment is now set up, but you must first configure your environmental variables in the .env file. "XXXXXXXXXXXXXXXX" are simply placeholder values for the Airtable base ID and API Key. The next section will cover how to get these values.
Set up the Airtable base
Airtable is a useful service for collaboration, as well as managing data and spreadsheets. For this project, I used Airtable to create a spreadsheet of each of the classes in my schedule, including their name, day of the week, URL of directions, time of day, and classroom.
Create your Airtable base
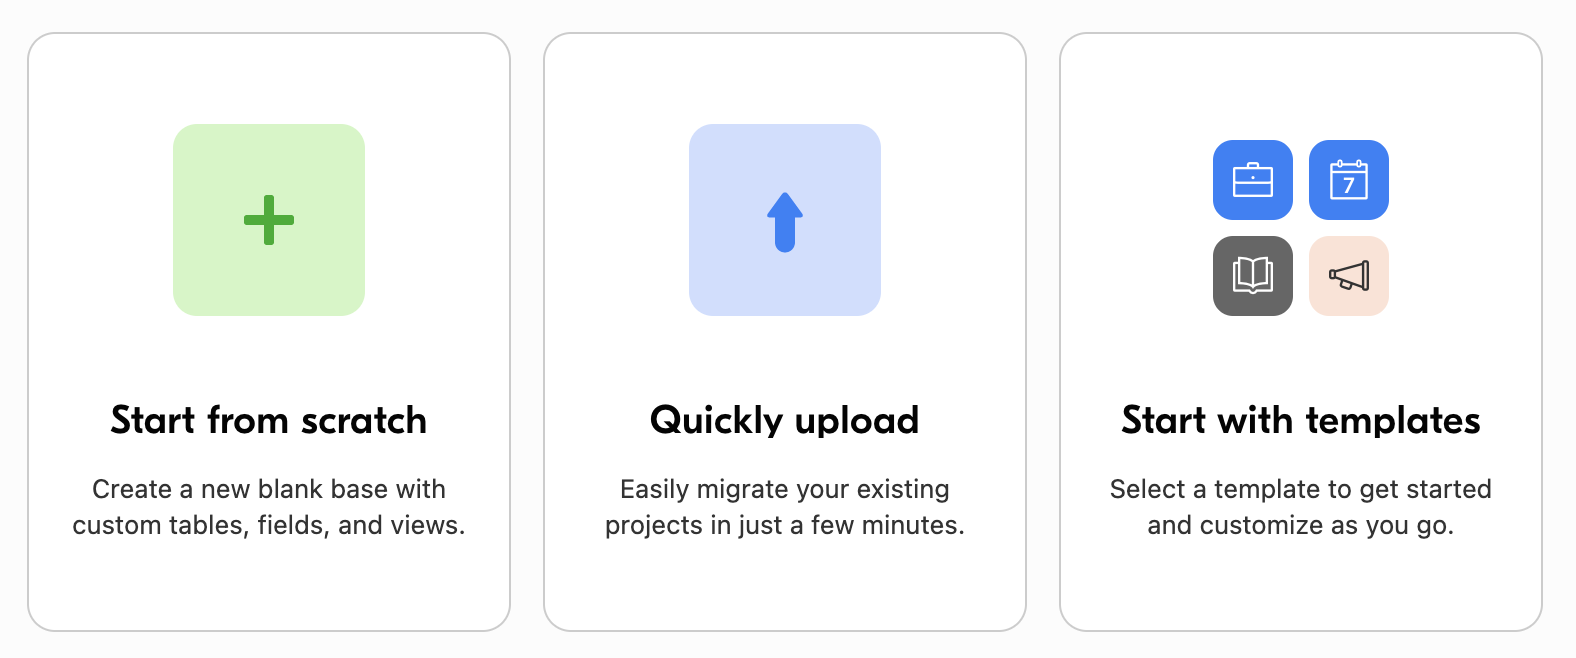
Now, let's go over how to set up this airtable base. First, go to Airtable's home page. Then click on the tile with the green + sign labeled, Start from scratch.
Go ahead and rename your Airtable base by clicking Untitled Base. I named mine School Stuff. Then, click Table 1 to rename the table to schedule. Afterwards, your default base should look something like this:
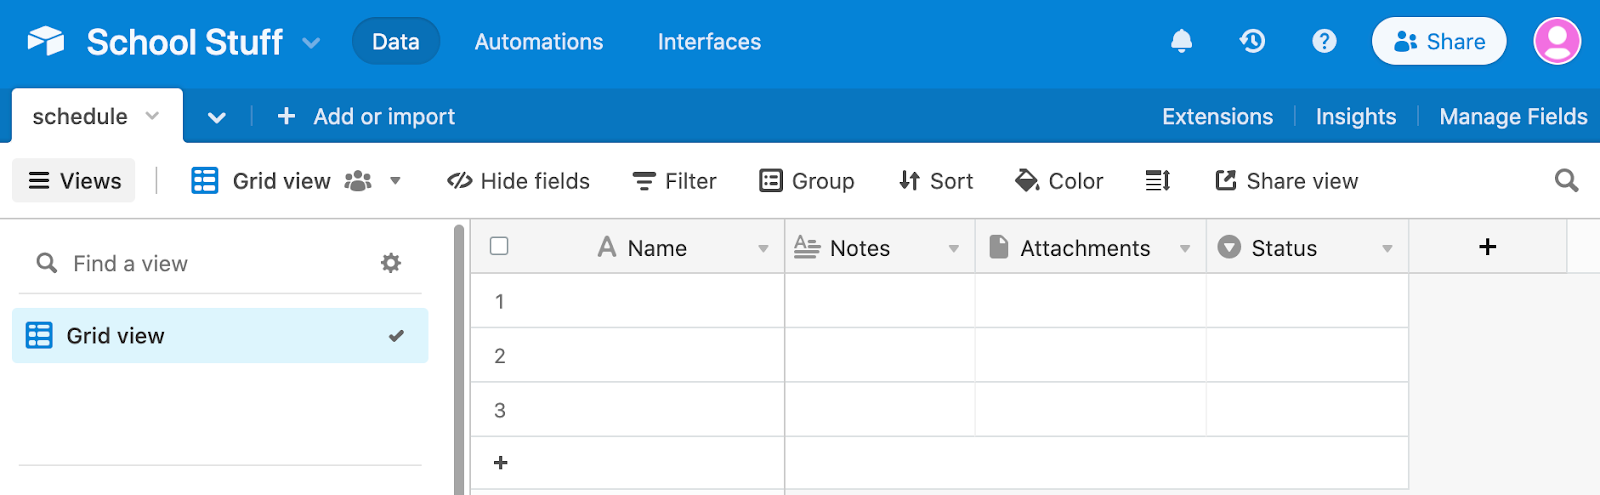
Next, you'll reformat the table to describe your schedule. Right-click (or click the dropdown menu) on the column names to delete the Notes, Attachments, and Status columns. Then, by clicking the + in the column header to add a new column, add each of these columns below by naming them, selecting their respective types, and clicking Create field:
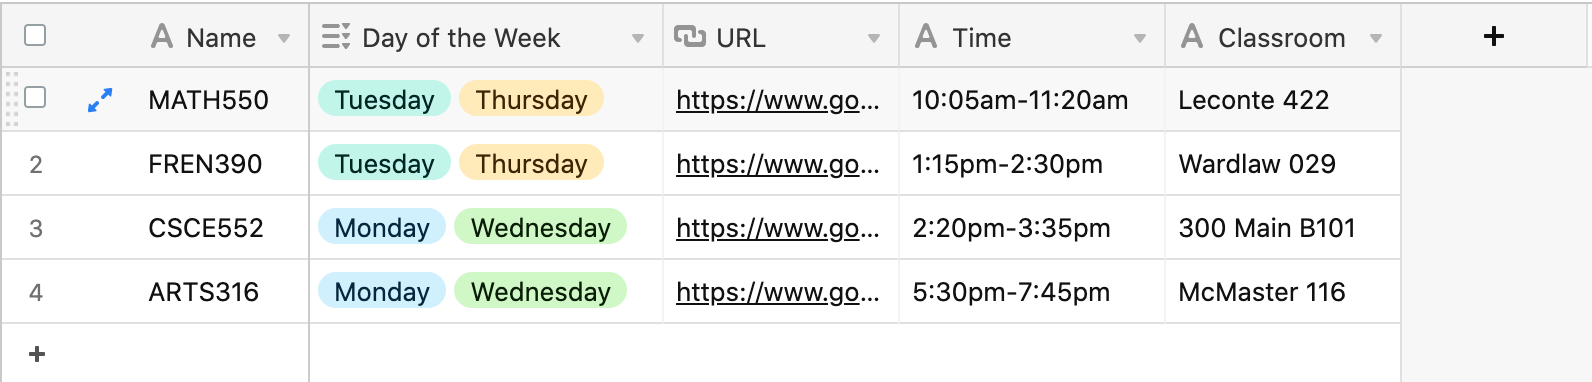
- "Day of the Week" with type Multiple select. Add each day of the week as an option.
- "URL" with type URL.
- "Time" with type Single line text.
- "Classroom" with type Single line text.
Add an entry to the table for each class you have in the schedule and fill out its fields. For the URL column, I linked a URL to Google Maps directions to the class. Alternatively, you can choose any other navigation service.
Access the Airtable base ID and API Key
To access the Airtable base ID, navigate to the Airtable API Documentation page, click on the Airtable base you're working on, and it will take you to a page with the Airtable base ID.
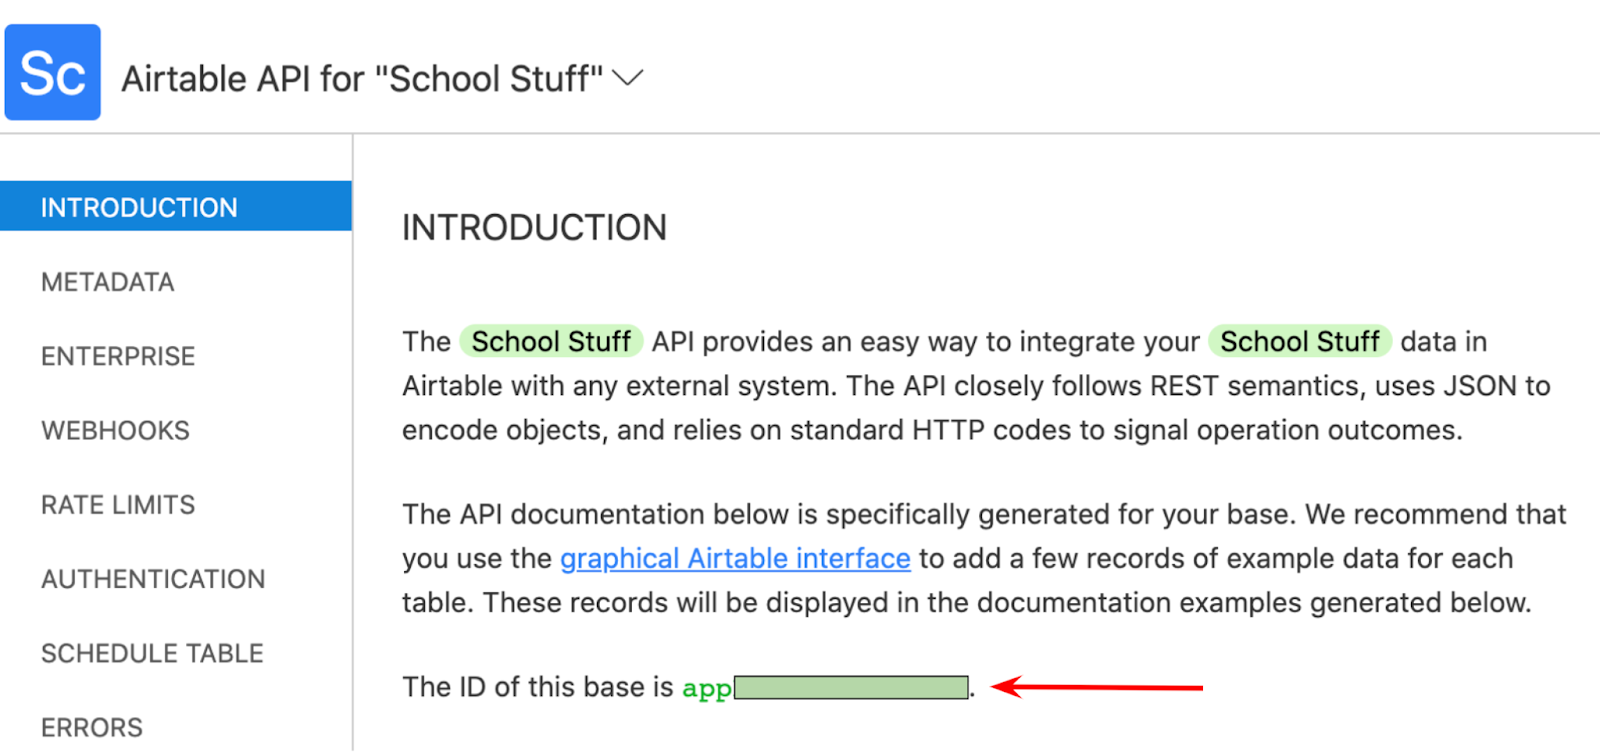
Afterwards, replace the "XXXXXXXXXXXXXXXX" placeholder for AIRTABLE_BASE_ID in the file named .env you created earlier with the Airtable base ID you had just obtained.
To get an Airtable API key, navigate to the Account Overview page. Scroll down to the section labeled <> API, click Generate API key, and copy your API key.

Then, replace the "XXXXXXXXXXXXXXXX" placeholder for AIRTABLE_API_KEY in the file named .env you created earlier with the Airtable API key you had just copied.
You are now ready to begin coding the application.
Create your application
Here is the expected flow of the application:
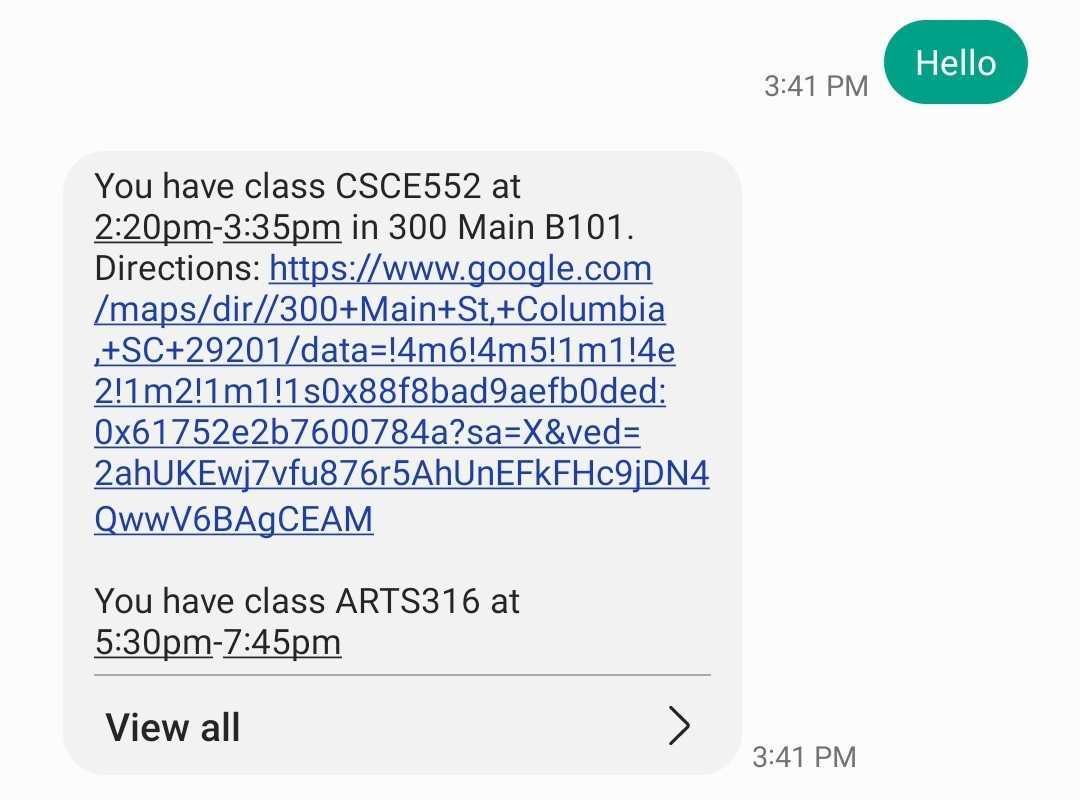
- A user messages the Twilio phone number.
- The Twilio phone number responds with the name, location, time, and a URL of directions for all the classes of the day.
In the school-schedule-project directory, create a new file named app.py. To follow the expected flow, copy and paste the following code into app.py:
This code serves as an outline of the application. The necessary modules are imported at the top, environmental variables loaded in, and the Flask application is initialized with the /send-classes endpoint.
Since the application is expected to send you the classes for the day, let's define a function that returns the day of the week. Copy and replace the following code for getDayOfWeek with the code below:
To get the day of the week, you use the function call datetime.datetime.today().weekday(). However, this returns the day of the week as an integer instead of a string with Monday being 0 and Sunday being 6. An easy way to solve this is to define a list with 'Monday' being positioned as element 0 and 'Sunday' being positioned at element 6. That way, it can be returned easily by indexing into the list.
Now let's define sms_reply(). Before you can get the name, time, classroom, and directions, you must first access the Airtable base and format the data. Replace """Access and format Airtable base here""" with the code below:
In the code snippet above, the table is initialized with the environmental variables AIRTABLE_API_KEY and AIRTABLE_BASE_ID from the .env file, and the name of the table, "schedule", is provided. table.all() returns a list of dictionary objects for each entry in the spreadsheet. List comprehension is used to initialize the variables classes and todays_classes to obtain the classes that match the current day of the week.
Next, what's left is to format the message that will be returned. If todays_classes is empty, the user will be notified that there are no classes. Otherwise, if there are classes, the user will be notified of each of the classes for the day. This will be done with a loop through todays_classes. The fields for each class can be accessed with their respective dictionary keys. The information for each class is then formatted and concatenated to the return message. To do all of this, replace """Create reply message here""" with the code below:
You have now completed the code! Your code should look something like this:
However, the application is not quite done yet. Continue to the next section to see how to configure the webhook and how to run the application.
Set up the ngrok tunnel and webhook
If you were to run the program prematurely, you would not receive a message from the phone number. There are two things that need to be addressed. First, you need to connect your local server to a publicly accessible URL by opening up a ngrok tunnel to your local machine. Second, you need to connect the Twilio phone number to the application by using a webhook.
After having installed and authenticated ngrok on your machine, open another command prompt tab or window, and run this command to open a tunnel to port 5000.
Afterwards, your command prompt should something look like this:
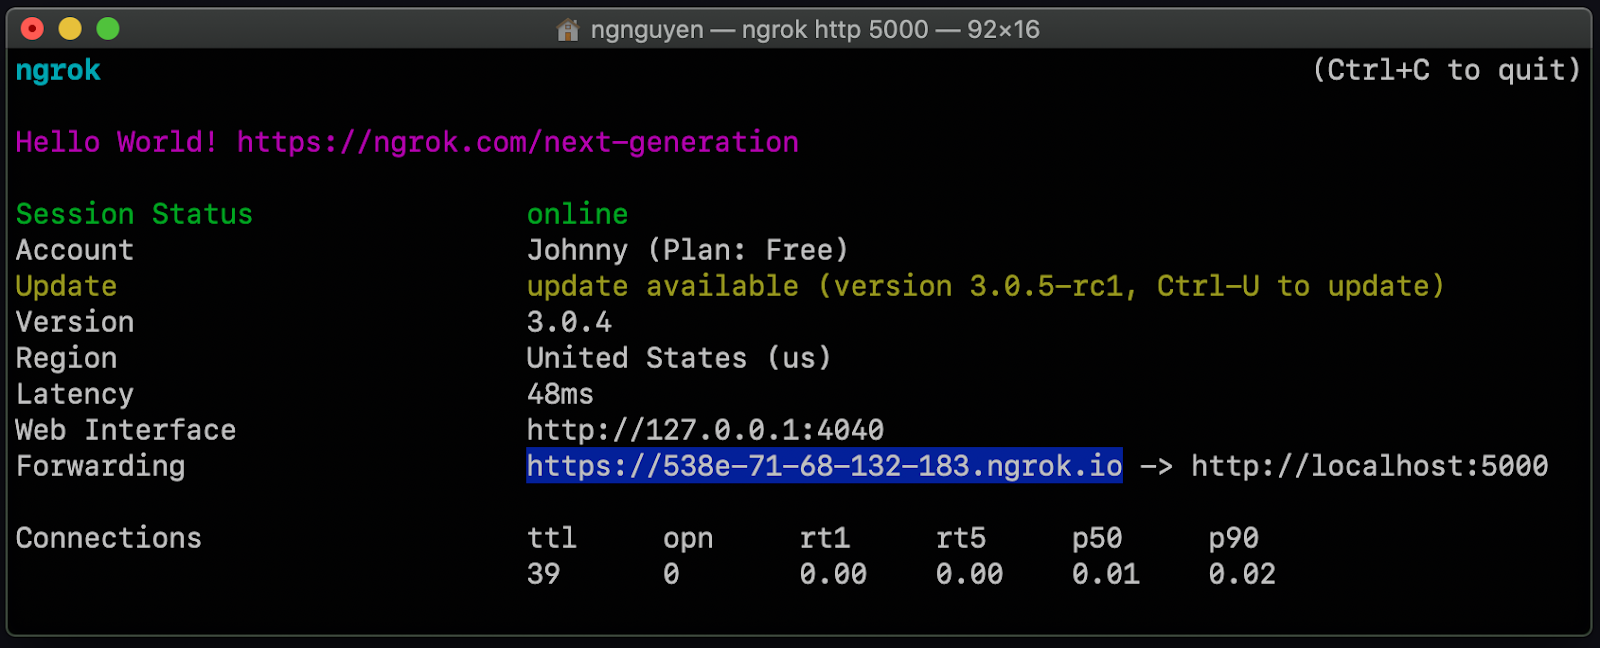
Next to the word Forwarding there should be a URL that points to https://localhost:5000. Your URL should be different than the one shown above. Copy that URL, as it will be used to set up the webhook. Leave this command prompt open.
On the left-hand side of your Twilio console, navigate to Phone Numbers > Manage > Active numbers. Clicking Active numbers will take you to the Active numbers page. Click the link for the phone number that you will be using for this application.
This will take you to the configure page for the phone number. Scroll down to Messaging and paste the URL you copied from before to the A MESSAGE COMES IN section, and add “/send-classes” at the end of the URL. This is the Flask application's endpoint that the TwiML response is sent to. So your URL should be something like https://your-ngrok-url.ngrok.io/send-classes and should be pasted like the example below:
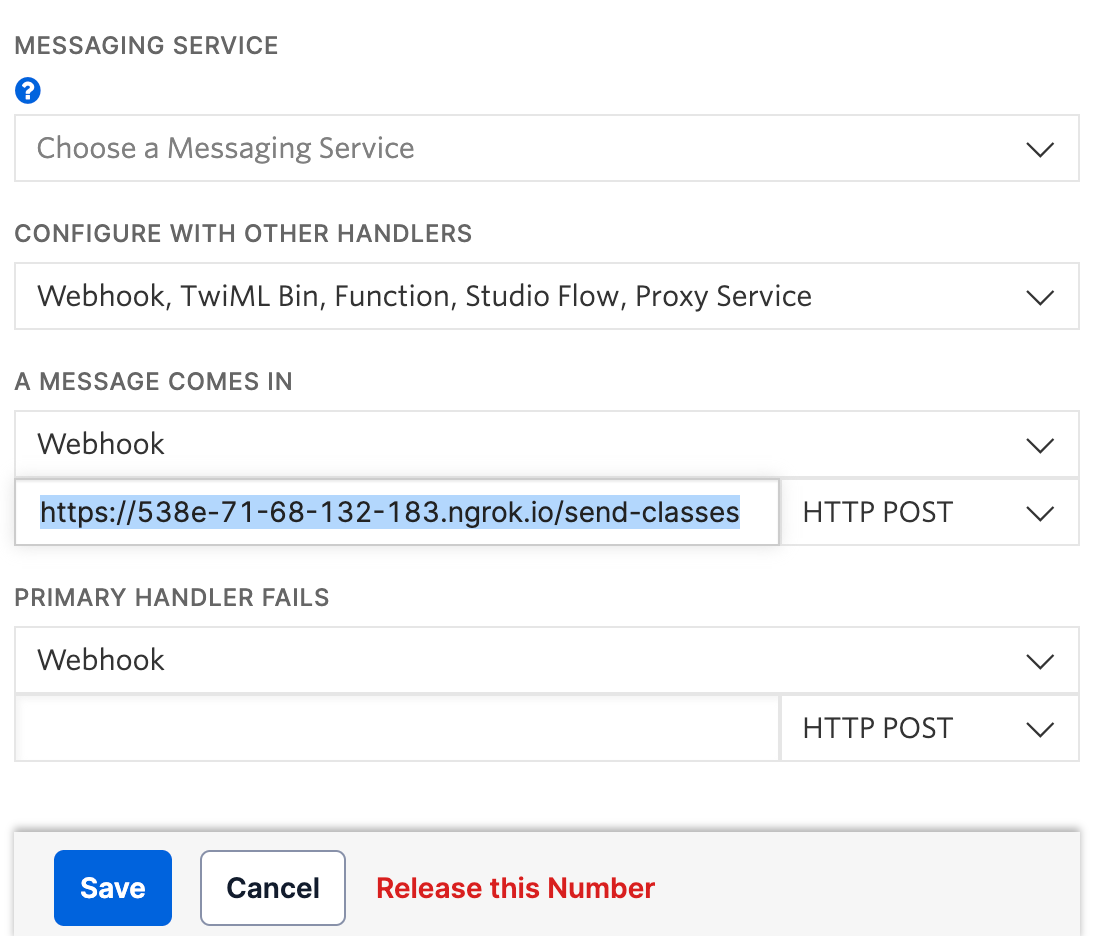
Click Save at the bottom of the page to update the number’s settings. You are now finally ready to run the application.
Run the application
To run the application, run this command in the school-schedule-project directory where the virtual environment is activated.
Afterwards, your application should be working properly. Whenever you send a text message to your Twilio phone number, the Flask application will receive a request at the /send-classes endpoint, fetch data from Airtable, and return your classes for the day.
Conclusion
Congratulations on building an application with Twilio's Programmable Messaging API. In this tutorial, you learned how to build an application that messages you information about the classes you have for the day. The application also uses Airtable to organize your schedule. The application checks the day of the week and uses Airtable to message you the name, time, classroom, and directions. Feel free to customize this application to your liking.
Want to get schooled on Twilio and Python? There's so much more you can do with Twilio and Python. To get you started, you can check out the Twilio Python Quickstart or the Twilio Python Helper Library. Even a beginner can make exciting applications using Python and Twilio SMS, such as building a sentiment analyzer for slang and emojis or creating a travel recommendation bot with Airtable.

Johnny Nguyen is an intern developer on Twilio’s Developer Voices Team. He enjoys creating fun coding projects for others to learn and enjoy. When he’s not napping or watching TikTok, he can be reached at ngnguyen [at] twilio.com.
Related Posts
-
 How to Send SMS without a Phone Number using C# .NET and an Alphanumeric Sender IDNiels Swimberghe Matthew Gilliard
 -
 What's new in the Twilio helper library for ASP.NET (v5.73.0 - April 2022)Niels Swimberghe
 -
 Add users & messages to new Twilio Conversation with Google Cloud Functions and C#Zach Snoek
Related Resources
Twilio Docs
From APIs to SDKs to sample apps
API reference documentation, SDKs, helper libraries, quickstarts, and tutorials for your language and platform.
Resource Center
The latest ebooks, industry reports, and webinars
Learn from customer engagement experts to improve your own communication.
Ahoy
Twilio's developer community hub
Best practices, code samples, and inspiration to build communications and digital engagement experiences.