Integrate Dialogflow with Twilio Conversations using NestJS
Time to read: 7 minutes
July 05, 2022
Written by
Reviewed by

This tutorial will allow you to scale customer interactions using Dialogflow before passing the conversation to an agent or another system. The following project will be composed of a backend built with NestJs/Express, Twilio’s Conversations API, and our DialogFlow integration.
Prerequisites
If you don’t have a Twilio account, you can get one for free here.
For the following exercise, you’ll need the following:
- NodeJs
- Typescript
- Twilio API key - can be generated from your Twilio console or programmatically (read more here)
- Ngrok- We’ll use this to expose our local server for testing.
- Google Cloud Account
High Level Flow
Before we dive into the coding aspects of the tutorial, let's go over the user flow and backend calls that we will create.
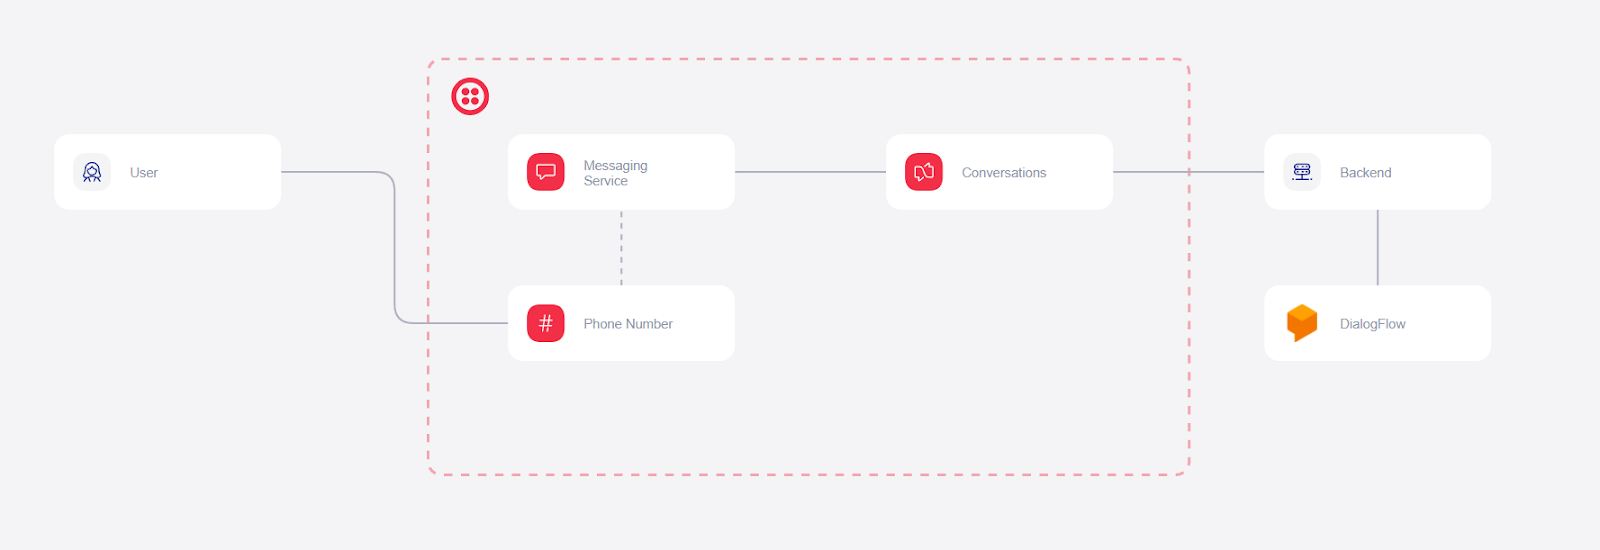
- User sends the first message to our Twilio Phone Number.
- Twilio Messaging Service creates a new conversation for the user.
- Conversations Service fires a webhook that tells our backend that a new conversation was created.
- Our backend receives the webhook and creates an isolated scoped webhook. When creating the scoped webhook, we also specify that we want to play all messages to this webhook, allowing us to capture the first message as well.
- Our Twilio Conversations Service fires the scoped webhooks for the first message.
- Our backend receives the first message and passes it to Dialogflow.
- Dialogflow responds with the message.
- Our backend writes Dialogflow’s response to the conversation.
- User receives the Dialogflow message.
Create our backend
Creating our NestJs project & folder structure
Let's install NestJS CLI globally and create a project named twilio-conversations-dialogflow-demo.
In a terminal, run the following commands:
When prompted, select NPM as the package manager and wait for all the dependencies to be installed.
Open up the project in your favorite code editor, and make a quick modification to our .prettierrc file to avoid any issues when copying and pasting code from this guide.
Replace the content in your .prettierrc with the configuration below to match this guide’s formatting:
Within your editor or file manager, create your project folder structure as shown below:
Environment File & Environment Enums
Create a .env file at the root of your project. Write your SERVICE_TWILIO_ACCOUNT, SERVICE_TWILIO_SID, and SERVICE_TWILIO_SECRET within the environment file.
Create an environment.enums.ts file in src/enums. We will use the enums to select the environment variables across our configuration
Project Dependencies
Install all the dependencies which we will be using npm:
Create TwilioService
Create a new service named twilio.service.ts under src/services. The Twilio service will act as our primary object when interacting with Twilio’s API.
Create DialogflowService
Create a new service named dialogflow.service.ts under src/service. The Dialogflow service will act as our primary object for interacting with Dialogflow’s API.
Create Controller Types
Create a new file named conversations.entities.ts under src/controllers/conversations, this will be our object definition types for the incoming requests from Twilio and our API responses.
Create Controller
Create a new file named conversations.controller.ts under src/controllers/conversations, as this will be our controller that will handle the incoming requests.
Below we will create two endpoints.
The /conversations/events endpoint will handle the onConversationAdded event, which will be sent by Twilio’s Conversations when a new conversation is created. After this event is received, we will create our scoped webhooks for this specific conversation.
The /:conversationId/events endpoint will handle the onMessageAdded event, which will be sent by Twilio’s Scoped Webhooks when a new message is received in the conversation.
Import Controller & Services into AppModule
Lets connect our newly created services to the application’s root module. Open the app.module.ts file which was automatically created by the NestJs CLI. We want to import all the files we’ve created above into the root module.
I’ve also removed the import for the AppService and AppController, which was automatically created in the code below.
Create our Dialogflow agent
For this exercise, we will be using Dialogflow ES. However, the steps involved are similar if you choose to use another version. You’ll need to navigate to dialogflow.cloud.google.com.
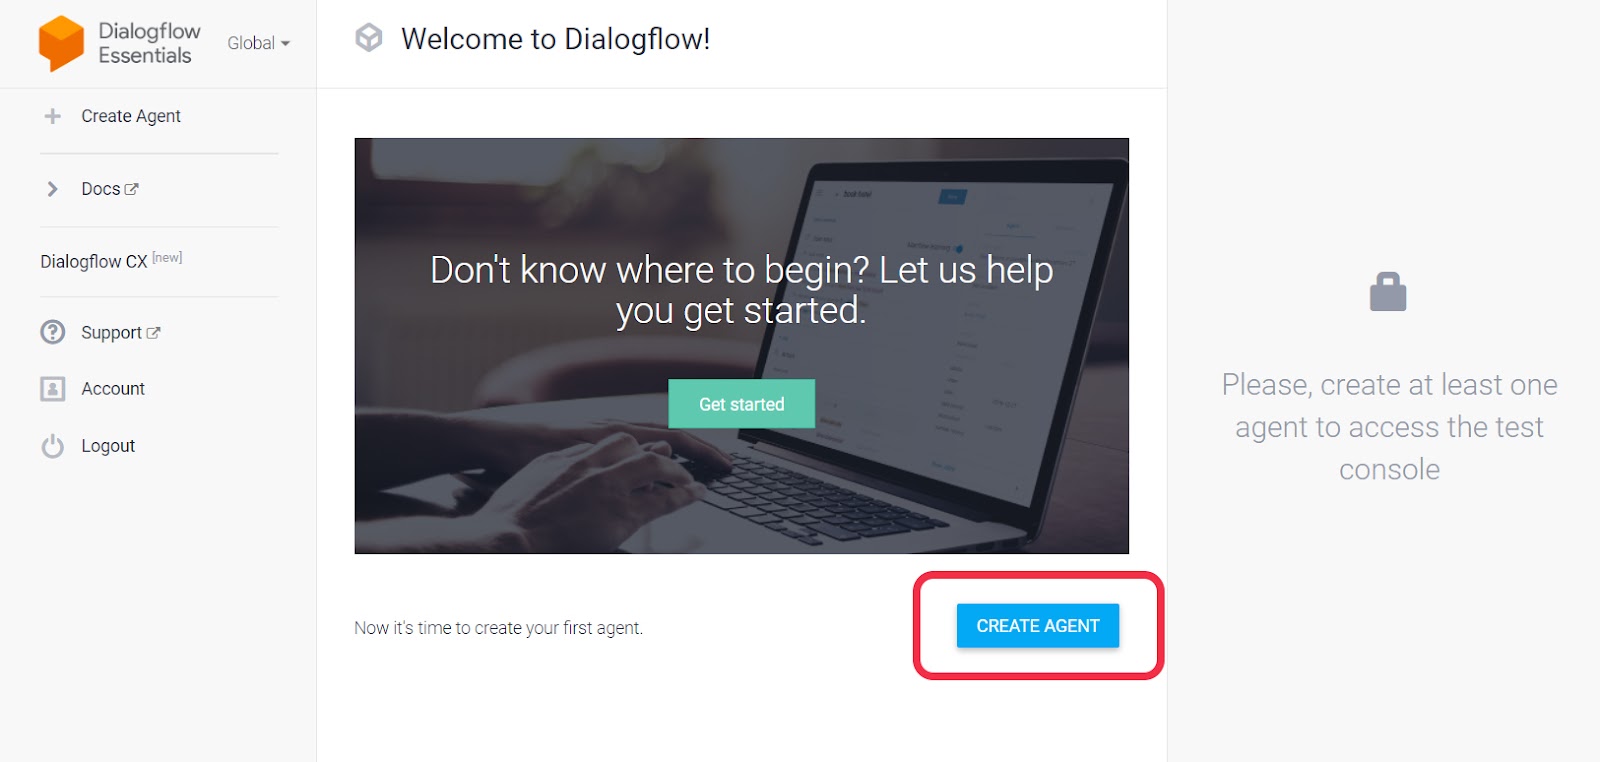
Create Agent
- Click the Create Agent button as shown in the image below.
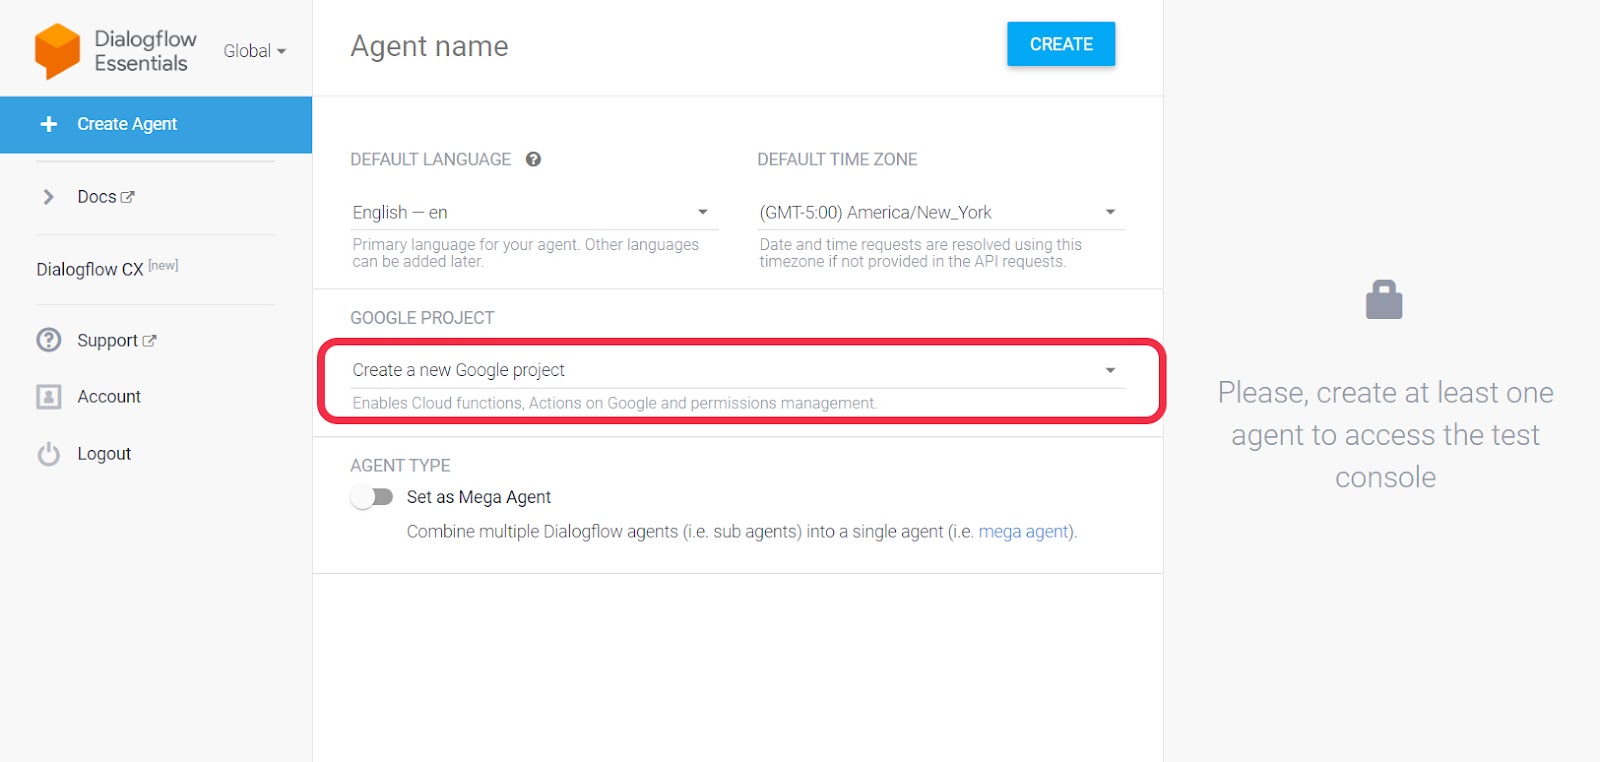
- Leave the default language set to English, and select create a new Google project (you can also configure the time zone if you wish). Click Create and wait a few seconds.
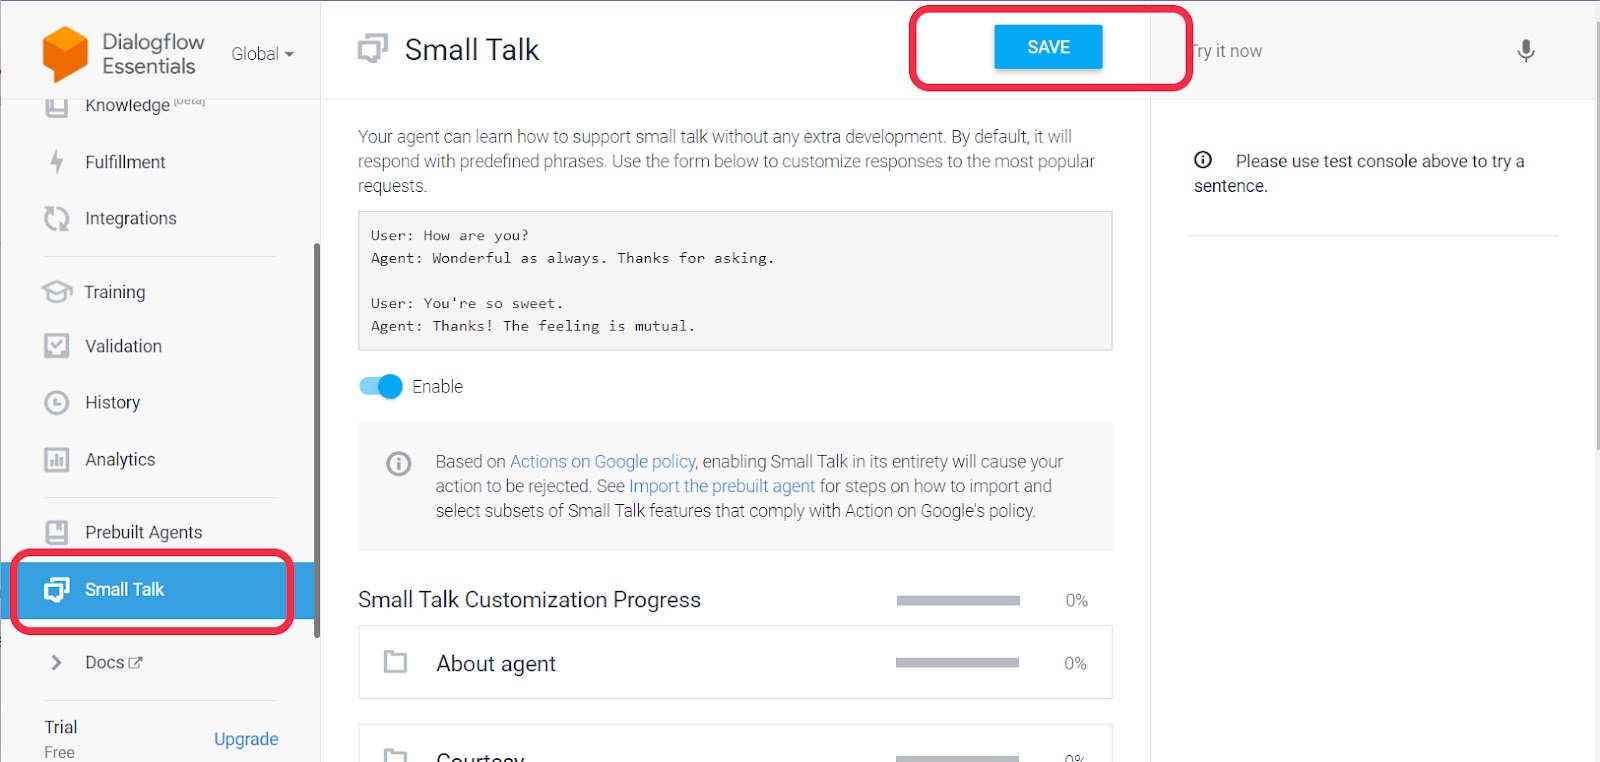
- Once the agent is created, navigate to Small Talk and enable the option from the toggle. Settings should auto-save. If it does not auto-save, then click the Save button as highlighted.
- Navigate to the agent’s configuration by clicking the gear icon. Then, copy the Project ID for this agent.
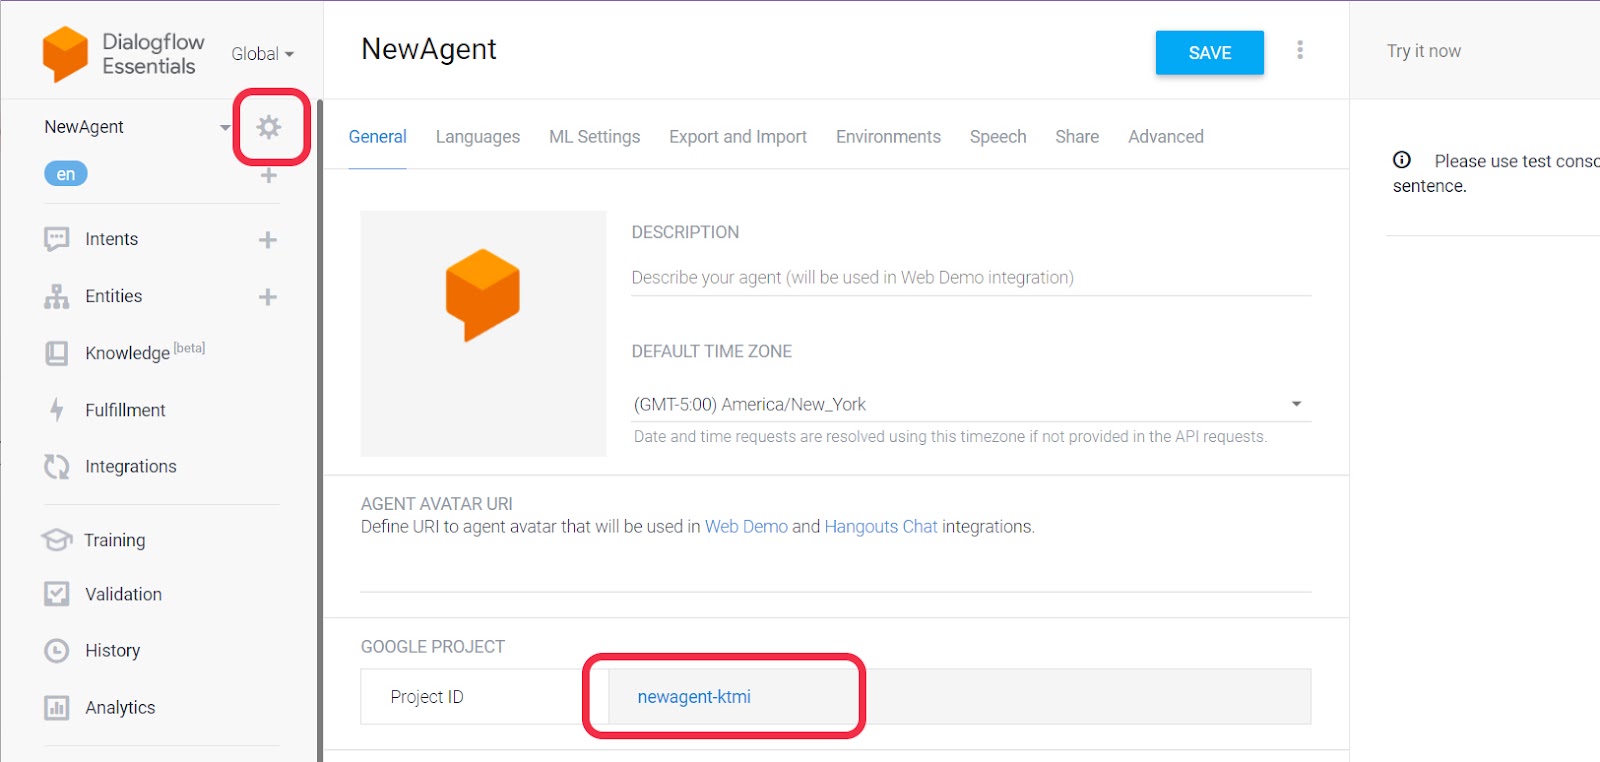
- Navigate into the backend’s codebase and set the
GCP_DF_PROJECT_IDto the value shown above within the.envfile. Create Google Service Account API Access
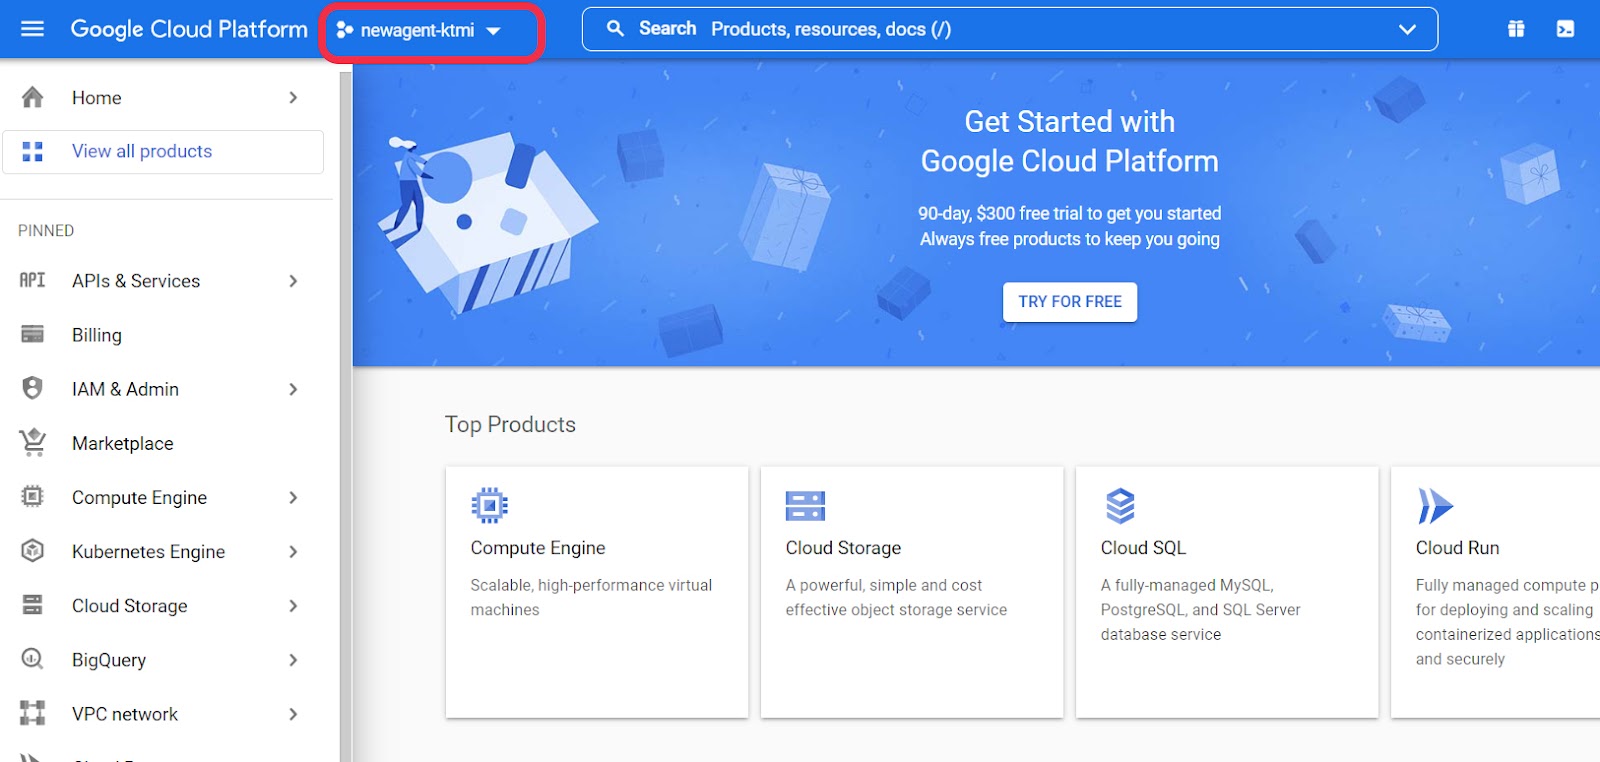
- Navigate to your Google Cloud Console and make sure your currently selected project is the one containing your agent. You can also access the project by clicking the project’s name in your Dialogflow’s agent configuration.
- Navigate to your Google Cloud Console and make sure your currently selected project is the one containing your agent. You can also access the project by clicking the project’s name in your Dialogflow’s agent configuration.
- Navigate to IAM & Admin > Service Accounts.
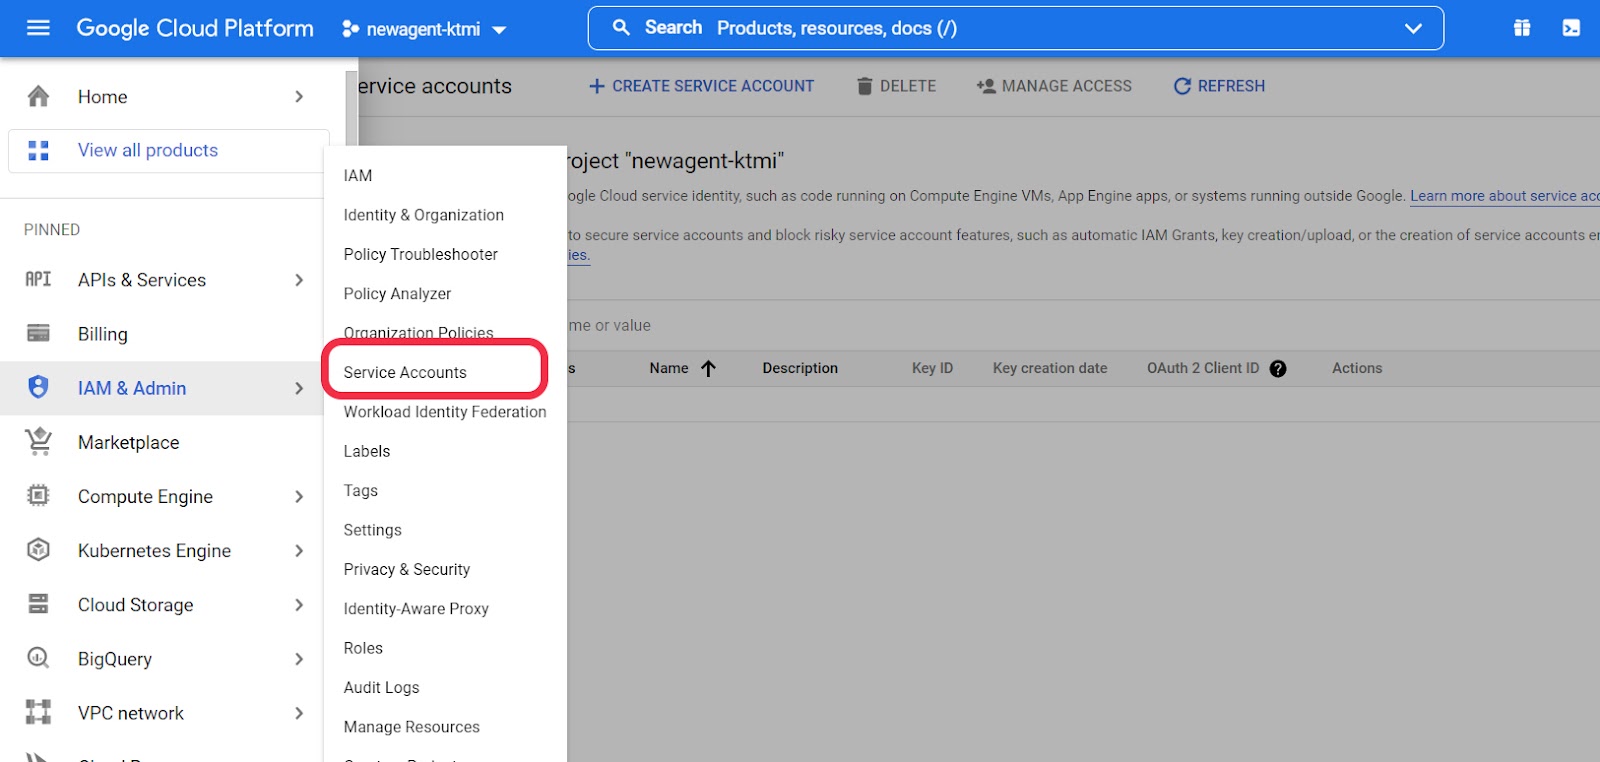
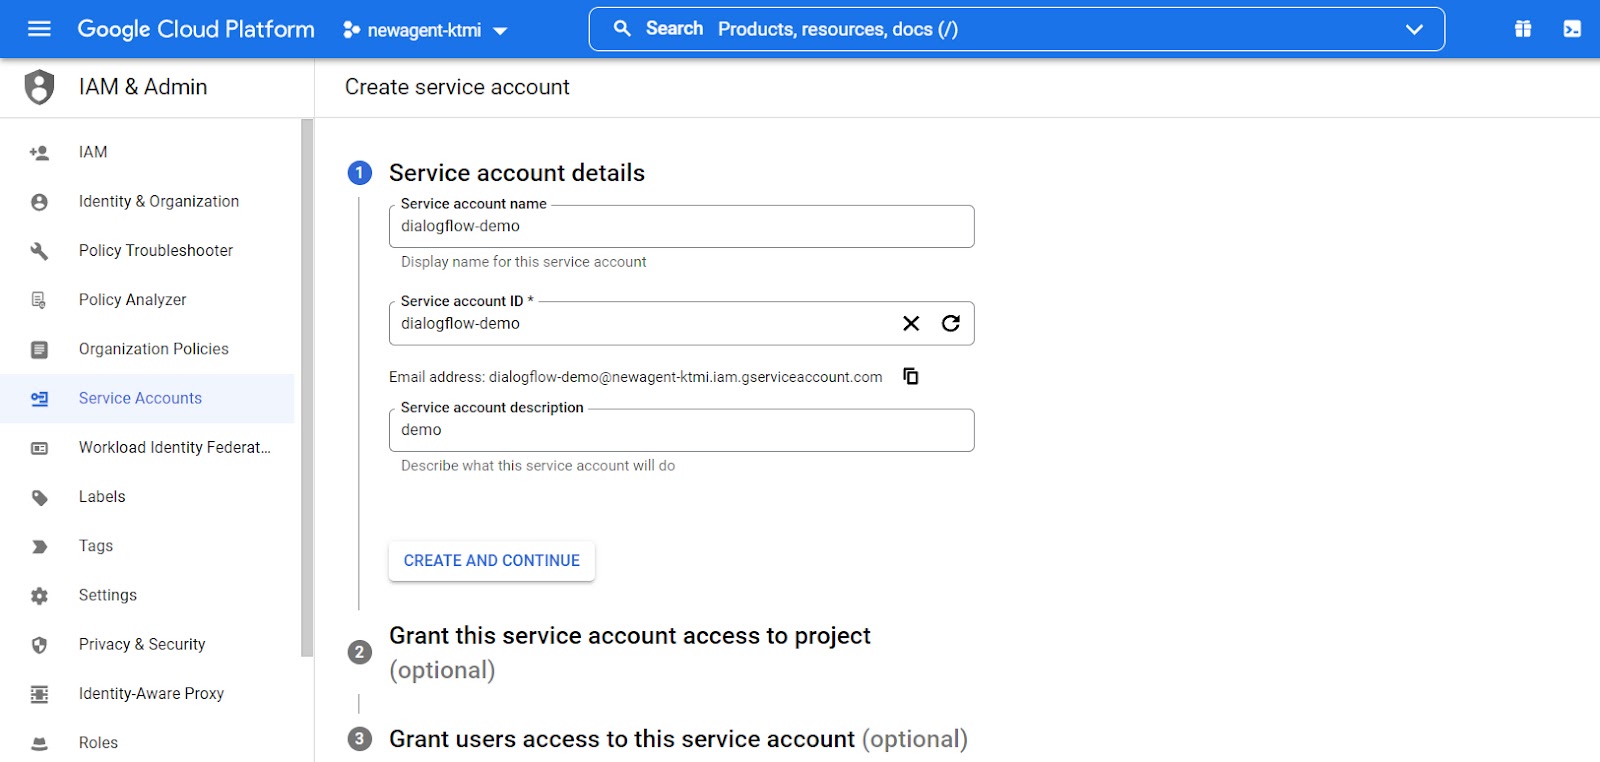
- Click on Create Service Account.
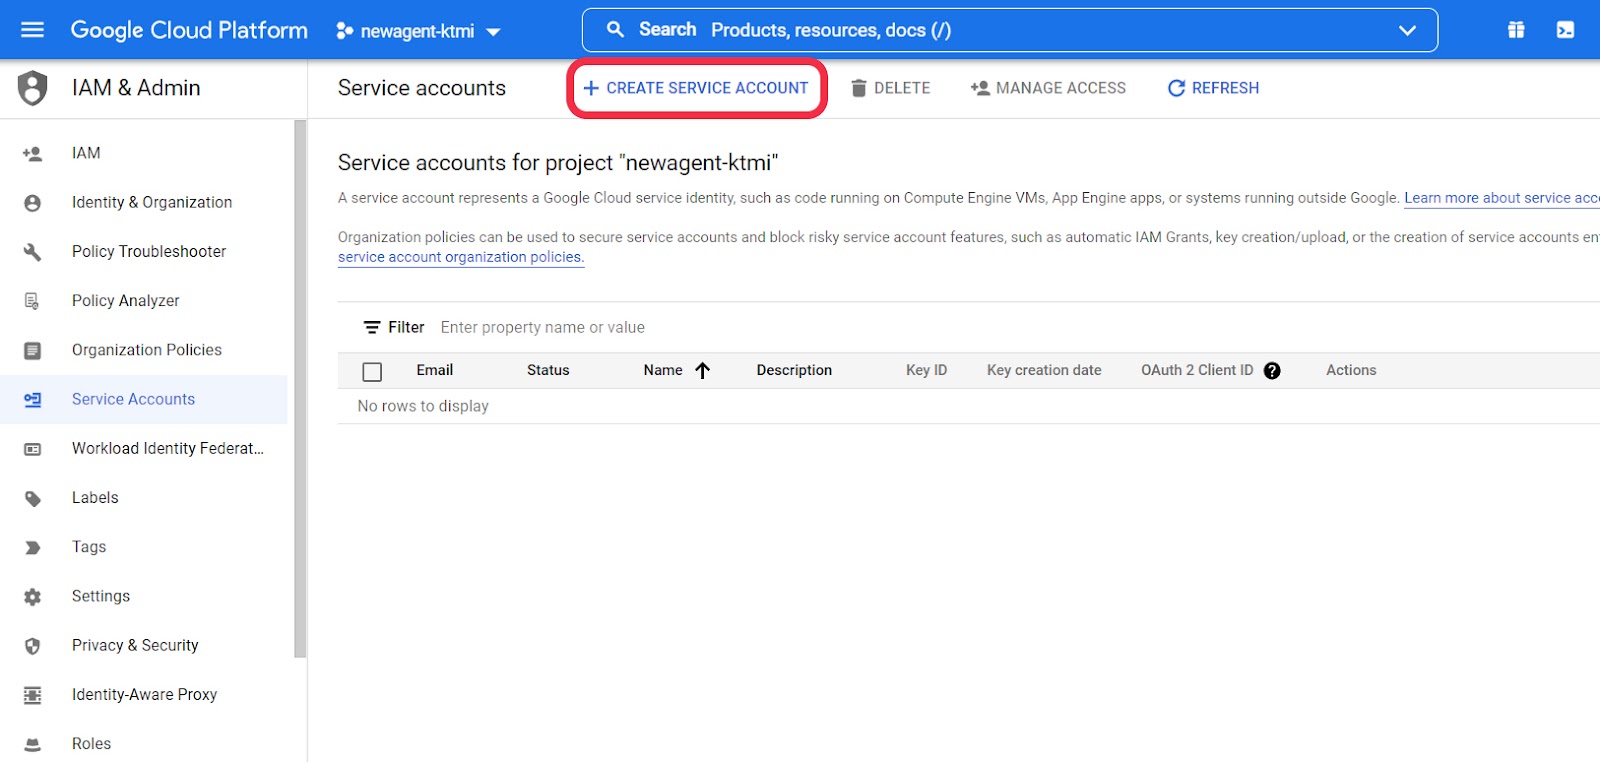
- Name your Service account, write a quick description, then click “Create and Continue”.
- Add the “Dialogflow API Admin” role to the service account and click Continue.
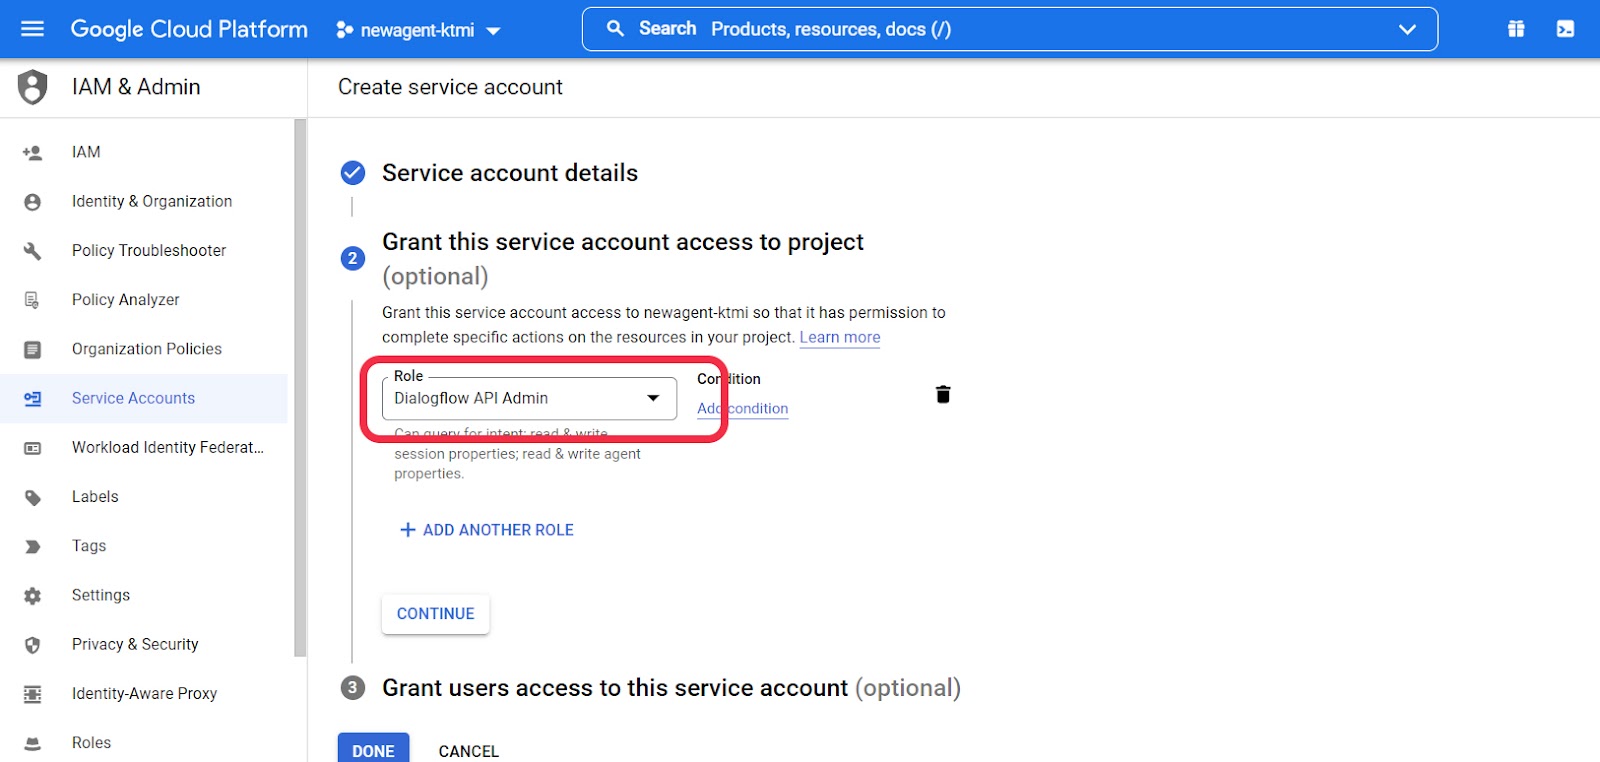
- For Step 3, click Done as we don’t need to assign user access.
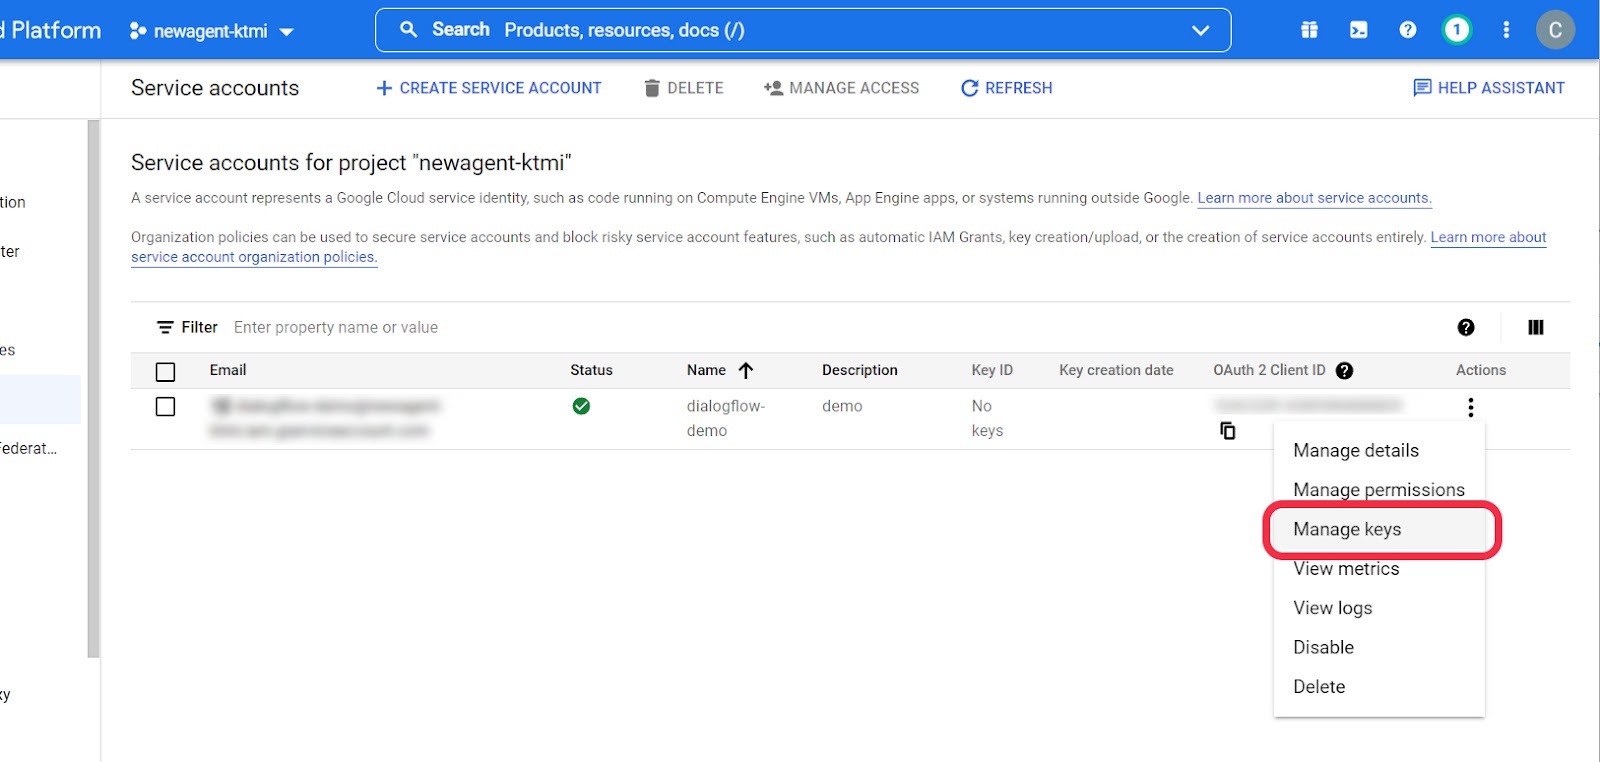
- You will now see the newly created Service Account, click the 3 dots next to the account and navigate to “Manage keys”.
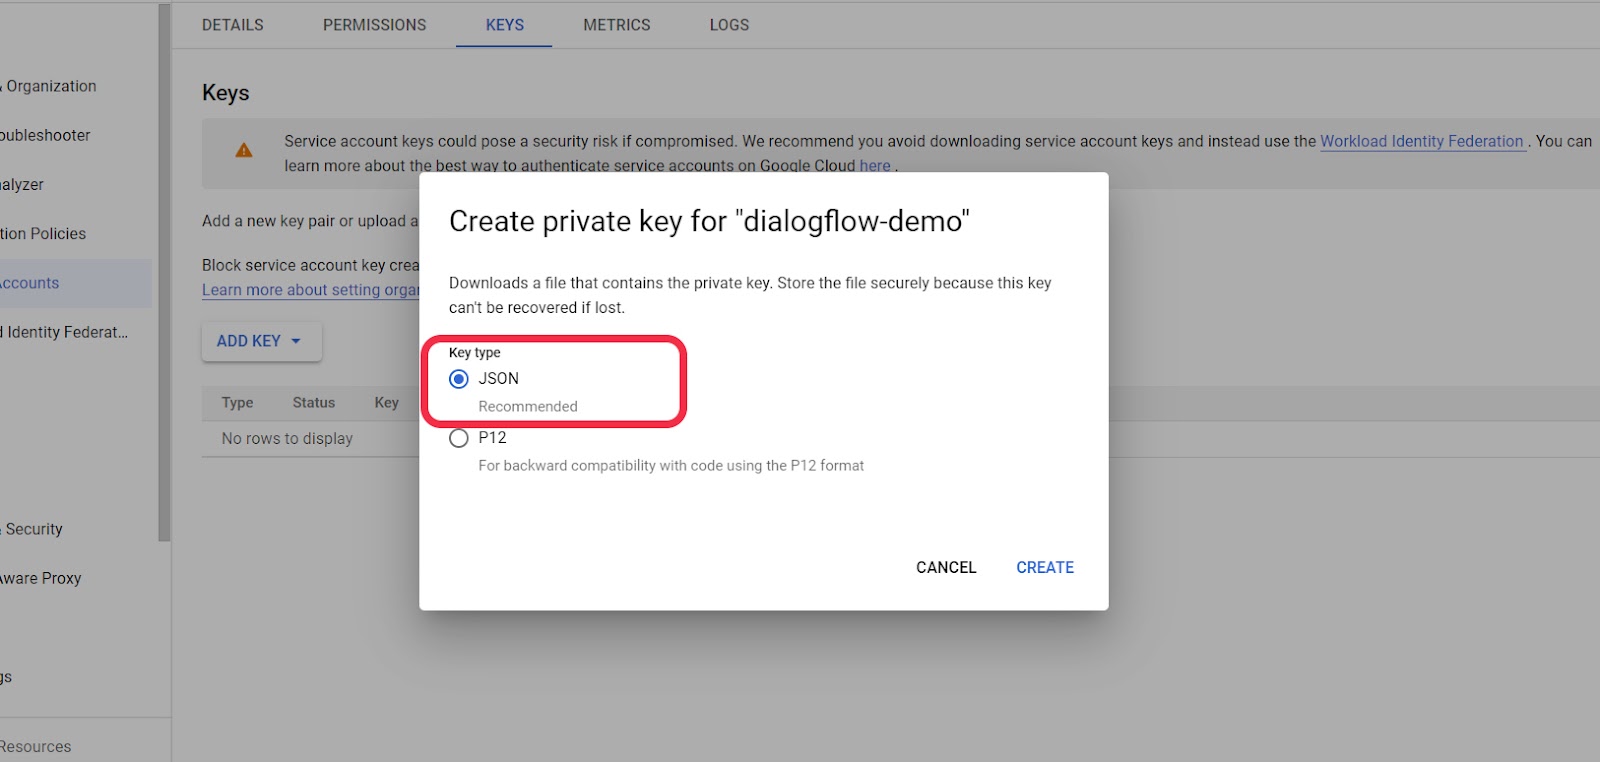
- Click on ADD KEY and Create new key.
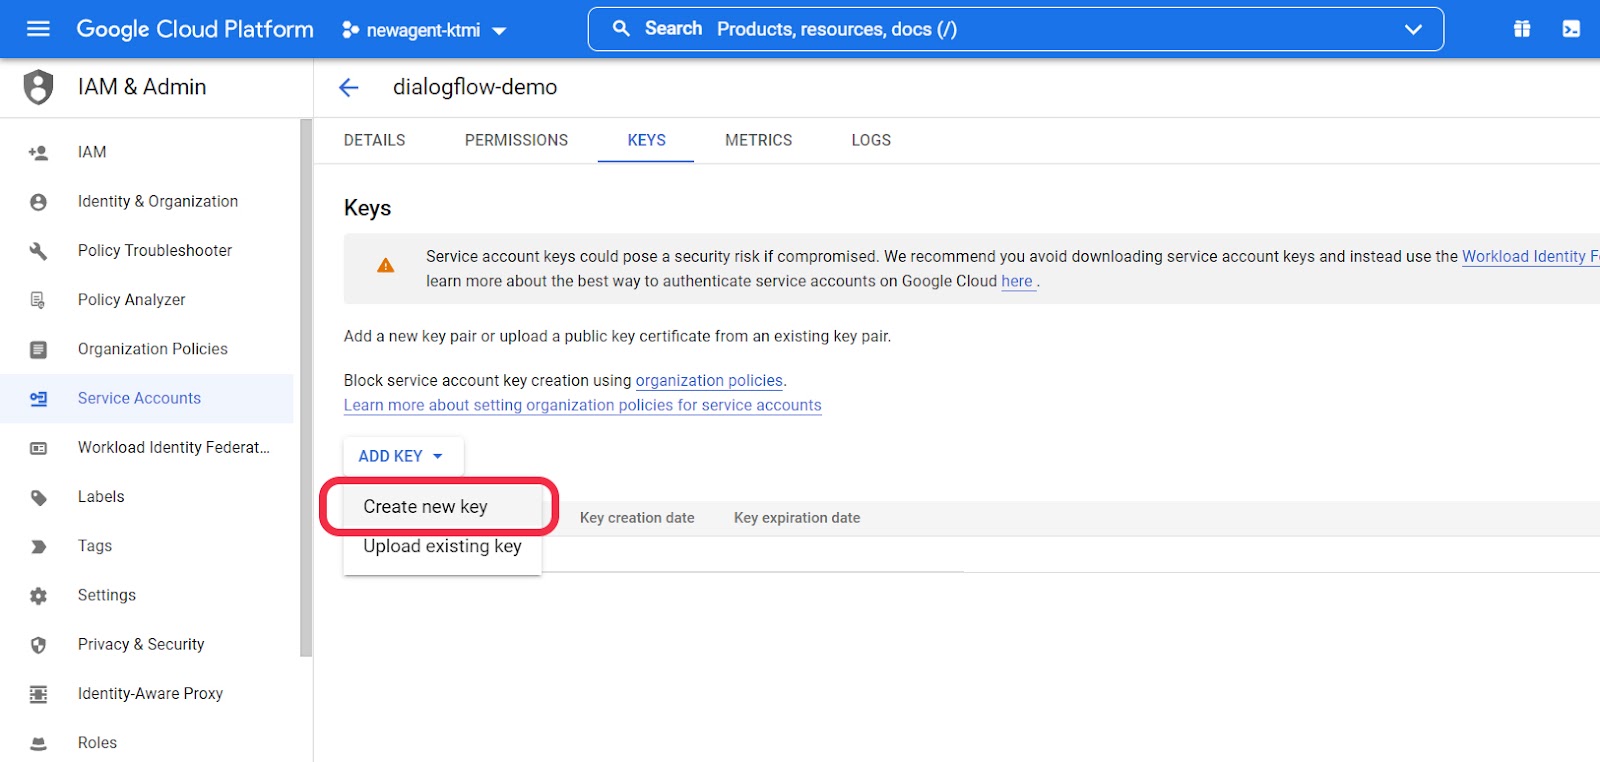
- Select JSON key type and click Create, this will download a
.jsonfile to your machine.
- Open the downloaded
.jsonfile and copy theclient_emailtoGCP_DF_CLIENT_EMAILwithin the.envfile of your backend. - Copy the private_key from the
.jsonfile intoGCP_DF_PRIVATE_KEYwithin the.envfile of your backend. Start our Ngrok Instance
Let's start our ngrok instance so we have an endpoint handy for our next steps. The application will use port
3000by default. The port can be found by navigating to themain.tsfile within your backend codebase.
If you have a paid version of ngrok, make sure to start it with a subdomain:
Otherwise, you can start ngrok with an auto-generated subdomain. Just be careful: if your ngrok instance restarts, you’ll need to update all the endpoints across this application.
Copy your endpoint and navigate into the backend’s codebase and set the APPLICATION_ENDPOINT to your ngrok’s external facing url.
Configure Twilio
Purchase a Twilio phone number
If you don’t have an unused Twilio phone number, you can purchase one via the Phone Numbers Console (for a more detailed walkthrough you can click here). Please make sure that this number has SMS capabilities.
Create a Twilio API key
Create a Twilio API key either through the console, api or CLI. Once you have your key SID and the key secret. Navigate to the .env file on your backend and update the following parameters:
- SERVICE_TWILIO_ACCOUNT_SID - your Twilio account ID, value starts with
ACXXXXXX - SERVICE_TWILIO_KEY_SID - API key’s SID, value starts with
SKXXXXXX - SERVICE_TWILIO_KEY_SECRET - Secret generated with API key
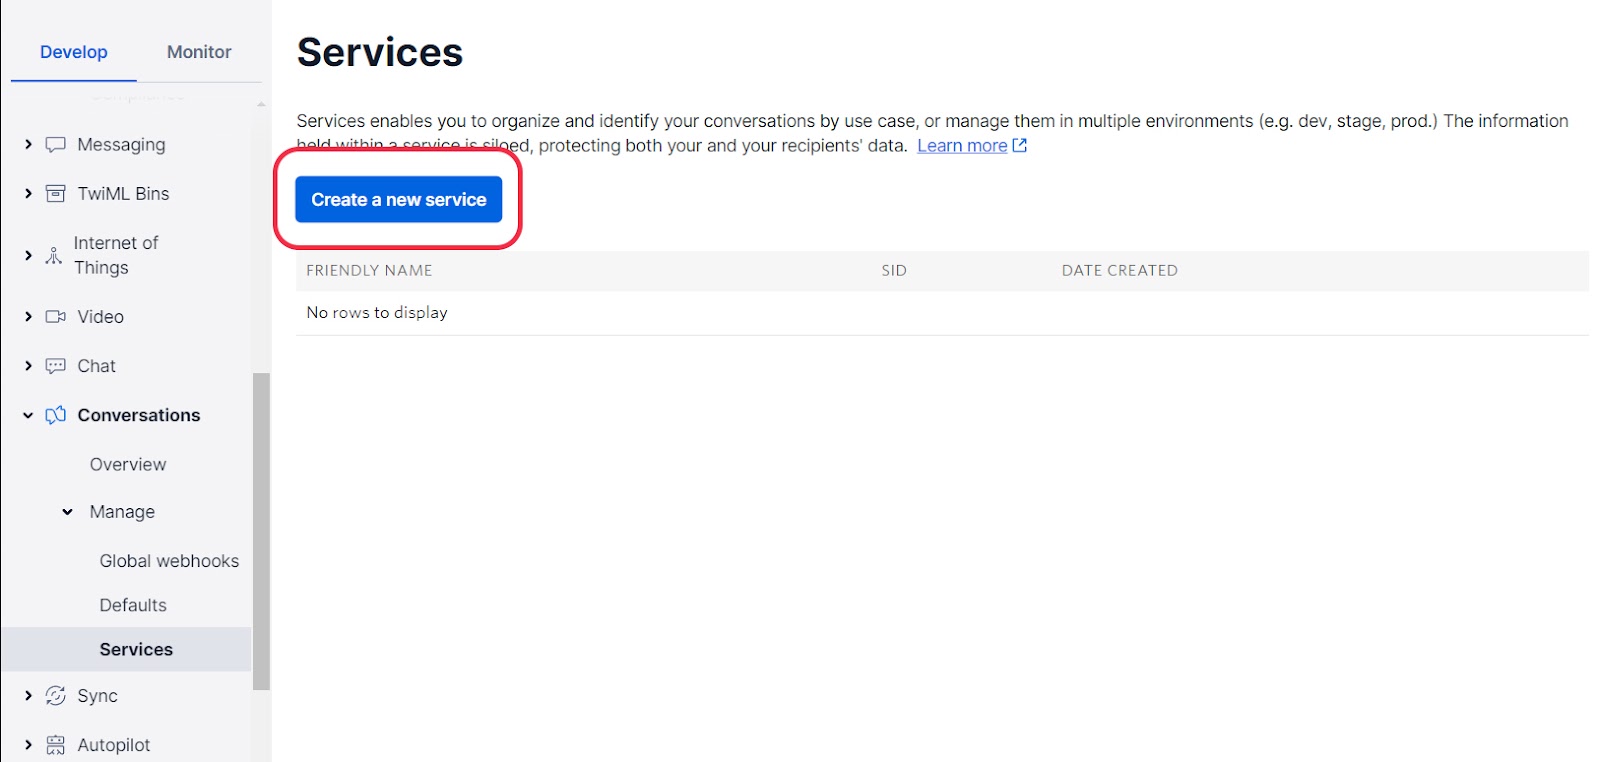
Create a new Conversations Service & Configure Webhooks
- Navigate to your Twilio Conversations Services dashboard and click “Create a new service” button.
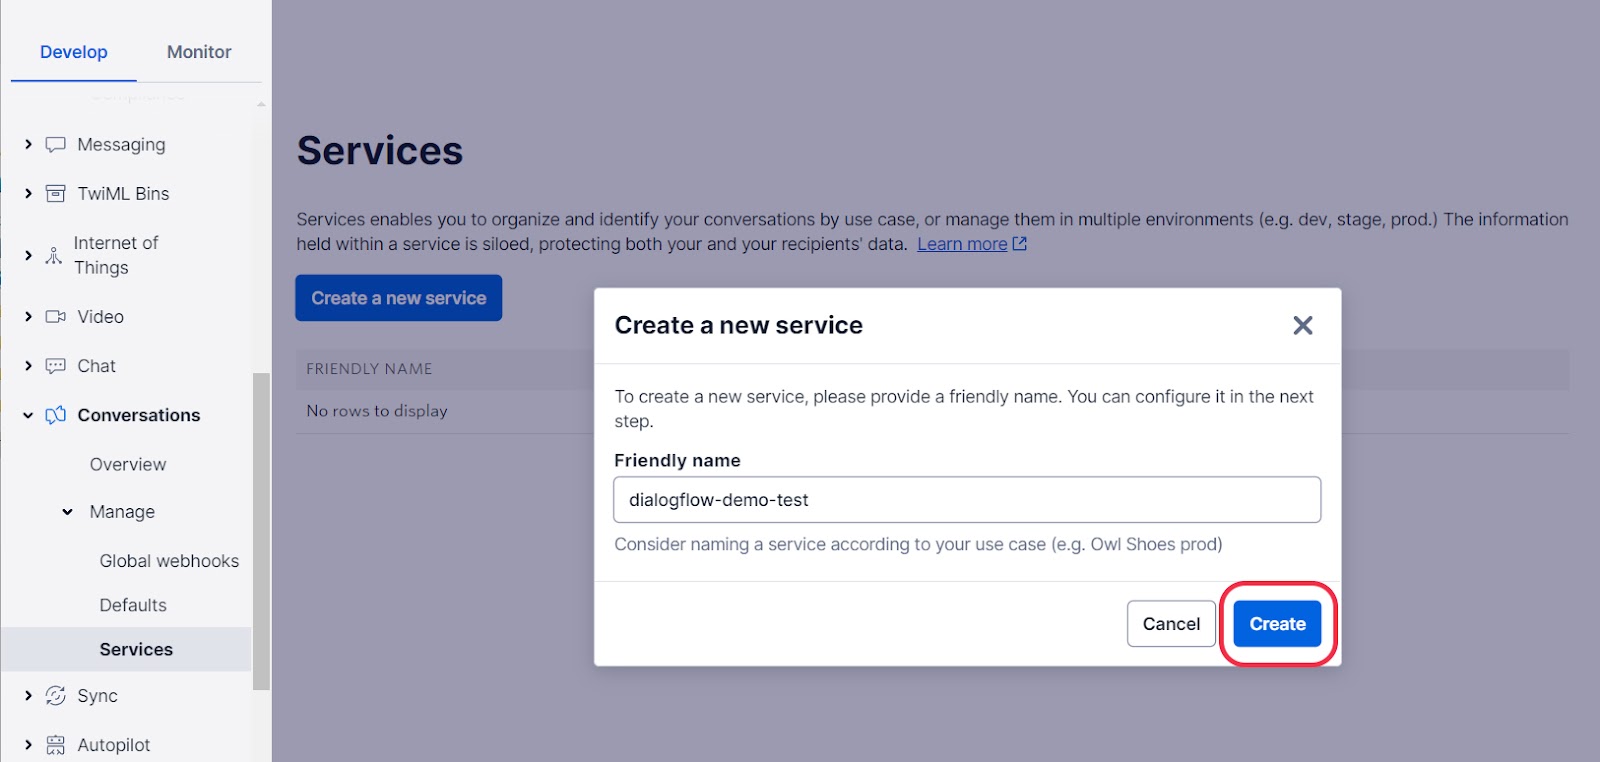
- Name your conversations service “dialogflow-demo-test” or a name you prefer, then click the “Create” button.
- On the next screen, copy the Service SID
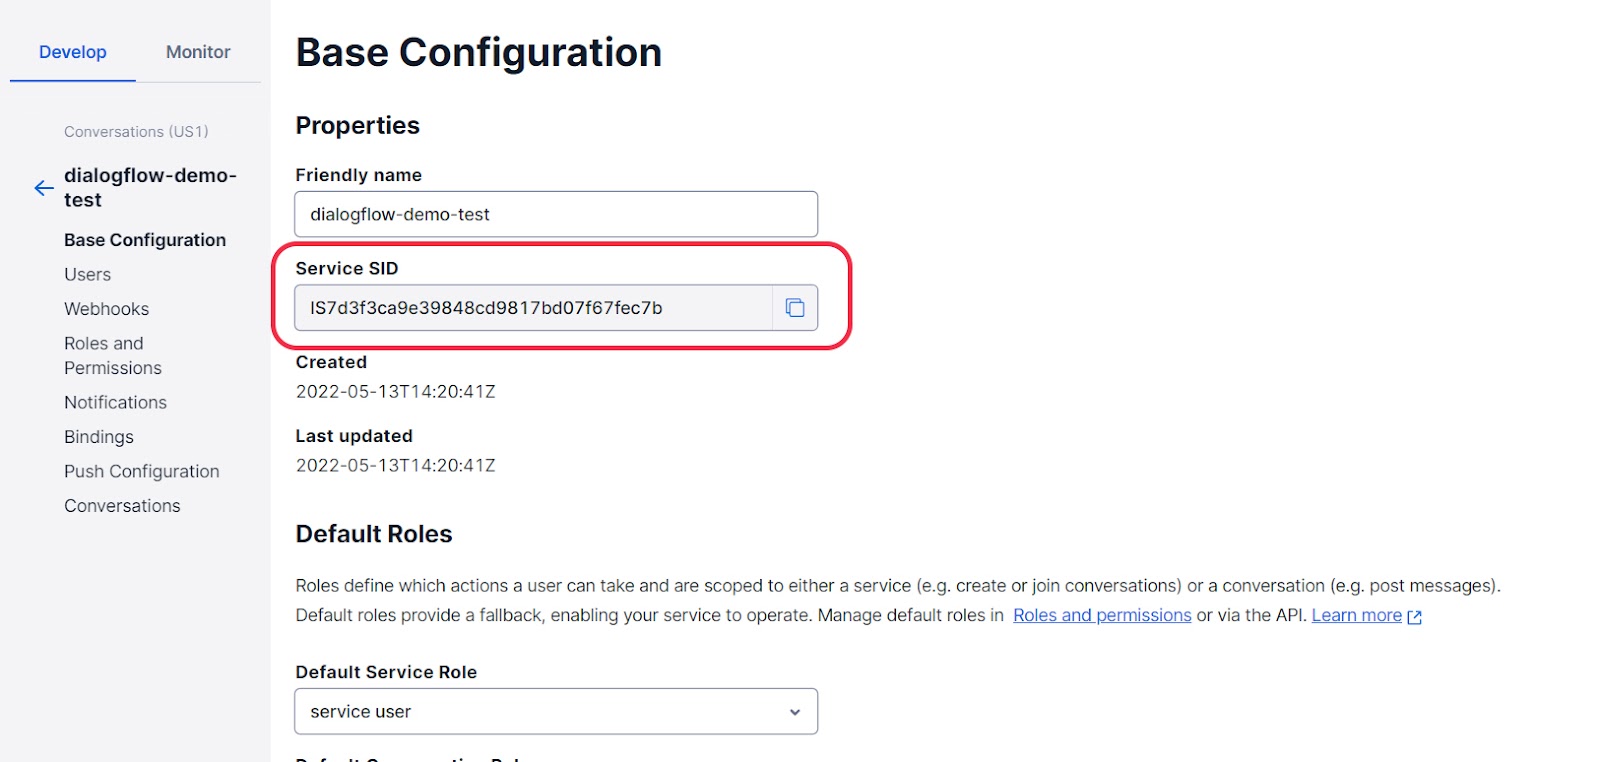
- Navigate into the backend’s codebase and set the SERVICE_TWILIO_CONVERSATION_SID to the value shown above within the .env file.
- Within our newly created Conversations Service, navigate to Webhooks and set your Post-Event URL to https://yoursubdomain.ngrok.io/conversations/events. Set the Method to HTTP POST, so we receive all our events as POST requests.
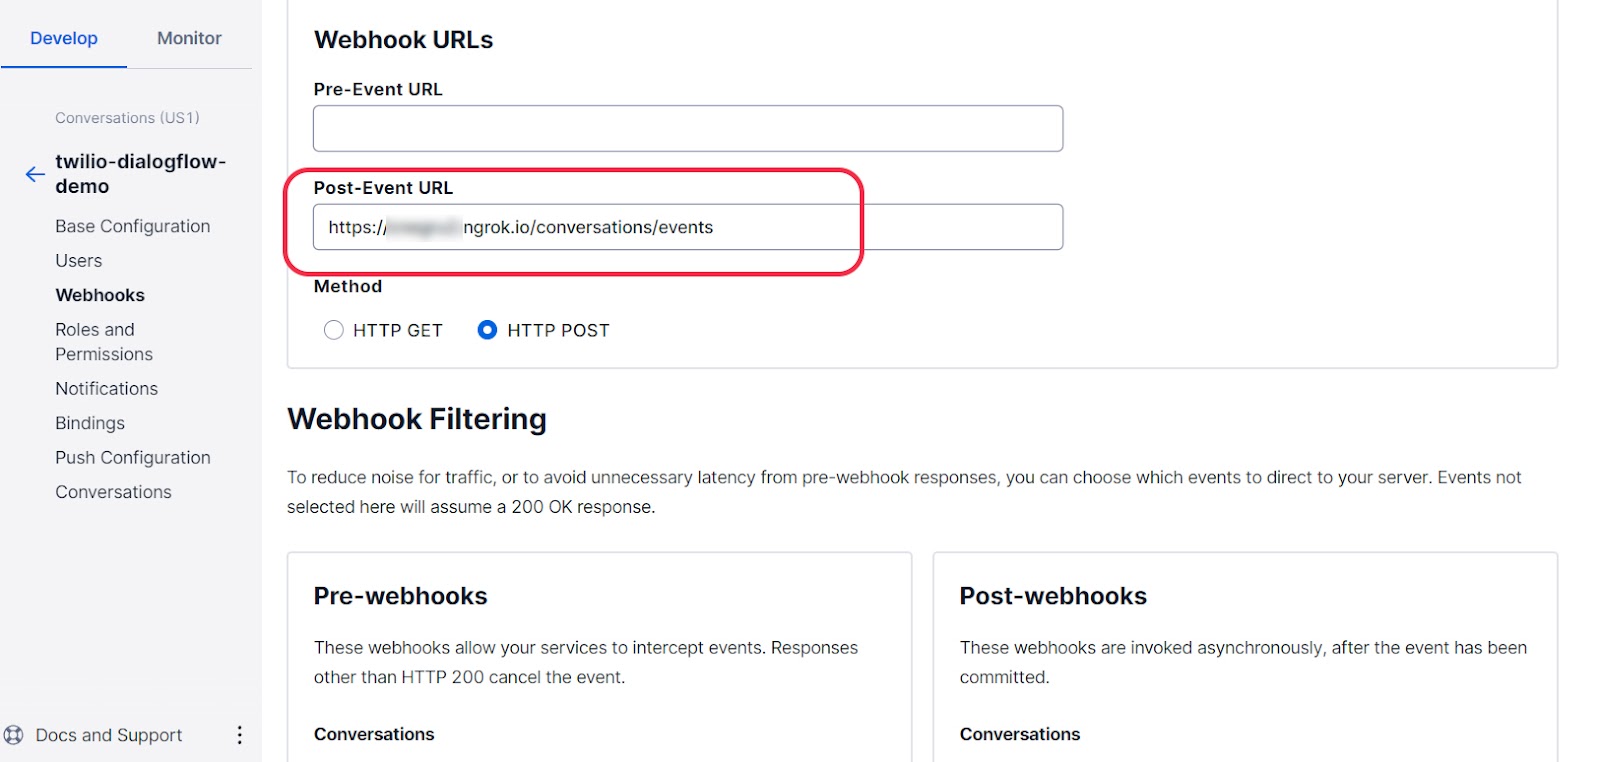
- Uncheck every webhook event for now – only the onConversationAdded Post-webhooks event should be checked.
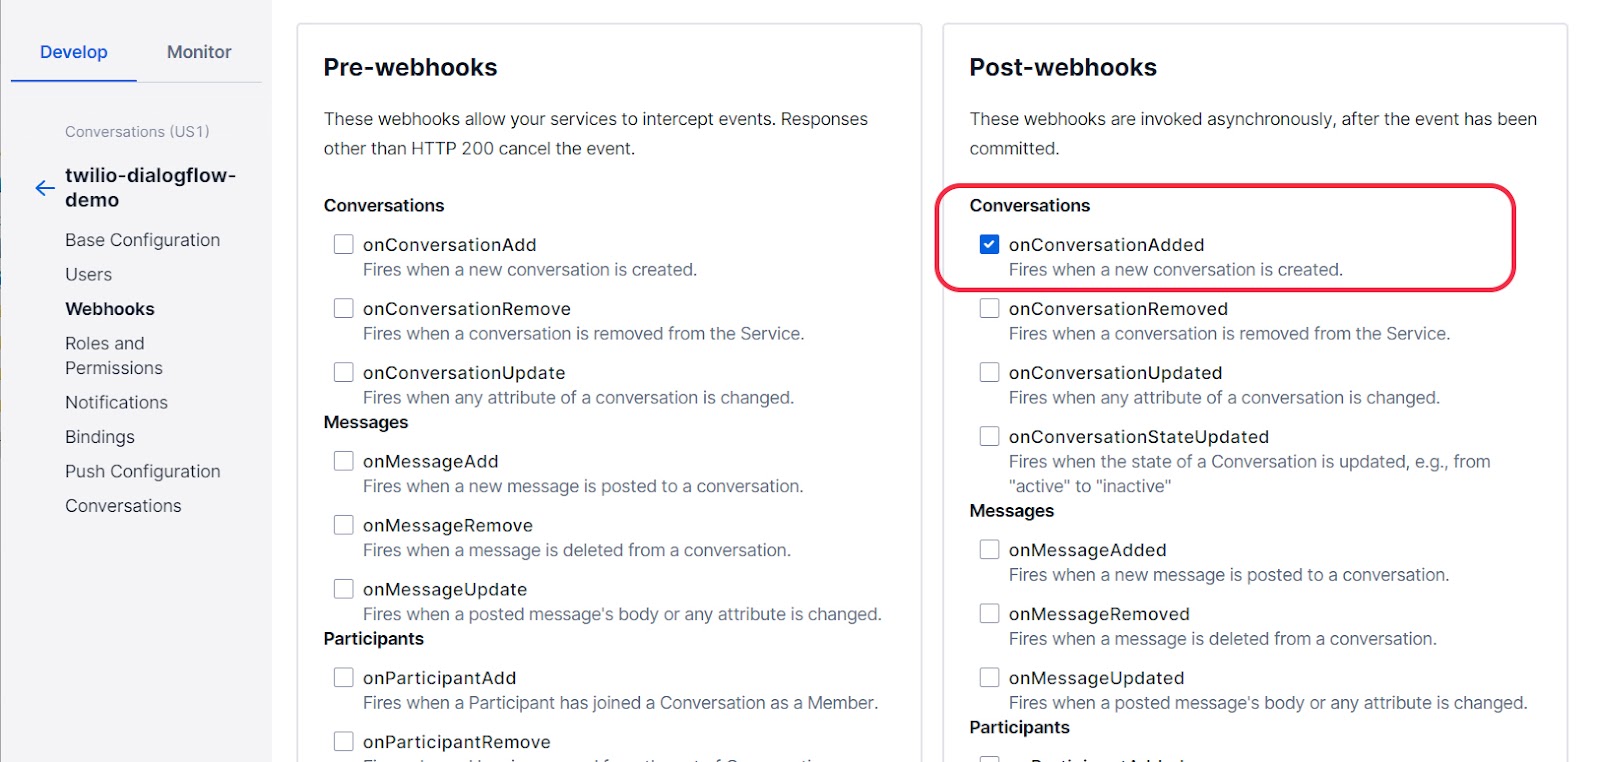
- Click the Save button
Create a new Messaging Service
Navigate to the Messaging Service dashboard within your Twilio console.
- Click “Create Messaging Service” button
- Name your service “dialogflow-demo-ms” and click “Create Messaging Service”
- Add your senders to the pool. This would be your Twilio phone number you’ve purchased above.
- Under Integrations, enable the radio Autocreate a Conversation. This will automatically create a conversation for each new person texting your number which does not belong to a conversation already.
- Click the “Add Compliance Info” button and then the “Skip Setup” button.
Configure a default Messaging Service and Conversation Service
Navigate to the Conversational Messaging Defaults within your Twilio console, and set your Default Messaging Service and Default Conversation Service to our services created above.
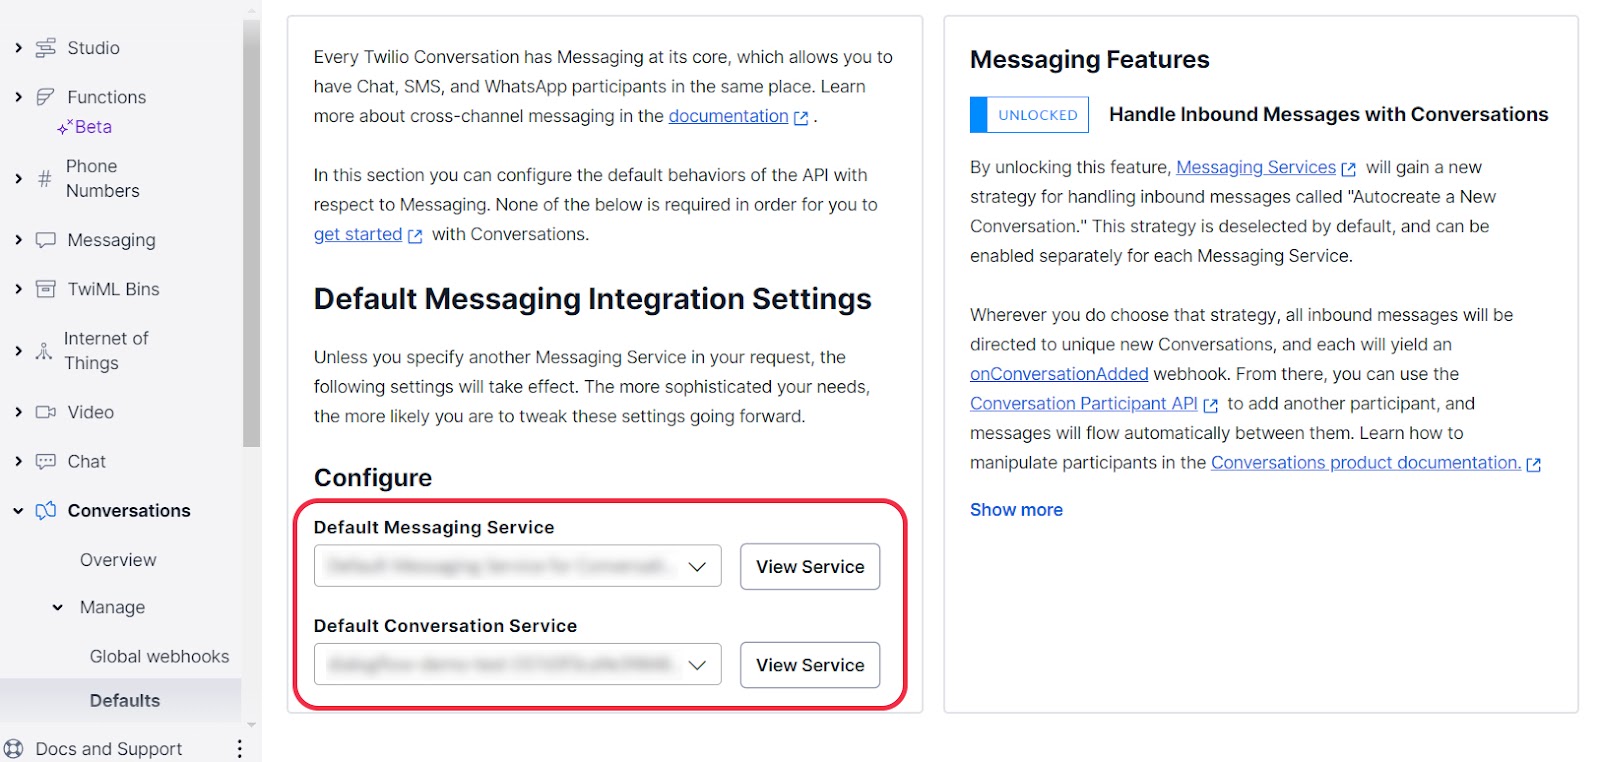
Don’t forget to click “Save” after making your changes
Run our project
Return to your backend code, open up a terminal within the project’s root and start the backend:
Your project should successfully start.
Testing the flow
Go ahead and send a message from your phone to the phone number purchased above and your Dalogflow automation should respond with its quirky remarks. Congratulations! You got it working!
Integrate DialogFlow ES with Twilio Conversations using NestJS
Awesome – you now have a working DialogFlow ES and Twilio Conversations integration, so you can automate your customer conversations. Next, try building the UI using our Conversations API Quickstart to build an end to end flow where the conversation is handled by a human..
We can’t wait to see what you build!
Catalin is a Senior Solutions Engineer at Twilio. Equipped with knowledge and an IDE, he's invested in teaching customers how to build their desired digital journeys using technology. Catalin can be reached at catalin [at] twilio.com.
Nick is a Solutions Engineer at Twilio. He helps developers from different industries architect engaging experiences that keep their customers coming back. He can be reached at nlittman [at] twilio.com
Github Repo
The repo for this demo can be found at https://github.com/canegru/twilio-conversations-dialogflow-demo

Related Resources
Twilio Docs
From APIs to SDKs to sample apps
API reference documentation, SDKs, helper libraries, quickstarts, and tutorials for your language and platform.
Resource Center
The latest ebooks, industry reports, and webinars
Learn from customer engagement experts to improve your own communication.
Ahoy
Twilio's developer community hub
Best practices, code samples, and inspiration to build communications and digital engagement experiences.