Intro to Infrastructure as Code with Twilio (Part 1)
Time to read: 9 minutes
March 09, 2021
Written by

This blog post is the first of a three-parts series where we explore how Infrastructure-as-Code (IaC) processes and tools can be used to deploy and maintain your Twilio solution.
In this part, we are going to introduce the fundamentals of the IaC process applied to Twilio products. At the end of this article, you will deploy and maintain your Twilio resources using a tool purposely built for this exercise.
Prerequisites
In order to follow along, you need:
- A Twilio project. You can get a free one here
- The Twilio CLI. You can install it using the instructions here
- The Pulumi CLI. You can install it using the instructions here
- Optional: a Pulumi account. You can sign up for Pulumi here
Infrastructure as Code
Before starting, let's review what Infrastructure as Code is. You can skip this paragraph if you are familiar with the concept already.
With the rise of cloud services, the need for managing infrastructure configuration has become prominent. The DevOps movement fueled a transformation in the development and operations practices, and automation needs for code integration and delivery (see CI/CD) forced many developers to get a better understanding of where their code will eventually run.
IaC helps developers and organizations get a step closer to fully automating their software lifecycle. At a high level, a common practice for developing new features follows these steps:
- Each developer has their own local environment for testing the application during development
- For each new feature, they create a new branch and once done, they request a code review (e.g. Pull Request)
- The new feature goes through automated unit and end-to-end testing on a specific staging environment
- Each developers involved in the code review may want to test the changes in their own environment before approving them
- Once the feature is approved, it's merged into the main deployment branch and deployed to production
The main challenge in the above cycle is making sure that any changes in the environments that the feature is based on are correctly reflected in all staging environments and in production. This is particularly challenging when developers have to review and test their peer's code without affecting their own work environments.
IaC helps streamline this process because the configuration is stored as code / scripts and passed along with the code, allowing for any changes to the environment to be easily applied and rolled back without error-prone manual interventions.
Let's see that in practice with an example.
Twilio TaskRouter and IaC
In this example, we will focus on Twilio TaskRouter but the main concepts can be reused for all other Twilio products and resources. Twilio TaskRouter is a skills-based routing engine for contact centers. It enables contact centers to match tasks (such as incoming calls or SMS) to the right worker. If you want to learn more about TaskRouter and how to implement a simple language-based routing, you can watch this excellent screencast.
In this example, we will use a similar routing logic, but we will implement it as IaC using Pulumi. So let's start by initializing our project: in order to do that, you need to install a plugin for the Twilio CLI (see the prerequisites section above) called plugin-twilio-infra. This plugin will automate most of the steps needed to set up a new Pulumi project. This plugin can be installed using the following command from a Terminal or a command prompt:
Once installed, you can check that the plugin is working using:
Create a new project
We are now ready to create a new project that includes all the dependencies needed. Create a new folder my-first-iac-project and cd into it:
Now let's initialize the Pulumi CLI: for this example we are going to use the local filesystem as our storage backend. You can initialize that using:
Feel free to sign up for a Pulumi account if you'd rather use their service for storing your infrastructure state.
Now, let's use the new plugin to initialize the project:
This will guide you through several choices, such as:
- Project name
- Project description
- Stack name: this is the name of the Pulumi stack for this project. You can read more about stacks, but in a nutshell, a Pulumi stack denotes different phases of developments or staging environments (e.g.
dev). - Passphrase: this is used by Pulumi to generate a unique key for your stack. This is used only if the Pulumi CLI is using your local filesystem as a storage backend. Don't forget the passphrase, because you will need to access the stack.
At the end of this process, the folder will be initialized with the following files:
package.json: this describes your project and its dependencies.gitignore: this is used to exclude files in case you are usinggitto manage your code. You can safely ignore it if you don't use it/node_modules: this folder contains all the dependencies, and in particular, thetwilioJavaScript client and thetwilio-pulumi-providerPulumi.yaml: this file describes your Pulumi project: the name, description, and runtime environment. The Twilio CLI Plugin is setting the environment asnodejsby default. The reason is that the Twilio dynamic provider (i.e.twilio-pulumi-provider) is currently available for NodeJS onlyindex.js: this is where your configuration code will go. We will see that in details in the next section
Describing your infrastructure using code
In this example, we want to create a routing strategy within Twilio's TaskRouter that will have two queues (English and Spanish) where agents will be picking up calls. To build that from scratch, you will need a TaskRouter Workspace, two TaskQueues, a Workflow, and (at least) two Workers.
To describe our TaskRouter Workspace using the Twilio dynamic provider, add the following code to your index.js file:
Note that describing a component is as simple as instantiating an object. In this case, we are using the Resource class exposed by the twilio-pulumi-provider package. The first argument is its ID, and it's used by Pulumi to track its state. The second argument is an object describing the API endpoint and its attributes:
resources: this is the API URL broken down as array items. For example, in this case, the API endpoint URL for creating a workspace ishttps://taskrouter.twilio.com/v1/Workspacesand we are using the subdomain (i.e.taskrouter) as the first element of the array and the path (i.e.workspace) as the second element of the array. We will see later how we can convert other API URLs to arrays.attributes: this is an object that describes the parameters of the resources you are creating or modifying. For example, in this case, these are parameters for a new Twilio Workspace resource (you can check the API documentation for more details)
It is important to note that the way we are describing the resource with the API path is not the most common pattern used by Pulumi or other IaC platforms. In the case of the twilio-pulumi-provider package, we chose this method since by doing so, there is no need to maintain a Resource Class implementation for each endpoint or update it with the release of a new API endpoint.
Next, let's add the TaskQueue, one for English and one for Spanish:
Note that when creating the TaskQueue resources, we need to pass the SID (or unique ID) of the TaskRouter workspace. In fact, when you use the API, its URL would be: https://taskrouter.twilio.com/v1/Workspaces/{WorkspaceSid}/TaskQueues where {WorkspaceSid} is the sid of the Workspace the new TaskQueue belongs to. In order to do that, we use the sid attribute of the workspace resource created in the previous step. The ability to reference other resources and their attributes (e.g. SID, friendly name, etc) is one of the most important features of IaC platforms.
Let's now create the two workers, adding the workerOne and workerTwo resource definitions at the bottom of the file:
Finally, let's put all the resources together, and add the code for the workflow at the bottom of the file. Make sure you replace the assignmentCallbackUrl with the address of your webhook:
In the code above, we are using pulumi.all().apply() to generate the configuration for the workflow. We need to use this because the attributes of the resources we created earlier in the file are not directly accessible as property of the resource objects (i.e., you cannot simply use TaskqueueEnglish.sid to access the SID of the TaskqueueEnglish queue). With Pulumi, we need to wait for both of the TaskQueue's SIDs to generate a stringified payload, then apply that value as configuration input. To learn more about how Pulumi handles inputs and outputs, see Inputs and Outputs section on the Pulumi Programming Model.
Create your resources
We are now ready to test our implementation and create the actual resources in our Twilio project.
First step, make sure that your Twilio CLI is logged into the project your want to deploy these resources to. If you are not sure which project you are logged in to, you can use twilio profiles:list to list all the profiles, and twilio profiles:use to select the one you want to use. If your project is not listed, then use twilio profiles:create to log in to a new Twilio project, and then run twilio profiles:use <profile_name> to select that.
Let's now use the twilio infra:deploy command of the CLI to deploy the resources we have created:
This first part of the command output is showing you a preview of the resources that will be created. If you are happy with that, select yes and press enter. If everything ran successfully, you should see the following:
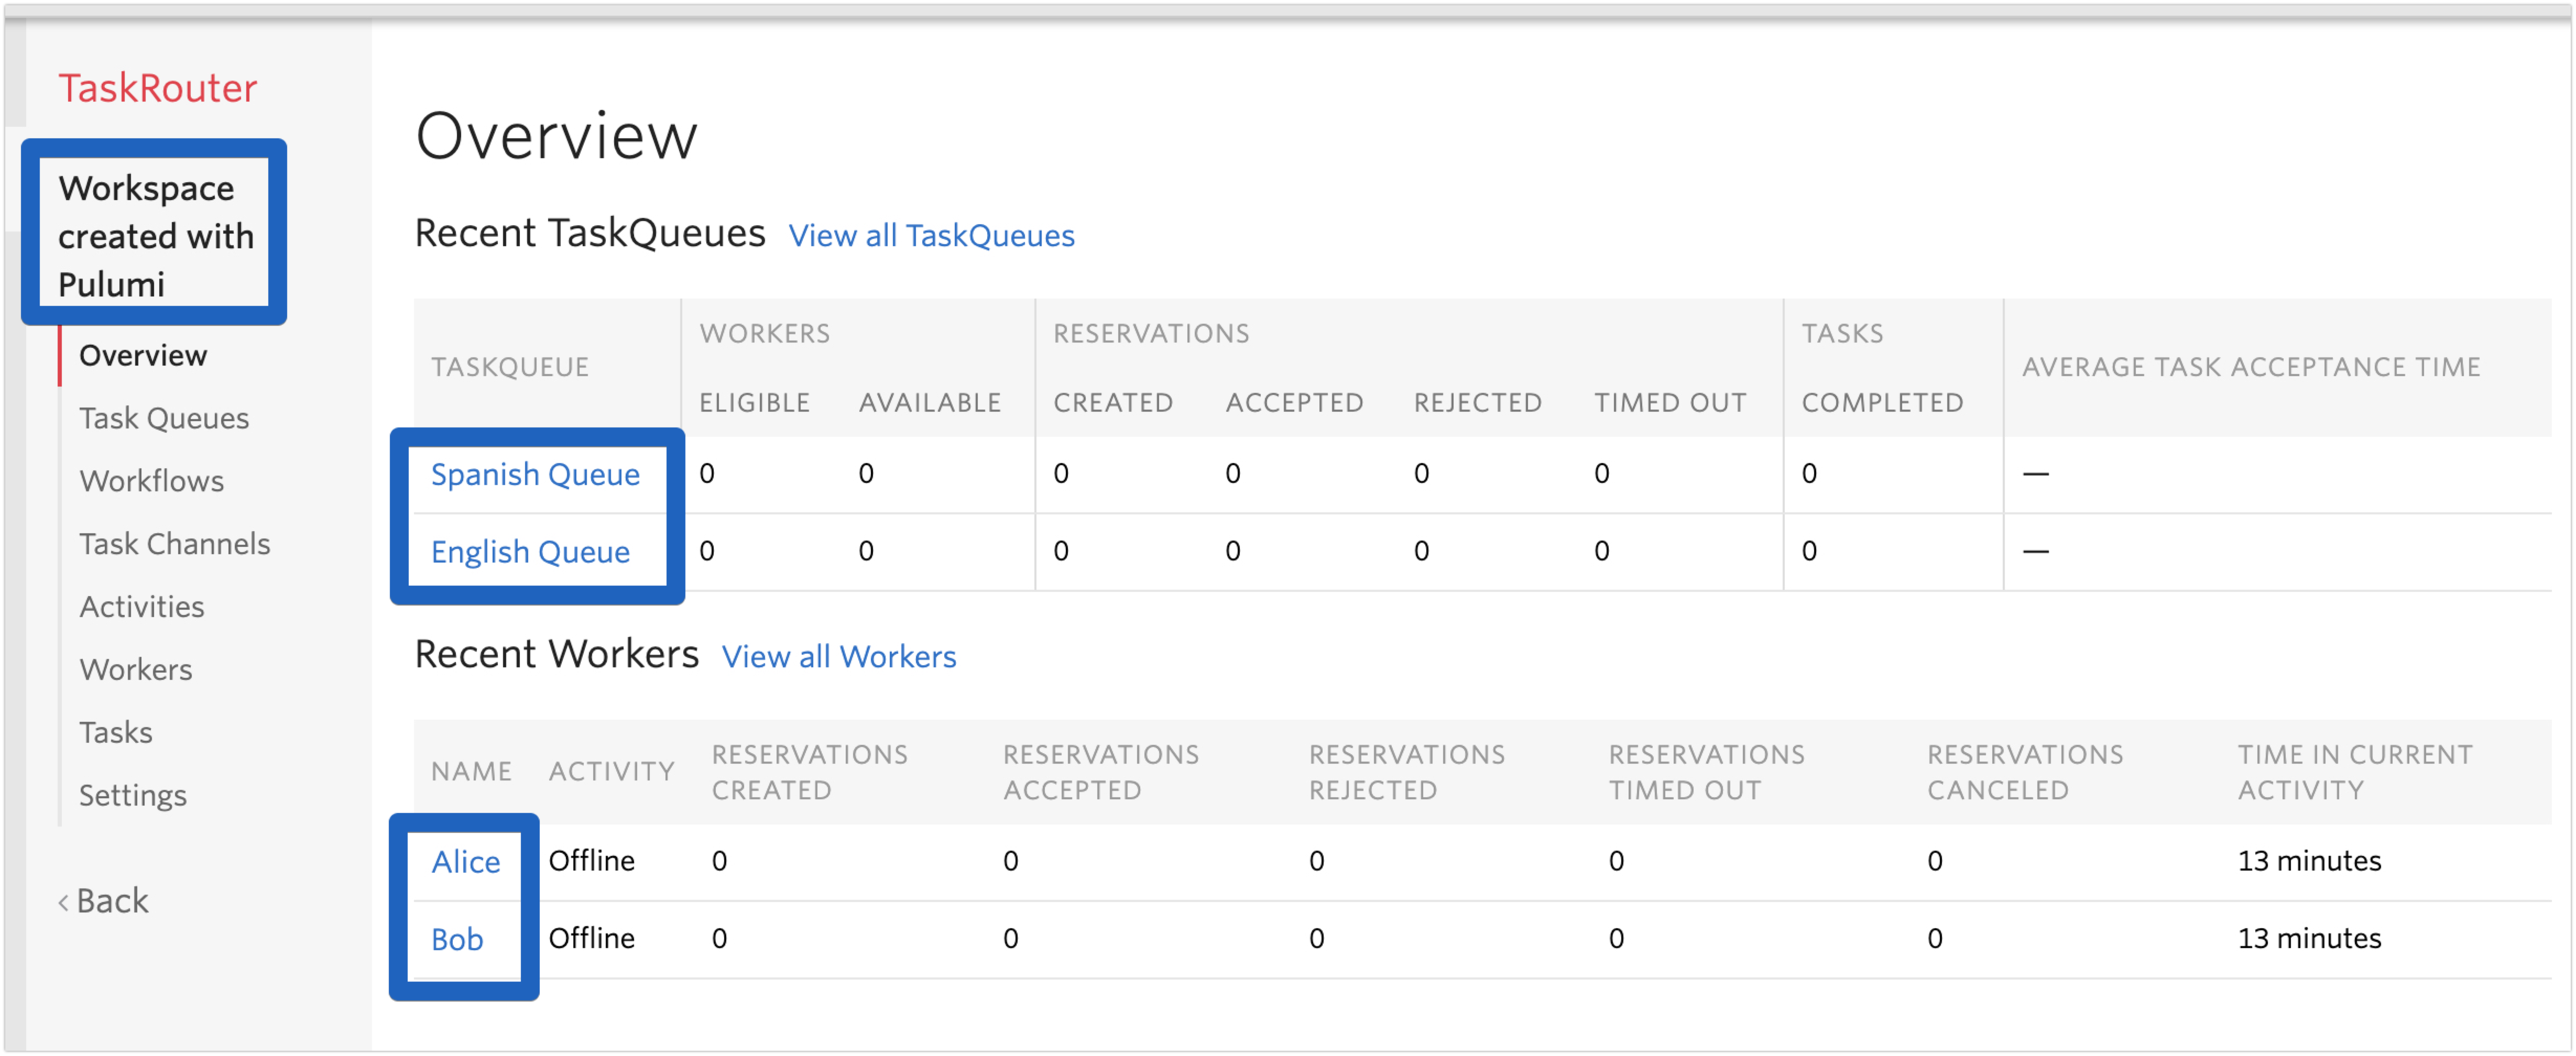
If you now navigate to your Twilio console and look at the TaskRouter Workspaces, you will see that a new Workspace has been created called Workspace created with Pulumi. If you click on it, you should see that the two queues and the two workers have been created:
Modify an existing resource
Creating a new Twilio resource can be done easily through APIs as well. Where an IaC approach really shines is when you need to modify a resource.
Let's explain that with an example. Let's assume you are working in a team, and each developer has her/his own Twilio project. Throughout the development cycle, you want to make sure that all the developers have the same resources in their project. The traditional (API) approach would be:
- At the beginning of the project, distribute a script that uses API / SDKs to create all the resources needed
- All the developers will run the script to provision their account
- Each time there is the need to change a resource, you need to distribute a new script that updates the Twilio resource(s)
- If a new developer joins the team (or an existing one wants to start a new project), they need to execute the first script for provisioning and all the subsequent script(s) to make the changes (in the specific order)
This approach doesn't scale, and you may end up with having multiple scripts you need to manage.
With the IaC approach, the only thing you need to do is to change the original script to add / modify / delete resources, and commit the script to your shared code repository.
Let's see that in action: let's say you want to change the name of the worker from Alice to Maria. To do that, you simply have to change the property of worker workerOne in the code:
If you now run the deploy command again, you will see the following:
That means that one resource (`worker-one`) will be updated because one of the items (attributes) has changed compared to the last deployment. Let's go ahead and select yes and press enter. You will see the following:
As you can see from the output of the command, Pulumi detected a change in worker-one and changed the deployed resource accordingly. If you navigate to the TaskRouter Workspaces page in the Twilio Console, you will see the name of the the worker has changed:

All you have to do now to make sure all the other developers update their workspace, is to distribute (e.g. commit the file in a shared repo) the new configuration file (index.js in our case) and ask them to run the deploy command (e.g. add the deploy script as post-merge githook)
Also, if the IaC script is part of a CI/CD pipeline, the staging / production resources will be updated accordingly d the next deployment (more on this in part two of this blog series).
Destroy your resources
Now that we went through this example, you may want to delete the resources you just created. With IaC, this operation is very easy. Just run the following command:
After confirming you want to perform the operation, all the resources created will be removed from your project:
Conclusion
As you can see, IaC brings many advantages to the development lifecycle. It helps in streamlining the creation of resources in all the environments (dev, staging, production) as well as keeping track of all the changes to the resources. It can be easily integrated in your CI/CD pipeline, reducing human errors and speeding up the deployment time. Depending on the IaC tool used, developers don't have to learn a new language or new APIs to configure the upstream resources. And we only scratched the surface of how IaC can help scale your project. In the next parts in the series, we will see how to integrate IaC in your pipeline and we will dig deeper into some of the features offered by Pulumi.
Next Steps


Related Resources
Twilio Docs
From APIs to SDKs to sample apps
API reference documentation, SDKs, helper libraries, quickstarts, and tutorials for your language and platform.
Resource Center
The latest ebooks, industry reports, and webinars
Learn from customer engagement experts to improve your own communication.
Ahoy
Twilio's developer community hub
Best practices, code samples, and inspiration to build communications and digital engagement experiences.