Intro to Speech Recognition in Swift via FlyoverKit
Time to read: 4 minutes
December 17, 2018
Written by

One of my favorite computer science electives was Speech Synthesis and Recognition because Natural Language Processing and Computational Linguistics are becoming more widespread (look at Siri!). In this post we will add speech recognition to select famous landmarks with FlyoverKit in Swift. If you haven't seen part one of this multi-part series, check it out on the Twilio blog here.
Setup
For this post you will need Xcode 10, a Mac, and a physical iOS device to test the speech recognition features. To follow along with this post make sure to clone the corresponding GitHub repo here as we'll be adding speech recognition capabilities to it. If you just want to make a simple speech recognition app in Swift, you can use the same code but just need to add a button to your ViewController. Name the button locButton, and create a label called placeLbl. Ignore the code in this post that is italicized.
Before we can get to some code be sure to
1. cd flyoverkit_with_twilio on the command line to get into the cloned directory.
2. run the command git checkout part-1-simplified to check into the right branch to follow alongside this post.
3. open TwilioFlyover.xcworkspace and not TwilioFlyover.xcodeproj in order to link all of the necessary frameworks. If you see a cannot load underlying module for FlyoverKit error try running the app anyways and the error should disappear.
Speech Recognition Implementation
First we need to ask the user for permission to access the microphone for speech recognition. Open up .xcworkspace and add two keys to your Info.plist file:
- NSSpeechRecognitionUsageDescription
- NSMicrophoneUsageDescription
Their corresponding values should describe what we are going to do with the microphone and speech detection, as shown in the Info.plist below.

Now we're going to
- Initialize the libraries we need for speech recognition
- Ask the user for permission to use the microphone with speech detection
- Use speech detection to find landmarks from an audio input stream
- Implement FlyoverKit and use the voice search to drive the experience
In ViewController.swift add import Speech at the top below the ones from part one of this blog series as below.
Let's define the following global variables above the mapSetUp method:
What do they do?
- SFSpeechRecognizer performs the speech recognition task.
- Because it returns nil speech recognition for the given locale isn't supported it should be an optional.
- We are passing "en-us" as the locale identifier, converting from US English speech to text. You can change that identifier for different languages or even use Locale.current for the user's current region settings. More information on locales can be found here.
- SFSpeechAudioBufferRecognitionRequest controls the audio buffer and allocates speech in real-time when a user speaks. If you used a pre-recorded audio file use the SFSpeechURLRecognitionRequest instead. SFSpeechRecognitionTask manages, cancels, or stops the current recognition task.
- AudioEngine() processes audio input and provides an update when the microphone receives audio.
Make sure to uncomment the lines in mapSetUp that are currently commented out!
Ask For Permission to Access Microphone
Scroll down and find viewDidLoad(). This is where we will add code to asynchronously present a system dialogue to a user requesting access to the microphone. We need to also asynchronously check that we have microphone permission by using DispatchQueue.main.async to set a boolean.
Record Audio
Below viewDidLoad let's add the startRecording() function to record a new audio buffer.
A recognitionTask object is created when the recognizer kicks off a request to either track the progress of a transcription or cancel it. We're measuring the audio input and wish to resume audio playback upon deactivating our audioSession. This is a large function that can be viewed in its entirety in this GitHub gist here.
The start of that function should include the following code:
Next we start voice recognition by calling the recognitionTask method of our speechRecognizer object. This function has a completion handler which will be called each time the recognition engine has received input, has refined its current recognition, or has been canceled or stopped. The final transcript returned is set to be our recognitionTask. We define a boolean to check if the recognition is over. If there is no error or the result is final, we stop the audioEngine with audio input, recognitionRequest, and recognitionTask and enable the record button. The best transcription of our chunk of audio (called bestStr) then becomes the text displayed by our label placeLbl. Lastly, if the result is the final result then set isFinal to true and set the map up again to reflect the new location according to bestStr.
To learn more about audioEngine, check out the audioEngine documentation. In short, it uses things called nodes to process an audio buffer. Here the inputNode creates a singleton for the incoming audio. As stated by Apple: “Nodes have input and output busses, which can be thought of as connection points. For example, an effect typically has one input bus and one output bus. A mixer typically has multiple input busses and one output bus.”
The installTap function configures the node and sets up the request instance with an audio buffer on the proper bus. Then, we prepare and start the recording using the audio engine.
The following code does just that and should be placed beneath the code just added.
You should see an error that says "use of unresolved identifier convertFromAVAudioSessionCategory. Make sure the last bit of code at the very bottom beneath didReceiveMemoryWarning and the very last closing bracket is this helper function from the Swift 4.2 migrator.
Now let's modify a function we made in the last post. Find the locButtonClicked function. Check if our audioEngine instance is running. If so, stop it and end the audio instance. The button text displays "record" but nothing is recording yet. If the button is clicked the recording will start and the text changes to "stop" to signify to the user that clicking the button again would "stop" the recording.
That code should look like this:
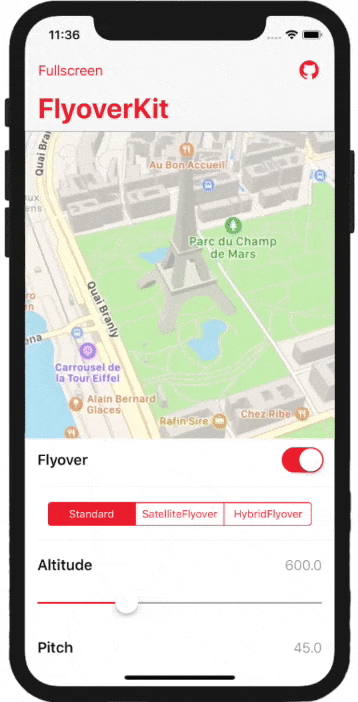
Tada! If you run the app on your physical iPhone device, click "record", and speak a location (like for example Griffith Observatory or Miami Beach) into your phone. You should see something similar to the screen below.

What's Next
The completed code for this post can be found on a different GitHub fork here. Want to dive deeper into speech recognition in Swift? I recommend checking out this Ray Wenderlich tutorial on speech recognition or this Hacking with Swift tutorial on speech-to-text conversion. Conversely if you want to learn about speech synthesis (conversely, text-to-speech) you can read Apple's official documentation on speech synthesis or this succinct way of converting text to speech from Hacking with Swift.
I can't wait to see what you build--you can let me know via Twitter @lizziepika or via email lsiegle@twilio.com.

Related Resources
Twilio Docs
From APIs to SDKs to sample apps
API reference documentation, SDKs, helper libraries, quickstarts, and tutorials for your language and platform.
Resource Center
The latest ebooks, industry reports, and webinars
Learn from customer engagement experts to improve your own communication.
Ahoy
Twilio's developer community hub
Best practices, code samples, and inspiration to build communications and digital engagement experiences.