Migrating Swift iOS Apps from MVC to MVVM
Time to read: 12 minutes
May 31, 2018
Written by

Design patterns are reusable solutions to common problems in code. MVVM (Model-View-Viewmodel) and MVC (Model-View-Controller) are both design patterns. While MVC is a very common and easy-to-implement design pattern, it has been faulted as very inefficient while working with large code bases. If you’ve built a product, you’ve probably built using MVC. Other common design patterns include MVP (Model-view-presenter) and VIPER (here is a little write up that describes them). In this post, we’ll be concentrating on MVVM and MVC.
Why use design patterns? We use them because design patterns are typically easier to reuse and debug than an unproven design. Say you solve a problem without any particular design, and at the moment, it works. However, in the future you get a bug. When you go back to debug, it may be hard to figure out where some things are and why you even did them in the first place. Imagine how much more difficult it will be for someone who did not write the code to navigate it. We will learn how to use one common iOS pattern, MVVM, in this post.
Building a To-Do App
In order to understand the MVC and MVVM design patterns, we will be building a to-do app. The app has all the basic functionalities that will show the patterns. It can create a to-do activity, delete a to-do activity, and mark an activity as done. The app also persists the data so that you still maintain the state of the app (number of items, item done or not) after it goes to the background.

You will need:
- Xcode 8.3 or later; this is the IDE used to build iOS apps.
- A general understanding of the Swift language. The app we will be working on is very simple, so you will only need an understanding of the syntax and how to debug.
- The app we will be working with, which is hosted on a GitHub repository. The repo has three branches: master, MVVM, and MVC. As you might have guessed, the MVVM branch has the MVVM flavor of the app and the MVC has the MVC flavor.
The most important thing you will need is the willingness to learn and follow along with the migration.
MVC vs. MVVM
Before we go any further, there are two very integral parts of any iOS app that you should understand: UI logic and business logic. What is the difference, you ask?
Business logic is the programming that manages the communication between an end user interface and databases. It ensures the models are updated, the data is processed in a way that is human readable, and so on. This includes actions such as updating the data, deleting items from a list, formatting a data type, and that kind of thing. This could be known as “processing” in simpler terms.
UI logic is the part that deals with the user interface, i.e. what the user sees and interacts with. This includes updating the labels, the table, animating the screen components, and all those pretty things we like to look at.
These two parts are generally what inspires data separation and hence design patterns such as MVVM and MVC. As we move forward, it would be beneficial to think to yourself: is this piece of code dealing with the UI or the business logic?
Understanding MVC
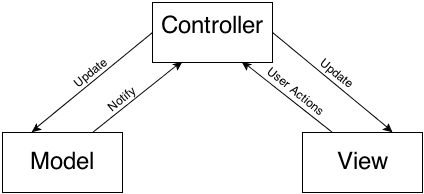
MVC is the architecture that the Apple SDK is built on. It consists of three main sections:
- Model: this is where the data lives. In our case, to-do items are models of data.
- View: this is what the user interacts with on the screen. In this case, it is what will present the name of the the to-do item (say, a label), status of the to-do item (say, an accessory), and the swiping gesture to delete.
- Controller: this controls the flow between the view and the model. If the view wants to present a to-do item, it will ask the controller to ask the model for the item. The controller will get the item from the model, then update the view accordingly. If the model changed, it would notify the controller, and the controller would then update the model accordingly.
Here are two examples of how we could implement MVC:
- Case 1: A user swipes a to-do item, deleting it. We need to update the model, which will be done by the view controller.
- Case 2: Say we have a timer that reminds the user of items that have gone undone for a while. Once the timer lapses, the model will notify the controller that an action is required on the view side. The controller will then update the view and display an alert.
As with anything, there are pros and cons to working with MVC.One of its greatest strengths is that MVC is a design pattern that is learnable. When working with smaller codebases, the effort required to implement MVVM or any other more complex pattern may not be justifiable.
However, as you may have observed, the view controller has quite a lot of responsibilities. Therefore, it ends up being the dumping ground for a lot of the code. This has led to increasingly massive files. This is why MVC has been referred to as the “Massive View Controller.” This has caused a lot of problems such as the codebase being impossible to navigate and being virtually untestable, which is because when the view is coupled with the controller, you have to mock the view in order to test the controller.
Understanding MVVM
As with MVC, MVVM consists of several parts:
- View: This is the same as in MVC; it’s responsible for the data, making up all the small domains of the to-do list object.
- Model: This is the same as in MVC; this is where the data lives. In this case, to-do items are models of the data.
- View Controller: The view controller sets up UI views. It does not interact with the model at all. It instead goes through the view model, and asks for what it needs in a format ready for display. It should have absolutely no business logic.
- View Model: The view model is basically a representation of the view controller. If the view controller has a label, the view model should have a property to supply it with the text in string form. It triggers all calls, and sends and receives data. When dealing with the view model, you should ensure it is as dumb as possible. This means that you should decouple it from the view controller as much as possible. We should ensure that we do not inject instances of the view controller to the view model. The view model should be completely independent of all the view controller.
Here are two examples of how we implement MVVM :
- Case 1: A user swipes a to-do item, deleting it. We need to update the model. The view controller would do any action to update the view. However, to update the model, the view controller would communicate with the view model and prompt it to update the model since this is business logic.
- Case 2: Say we have a timer that reminds the user of items that have gone undone for a while. Once the timer lapses, the model would notify the view model that an action is required on the view side. The view model would then fire an action in the view controller to update the view and display an alert.
Just like MVC, there are pros and cons to working with MVVM. Due to the decoupling of UI and business logic, the MVVM design pattern results in more flexible and easier-to-read classes. However, the cost of MVVM can be a bit high as sometimes it is difficult to figure one’s way around binding and other technicalities of MVVM.
Moving From MVC to MVVM
As mentioned earlier, the source code is hosted here. After cloning, go into the project directory. You will typically start with the branch master. Run the command git checkout Angie/MVC to checkout the branch named Angie/MVC. This is the branch that has the original version of this project, built using the MVC pattern. You can then open the app in XCode and look around to familiarize yourself with the various parts of the app. On the far left, we have the project navigation. The project should look like this:
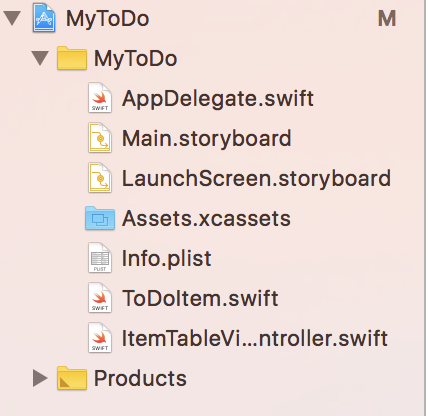
In the folder
MyToDo, there are a couple of files we will work on and others we will not be paying a lot of attention to. We won’t be working with the common files, Assets.xcassets, Info.plist, LaunchScreen, AppDelegate, or Main. This is the controller. In MVC, the view controller takes the bulk of the responsibility. Take a look around and see.
I have numbered some comments so that we can go through each function and see what it does. The numbers below coincide with the comments on this file in the code we downloaded.
- We initialize the global properties: a list with the class objects and an instance of user defaults where we save the plist.
- This is where we call the functions we want to be called before the view appears (while view is loaded), such as configure the view and fetch the data to be displayed.
- Here we configure (customize) the view.The first line gets rid of the lines between the table cells and the rest creates the beautiful gradient on the app.
- This is an action connected to the ( ) in the navigation bar; it pops up an alert where input is required. When
okis pressed, it adds the item to the list and also to the table. - This returns the number of sections in the table. In this table we have one section. Say we wanted to split the items into the days they are added. We could add sections for that. Instead of
return 1we would do returndays.countor something to that effect. - This returns the number of rows. In this app, a row contains a single to-do item. We therefore return the number of rows that coincides with the number of items in the to-do list.
- This returns the cell for a certain index path. We use the index path to access items so that we can edit them.
- This is used when marking an item as done or not done. When you tap the row, the done property is toggled between done and not done.
- This function deletes an item. It enables you to edit the row, such as swiping it. In our case, we have set the swipe motion to delete an item.
- This is the action that is called whenever loading the app to get the data we want to display. We fetch it from the user defaults.
- This is the function we call to save the data whenever the app goes to the background.
Now, let’s think about each of these functions. Which one of these have UI logic, which ones have business logic, and which ones have a bit of both? Let’s look at a couple:
configureView()
This function is right after viewDidLoad(), and it is all UI logic. Its purpose is to customize the UI to look as it does now.
saveData()
This function is found right at the end of this file. Looking at it, you will notice it is purely business logic, which is saving data to the user defaults. This is because it does not touch the UI logic in any way and it just modifies the list.
Let’s Get Down to MVVM
As we mentioned earlier, the goal in MVVM is to separate all the UI logic from the business logic. Looking at the app, we have UI logic and business logic. First things first, we need to have a way to expose the view model data to the view controller. There are a couple of ways to do this:
- Binding: with binding, we use a class that binds the view model class to the view controller. This is a great approach when dealing with more complex classes.
- Closures: here we use closures to expose certain properties of the view model class. These are especially useful when working with networking requests and other tasks that rely on external factors. An example is if we were fetching data from an API, we would use a closure to update the view controller.
- Delegates and protocols: these are used to monitor changes in a property and update the view controller. A great example is when we monitor changes on the data and perform an action based on that change. For instance, if we wanted to present an alert whenever a Wi-Fi network is detected, we would use delegates.
- Variables: this is the simplest method and is the one we will be using. We create properties in the view model and have string or other formatted representations of them in the view controller. The view controller accesses the variable from the viewModel in a ready to use format.
Let’s move forward using the simplest method, by creating properties in the view model and exposing them to the view controller.
First, create the view model. We will create a new file called ItemTableViewModel. Go to File-> New->file->Swift file and name it ItemTableViewModel. This creates a new empty file. Add a class declaration so that the file now looks like below:
We also need to tell the view controller about the view model. In the ItemTableViewController right after the class declaration, add a global property let viewModel = ItemTableViewModel(). Whenever we need to fetch something from the view model, we will refer to it.
Now that we have that set up, let’s get down to the meat of this.
Add item functionality
This part is implemented in the didTapAdd function found in the ItemTableViewController file right after the configureView function. You will find it in the startup project we downloaded and have been looking at.
This function adds an alert with a text field where a user can input the name of a to-do item. After the user taps ok, the item should be added to the table, and then to the list of to-do items. If this statement is a bit daunting, there is a gif at the beginning of this post that shows how this works.
Can you spot some business logic? Assigning values to the alert and the action is business logic.
Now, we need to take an action to remove the business logic from the view controller. We will create variables in the view model and assign them to the action and alert from there. The view controller should be fed the values by these variables in the form it needs. In this case, it needs strings. The view model is now tasked with supplying the alert controller title, the alert controller message, the actionTitle and the todo title. We therefore add these properties to the class. Add this right below the class declaration in the ItemTableViewModel file.
We now need to assign these where they are needed in the view controller. In the didTapAdd function, change these first few lines from this:
To this, using view model:
Appending the new item to the list is definitely business logic since it updates the list and does not modify the user interface at all.
We need to take an action to remove the business logic from the view controller. So, we move this piece of functionality to the ItemTableViewModel. Right after the declaration of the global variables, we will add this function:
Build and run. Is there a problem? The issue is because the view model does not have access to the list of to-do items.
Remove this list declaration, private var todoList = [ToDoItem](), from the view controller to the view model. When the declaration of the list in the view controller is removed, you get a couple of errors because of how we had referenced the list earlier. Just go ahead and reference the list from the view model in all the places where you get errors.
Earlier on, in the method that returns the number of rows, this was the implementation:
Since the list is only in the view model, we change it to:
The new view model looks like this:
Build and run. Does everything work as expected? The new add function in the view controller is much lighter and only has UI Logic.
Delete item functionality
This function is tasked with removing an item from the list and removing the associated row. I spy with my little eye some business logic. When a row is clicked on and swiped to the left, it is deleted.
The UI logic here is removing the cell since it only interacts with the view.tableView.deleteRows(at: [indexPath], with: .top)
The business logic here is removing the item from the list.todoList.remove(at: indexPath.row)
What solution do we have? We create a function in the view model that will be called whenever the delete is called. Insert this right below the addToDo() function.
The final delete functionality will now look like this in the view controller:
This is the completed version of the view model at this point:
Opportunities for Growth
Following the logic we used to judge whether something is UI or business logic, you will find we still have plenty of business logic in the view controller. Take a shot at moving it over to the view controller. Here is the final MVVM version of the to-do app; the MVVM version is in the Angie/MVVM branch. If you look at the new classes, you will notice the viewController class has not necessarily reduced in size. However, it is much easier to test. If I wanted to test any view logic, I would just test the view model instead of having to mock the views. The view model class is now reusable and is easier to debug.
One of the most common mistakes is having the view model aware of the controller. Say you are working with a table view controller and want to delete the row that has been clicked on. You may be tempted to do it like this:
You may be tempted to have a global variable that can be accessed and modified by the above function. Then you could access it as below.
This is not only bad practice, it is also very ugly. The view model should know nothing of the view controller.
From MVC to MVVM
As you’ve observed, MVVM does make debugging, testing, and reading code easier. It is therefore essential to master different techniques so that you are able to solve different methods. The above is one way of doing MVVM. However, with more complex problems, it would be beneficial to use cocoa pods, such as ReactiveCocoa and RXSwift. These are solutions that are tailored to make MVVM easier to work with.
There is no single architecture that is a one-size-fits-all; each has its use cases where it works best. It is therefore beneficial to be knowledgeable about VIPER, MVVM, and MVC in order to make an informed decision.
To better understand MMVM and binding, you could explore networking. A perfect way to do this is to implement a login system. This can be done by implementing a Firebase database. During fetching and saving data, this is a perfect opportunity to explore the methods we mentioned on binding.
There you have it, you can now move an app from MVC to MVVM.

Related Resources
Twilio Docs
From APIs to SDKs to sample apps
API reference documentation, SDKs, helper libraries, quickstarts, and tutorials for your language and platform.
Resource Center
The latest ebooks, industry reports, and webinars
Learn from customer engagement experts to improve your own communication.
Ahoy
Twilio's developer community hub
Best practices, code samples, and inspiration to build communications and digital engagement experiences.