Chat with any PDF Document using Twilio, OpenAI, and Langchain
Time to read:
November 27, 2023
Written by
Reviewed by
In this tutorial, you will learn how to build a WhatsApp chatbot application that will allow you to upload a PDF document and retrieve information from it. You are going to use a PDF document containing a few waffle recipes, but what you will learn here can be used with any PDF document.
To build this application, you will use The Twilio Programmable Messaging API for responding to WhatsApp messages. You will combine a framework named LangChain and the OpenAI API to process PDFs, create OpenAI embeddings, store the embeddings in a vector store, and select models for answering user queries related to the information contained in the document embeddings.
Embeddings are numeric representations of text, capturing semantic meaning and aiding in various natural language processing tasks. A Vector store is a storage and retrieval structure for vector embeddings, it is commonly used in tasks such as information retrieval and similarity search, enhancing the contextual understanding of textual data by machines.
The Twilio Programmable Messaging API is a service that allows developers to programmatically send and receive SMS, MMS, and WhatsApp messages from their applications.
LangChain is a language model-driven framework for context-aware applications that leverage language models for reasoning and decision-making. It connects models to context sources and facilitates reasoning for dynamic responses and actions.
The OpenAI API is a service that provides access to OpenAI's language models and artificial intelligence capabilities for natural language processing tasks.
By the end of this tutorial, you will have a chatbot that allows you to chat with any PDF document :

Tutorial Requirements:
To follow this tutorial, you will need the following components:
- Node.js (v18.18.1+) and npm installed.
- Ngrok installed and the auth token set.
- A free Twilio account.
- A free Ngrok account.
- An OpenAI account.
- This PDF file stored in a device that has access to a WhatsApp client. This document was originally downloaded from the Breville.com website and contains 4 waffle recipes. (Click on the Download raw file button to download the file)
Setting up the environment
In this section, you will create the project directory, initialize a Node.js application, and install the required packages.
Open a terminal window and navigate to a suitable location for your project. Run the following commands to create the project directory and navigate into it:
Use the following command to create a directory named documents, where the chatbot will store the PDF document that the user wants to retrieve information from:
Run the following command to create a new Node.js project:
Now, use the following command to install the packages needed to build this application:
With the command above you installed the following packages:
twilio: is a package that allows you to interact with the Twilio API. It will be used to send WhatsApp messages to the user.express: is a minimal and flexible Node.js back end web application framework that simplifies the creation of web applications and APIs. It will be used to serve the Twilio WhatsApp chatbot.body-parser: is an express body parsing middleware. It will be used to parse the URL-encoded request bodies sent to the express application.dotenv: is a Node.js package that allows you to load environment variables from a .env file intoprocess.env. It will be used to retrieve the Twilio and Open AI APIs credentials that you will soon store in a .env file.node-fetch: is a Node.js library for making HTTP requests to external resources. It will be used to download the PDF documents sent to the chatbot.langchain: is a LangChain is a framework for context-aware applications that use language models for reasoning and dynamic responses. It will allow an AI model to retrieve information from a document.pdf-parseis a Node.js library for extracting text content and metadata from PDF files. It will be used under the hood by a LangChain module to retrieve the text from the document containing the recipes.hnswlib-nodeis a package that provides Node.js bindings for Hnswlib. HNSWLib is an in-memory vector store that can be saved to a file. It will be used to store the document information in a format suited for AI models.
Collecting and storing your credentials
In this section, you will collect and store your Twilio and OpenAI credentials that will allow you to interact with the Twilio and OpenAI APIs.
Twilio credentials
Open a new browser tab and log in to your Twilio Console. Once you are on your console copy the Account SID and Auth Token, create a new file named .env in your project’s root directory, and store these credentials in it:
OpenAI credentials
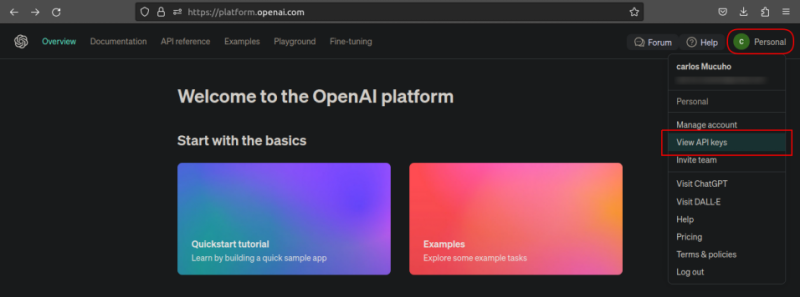
Open a new browser tab and log in to your OpenAI account and when prompted to select a page click on the button that says API. Once you are logged in, click on the button located in the top right corner with the text Personal or Business (depending on your account type) to open a dropdown menu, and then click the View API Keys button in this menu to navigate to the API page.
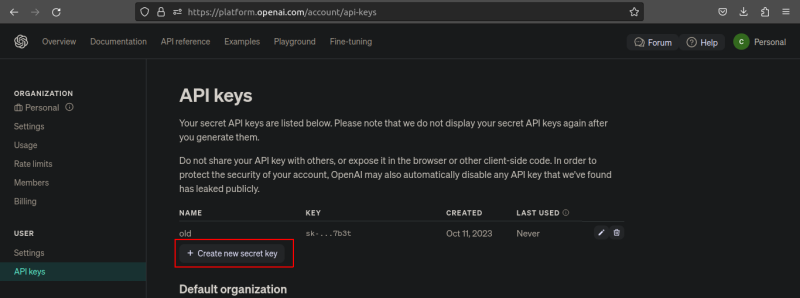
On the API keys page, click the Create new Secret Key button to generate a new API Key.
Once the API key is generated, copy it and store it on the .env file as the value for OPENAI_API_KEY:
Creating the chatbot
In this section, you'll create a WhatsApp chatbot application that can handle user messages, provide responses, and store incoming documents in the documents directory.
In the project’s root directory create a file named server.js and add the following code to it:
The code begins by importing the express, body-parser, twilio, fs, and dotenv packages needed to create and serve a Twilio WhatsApp chatbot capable of receiving and storing documents.
After importing the packages the code sets an Express server, sets up the port to 3000, and configures the json and body-parser middlewares to parse JSON and URL-encoded request bodies.
Add the following code to the bottom of the server.js file:
Here, the Twilio API credentials (TWILIO_ACCOUNT_SID and TWILIO_AUTH_TOKEN) are retrieved from the environment variables and used to create a new Twilio client instance which is then stored in a constant named twilioClient.
Add the following code below the twilioClient constant:
The code above defines a JavaScript function named sendMessage that is responsible for sending a WhatsApp message using the Twilio WhatsApp API.
The function takes as parameters the message that should be sent, and the recipient’s and the sender’s phone number then uses the twilioClient.messages.create() method alongside these parameters to create and send the WhatsApp message. The message SID will be printed to the console if the message is successfully sent.
Add the following code below the sendMessage:
Here, the code defines an asynchronous function named saveDocument that takes in a parameter of a media file URL. This function is responsible for downloading the PDF file from the URL parameter and saving it as document.pdf in the documents directory.
The code begins by dynamically importing the node-fetch module and setting the path where the document will be saved. Next, the code returns a promise where the fetch function is used to download the PDF file, and the fs.createWriteStream(filepath) method is used to save the file in the specified path. If the file is downloaded and stored successfully the function returns true. However, if an error occurs the function returns false.
Add the following code below the saveDocument() function:
The code above defines an asynchronous function named handleIncomingMessage() that takes a request object containing the incoming message as a parameter. This function is responsible for handling incoming messages and formulating responses based on the content of those messages.
First, the code retrieves the incoming message body, stores it in a constant named Body, and then defines a variable named message which gets sent back to the user.
Next, the code checks If the message contains the string "/start" and if that is the case it prompts the user to send the PDF document that the user wants to chat with in the response message and returns the response message.
If the code does not contain the string "/start", the code assumes that the incoming message contains a question and acknowledges the question by repeating it in the response message and returns the response message.
Add the following code below the handleIncomingMessage() :
This code defines an Express.js route that handles incoming HTTP POST requests at the path '/incomingMessage'. This route is responsible for receiving the WhatsApp messages sent by the user, distinguishing between text messages and document uploads, and generating appropriate response messages.
The code begins by retrieving the message recipient, body, and sender from the request body, storing them in the To, Body, and From variables respectively, and then defines a variable named message where it will store the message that will be sent back to the user.
Next, the code checks if the MediaUrl0 property in the request body is undefined, suggesting that the message does not contain a document. If that is the case, the code calls the handleIncomingMessage function, and passes the request object as an argument, to generate a response message. This response message is assigned to the message variable.
Lastly, the code calls the sendMessage function to send the response message back to the user and returns an HTTP status code of 200, indicating that the request was successfully processed.
Take note of how when calling the sendMessage function, the To and From variables switch places since the user who sent the message is now the receiver and the chatbot the sender.
Add the following code inside the else statement:
The code inside the else statement will run if 'MediaUrl0' is defined, indicating that a document is being uploaded. The code begins assigning a Please wait message to the message variable, indicating that the chatbot is processing the document.
Next, the sendMessage() function is called to send the "Please wait" message to the user who uploaded the document. The saveDocument() function is called to download and save the document from the URL provided in 'MediaUrl0'. The boolean value returned is stored in a constant named wasDocumentSaved, indicating whether the document was successfully saved.
If the document was not saved an error message is assigned to the message variable, and the sendMessage() function is called to send the error message. If the document was successfully saved, a Document saved message is assigned to the message variable, and the sendMessage() function is called to send this success message.
After handling the incoming message, the route function ends by returning an HTTP status code of 200, indicating that the request was successfully processed.
Add the following code to the bottom of your server.js file:
Here, the Express server is started using the app.listen() method on the port 3000. When the server starts a message stating that the server is running is printed to the console.
Running the chatbot and making it publicly accessible
In this section, you will run the express application to serve the chatbot, use Ngrok to make the application publicly accessible, and configure the Twilio WhatsApp settings in the Twilio console.
Go back to your terminal and run the following command to start the application:
Open another tab in the terminal and run the following command to expose the application:
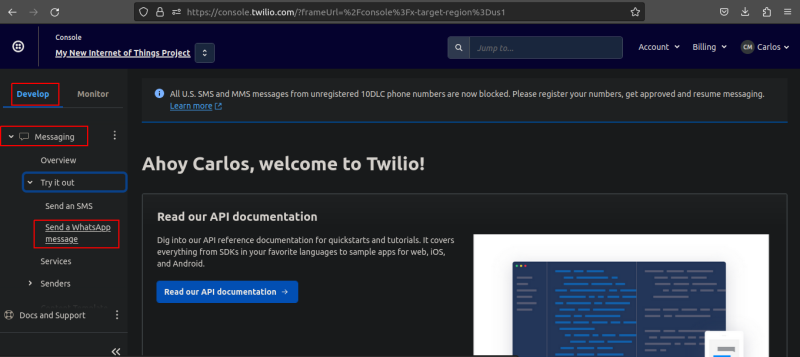
Copy the https Forwarding URL provided by Ngrok. Go back to your Twilio Console main page, Click on the Develop tab button, click on Messaging, click on Try it out, then click on Send a WhatsApp message to navigate to the WhatsApp Sandbox page.
Once you are on the Sandbox page, scroll down and follow the instructions to connect to the Twilio sandbox. The instructions will ask you to send a specific message to a Twilio Sandbox WhatsApp Number.
After following the connect instructions, scroll back up and click on the button with the text Sandbox settings to navigate to the WhatsApp Sandbox settings page. Once on the Sandbox settings, paste the Ngrok https URL in the “When a message comes in” field followed by /incomingMessage, set the method to POST, click on the Save button, and now your WhatsApp bot should be able to receive messages. Ensure your URL looks like the one below:

Open a WhatsApp client, send a message with any text, and the chatbot will send a reply with the text you sent. Send a message with the text /start and the chatbot will prompt you to send a PDF document. Send the PDF document containing the waffle recipes and the chatbot will send a reply stating that the document was saved.
Before moving to the next section, go back to the terminal tab running the application and stop the application.
Generating the embeddings
In this section, you will load the document that you wish the chatbot to understand, generate embeddings for the PDF document, and store the embeddings in a vector store.
In the project’s root directory create a file named embeddingsGenerator.js and add the following code to it:
The code starts by importing the PDFLoader, OpenAIEmbeddings, and the HNSWLib modules from the langchain library. Additionally, the code also imports the dotenv library.
The PDFLoader module will be used to load the PDF document that you want to chat with. The OpenAIEmbeddings module will be used to generate embeddings compatible with OpenAI models. The HNSWLib module will be used alongside the hnswlib-node library to store the embeddings.
The code then stores the OpenAI API key in a constant named OPENAI_API_KEY.
Add the following code below the OPENAI_API_KEY constant:
Here, an async function named generateAndStoreEmbeddings enclosed within a try-catch block was defined. This function is responsible for generating and storing document embeddings.
Inside the function, the code begins by creating a new instance of the PDFLoader class, passing the document.pdf file path as an argument.
It then uses the load() method on the PDFLoader instance to load the specified PDF document. After loading the document, it creates a vector store using the HNSWLib.fromDocuments method. This method creates a vector representation of the document, using the HNSWLib vector store and the OpenAIEmbeddings. The vector store is then saved in a folder named "embeddings" in your project root’s directory for future use.
Lastly, if this entire process is successful a message stating that the embeddings were created is printed to the console and the function returns true. However, If an error occurs the error is printed to the console and the function returns false.
Add the following code below the generateAndStoreEmbeddings() function:
The first line of code above calls the generateAndStoreEmbeddings() function and the second exports this function.
Go back to your terminal and use the following command to run this file:
After executing the command above a folder named embeddings containing the document’s embeddings will be created in your project’s root directory.
Before moving to the next section, comment out the generateAndStoreEmbeddings() function call:
Retrieving information from the document
In this section, you will use the document’s embeddings alongside an OpenAI model to retrieve information.
In the project’s root directory create a file named inference.js and add the following code to it:
The code starts by importing the OpenAI, HNSWLib, OpenAIEmbeddings, and the RetrievalQAChain modules from the langchain library. Additionally, the code also imports the dotenv library. The RetrievalQAChain module It's designed to streamline and simplify the process of building a retrieval-based question-answering system, where answers are retrieved from stored representations of documents or text data.
Next, the code then stores the Open AI API key in a constant named OPENAI_API_KEY. It then creates an instance of the OpenAI model using the OpenAI class from the langchain library. The model is specified with the name gpt-3.5-turbo. This model is designed for natural language processing and generation.
Add the following code below the model constant:
The code defines an async function named ask enclosed within a try-catch block. This function takes a question as an argument and is responsible for performing a question-answering task using the OpenAI model.
Inside this function, the code loads a vector store from the "embeddings" folder. This is the vector store containing the recipe document’s embeddings that were created in the previous section.
Next, it creates a RetrievalQAChain using the OpenAI model and the vector store. This chain is set up to handle the question-answering process. The function then calls the chain.call() method with a question as the query and awaits the result. If this entire process is successful the result is printed to the console and the function returns the value stored in the result's text property. However, if an error occurs the error is printed to the console and the function returns a message stating that the model failed to retrieve the information.
Add the following code below the ask() :
The first line of code above defines a constant named question that holds a string that will be used to ask the model how long it takes to prepare each recipe. The second line calls the ask() function and passes the question as an argument. The third line exports the ask() function.
Go back to your terminal and use the following command to run this file:
After executing the command above you should see the following output:
The output above shows that the model is now able to retrieve information from the recipes document.
Before moving to the next section, comment out the question constant and the ask() function call:
Chat with document
In this section, you will integrate the embeddings generation and query features created in the previous two sections to the chatbot to allow users to retrieve information from a document.
Open the server.js file and add the following code below the twilioClient constant declaration located around line 14:
Here, the code uses destructuring to import the generateAndStoreEmbeddings() and ask() functions from the embeddingsGenerator.js and inference.js files respectively.
Go to the handleIncomingMessage() function located around line 49 and replace the code in the else statement with the following:
The highlighted code calls the ask function to use an AI model to retrieve information from a document and store the value returned in the message variable.
Go to the /incomingMessage route handler located around line 63 and replace the last three lines inside the else statement with the following:
The code added, begins calling the generateAndStoreEmbeddings() function to generate the document embeddings and store them. The boolean value returned is stored in a variable named wasEmbeddingsGenerated, indicating whether the embeddings were generated and stored.
If the embeddings were not generated and stored an error message is assigned to the message variable, and the sendMessage() function is called to send the error message. If the embeddings were successfully generated and stored, a message stating this is assigned to the message variable, and the sendMessage() function is called to send this success message.
After sending the message, the route function ends by returning an HTTP status code of 200, indicating that the request was successfully processed.
Go back to the terminal and run the following command to start the chatbot application:
Return to your Whatsapp client, send a message with the text /start, and the chatbot will prompt you to send a PDF document. Send the PDF document containing the waffle recipes, and the chatbot will send a reply stating that the document embeddings were generated. Send a message containing a question about the PDF document, and the chatbot will send a reply with the desired information
Conclusion
In this tutorial, you learned how to create a WhatsApp chatbot capable of retrieving information from a PDF document containing waffle recipes. You've learned how to leverage the Twilio Programmable Messaging API for message handling, integrate LangChain and the OpenAI API to process PDFs, generate and store document embeddings, and select appropriate models to respond to user queries based on the document's content.
The code for the entire application is available in the following repository https://github.com/CSFM93/twilio-chat-with-document.
Carlos Mucuho is a Mozambican geologist turned developer who enjoys using programming to bring ideas into reality. https://twitter.com/CarlosMucuho
Related Resources
Twilio Docs
From APIs to SDKs to sample apps
API reference documentation, SDKs, helper libraries, quickstarts, and tutorials for your language and platform.
Resource Center
The latest ebooks, industry reports, and webinars
Learn from customer engagement experts to improve your own communication.
Ahoy
Twilio's developer community hub
Best practices, code samples, and inspiration to build communications and digital engagement experiences.