Build a Multi-Room Web Chat Application with Flask, React and Twilio Conversations
Time to read: 21 minutes
November 17, 2020
Written by
Reviewed by

The Twilio Conversations API is a great way to build a unified messaging solution that works across SMS, MMS, WhatsApp, web and mobile chat. In this tutorial you will learn the basics of the Conversations API by creating a web chat application with support for multiple chat rooms.
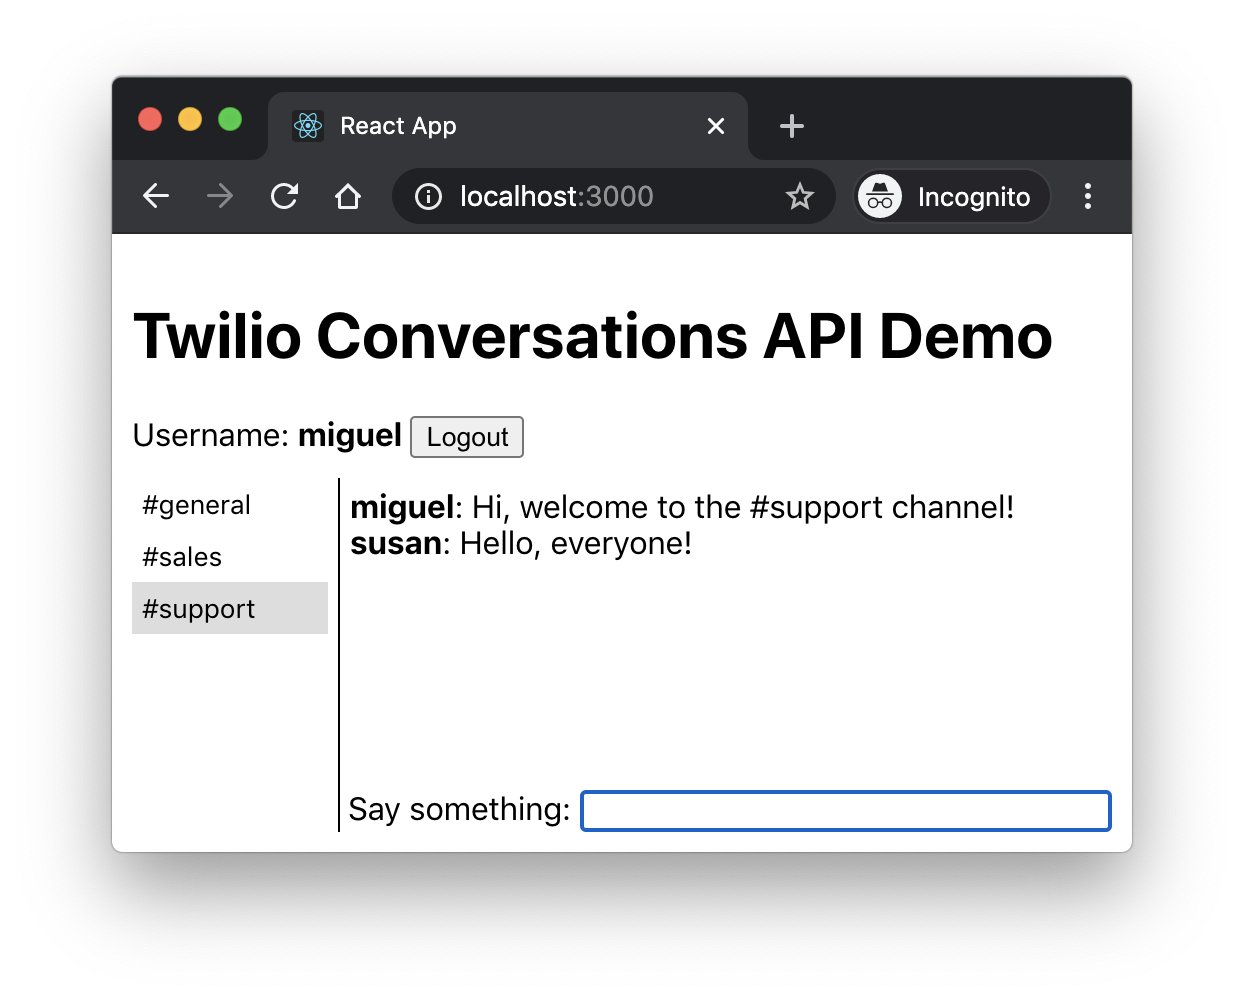
The main features of the application we will build are:
- A Flask backend that logs users in.
- A command-line interface to manage your chat rooms.
- A Rect front end that allows your users to chat on the different chat rooms.
Requirements
To follow this tutorial you need the following components:
- Python 3.6 or newer. If your operating system does not provide a Python interpreter, you can go to python.org to download an installer.
- Node.js 14 or newer. Review the installation instructions for your operating system.
- The Yarn package manager for Node.js. Review the installation instructions for your operating system.
- A Twilio account. If you are new to Twilio create a free account now!
- Some basic knowledge of Flask and React, the two frameworks that we will use for the back and front ends respectively.
Project structure
Since this project uses front and back ends, we will create a hybrid project structure that includes both together. What I have found to be the easiest way to combine a React front end and a Flask back end is to create the React project first, and then create the back end in a subdirectory.
In case you are interested, I have written an article on how to combine React and Flask projects where the techniques we are going to use here are explained in detail.
If you prefer to download the project instead of building it step-by-step, the complete code for the application is available on GitHub.
Front end configuration
Let’s begin by creating the React project. For this we are going to use the create-react-app tool. Open a terminal window and enter the following command:
This command will create a flask-react-twilio-chat directory and populate with a starter React application.
Change into the project directory and install all the JavaScript dependencies required by the React project:
For this project we will also need the Twilio Conversations client library, so let’s get that installed as well:
Back end configuration
As mentioned above, the Python back end is going to live in a subdirectory inside the React project. We will simply call it api:
The Python back end will have its dependencies installed in a virtual environment, so let’s create it now:
The Python virtual environment has a copy of pip, the Python package installer. We will next use the installer to bring in the Python dependencies for the project. If you are following the tutorial on a Mac OS or Unix computer, run the installer as follows:
If you are following the tutorial on Windows, install the Python packages with the following command:
The three Python packages that we have installed are:
- The Flask web framework.
- The Twilio Python Helper library, to work with the Twilio APIs.
- The dotenv package, to import configuration variables from environment files.
Twilio account set up
Before we begin to code we are going to log in to the Twilio Console and set everything up for this project.
Add a conversation service
The Conversations API uses a “service” to describe a configuration that is specific to a project. In this section we are going to create a new service for our chat application.
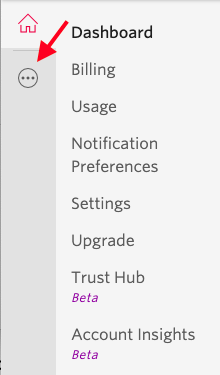
Click the “All Products & Services” link in the left navigation menu, and then select Conversations from the product list.
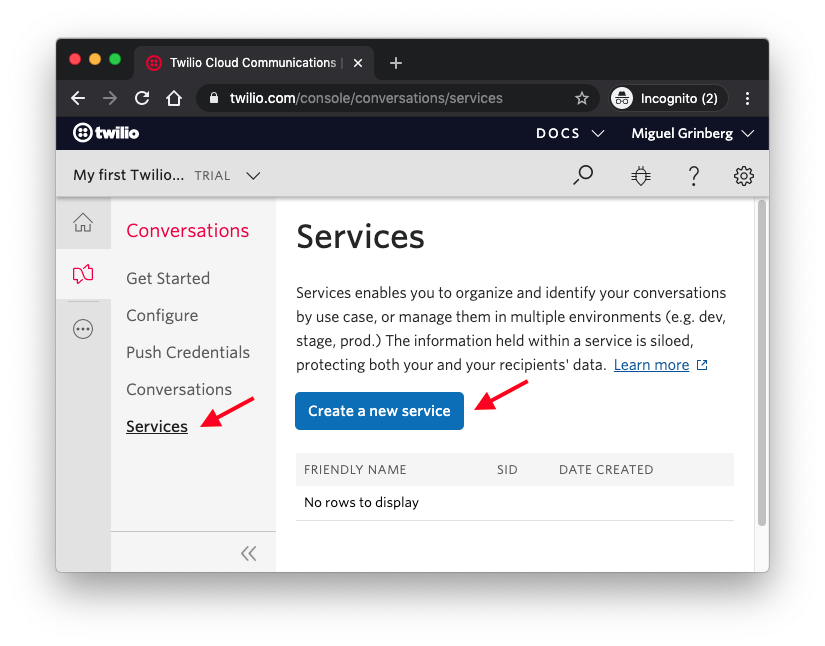
In the main Conversations dashboard, select “Services” and then click the “Create new service” button.
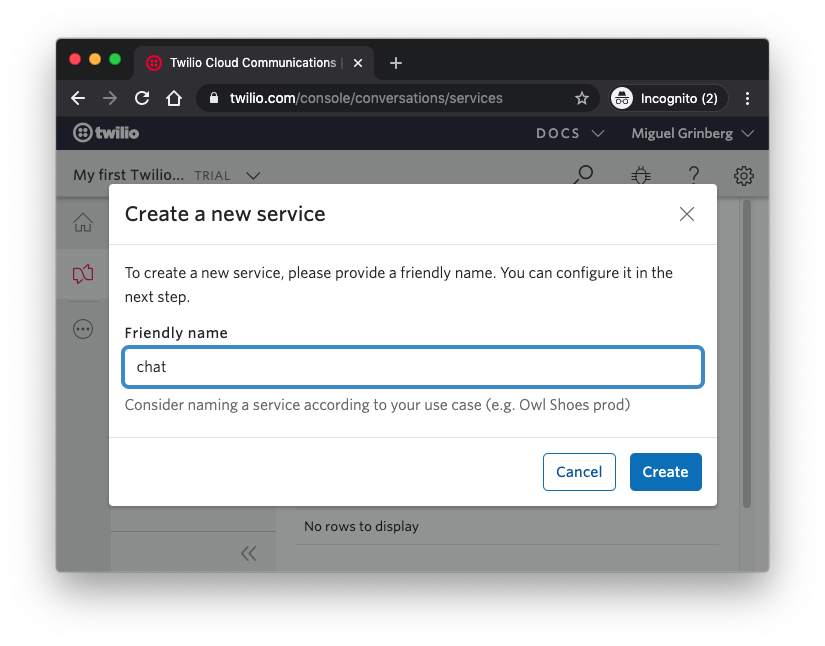
Enter a service name such as chat and click the “Create” button.
Add a participant role
The Conversations API uses a fairly sophisticated system of roles to determine what capabilities each user has access to. You can check out the default roles that have been defined in the new service you just created by clicking the “Roles and Permissions” menu option. If you don’t see this option in the menu, then you do not have the new service selected. In that case click on “Services” and select the “chat” service first.
You will find four predefined roles. The “Type” column shows that there are two possible role types: “service” and “conversation”. Service roles are assigned to users when they log in to a Conversations service. Conversation roles are assigned when the user joins a particular conversation, which is an individual chat instance or chat room. An active user will be assigned a service role, plus a conversation role for each conversation it participates in.
Click on the roles to see what capabilities they have. The “service user” and “channel user” roles are the defaults.
One aspect of the role defaults that I find inconvenient for this project is that the service user role has the ability to create chat rooms via the “createConversation” permission. In this application the chat room list is going to be managed by the server, so it would be beneficial to prevent clients from creating their own.
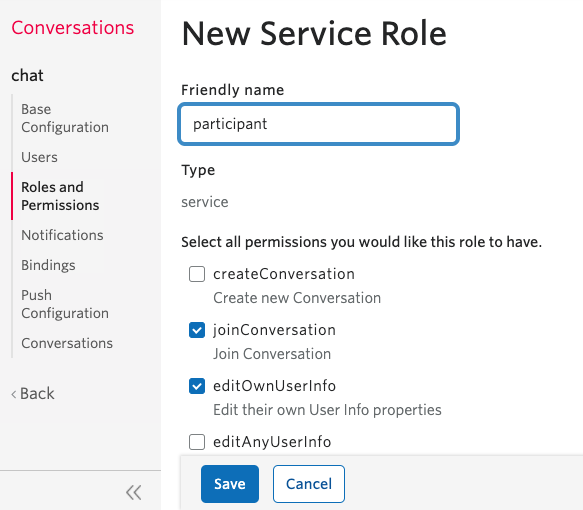
Let’s create a new service role that is more appropriate. Click the “New Service Role” button and add a new role with the name participant. Check only the “joinConversation” and “editOwnUserInfo” permissions. Click “Save” to add this new role.
We will assign this role to users programmatically as they log in to the system.
Configure the default Conversations service
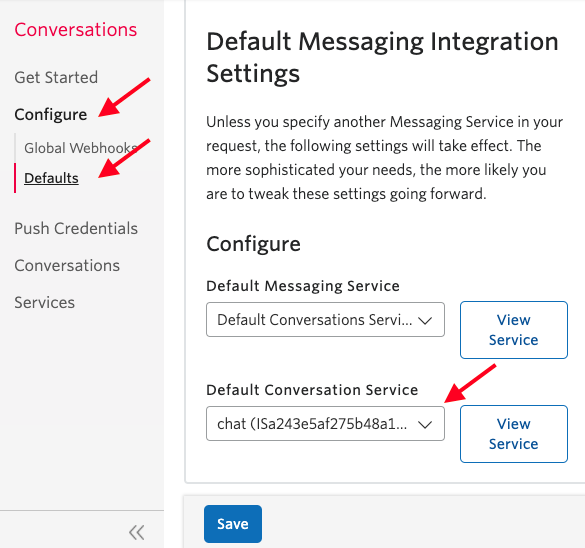
To simplify the creation of chat rooms, we are going to complete the configuration by setting the chat service as the default. Go back to the main Conversations dashboard (click “Back” if you are still viewing the service configuration) and then click “Configure” followed by “Defaults”. In the “Default Conversation Service” dropdown, select the chat service and then click “Save”.
Obtain your account credentials
Go back to the top-level dashboard of the Console. Here you will see the “Account SID” and “Auth Token” assigned to your account. These values are important, as they identify your account when making requests to the Twilio API.
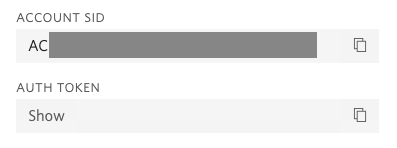
Because we are going to need these values to authenticate, we are going to use the “Copy to Clipboard” buttons on the right side of each code to transfer them to a configuration file.
Open a new file named .env (note the leading dot) in the api directory and write the following contents to it, carefully pasting the Account SID and Auth Token where indicated:
Once again, make sure this .env file is located in the api directory, as it is the Python back end that needs it.
Create an API key
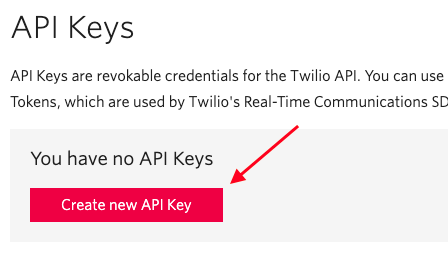
The Conversations client library uses a Twilio API Key for authentication, so in this step we will create one. Navigate to the API Keys section of the Twilio Console under the Settings menu to do this.
If you’ve never created an API Key before, you will see a “Create new API Key” button. If you already have one or more API Keys created, you will instead see a red “+” button to add one more. Either way, click to create a new API Key.
Enter chat as the name of the key (or any name you like), leave the key type as “Standard” and then click the “Create API Key” button.
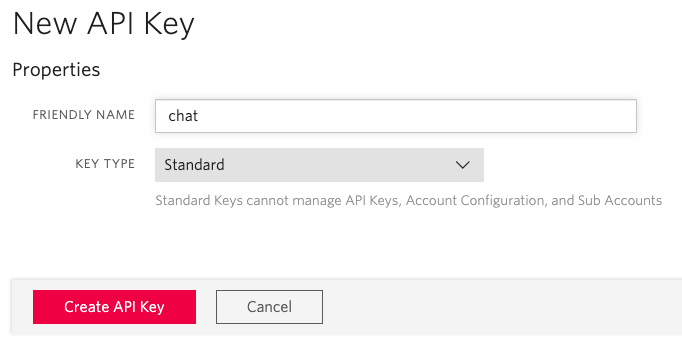
Now you will be presented with the details of your newly created API Key. The “SID” and “SECRET” values are used in the authentication mechanism, so they need to be added to the .env file we created above.
Open the api/.env file again in your text editor, and add two more lines to it to record the details of your API key:
Once you have your API key safely written to the .env file you can leave the API Keys page. Note that this page is only shown once so if you ever lose your API key secret you will need to generate a new key.
The information contained in your .env file is private. Make sure you don’t share this file with anyone. If you plan on storing your project under source control it would be a good idea to configure this file so that it is ignored, because you do not want to ever commit this file by mistake.
Chat back end
The Python back end is going to be in charge of the administration of the chat server, and will implement two main aspects of our project:
- Manage the list of chat rooms available to users.
- Authenticate users as they log in using the front end application.
Because our back end is going to be fairly short, we can implement it all in a single Python file. We’ll call this file app.py and will put it in the api directory. Below you can see the start of the api/app.py file, which includes the imports and the Flask application instance:
This first portion of the back end application imports all the symbols that we will need. It then calls the load_dotenv() function from the python-dotenv package. This function will read the four configuration variables stored in the .env file and add them to the environment.
The twilio_client variable is initialized with the Client class from the Twilio library. This object encapsulates all the Twilio API functions. We do not pass any arguments to the constructor, but keep in mind that the client object uses the TWILIO_ACCOUNT_SID and TWILIO_AUTH_TOKEN variables that we imported from the .env file to authenticate all requests.
The last line creates the Flask application instance, which is the main entry point to the back end service.
List chat rooms
For this application we are going to manage the list of chat rooms from the command line. The Flask framework provides a nice integration with the command line through the flask command, so we will create a series of custom commands for it.
To keep things well organized, all the commands that manage chat rooms are going to be issued with the format flask chatrooms <sub-command> <arguments>. Below is the implementation of the chatrooms group, plus the list sub-command, which shows a list of all the chat rooms that are defined. Add the following code at the bottom of api/app.py:
The AppGroup class is used by Flask to define a command group, from which a number of sub-commands can be derived. The group is added to the app application instance so that it is incorporated into the flask command.
The list() function implements the list command. The @chatrooms_cli.command() decorator adds it to the chatrooms group, along with its help message.
The function gets the list of conversations (which we call chat rooms in this application) and prints them. For each conversation the name and the sid identifier are printed.
The twilio_client.conversations.conversations expression may look odd, so it deserves an explanation. The twilio_client.conversations is a reference to the Conversations API client object. This object exposes a number of different resources, such as participants, roles, and conversations. The second instance of the term conversations in the above expression indicates that we are going to issue a request that relates specifically to conversation resources.
At this point we do not have any chat rooms defined in the system, but nevertheless, we can try the command to make sure that everything is working so far and that there are no errors.
Change to the api directory, and activate the Python virtual environment:
Now you can use the flask command. Let’s start by getting the help information:
This should give you a few lines with information about how to run the Flask project. At the bottom you will have a section listing all the command groups that are available, and here you should see chatrooms in addition to the default Flask groups:
You can also try to get specific help information on the chatrooms command:
Try running the list command. Here you should not see any output, since we haven’t created any chat rooms yet.
Create chat rooms
We can add a second sub-command named create. Add the following code at the bottom of app.py:
The create() function takes a name argument, which is the “friendly name” of the new conversation resource.
The function starts by looping through all the existing conversations, which we get using the same list() method we used in the list sub-command. If we find a conversation with the requested name then we print an error message and exit, since we want the names of all the chat rooms to be unique.
If the name is new, then once again we use the conversations resource of the conversations product of the Twilio client library. However, this time the create() method to request a new conversation to be created with the given name.
Using the same terminal session you used above, confirm that the flask chatrooms --help command now shows both list and create as sub-commands. Then create two or three chat rooms:
Note that I have enclosed the chat room names in double quotes because the # character is interpreted as the start of comments in Unix-based shells. There is no need to use a # prefix in the chat room name, I’m doing it just because it is standard in many messaging applications such as Slack and Discord.
Delete a chat room
The last chat room management sub-command is delete. Below you can see the implementation, which you can also append to the app.py file:
This function also iterates over the list of conversations until it finds the one referenced by the name argument. Once the conversation is found, the delete() method is used to remove it from the system.
Feel free to play with the three chat room sub-commands until you have two or three channels that you will use for the rest of the tutorial.
User access
The last function of the back end that we need to implement is the ability to log users into the system when they connect from the front end. This is going to be implemented with a Flask HTTP endpoint that clients can send a request to when the user is logging in.
The login endpoint is longer and more complex than the functions we have seen so far, so we’ll go over it in a few steps. Below you can see the general structure of this endpoint. Add this code to the bottom of app.py:
In this version there are a few sections that are omitted so that the structure of the function is more clear and easier to understand.
The @app.route line defines the function as a Flask route attached to the /login URL and with the POST HTTP method. This is the URL and method that clients will use when sending their login requests.
In the first line of the function we extract the JSON body from the Flask request object as a dictionary. The data that the client needs to send for this application is extremely simple, just a username key. To prevent unneeded complexity in this example, we are not going to manage passwords, but in a real-world application you will definitely need to also have clients send their passwords as well.
If the client fails to provide a username, then the route ends with a 401 error, which is the HTTP status code for unauthorized access. This would also be the status code returned when password verification fails.
What follows are the three steps that are required to give the user access into the chat:
- Create a user resource (only if it does not exist yet).
- Add the user to all the chat rooms.
- Generate an access token that the front end can use to make calls to the Conversations API.
Once these tasks are completed, the endpoint returns a dictionary that includes the list of chat rooms obtained in step 2, and the access token obtained in step 3. The returned dictionary will be converted to JSON format by Flask.
We’ll now review the three login tasks one by one.
Create a new user
Once we received the username from the client, we can create a user with that name. We will also give the user the participant role that we created earlier, which is more restricted than the service user role that Twilio assigns by default to new users.
Here is the code for this section of the endpoint. Insert it in the proper place in the login() function:
We first use the roles.list() method to iterate over all the roles until we find one with the name participant. Then we save the sid identifier for this role.
Next we use the users.create() method to create the user. The identity argument needs to be a unique identifier for the user. It is sufficient to use the username for this application, but if the application needs to accept duplicate usernames, then using a database identifier for the user would be a better choice. In that case the username could be stored in the optional friendly_name attribute. The role_sid argument sets the service role for the user to our restricted participant role.
What would happen when a user logs in to the system a second time? The users.create() call in that case would fail, because the identity argument would be set with a user that already exists in the system. In this situation the call will raise a TwilioRestException with a status code set to 409, which is the HTTP status code for “Conflict”. We catch this exception and suppress it, making sure we raise any other exceptions again so that they bubble up.
Add users to conversations
The Twilio Conversations API uses a fairly sophisticated user access model, where users may join or leave each of the conversations defined in the service. In a chat application such as Slack this would be the equivalent of joining or leaving a channel.
In this application we are going to automatically add users to all the chat rooms, so that they can switch between them from the front end application. The code that performs this is shown below. Insert it in the proper place in the login() function defined above.
The conversations.list() method is used to get the list of all the conversations, and then for each one we invoke the participants.create() method with the user’s unique identity name. This effectively causes the user to be added to the chat room.
If the user was already added, then in the same way as before, the Conversations API will raise a 409 exception, which we suppress.
NOTE: While this application does not have a “leave chat room” functionality, the participants.delete() method can be used to perform this function.
Generate access tokens
The third log in step is the most interesting. In the back end, we are authenticating to access the Conversations API with the Twilio Account SID and Auth Token values stored in the .env file. The front end application will also need to make calls into the API, but because the web browser is not as secure as a server, we cannot expose our credentials, as they could be compromised.
The solution that many of the Twilio APIs with a client-side component use is to have the server generate an access token for the client to use. The benefit of authenticating with a token is that tokens are configured to give access to very specific parts of the API. Tokens also eventually expire and cannot be used anymore.
Below you can see the logic that creates an access token. Add this code in the correct place within the login() function.
The access token uses the API key that we created earlier in the Twilio Console. API keys are used in the token generation and make tokens secure. To generate a token we use the Twilio Account SID, the API key’s SID and Secret values and the user’s identity.
A token by itself does not give access to any services. The add_grant method is used to add capabilities to the token. For this application we use the “chat” grant. The service_sid argument is the Conversations service we are granting access to. Since we are using a default Conversations service, we obtain the service_sid value from the chat_service_sid attribute of one of our conversations, which we retrieved in the previous section of the login() function.
Generate a response
The last part of the login() function is to return a response to the client. The response includes the list of chat rooms (which the front end will display in a left sidebar) and the access token that the client can use to send requests to the Twilio Conversations API.
Below is the response logic. Add it to the login() function to complete it.
The chatrooms key in the response is going to be a list where each element is itself a two-element list containing the name and sid for the chat room. Here is an example response from this endpoint:
Run the server
To complete the server, we are going to add a configuration file that tells Flask some details about our application. Add a .flaskenv file in the api directory with the following contents:
The FLASK_APP variable tells Flask where our application is located. The FLASK_ENV variable tells Flask we want to run in development or debug mode.
Congratulations, the back end portion of the project is now complete!
To start the back end we have a couple of options. If you are in the api subdirectory and have the Python virtual environment activated, you can run the application by typing the flask run command:
You will not get a prompt back, since the server will now be active and waiting for client requests. When running in development mode Flask will monitor the source files and when it detects changes automatically restarts and reloads, so that the changes are incorporated. So you can leave this terminal session running and if you need to make any changes to the code the server will automatically update.
I find having to cd into the api directory just to start the Python server somewhat inconvenient, especially because we now have to move on to the front end, for which we’ll need to be back at the top-level directory of the project.
If you are using Mac OS or Unix, there is a small improvement you can make. When working with a combined Flask and React project I prefer to incorporate all the command management into the React command-line. Go back to the main project directory and open the package.json file. Locate the “scripts” section and add two new commands called start-api and chatrooms to it:
The start-api command does exactly what we did above to start the server, which is to change into the api subdirectory and then execute flask run. A nice trick is to use the path to the flask command inside the virtual environment to avoid needing to activate it.
If you have a Flask server running from before, stop it by pressing Ctrl-C, and then run yarn start-api from the top-level directory to start it again:
The chatrooms command gives access to the three chat room management sub-commands also from yarn, without having to move into the api directory or activate the virtual environment. For example, you can get the list of chat rooms with the following command:
Since we are working on the package.json file, let’s make another change that is going to make our lives easier when we start integrating the front and back ends. At the bottom of the file, right before the final }, add a comma after the last element, and then insert a proxy key:
The proxy configuration is important because it will allow the front end to send requests to the API through its own web server, which will now act as a proxy and forward these requests to the Flask server.
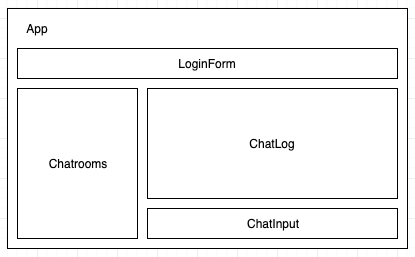
Multi-Room chat front end
With the back end project completed, it is now time to move to the React front end. The diagram below shows the five components that this application defines.
Run the front end project
Before we begin coding the front end, it is a good idea to start it, since like the back end it is also designed to automatically update when code changes are made.
Assuming you left your first terminal window running the back end, open a second terminal and start the front end by running the yarn start command. After a few seconds, a web browser should open with the default React starter application:
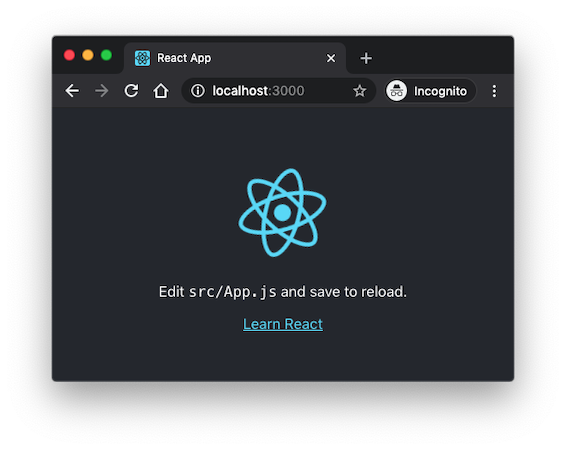
Leave the two terminals running while we move on to code the front end application.
Application and state
The top-level application component is implemented in two files that you can download below:
Download and copy these files to your src directory, replacing the files of the same name that were installed by the create-react-app script.
The component creates a React context that keeps track of the application state. The attributes of this context, which is stored in a variable called chatData are:
user: the user object, which includesapi,usernameandchatroomsattributes.selectedChatroom: the currently selected chat room from the left sidebar. This is the actual Conversation object from the Twilio Conversations library.login(username): a function that logs the user in.logout(): a function that logs the user out.selectChatroom(sid): a function that selects a chat room, given its conversationsid.
The basic page layout returned by this component closely matches the diagram shown above. Here is the JSX definition from the App.js file:
The ChatContext object is what sub-components will be able to access if they need to use the context, either to get information from it or to change the state of the application by calling one of the functions.
Note how the ChatRooms, ChatLog and ChatInput components are all conditional, depending on the existence of a logged in user, which is detected by checking the user.username attribute in the application context.
The login() function exposed by the context has some interesting features, as it needs to first call the Flask server’s /login endpoint to get the list of chat rooms and the access token, and then use the token to authenticate with Twilio to get an API client.
The complete login logic is shown below:
The first request is issued with the fetch() function and goes to the Flask server’s /login endpoint. The body of the request is a JSON payload with the username key, which is exactly what the back end expects.
Once this request returns, the JSON payload is decoded and then the Conversations.create() function is used to initialize the Twilio Conversations Client object with the provided access token.
If both requests succeed, the application context is updated to have the api attribute set to the Conversations client instance, username set to the username entered by the user, and chatrooms set to the list of chat rooms returned by the server.
Login form
The login portion of the application is implemented in the LoginForm.js file. As before, download and copy these files to your src directory.
This component has two different presentations. When there is no user logged in, it presents itself as a login form:

But once the user logs in, it changes to allow the user to log out:

Which version to use is determined by the chatData.user.username value coming from the application state.
To carry out a login action, the component simply calls the context’s login() function with the value of the username field as an argument:
The component also includes simple error reporting feature using the error state variable, which adds a message to the form when set:

Chat room sidebar
The left sidebar of the application shows the list of available chat rooms. The component is implemented in two files that you can download and add to your project:
- ChatRooms.js: the sidebar component.
- ChatRoom.css: the styles for the sidebar.
This is a fairly standard React component that loops through the chat rooms that were returned by the back end and adds them as <button> elements. For each button, the id attribute is set to the conversation_sid value that identifies the chat room.
When a button is clicked, an onClick handler calls the chatData.selectChatroom() exposed by the application context passing the sid as argument.
Chat log
The chat log for the selected chat room is shown by the ChatLog component. The component is implemented in two source files that you can download and add to the project's src folder:
- ChatLog.js: the chat log component.
- ChatLog.css: the styles for the chat log.
The JSX content in this component is generated by iterating over a messages state variable and rendering each message with the format <b>user</b>: message. An empty <div ref=”bottom”> element is added after the messages, and then every time the messages state changes an effect function ensures the bottom div is visible, effectively causing the log to scroll up as new messages are added:
A second effect function that is dependent on the selectedChatroom variable coming from the application context is used to update the messages list when the selected chat room changes, and when a new message is added to the current chat room:
This function will be triggered when chatData.selectedChatroom changes. The function uses the getMessages() method from the Conversations API to get the last page's worth of messages, and then assigns them to the messages state variable, which will cause the messages to be rendered.
To ensure that new messages are also rendered when they arrive, the function then adds an event handler for the messageAdded event from the Conversations API. The return value of the effect function performs clean up by removing the event handler.
The messageAdded() function is the event handler that the Twilio client library will invoke when a new message is added to the conversation. The function updates the messages state with the new message, but note how it does it with a function so that the messages that are already rendered are preserved.
Chat message input
The last component is the input form where users can enter their messages. This component also has two source files that you have to download and copy into the project's src folder:
- ChatInput.js: the chat input form definition.
- ChatInput.css: the styles for the chat input form.
This component has a text input field where the user can enter a message. When the Enter key is pressed, it uses the chatData.selectedChatroom from the context to submit the message with the sendMessage() method:
What’s next?
For your reference, the complete code for this tutorial is available on GitHub.
If you reached this point, you should have the back and front end projects running, and the application should be accessible when you navigate to http://localhost:3000 in your web browser. You should now be able to open multiple browser tabs or windows and connect multiple times as different users to test the chat functionality.
But this is not the end! This goal of this project was to help you familiarize yourself with the Twilio Conversations API, but there are many ways in which you can extend this project. To name just a few:
- Add a right sidebar that shows the list of users who are part of the selected chat room.
- Add client-side event handlers for the
conversationAdded,conversationUpdatedandconversationRemovedevents to update the chat room list as changes occur. - Allow users to join and leave chat rooms.
- Use the
typing()method of the Conversation object to provide typing hints, and then handle thetypingStartedandtypingEndedevents to show typing indicators for users. - Allow non-chat participants (such as SMS or WhatsApp clients) to join chat rooms.
- Implement private messages by creating new conversations on-the-fly conversations that only a specific subset of the users can access.
I hope you learned something new by following this tutorial. I would love to see what Conversations projects you build!
Miguel Grinberg is a Python Developer for Technical Content at Twilio. Reach out to him at mgrinberg [at] twilio [dot] com if you have a cool Python project you’d like to share on this blog!

Related Resources
Twilio Docs
From APIs to SDKs to sample apps
API reference documentation, SDKs, helper libraries, quickstarts, and tutorials for your language and platform.
Resource Center
The latest ebooks, industry reports, and webinars
Learn from customer engagement experts to improve your own communication.
Ahoy
Twilio's developer community hub
Best practices, code samples, and inspiration to build communications and digital engagement experiences.