Detect Objects in a Serverless Twilio Video App with TensorFlow.js

November 16, 2021
Written by
Reviewed by

header-tf-obj-det

This article is for reference only. We're not onboarding new customers to Programmable Video. Existing customers can continue to use the product until December 5, 2024.


We recommend migrating your application to the API provided by our preferred video partner, Zoom. We've prepared this migration guide to assist you in minimizing any service disruption.


Object detection is a computer vision technique for locating instances of objects in media such as images or videos. This machine learning (ML) method can be applied to many areas of computer vision, like image retrieval, security, surveillance, automated vehicle systems and machine inspection. Read on to learn how to detect objects in a Twilio Programmable Video application using TensorFlow.js.

object detection gif

Setup

To build a Twilio Programmable Video application, we will need:

Download this GitHub repo and then create a file named .env in the top-level directory with the following contents, replacing the XXXXX placeholders with the values that apply to your account and API Key:

TWILIO_ACCOUNT_SID=XXXXX
TWILIO_API_KEY=XXXXX
TWILIO_API_SECRET=XXXXX

If you'd like to better understand Twilio Programmable Video in JavaScript, follow this post to get setup with a starter Twilio Video app.

In assets/video.html on lines 20-22, import TensorFlow.js and the coco-ssd model to detect "objects defined in the COCO dataset, which is a large-scale object detection, segmentation, and captioning dataset." It can detect 80 classes of objects. (SSD stands for Single Shot MultiBox Detection, kind-of like how YOLO stands for You Only Look Once). Read more about the model here on Google CodeLabs.

 <!-- Load TensorFlow.js. This is required to use coco-ssd model. -->
  <script src="https://cdn.jsdelivr.net/npm/@tensorflow/tfjs"> </script>
  <!-- Load the coco-ssd model. -->
  <script src="https://cdn.jsdelivr.net/npm/@tensorflow-models/coco-ssd"> </script>

Then in the same file add a canvas element with in-line styling above the video tag within the room-controls div.


<canvas id="canvas" style="position:absolute;"></canvas>
<video id="video" autoplay muted="true" width="320" height="240"></video>

The complete assets/video.html file looks like this:


<!DOCTYPE html>
<html>
  <head>
    <meta charset="utf-8">
    <meta http-equiv="X-UA-Compatible">
    <meta name="viewport" content="width=device-width, initial-scale=1">
    <title>Twilio Video Serverless Demo</title>
</head>
  <body>
    <div id="room-controls">
      <canvas id="canvas" style="position:absolute;"></canvas>
      <video id="video" autoplay muted="true" width="320" height="240"></video>
      <button id="button-join">Join Room</button>
      <button id="button-leave" disabled>Leave Room</button>
    </div>

  <script src="//media.twiliocdn.com/sdk/js/video/releases/2.3.0/twilio-video.min.js"></script>
  <script src="https://unpkg.com/axios@0.19.0/dist/axios.min.js"></script>
  <!-- Load TensorFlow.js. This is required to use coco-ssd model. -->
  <script src="https://cdn.jsdelivr.net/npm/@tensorflow/tfjs"> </script>
  <!-- Load the coco-ssd model. -->
  <script src="https://cdn.jsdelivr.net/npm/@tensorflow-models/coco-ssd"> </script>
  <script src="index.js"></script>
  </body>
</html>

Now it's time to write some TensorFlow.js code!

Object Detection with TensorFlow.js

Now we will detect objects in our video feed. Let's make an estimate function to estimate objects detected and their locations, and to load the coco-ssd ML model.

We will call the model's detect method on the video feed from the Twilio Video application, which returns a promise that resolves to an array of predictions about what the objects are. The results look something like this:

bounding box info returned
 

In assets/index.js beneath const video = document.getElementById("video");, make an estimate function to load the model, get the predictions, and pass those predictions to another function we will soon make called renderPredictions. The renderPredictions function will display the predictions along with a bounding box on the video canvas. We also call requestAnimationFrame to smooth out the rendering of the predictions.

const estimate = () => {
    cocoSsd.load().then(model => {
        // detect objects in the video feed
        model.detect(video).then(predictions => {
            renderPredictions(predictions);
            requestAnimationFrame(estimate);
            console.log('Predictions: ', predictions);
        });
    });
}

Display Predictions on the Video Canvas

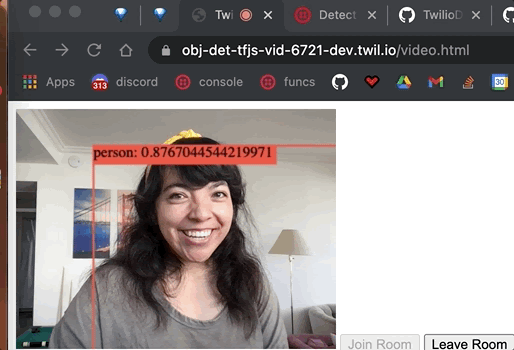
We have detected objects from the video feed, including the coordinates of the objects detected. Now let's display a bounding box around them and write the object and confidence score on top of the bounding box.

We grab the canvas element, set the width and height, and make the ctx variable for the canvas element's context (which is where the drawing will be rendered). We call clearRect on where the drawing will be rendered to erase the pixels in a rectangular shape by making them transparent. We customize the font for which the text will display the predictions  and then loop through all the predictions. The first element in the bbox object is the x coordinate, the second element is the y coordinate, the third is the width, and the fourth is the height. With those variables, we draw a bounding box and customize the lines that will draw it.

We make the strToShow variable to display the prediction class (object detected) and the prediction confidence score.

const renderPredictions = predictions => {
    const canvas = document.getElementById("canvas");
    canvas.width = video.width;
    canvas.height = video.height;
    const ctx = canvas.getContext("2d");
    ctx.clearRect(0, 0, ctx.canvas.width, ctx.canvas.height);
    // customize font
    const font = "15px serif";
    ctx.font = font;
    ctx.textBaseline = "top";
    predictions.forEach(prediction => {
      const x = prediction.bbox[0];
      const y = prediction.bbox[1];
      const w = prediction.bbox[2];
      const h = prediction.bbox[3];
      // draw bounding box
      ctx.strokeStyle = "tomato";
      ctx.lineWidth = 2;
      ctx.strokeRect(x, y, w, h);
      // draw label bg
      ctx.fillStyle = "tomato";
      const strToShow = `${prediction.class}: ${prediction.score}`
      const textW = ctx.measureText(strToShow).width;
      const textH = parseInt(font, 10); // base 10
      ctx.fillRect(x, y, textW + 4, textH + 4);
      //text on top
      ctx.fillStyle = "#000000";
      ctx.fillText(strToShow, x, y);
    });
  };

All we need to do now is call the estimate function: this can be done when the user connects to the room with estimate(video); above joinRoomButton.disabled = true;.

The complete assets/index.js code should look like this:

(() => {
  'use strict';
  const TWILIO_DOMAIN = location.host; //unique to user, will be website to visit for video app
  const ROOM_NAME = 'tfjs';
  const Video = Twilio.Video;
  let videoRoom, localStream;
  const video = document.getElementById("video");
 
  // preview screen
  navigator.mediaDevices.getUserMedia({video: true, audio: true})
  .then(vid => {
      video.srcObject = vid;
      localStream = vid;
  });
      
  // buttons
  const joinRoomButton = document.getElementById("button-join");
  const leaveRoomButton = document.getElementById("button-leave");
  var site = `https://${TWILIO_DOMAIN}/video-token`;
  console.log(`site ${site}`);
  joinRoomButton.onclick = () => {
    // get access token
    axios.get(`https://${TWILIO_DOMAIN}/video-token`).then(async (body) => {
      const token = body.data.token;
      console.log(token);
      //connect to room
      Video.connect(token, { name: ROOM_NAME }).then((room) => {
        console.log(`Connected to Room ${room.name}`);
        videoRoom = room;

        room.participants.forEach(participantConnected);
        room.on("participantConnected", participantConnected);

        room.on("participantDisconnected", participantDisconnected);
        room.once("disconnected", (error) =>
          room.participants.forEach(participantDisconnected)
        );
        estimate(video);
        joinRoomButton.disabled = true;
        leaveRoomButton.disabled = false;
      });
    });
  };
  // leave room
  leaveRoomButton.onclick = () => {
    videoRoom.disconnect();
    console.log(`Disconnected from Room ${videoRoom.name}`);
    joinRoomButton.disabled = false;
    leaveRoomButton.disabled = true;
  };
})();

const estimate = () => {
  cocoSsd.load().then(model => {
      // detect objects in the video feed
      model.detect(video).then(predictions => {
          renderPredictions(predictions);
          requestAnimationFrame(estimate);
          console.log('Predictions: ', predictions);
      });
  });
}

const renderPredictions = predictions => {
  const canvas = document.getElementById("canvas");
  canvas.width = video.width;
  canvas.height = video.height;
  const ctx = canvas.getContext("2d");
  ctx.clearRect(0, 0, ctx.canvas.width, ctx.canvas.height);
  // customize font
  const font = "15px serif";
  ctx.font = font;
  ctx.textBaseline = "top";
  predictions.forEach(prediction => {
    const x = prediction.bbox[0];
    const y = prediction.bbox[1];
    const w = prediction.bbox[2];
    const h = prediction.bbox[3];
    // draw bounding box
    ctx.strokeStyle = "tomato";
    ctx.lineWidth = 2;
    ctx.strokeRect(x, y, w, h);
    // draw label bg
    ctx.fillStyle = "tomato";
    const strToShow = `${prediction.class}: ${prediction.score}`
    const textW = ctx.measureText(strToShow).width;
    const textH = parseInt(font, 10); // base 10
    ctx.fillRect(x, y, textW + 4, textH + 4);
    //text on top
    ctx.fillStyle = "#000000";
    ctx.fillText(strToShow, x, y);
  });
};

// connect participant
const participantConnected = (participant) => {
  console.log(`Participant ${participant.identity} connected'`);

  const div = document.createElement('div'); //create div for new participant
  div.id = participant.sid;

  participant.on('trackSubscribed', track => trackSubscribed(div, track));
  participant.on('trackUnsubscribed', trackUnsubscribed);

  participant.tracks.forEach(publication => {
    if (publication.isSubscribed) {
      trackSubscribed(div, publication.track);
    }
  });
  document.body.appendChild(div);
}

const participantDisconnected = (participant) => {
  console.log(`Participant ${participant.identity} disconnected.`);
  document.getElementById(participant.sid).remove();
}

const trackSubscribed = (div, track) => {
  div.appendChild(track.attach());
}

const trackUnsubscribed = (track) => {
  track.detach().forEach(element => element.remove());
}

Tada! Now to deploy our app and test it, in the root directory run twilio serverless:deploy and grab the URL ending in /video.html. Open it in a web browser, click Join room, share the link with your friends, and start performing object detection.

banana, book, tennis racquet detected

You can find the complete code on GitHub here.

What's Next after Detecting Objects with TensorFlow and Twilio Programmable Video

Performing object detection in a video app with TensorFlow.js is just the beginning. You can use this as a stepping stone to build collaborative games, detect mask-usage like in this ML5.js app, put a mask on faces, and more. I can't wait to see what you build, so let me know what you're building online!

Twitter: @lizziepika

GitHub: elizabethsiegle

email: lsiegle@twilio.com