Extend the React Quick Deploy Video App with DataTracks
Time to read:
September 30, 2020
Written by
Reviewed by

In March, Twilio released quick deploy video apps for three different platforms - React.js, iOS, and Android. These apps are fully functioning video collaboration apps that can be deployed to the cloud in minutes. They serve as a canonical reference for developers building out their communication solutions by showcasing the features and capabilities of Programmable Video.
When you build a video app, you can get pretty far with just audio and video. But what if you want to go above and beyond audio and video to build more engaging video experiences by adding hand-raising, annotations, whiteboarding, and more?
The answer is DataTracks. With Twilio Video, you can use DataTracks to send real-time ephemeral data such as text, JSON, or binary data to other participants in a video call. We say the data is ‘ephemeral’ because it isn’t persisted anywhere. If you aren’t in a room when someone sends data over their DataTrack, you’ll miss out.
In our SIGNAL talk, Accelerating Development of Collaboration Apps with Twilio Video, We show you how you can build upon the React quick deploy video app by using DataTracks to add ephemeral messaging. We call this feature “Snack Chats”.
Introducing Snack Chats
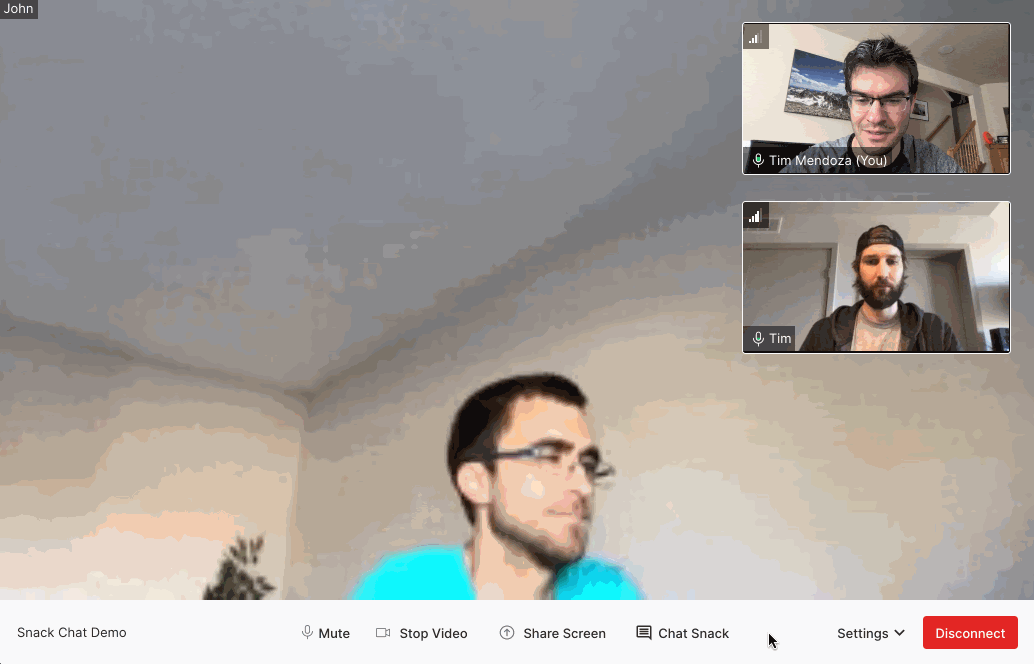
“Snack Chats” is a feature that allows participants to send a quick message to all other participants in a video room. They provide a nice way to share a link, ask a question, or just say "hi" to other users in a video call. Take a look!
You’ll notice the UI has changed - that’s because at SIGNAL today, we launched a redesigned UI for our quick deploy video app. This tutorial shows you how to add Snack Chats to your React.js quick deploy video app using this new UI.
Before we start
Let’s make sure that you have everything that you need. First, you’ll need a Twilio Account (create one here). You’ll also need to install Node.js (version 12+) and npm.
This app is built with React.js and React Hooks. Be sure to check out the React documentation if you need a refresher.
The MaterialUI library is also used throughout this application to build parts of the user interface.
Let’s start building
Let’s dive into the code! Since the code to our React App will likely change in the future as we add new features, let’s look at the code as it stands in this specific release. This way, you’ll always see the right version of the code, no matter when you are reading this post.
If you want to download the code and follow along in your own editor, then follow the next steps to clone the app, install dependencies, and deploy the app using Twilio Serverless. Don’t forget to check out the README for more information about these steps.
Set Up the Notistack Library
We’ll need to set up a library that we can use to help us display these Snack Chat notifications. We’ll use a library called notistack, which is a cool React library that lets us easily display the notifications that you see in the GIF above.
We can install the library with npm install -S notistack.
Next, we need to wrap our application in notistack’s <SnackbarProvider /> component. This will let us use notistack’s useSnackBar() and enqueueSnackbar() hooks from any component in the app. We can add this <SnackbarProvider /> inside the index.tsx file within the src folder.
Add the following line at the top of the index.tsx file with the rest of the import statements:
Then add the <SnackbarProvider> component around the <Router> component. Here’s what the whole file should look like:
That’s all we need to do to set up this library. Now let’s move on to the reason why everyone is here - DataTracks!
Publish a DataTrack
In order to make DataTracks work in this app, we will need these two things:
- Each participant will need to publish their own
LocalDataTrackwhen they connect to a room - Each participant will need to listen to the messages coming from the
RemoteDataTracksof all other participants
To publish a DataTrack, we can use the Video.connect() function from the twilio-video.js SDK. This function accepts a ConnectOptions object which lets you specify an array of tracks that the SDK will publish to the room as soon as you connect. Let’s add a DataTrack to this array so that it gets published when we join a room.
The Video.connect() function can be found in the useRoom hook that is used inside the VideoProvider component. This VideoProvider component wraps the whole application, and provides many useful methods and properties that any component can use with the useVideoContext() hook.
The Video.connect() function is already publishing our local audio and video tracks through the localTracks array. Let’s create a new LocalDataTrack and add it to the array of tracks that will be published when we connect to a room.
Navigate to the useRoom.tsx file inside src/components/VideoProvider/useRoom/ and replace the line Video.connect(token, { ...options, tracks: [] }).then( with the following:
Be sure that the LocalDataTrack class is imported at the top of the file. Change the import Video line at the top of the file so that it includes LocalDataTrack as seen here: import Video, { ConnectOptions, LocalDataTrack, LocalTrack, Room } from 'twilio-video';.
That's it - we don’t need to do anything else in this file.
Normally, we would need to track this newly created LocalDataTrack somewhere in our React state so it can be used by other components, but we don’t need to do that in this case. We can just access our LocalDataTrack from the room object which will be seen later.
Build a <DataTrack /> component in React
Before we can consume a DataTrack from other participants, we first need to build a <DataTrack /> component that can be rendered by React. Let’s look at how a DataTrack works.
A DataTrack is very similar to an EventEmitter from NodeJS, but it can operate remotely between multiple browsers. Let’s say a person named Alice wants to use a DataTrack to send data to someone else named Bob. Alice would use the LocalDataTrack.send() method (similar to the EventEmitter.emit() function) on the DataTrack to send a message to all participants that have subscribed to the DataTrack, like this:
In order to receive the message, Bob would need to listen to the message event on Alice’s RemoteDataTrack, like this:
It’s that simple! So let’s build a <DataTrack /> component that accepts a RemoteDataTrack as an argument then listens to it's message event.
Create a folder inside of the src/components named "DataTrack". Navigate to the DataTrack folder and create a file named DataTrack.ts where you will insert the following code:
This component contains a useEffect hook which will execute the function passed to it every time this component receives a new track (this is because of the dependency array on line 14). Here we see that whenever a new message is received, we call the enqueueSnackbar() function (from the notistack library) with that message. Calling the enqueueSnackbar() function is what makes a new SnackBar appear in the app. On line 11, there is a function that removes the handleMessage listener that was previously added. This is just a useEffect cleanup function that cleans up old listeners in case the track object ever changes.
That’s all we need in a <DataTrack /> React component! Let’s add it to the app so that it can listen to the RemoteDataTrack from other participants.
Render DataTracks from other Participants
Next, we’ll need to use the new <DataTrack /> component to render the RemoteDataTracks that are published by all the other participants in a room. We don’t need to worry about subscribing to them - the SDK does that automatically. Before we do this, I’d like to briefly explore the object hierarchy of our room object.
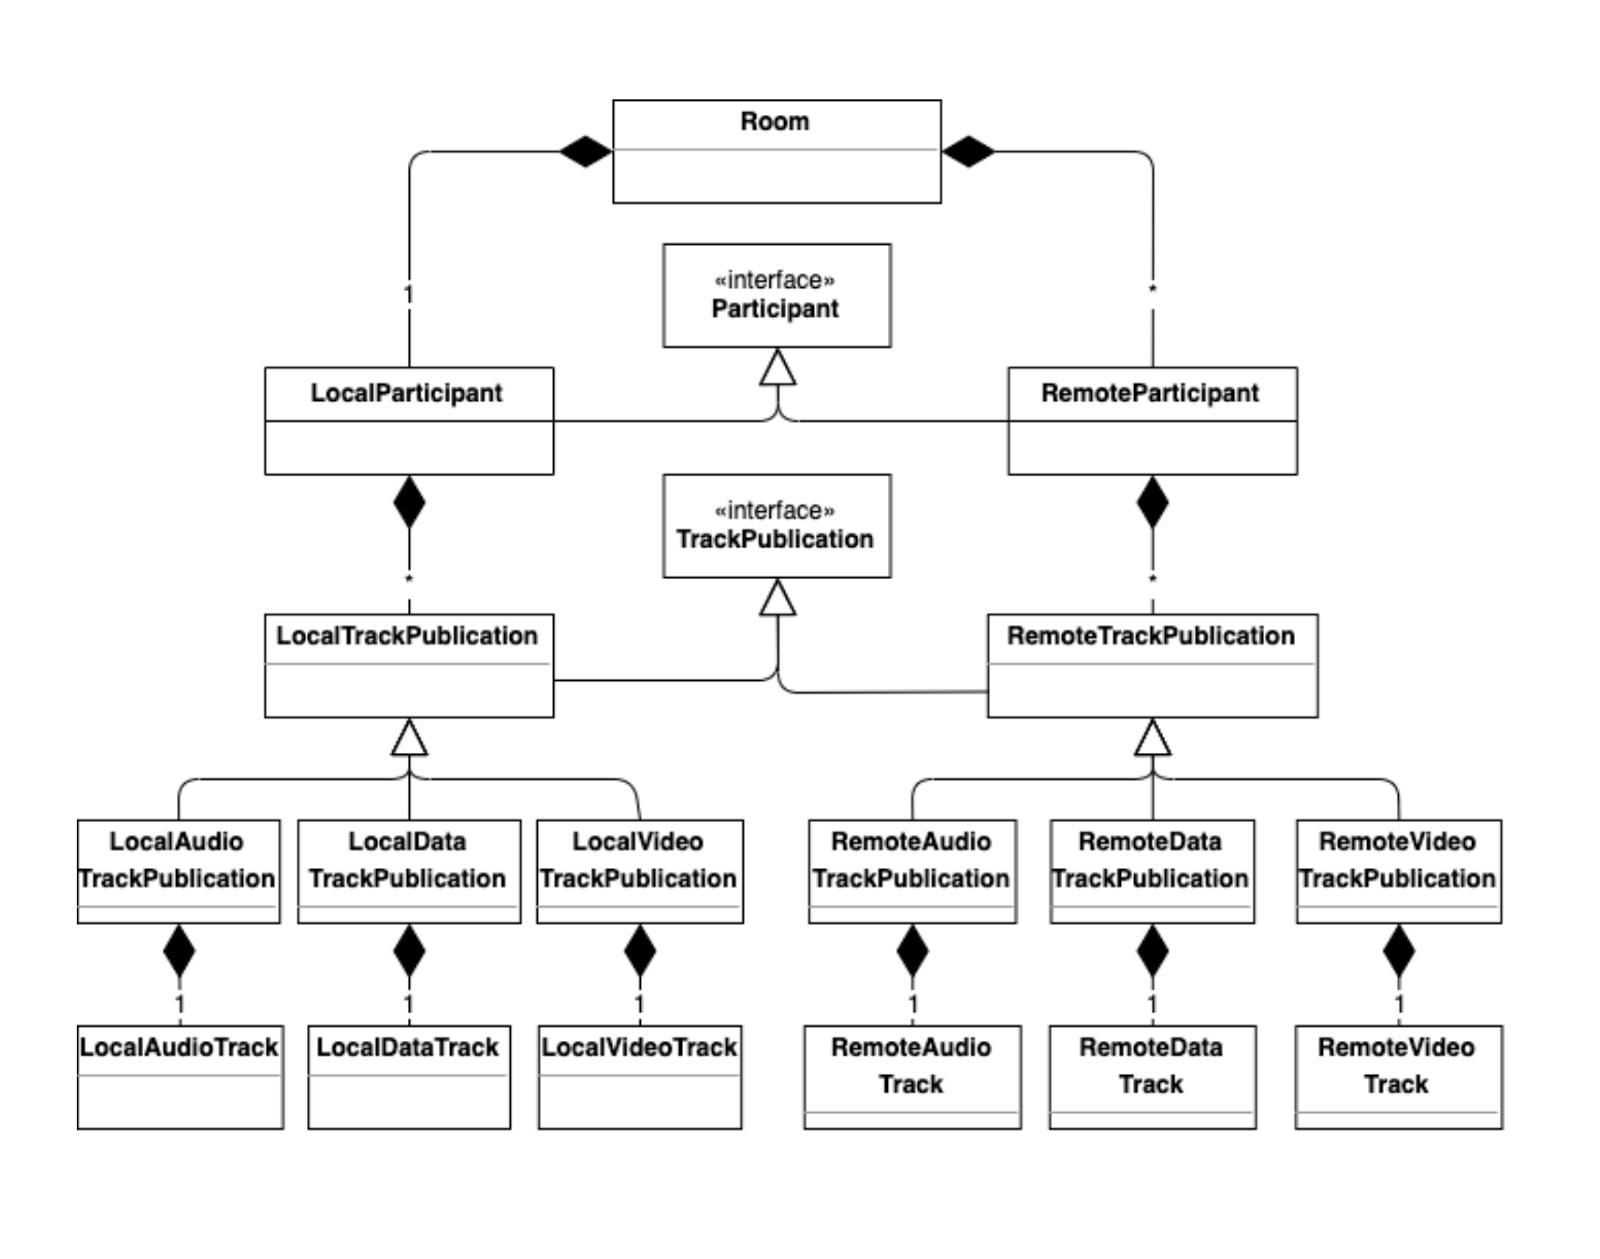
This image represents the object hierarchy of the Room object (which is returned by Video.connect()). There’s a lot there, but I want you to notice how Participant objects have TrackPublication objects which have Track objects. This is important to take note of because our React App uses a very similar structure with its components:
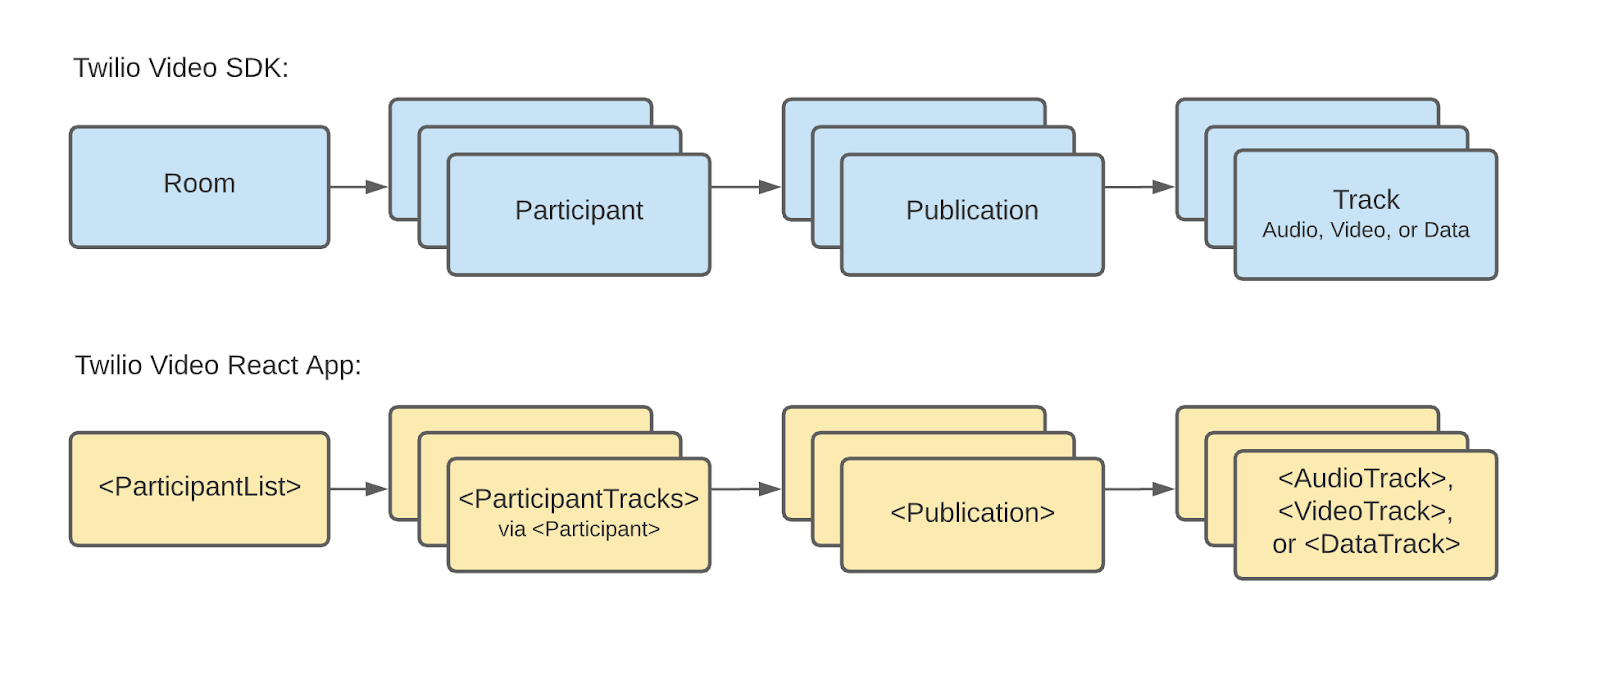
See the similarity? This should give us a clue as to how to modify the App so that it can render a new kind of track. Note that:
-
The
<ParticipantList />component renders one<ParticipantTracks />component for each participant in a room (via the<Participant />component) -
The
<ParticipantTracks />component renders all<Publication />components for each Participant -
The
<Publication />component renders one Track component (<AudioTrack />,<VideoTrack />,or<DataTrack />) for each Publication
With this we can see that we need to modify the <Publication /> component so that it renders our new <DataTrack /> component.
Enough talking - let’s look at the code!
If we look at the <Publication /> component (in src/components/Publication/Publication.tsx), we can see that it:
- accepts a
Publicationobject - extracts the Publication’s Track with the
useTrack()hook - renders an
<AudioTrack />if theTrack.typeis audio, or a<VideoTrack />if theTrack.typeis video
Let’s make the <Publication /> component render a <DataTrack /> component when the Track.type is data. Go to the Publication.tsx file inside of the src/components/Publication/ folder and add the highlighted lines below:
That’s it! Just need to add these three lines of code.
NOTE: We only want one <DataTrack /> rendered per participant, and the videoOnly boolean helps us achieve this. Sometimes a <Participant /> component is rendered more than once for a given Participant. For instance, a Participant may be rendered in the <ParticipantList /> component and the <MainParticipant /> component at the same time. In this case, we would want to have the Participant’s video displayed in both locations, but we’d only ever want the Participant’s Audio and Data tracks rendered once (via the <ParticipantList /> component). We achieve this by having the <MainParticipant /> set videoOnly to true.
With all of that - we have everything that we need to:
- have each Participant publish a LocalDataTrack
- have each Participant listen to
RemoteDataTrackfrom all other participants
The last thing we need to do is build a way for each Participant to send messages with their DataTracks.
Let’s find a good place to send a message by calling LocalDataTrack.send().
Build the User Interface
As you saw in the GIF at the very beginning of the article, there is a “Snack Chat” button, a text field, and a “Send” button that we still need to build. Let’s build a component that allows the user to type in a message and send the message through their DataTrack by clicking on a “Send” button.
Navigate to the src/components/Buttons folder and create a new folder named "ChatSnackButton". Make a file named ChatInput.tsx and copy the following code into that file:
In this component, we can see that when the user enters a message and clicks the “Send” button (or presses their ‘return’ key) the handleSubmit() function then does the following:
- It gets the
LocalDataTrack(which we published when we connected to the room) from theroomobject using theuseVideoContext()hook - It constructs a message to send with the
LocalParticipant’s identity (also found on theroomobject) - It sends the message to all other participants in the room using the function
localDataTrackPublication.track.send(fullMessage); - It displays the message in a local snack bar to let the user know that their message has been sent
- It clears the text field
It doesn’t take much code to send some data with DataTracks. You just need to grab your LocalDataTrack from the Room object, and then call track.send() with your message. The rest is just a matter of building a user interface, which can be done any number of ways.
Finally, we’ll need a place to house the <ChatInput /> component that we just made. Let’s build the “Snack Chat” button and have it render the <ChatInput /> component when it is clicked. Inside the same folder "ChatSnackButton", create a new file named ChatSnackButton.tsx and paste in the following code:
Here we render the <ChatInput /> component in a Tooltip component (as the title prop). We also use a "Chat Snack" Button to open the Tooltip. A <ClickAwayListener /> component (from Material UI) is used to automatically close the Tooltip when the user clicks away from it.
The final step is to include the <ChatSnack /> button in the <MenuBar /> component (this is the white bar seen at the bottom of the screen). Find the MenuBar.tsx file inside of the src/components/MenuBar folder and include the line import ChatSnackButton from '../Buttons/ChatSnackButton/ChatSnackButton'; in the imports at the top of the file.
Then, add the following highlighted lines to the MenuBar function at the bottom of the app:
NOTE: There isn’t much space in the mobile version of the <MenuBar /> component to display the <ChatSnackButton />, so we’ll use the <Hidden /> component (from Material UI) to hide the button on mobile devices.
Test out the Snack Chat app
Let’s try it out! Using the quick deploy feature of this app, we can quickly deploy the app to Twilio Serverless. In your terminal, go back to the twilio-video-app-react directory and run the following commands:
The app should have been successfully deployed to Twilio’s Serverless infrastructure. You can visit the link that was printed in your console to try out the app. Send the link to some friends and say “ahoy”!
If you want to see all the changes that have been made in this tutorial, you can see them all in this GitHub branch. If you want to see just the changes that have been made, you can look at the differences in this pull request.
Conclusion
Congratulations! You have added Snack Chats to your own quick deploy video app. Now participants can send ephemeral messages to each other during their video chats. Your feedback is important to us so please let us know what you think of the new quick deploy video app UI. Feel free to head over to the GitHub repo and leave feedback. You can also leave comments in the Snack Chat pull request or at the bottom of this post. We can’t wait to see what you build next!
Tim is a software engineer on the Voice and Video team at Twilio where he builds open-source web applications that help customers hit the ground running with Twilio and WebRTC. When not building apps, Tim can usually be found playing with his 150 pound dog, Diesel, or making questionable sounds on various musical instruments.


Related Resources
Twilio Docs
From APIs to SDKs to sample apps
API reference documentation, SDKs, helper libraries, quickstarts, and tutorials for your language and platform.
Resource Center
The latest ebooks, industry reports, and webinars
Learn from customer engagement experts to improve your own communication.
Ahoy
Twilio's developer community hub
Best practices, code samples, and inspiration to build communications and digital engagement experiences.