Run a PBX on a Raspberry Pi with Twilio SIP Trunking
Time to read: 24 minutes
September 22, 2021
Written by
Reviewed by

If you're a hobbyist, a tech-savvy small business owner, or even a curious solutions engineer, what could be more fun than running your own phone system? In this post I will show you how to do just that using a $100 Raspberry Pi 4 computer connected to a Twilio Elastic SIP trunk. I'm going to use the 3CX PBX (Public Branch eXchange) software, which is easy to administer and available as a free-to-use version for small deployments.
Traditionally, a PBX has served to connect the telephone handsets in an organization with the public switched telephone network (PSTN), providing features such as an operator station, voicemail, call forwarding and so on. It would consist of a rack of equipment in a telephone closet, connected to the building wiring system, and administered by members of a technical priesthood. In contrast, this modern implementation with the Raspberry PI 4 can still work with telephone handsets, but is also designed to use web-based softphones and mobile clients. It can be run in the cloud, or in our case, a computer not much bigger than a pack of playing cards.
While the 3CX PBX can be administered with a web browser, you will need a little IP networking knowledge and should feel comfortable with a Linux command line to perform the installation. As befits the age we live in, I’ll assume you're using a consumer-grade Internet connection, without a sophisticated firewall.
What you'll need
- A Raspberry Pi 4 with at least 4GB of memory. I recommend buying this in kit form, with a case, power supply, microSD card and the necessary cables. The CanaKit and The Pi Hut Raspberry Pi 4 starter kits are good choices, and both come with a 32 GB microSD card.
- For initial configuration, a USB keyboard, mouse and HDMI-equipped monitor.
- The 3CX software and a license key.
- A Twilio account. If you are new to Twilio click here to create a free account now and receive $10 credit when you upgrade to a paid account.
- (Optionally) One or more SIP phones. Here is a list of devices supported by the 3CX software. If your work area doesn't have a wired Ethernet connection, choose a model equipped with WiFi or one that is compatible with a WiFi adapter.
What you are going to build
The following diagram shows the principal parts of the project.
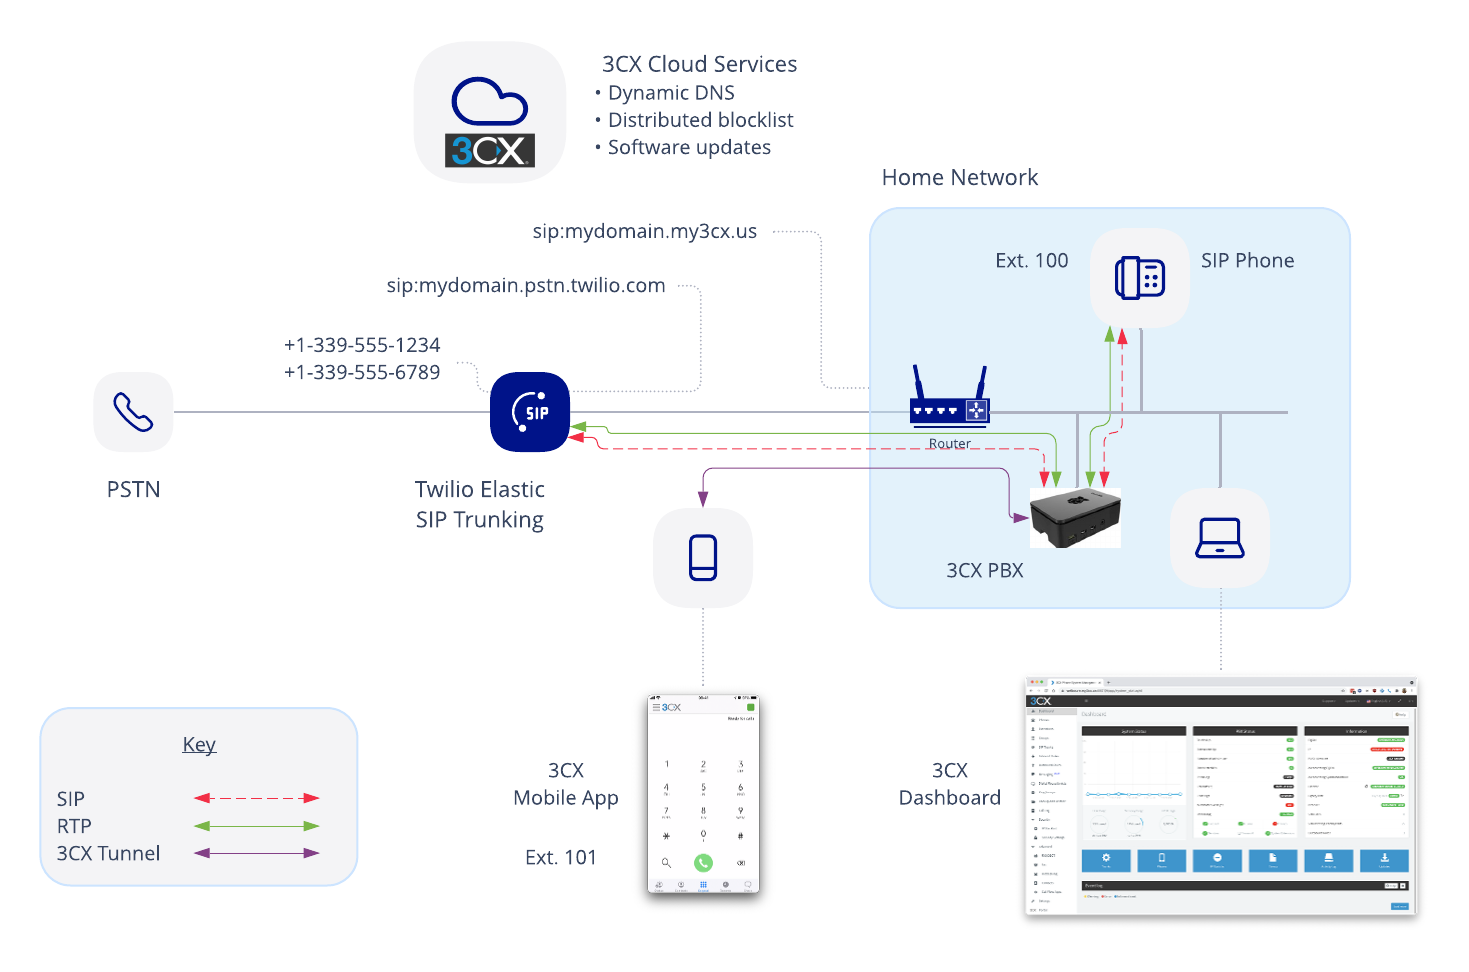
Your home network is where you'll host your 3CX PBX software, running on the Raspberry Pi. Once you've set up the Pi and installed the 3CX software, you'll configure the PBX using the 3CX web dashboard.
Before you communicate with the outside world, you will need to allow inbound calls. You will configure port forwarding in your router for SIP and RTP traffic. If you want to use the 3CX mobile app from outside of your home network, you will also need to forward the proprietary 3CX tunnel protocol. And if you want to be able to manage your PBX remotely, you'll have to configure port forwarding for that, too.
For communication, you'll create extensions that use:
- The 3CX web client, a softphone that runs in a web browser.
- The 3CX mobile app.
- Optionally, SIP phones.
To make calls to and from the PSTN, you'll need to configure a SIP trunk both on Twilio and on the 3CX PBX. You'll take advantage of the 3CX dynamic DNS service to create a custom 3CX domain, making sure phone calls from Twilio always find your home network. You'll also create a unique Twilio SIP domain so that Twilio can associate inbound calls from your PBX with your Twilio account.
You'll add phone numbers to your SIP trunk, and configure Direct Inward Dialing (DID) to associate a phone number with an extension. You'll create a dial plan on the PBX that will direct outbound calls to your Twilio SIP trunk.
In addition to handling inbound calls using phone numbers, I will also show you how to dial an extension directly from a Twilio Programmable Voice app, using its SIP address.
To finish off the configuration, I’ll show you how to enable emergency calling, provided that Twilio supports it in your country.
Finally, I’ll discuss ways in which you should secure your PBX to prevent hackers from running up very large phone charges on your account.
Set up the Raspberry Pi
Follow the instructions to assemble your kit and install the Raspbian Linux operating system. During this process you'll be asked to select your language, keyboard layout, timezone and WiFi credentials. You'll also be prompted to upgrade the software to the latest version. The initial boot software on the SD card ("NOOBS") will be replaced by the Linux file system.
If you have a wired Ethernet connection within convenient reach, I strongly suggest you connect your Pi via its Ethernet port instead of over WiFi. This will give better network performance, yield better call quality, and can avoid issues when you try to connect phones using plug-and-play networking.
Configure a static IP address
You should assign a static IP address to your Raspberry Pi, either by configuring it in the device itself or by reserving a fixed address in your router's DHCP table.
To configure the IP address in the Raspberry Pi, use the Pi’s built-in text editor. You can locate it from the Raspberry icon in the taskbar at the top of the screen. Select Accessories > Text Editor to open it. Append the following lines to the /etc/dhcpcd.conf file, choosing values appropriate for your environment. In the example below, my local subnet is 192.168.1.0/24, my router is 192.168.1.1, and I've chosen 192.168.1.200 to be my Pi's IP address. As is common with consumer broadband, my router is also my home network's DHCP server, DNS server and firewall.
Whether you set the IP address in the Raspberry Pi or in your router, you should refresh the interface so that the new IP address is used. To do this, start a terminal session by clicking the terminal icon in the taskbar then enter the following commands:
Note that if you are using the Pi's WiFi interface rather than its Ethernet port, the appropriate interface name is wlan0.
When you have completed this step, ping the Raspberry Pi from a different computer and make sure it responds. Once you’ve verified that it’s responding, enter CTRL+C to terminate the ping:
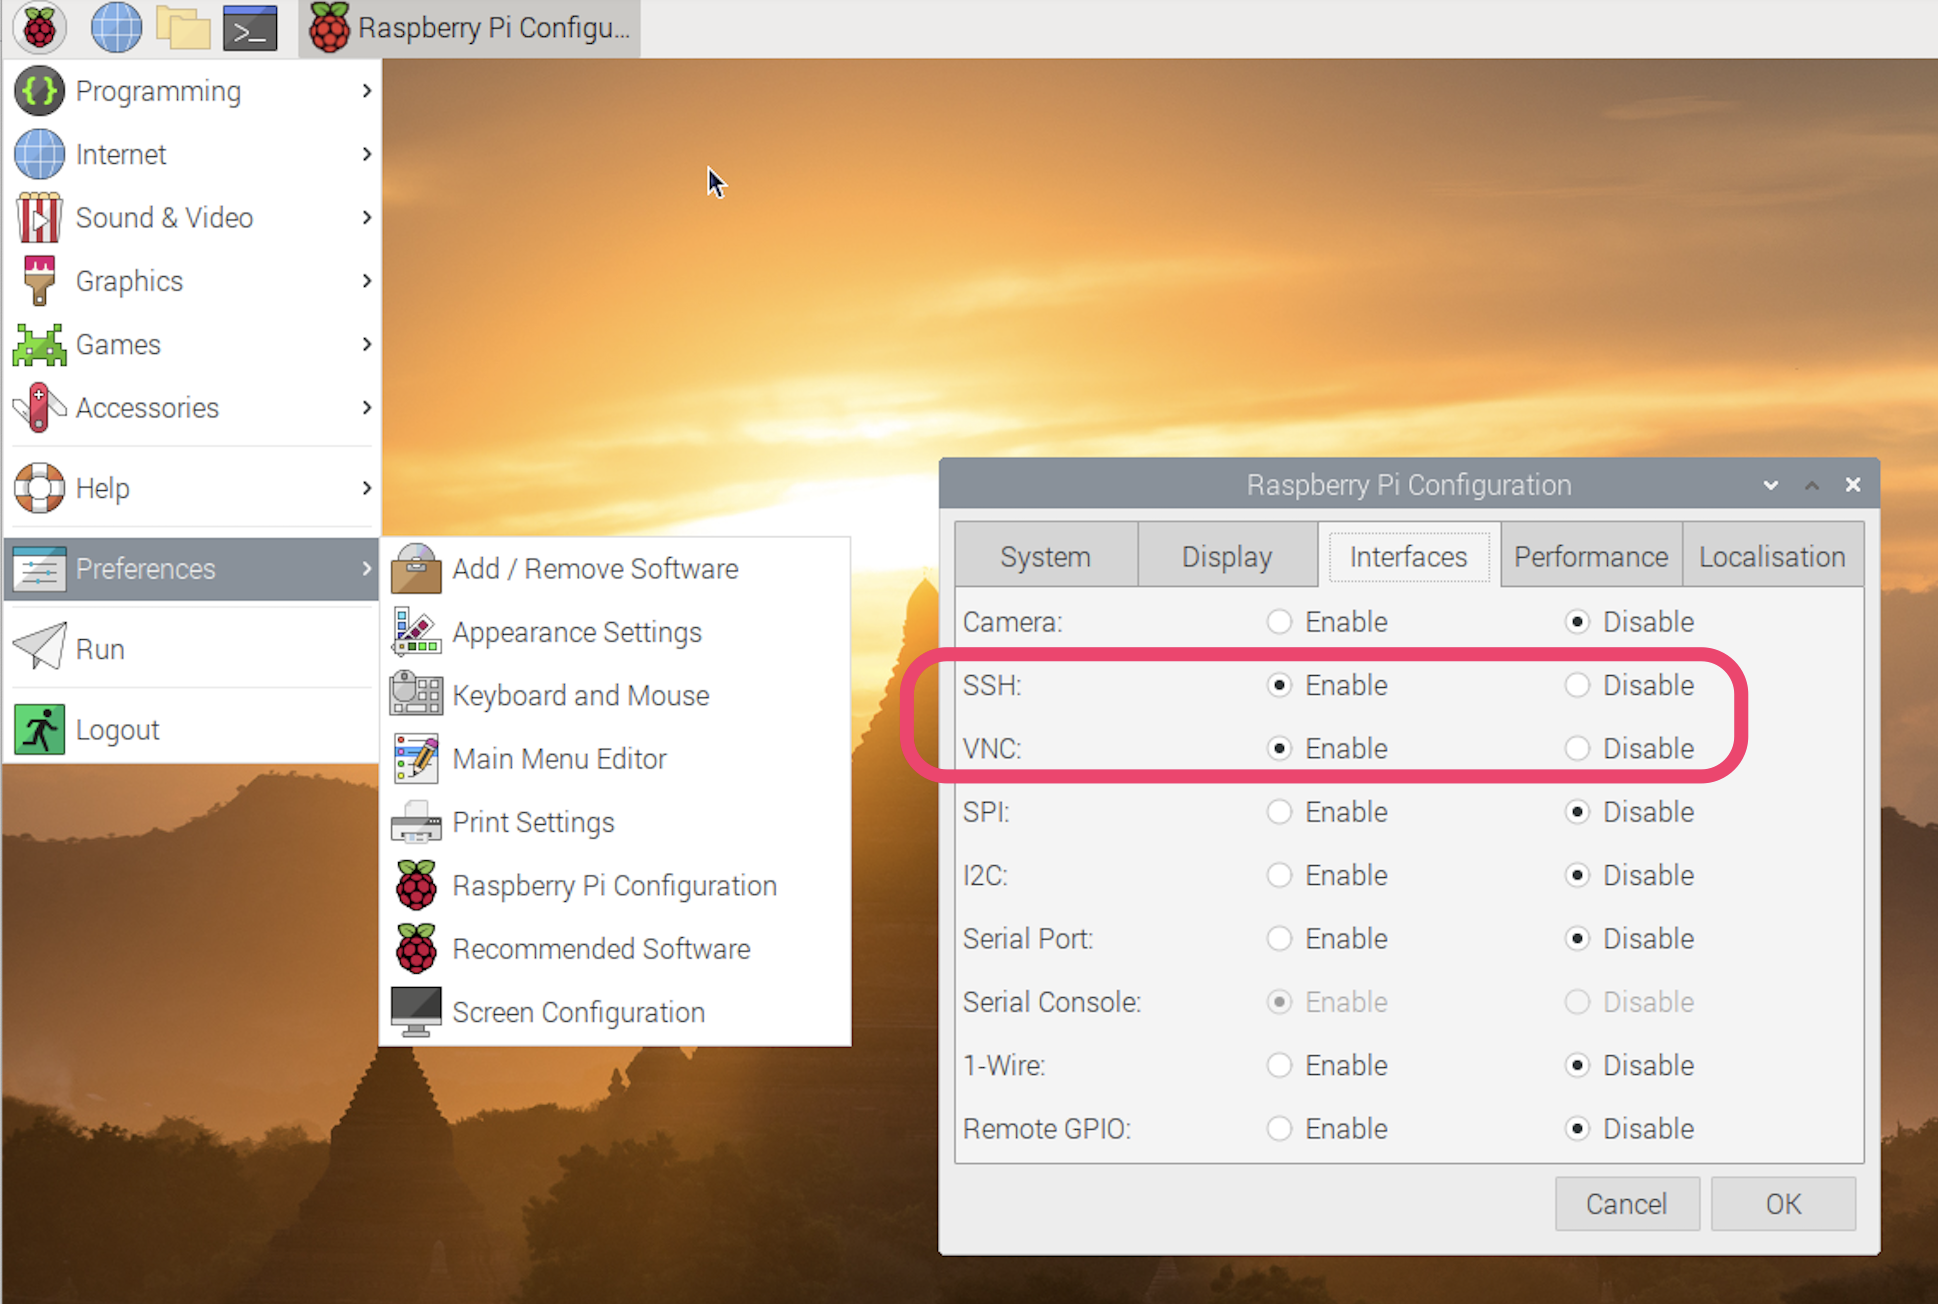
Enable remote access
You will most likely want to enable remote access to your Pi from other computers. I recommend that you enable SSH and the VNC remote desktop by doing the following:
- From the Raspberry icon in the taskbar, select Preferences > Raspberry Pi Configuration.
- Select the Interfaces tab, and enable SSH and VNC:
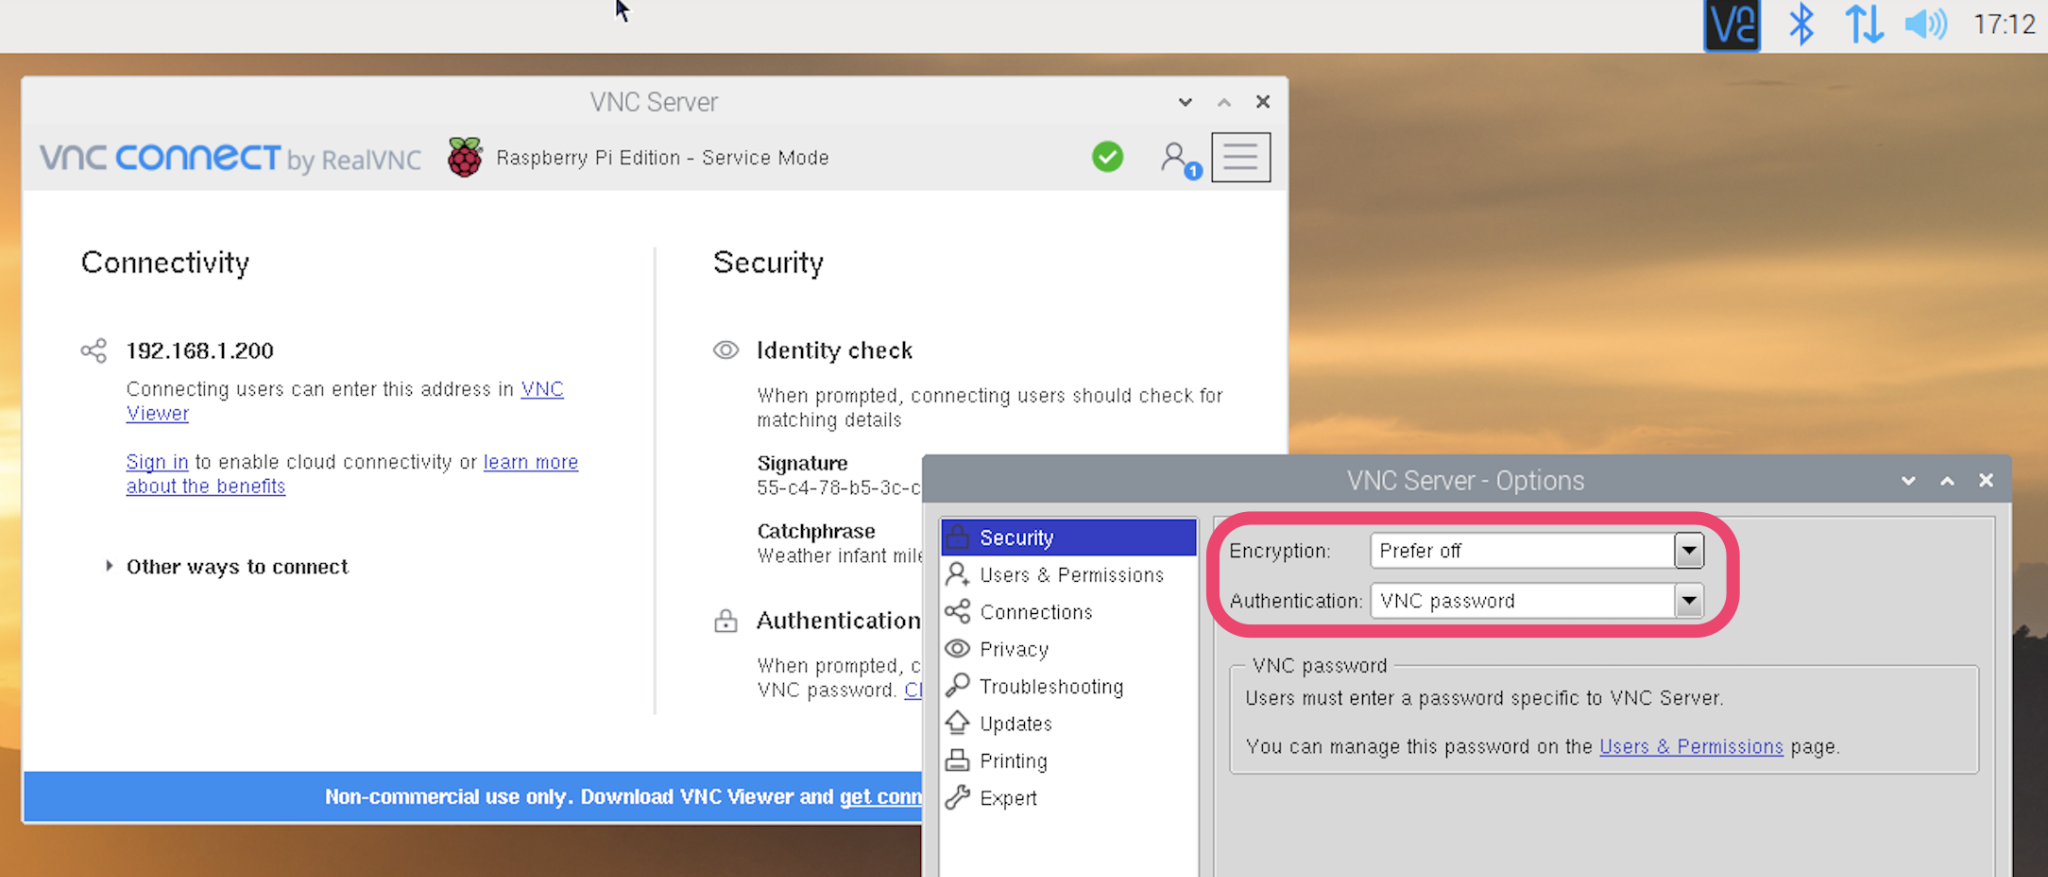
- Click on the VNC Server icon in the taskbar. Next click the VNC Server menu icon, select Options and then Security. Set Encryption to Prefer off, and Authentication to VNC password:
- Now click on Users & Permissions, and set the password for Standard user:
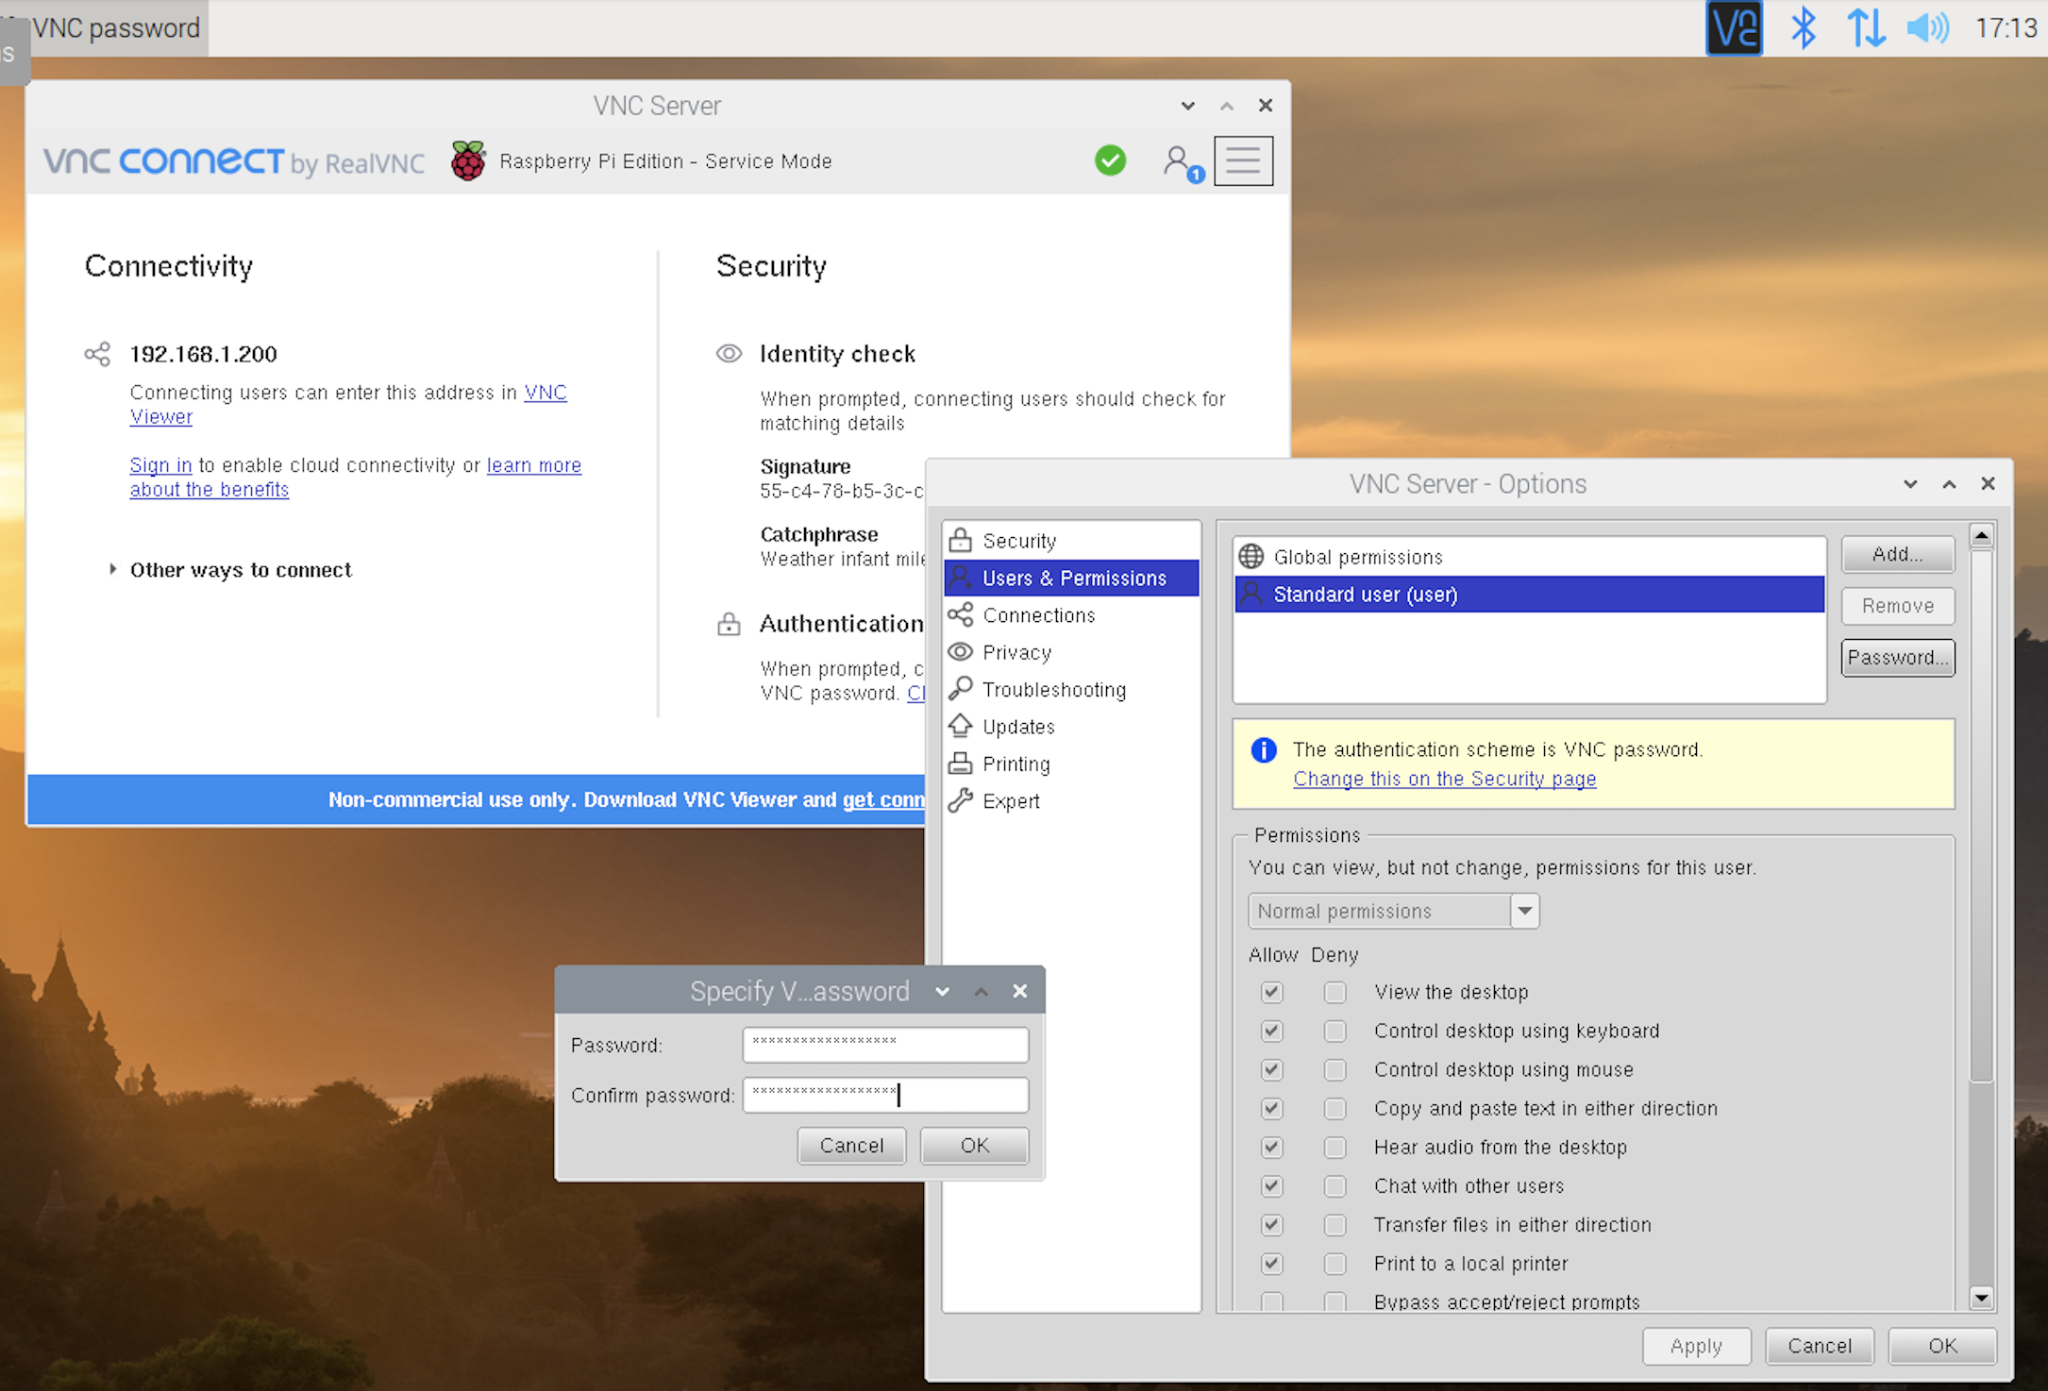
You should now be able to connect to your Pi from a remote system using a VNC client, using the IP address of the Pi, and the password you set in the previous step. On a Mac, the Screen Sharing app is a good built-in option. On Windows, RealVNC's VNC Viewer is an obvious choice to pair with the VNC Server that is bundled with the Pi's Raspbian Linux.
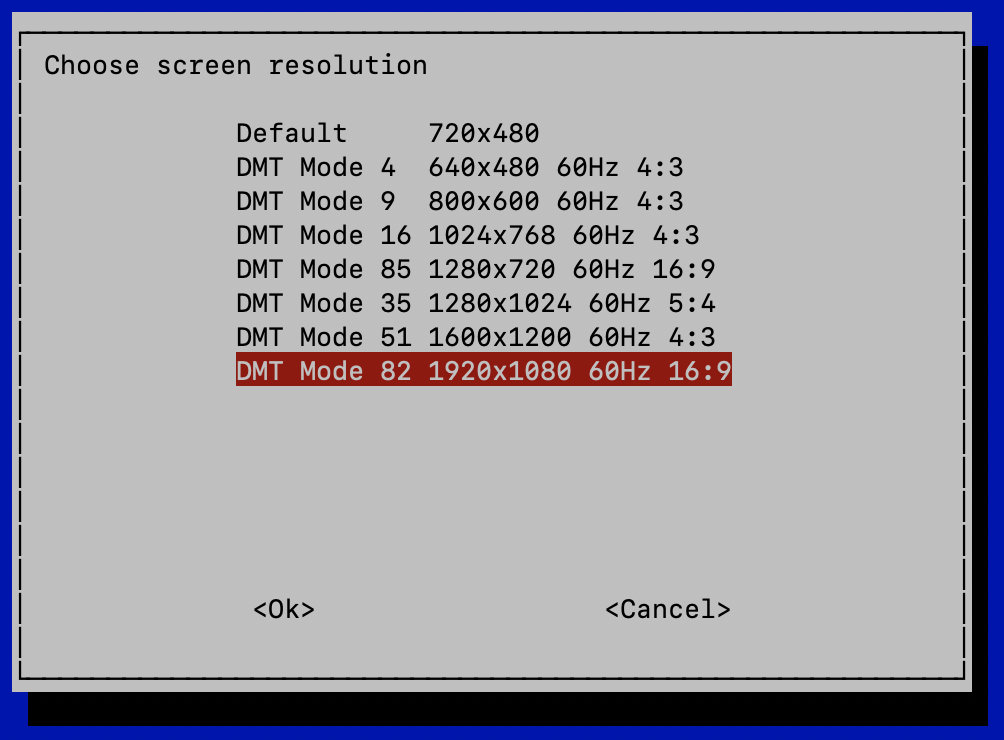
If you want to remotely access the Pi's desktop when there's no monitor physically attached, you will need to set a non-default screen resolution, otherwise your Screen Sharing / VNC Viewer app will display the message, "Cannot currently show the desktop". From a terminal session on the Raspberry Pi, run the command sudo raspi-config, navigate to Display Options > D1 Resolution, and pick one of the non-default resolutions, DMT Mode xx:
Tab to <Ok>, press the Return key, and follow the prompts to reboot your Pi.
If you don't need a graphical user interface at all, you can use the above raspi-config command to tell the Pi to boot into command line mode. To do this, navigate to System Options > S5 Boot / Auto Login, select B1 Console or B2 Console / Auto Login, tab to <Ok>, press Return and follow the prompts to reboot.
You can streamline SSH access to your Pi by enabling public key authentication. Instead of having to provide a password each time, the SSH connection attempt is signed by the client system using your private key, and the SSH server on the Pi uses your public key to check the signature. The process has two parts: using the ssh-keygen command to create the public/private key pair, and using the ssh-copy-id command to copy the public key to the Pi:
At the time of this writing Windows 10 does not support the ssh-copy-id command, so you will have to copy the key manually. Please refer to the linked article above for details.
Obtain a 3CX license key
Go to the 3CX download page and create an account if you haven't already done so. Provide the required information to obtain a free license key, good for up to eight concurrent calls.
Install the 3CX PBX software
For this part of the installation, we'll connect to the Pi using SSH. The default username is 'pi' and we'll use the static IP address defined previously:
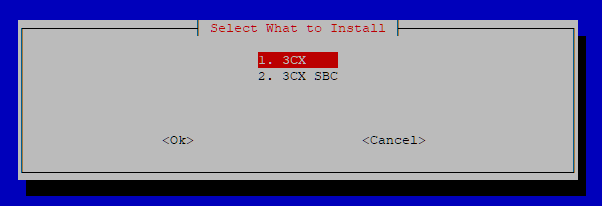
You'll be prompted to select either the 3CX PBX or SBC. Pick the PBX (simply referred to as '3CX'):
Once the package is installed, you'll be asked to accept the license agreement. Tab to <Ok> and then press Return to accept.
At the final stage of installation, you'll be asked whether you want to run the 3CX Configuration Tool from the command line or a browser. I suggest you select the option to use a web browser, which will cause the PBX web configuration tool to be launched.
If the installation process is interrupted or in case of a mistake, you can restart the installation by executing this command:
Initial configuration of the PBX
Connect to the PBX configuration tool using the URL supplied in the previous step (in my case, http://192.168.1.200:5015?v=2, but you should substitute your own Raspberry Pi's IP address) and follow the guidance of the configuration wizard (details here):
- Select New install and input your license key.
- Create an administrator account with a username and password.
- The installer will auto-detect your public IP address. Accept it.
- You will be asked to choose whether you have a static or dynamic public IP address. If you are on a consumer broadband network, you should pick the Dynamic IP option.
- 3CX has a very useful feature where it creates a dynamic DNS entry for your PBX, as a subdomain of one of 3CX's several regional domains. If your Internet service provider changes your public IP address, the 3CX software will automatically detect this and update the DNS record. In my case, I'm going to use my name with a variant which matches my geographic region:
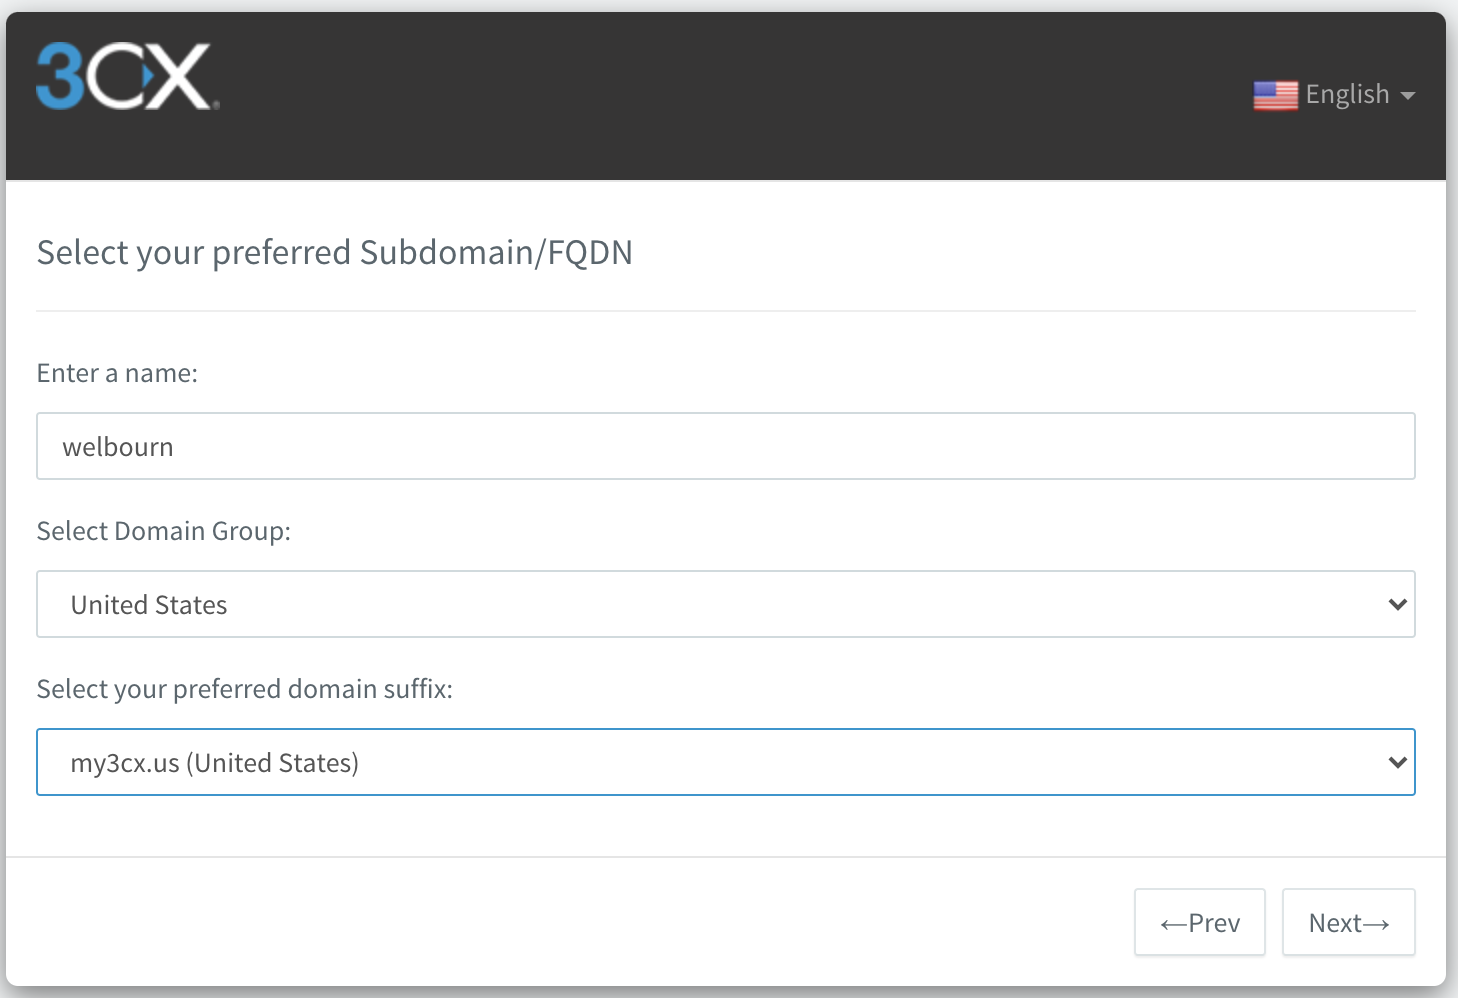
When I create my Twilio SIP trunk, I will configure it to send inbound calls to the domain
welbourn.my3cx.us.
- Set the ports used for HTTP, HTTPS, SIP and the 3CX tunnel protocol. Note that the HTTPS port is used both for administering the PBX and for accessing the web client.
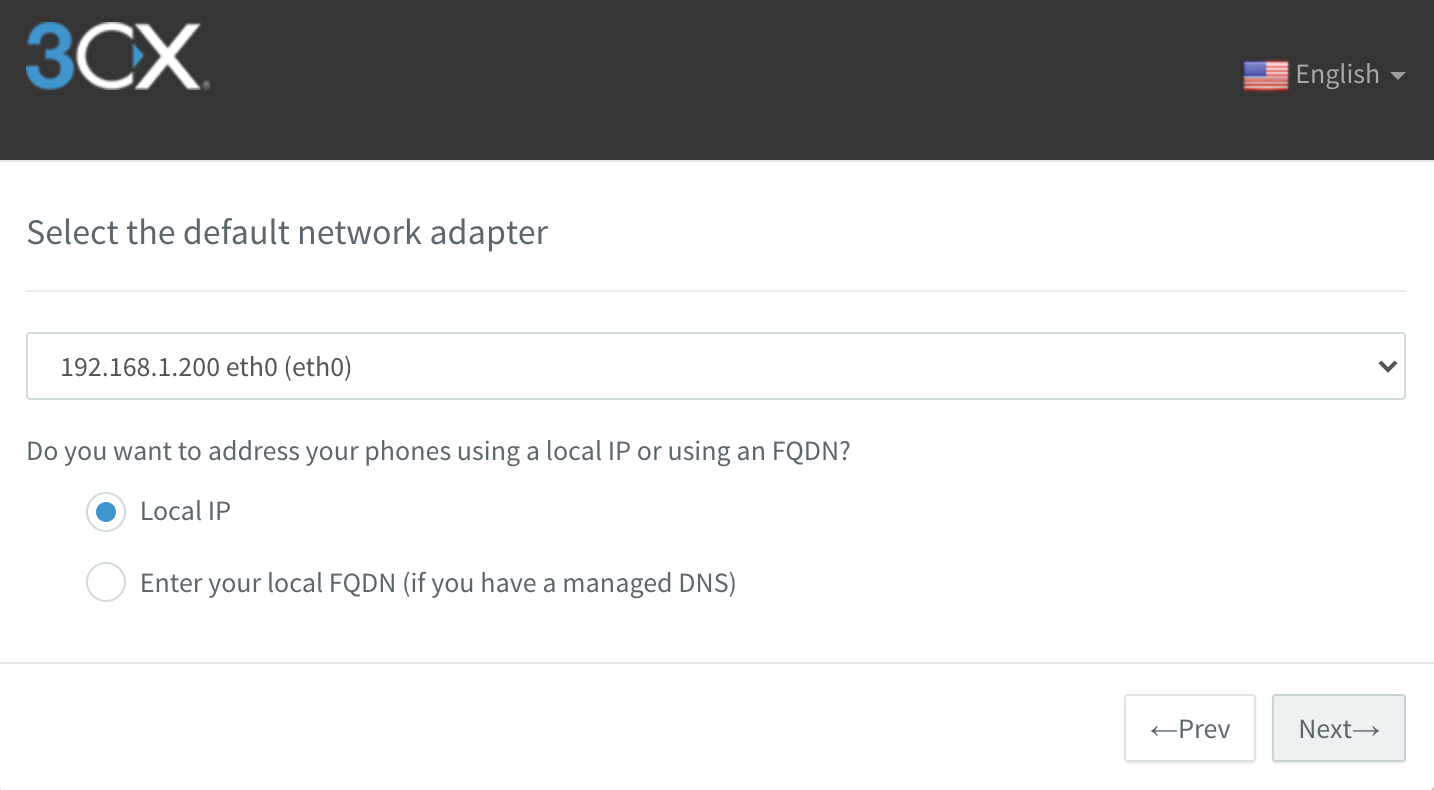
- Select the Raspberry Pi's default network adapter. Most likely you will also use local IP addresses for your phones, rather than DNS:
At this point, 3CX's cloud-based configuration server will create your fully qualified domain name and a security certificate to go with it. This takes a few minutes.
- Select how many digits you want for your extension numbers; it defaults to three.
- Input your administrator email address. This will be used for system notifications.
- Select your country and time zone.
- Create an operator extension. This will be the default destination for inbound calls. For 3-digit extensions, the operator extension defaults to 100, and the default for voicemail is 999. Be aware that 999 is the phone number used for emergency calls in the UK, Ireland and some other countries, so you may want to change this.
- Define the geographic permissions for which countries can be called. Note that Twilio has its own restrictive permissions, so you will also have to enable permissions in the Twilio console for international calling.
- Select the language for system prompts.
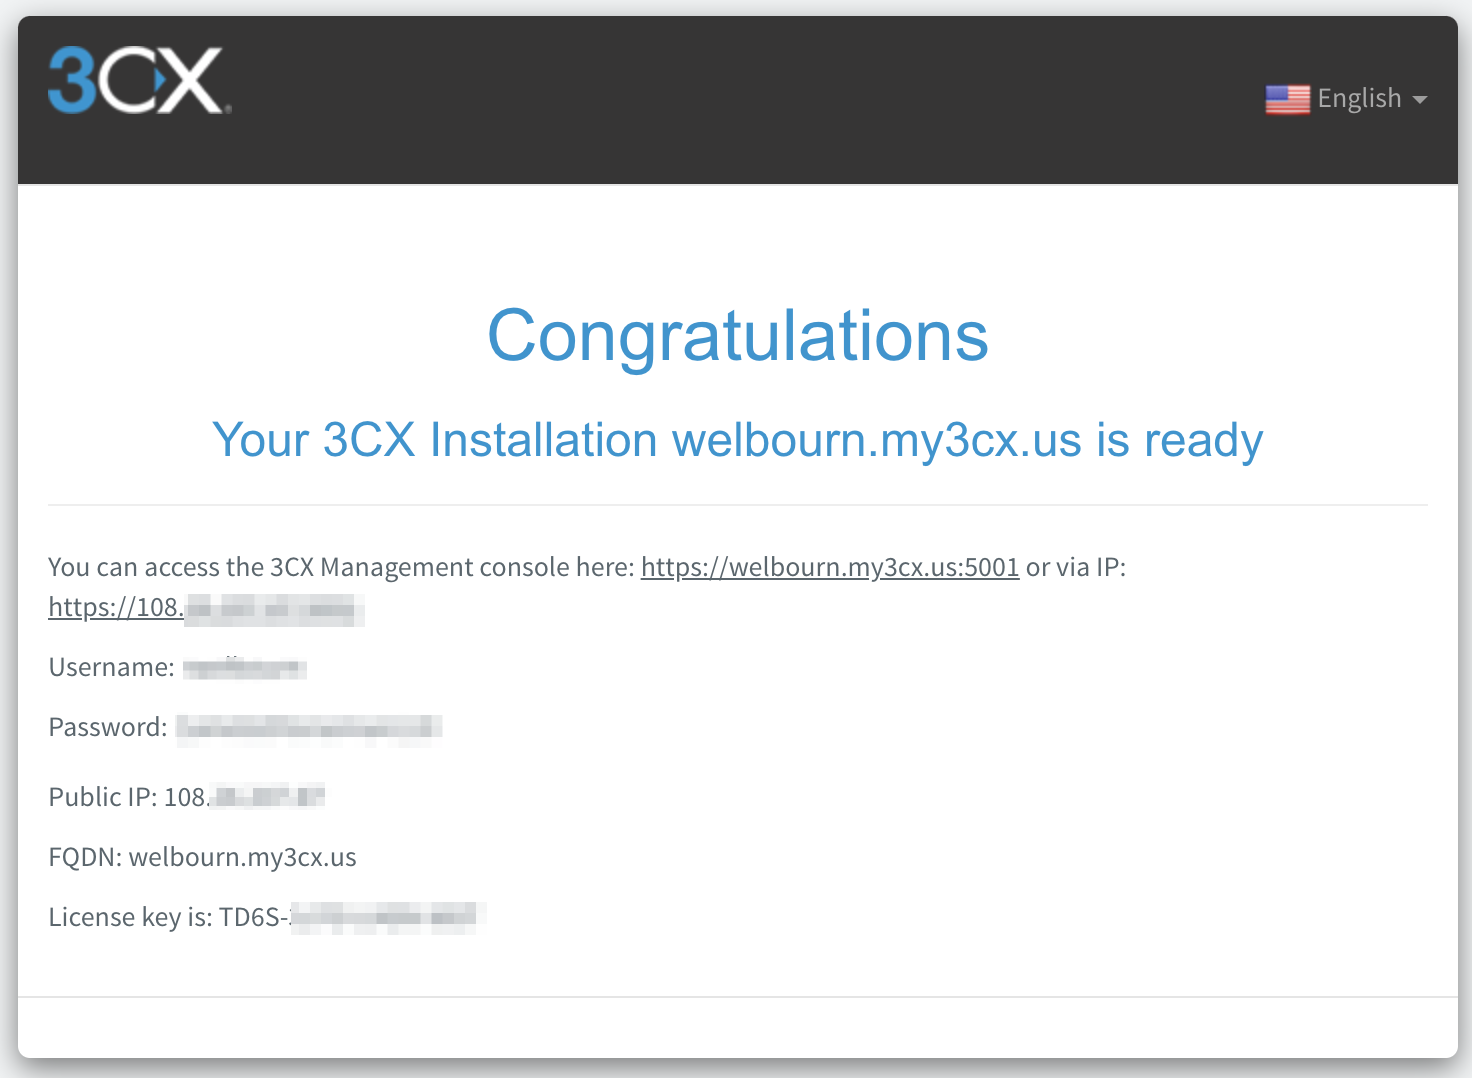
Once the initial configuration is complete, you will receive the following confirmation message:
The 3CX dashboard
Using the local URL (in my case, http://192.168.1.200:5000) and the administrator credentials you just created, login to your 3CX administrative dashboard:
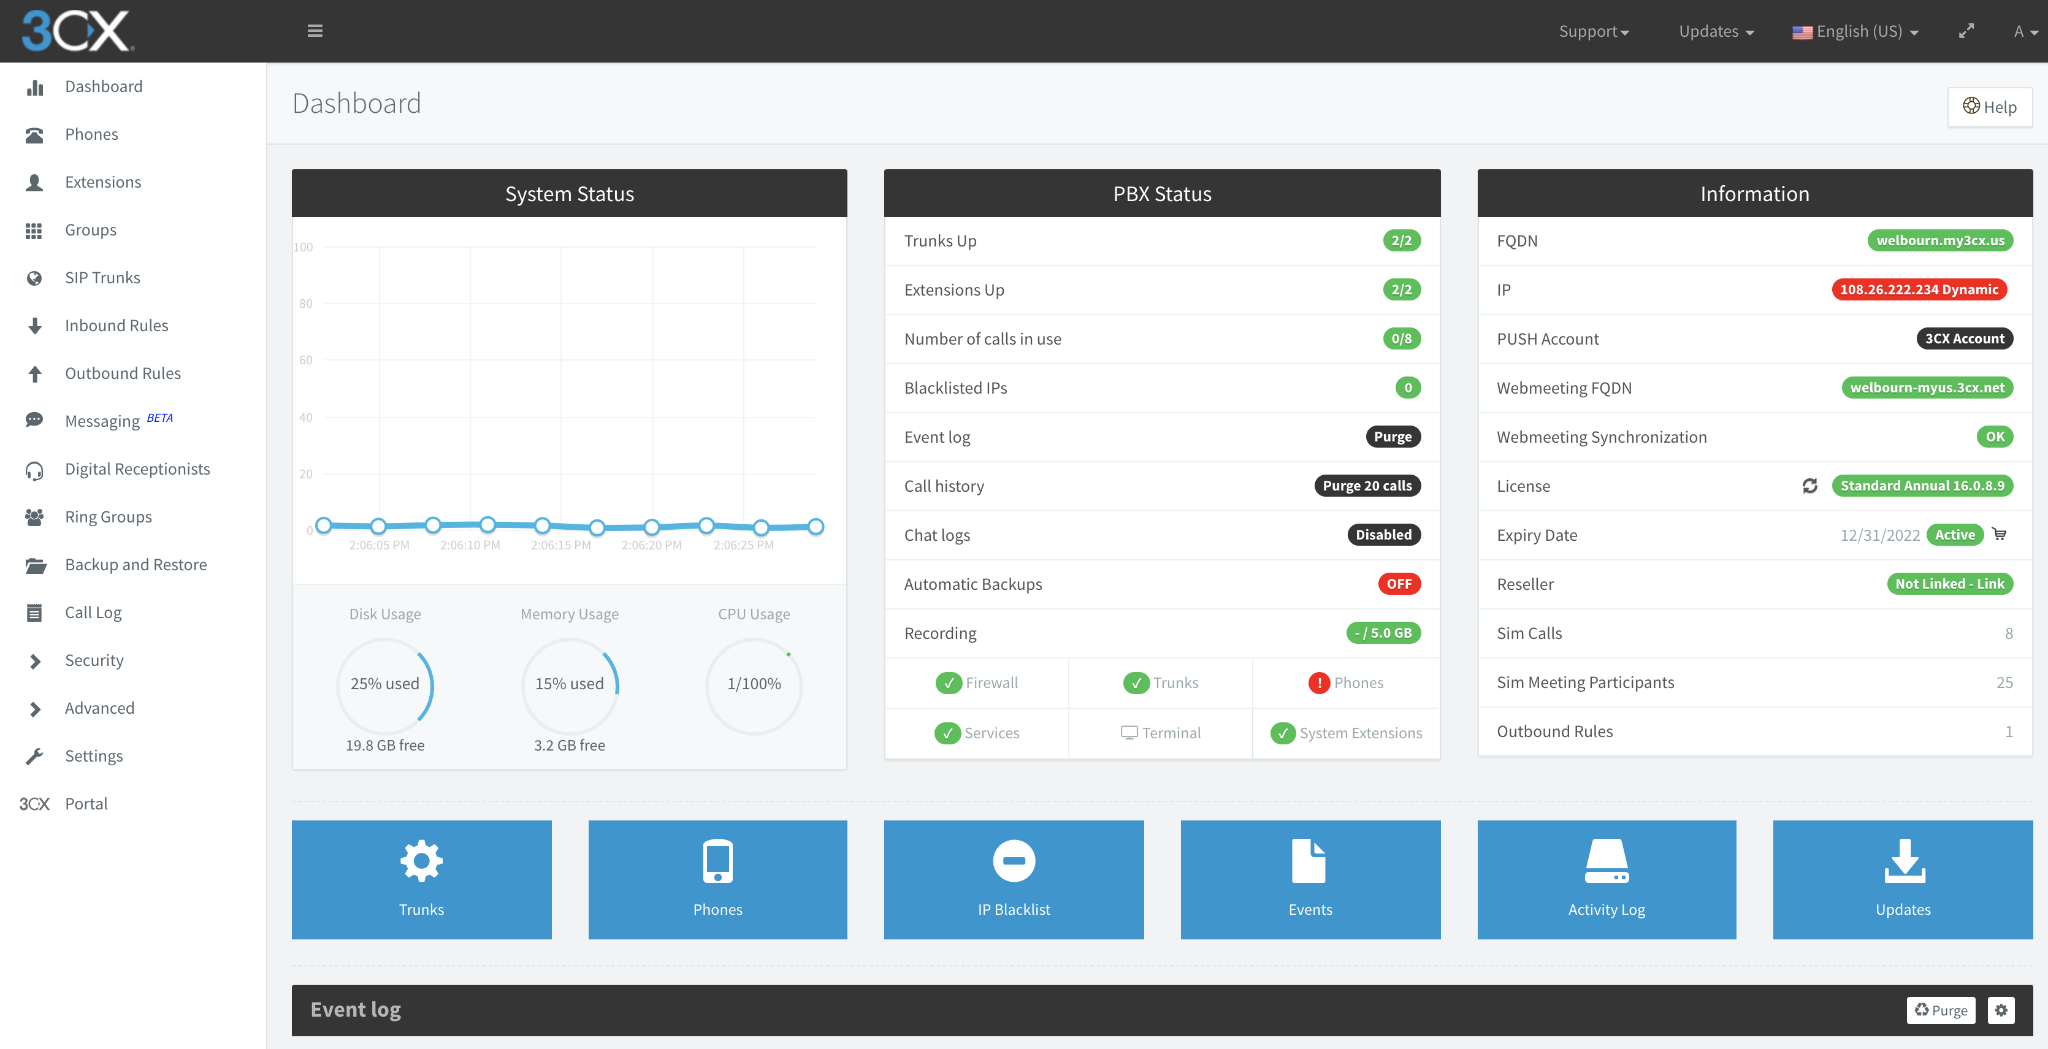
We are now in a position to perform the three fundamental tasks involved in configuring any PBX:
- Define extensions and their users.
- Create trunks to the PSTN.
- Create a dial plan to enable calls between extensions and the PSTN.
Configure your router to allow inbound calls
The next step is to allow inbound calls and remote access to the 3CX portal from outside of your local network by configuring the firewall of your router. For full details see the 3CX documentation. Here is a summary of the port forwarding you will need to configure, assuming you have chosen the defaults:
|
Service |
Port Range |
Transport Protocol |
|
SIP SIP over TLS 3CX Tunnel 3CX Portal (HTTPS) RTP |
5060 5061 5090 5001 9000-10999 |
UDP + TCP TCP UDP + TCP TCP UDP |
This procedure will also allow you to manage your PBX remotely using your 3CX domain.
Your router may have a SIP application-level gateway that is designed to facilitate outbound traffic from SIP phones to SIP servers; however, it may have unintended side-effects, so you should disable it if you can. Consult your router documentation for more information.
Make sure that you have successfully made the necessary changes by running the 3CX Firewall Checker by clicking on Firewall in the 3CX Dashboard, and then Run:
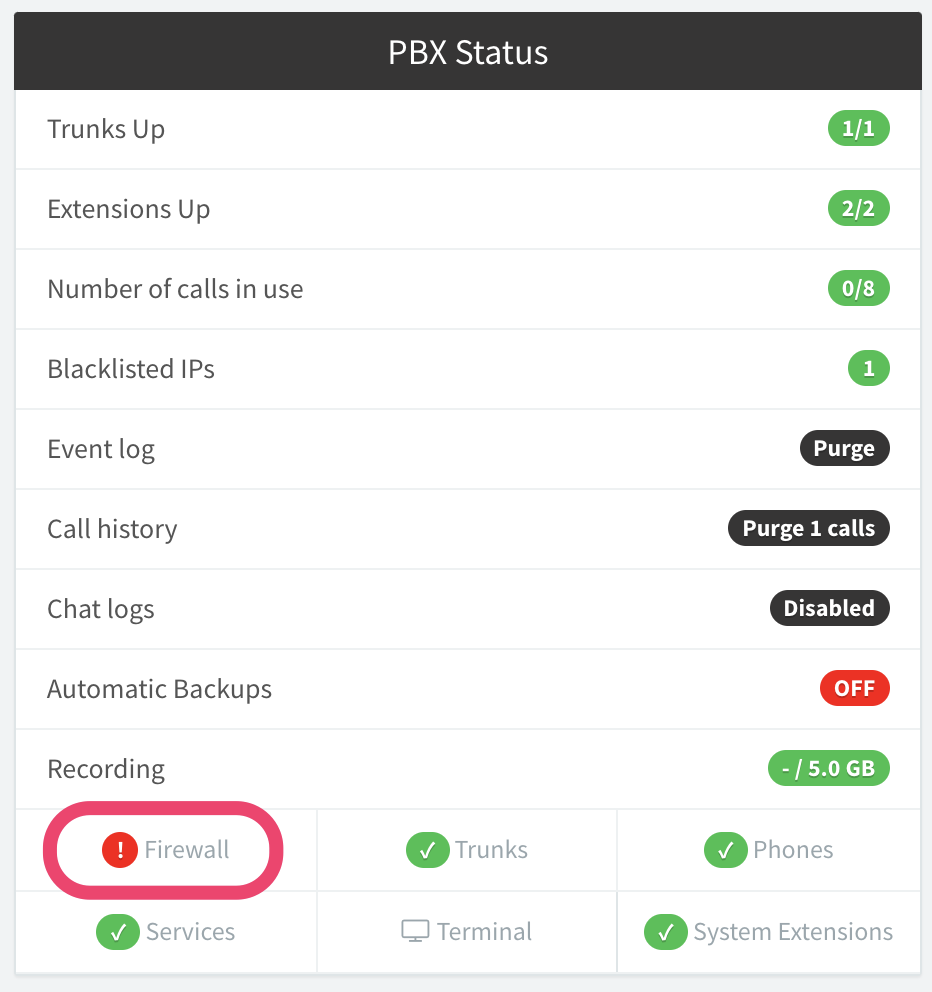
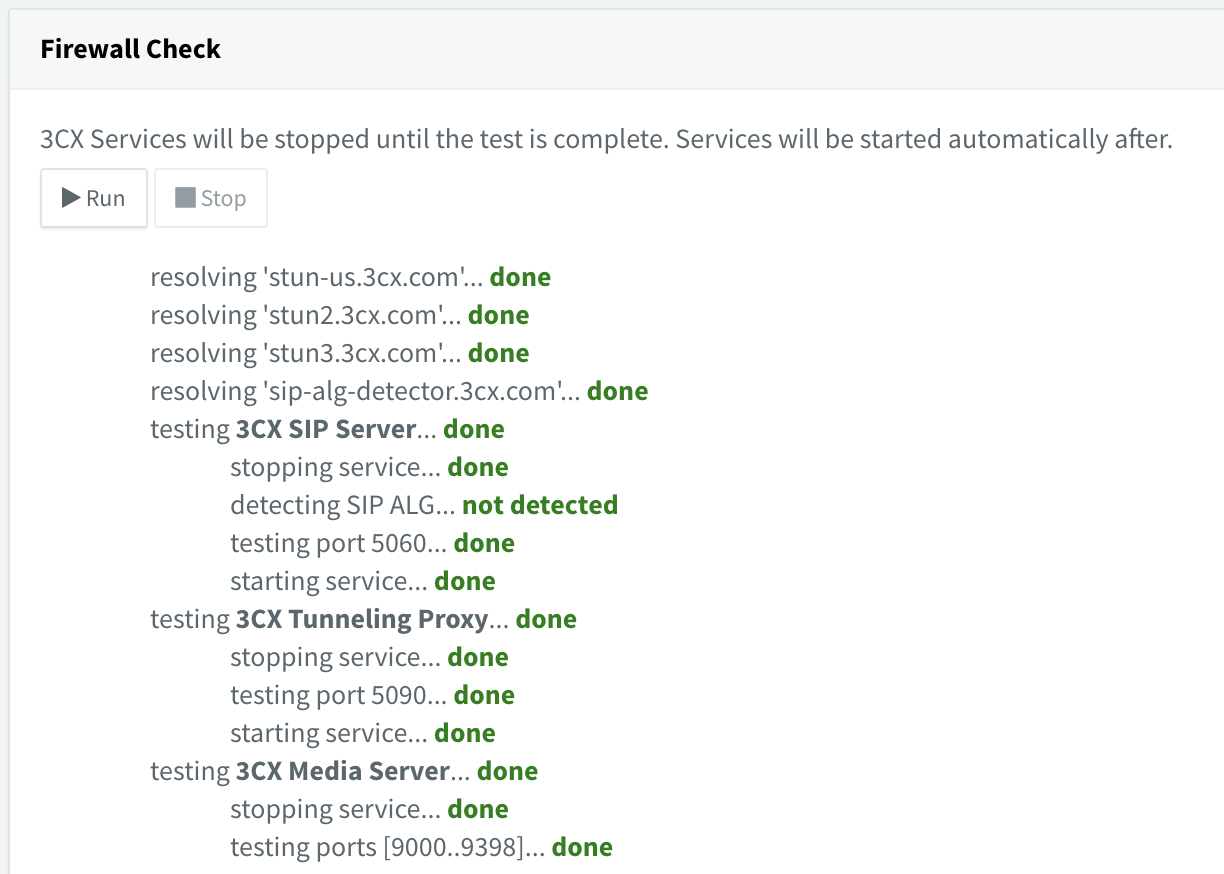
The consequences of a failed firewall check are that inbound calls will fail if SIP is not forwarded properly, or you will not be able to hear the other party if media is not forwarded. If you have a poor-quality Internet connection, some of the media port tests may fail if packets are being lost.
Define extensions
During initial setup, you created an extension for the operator, which is extension 100 by default:
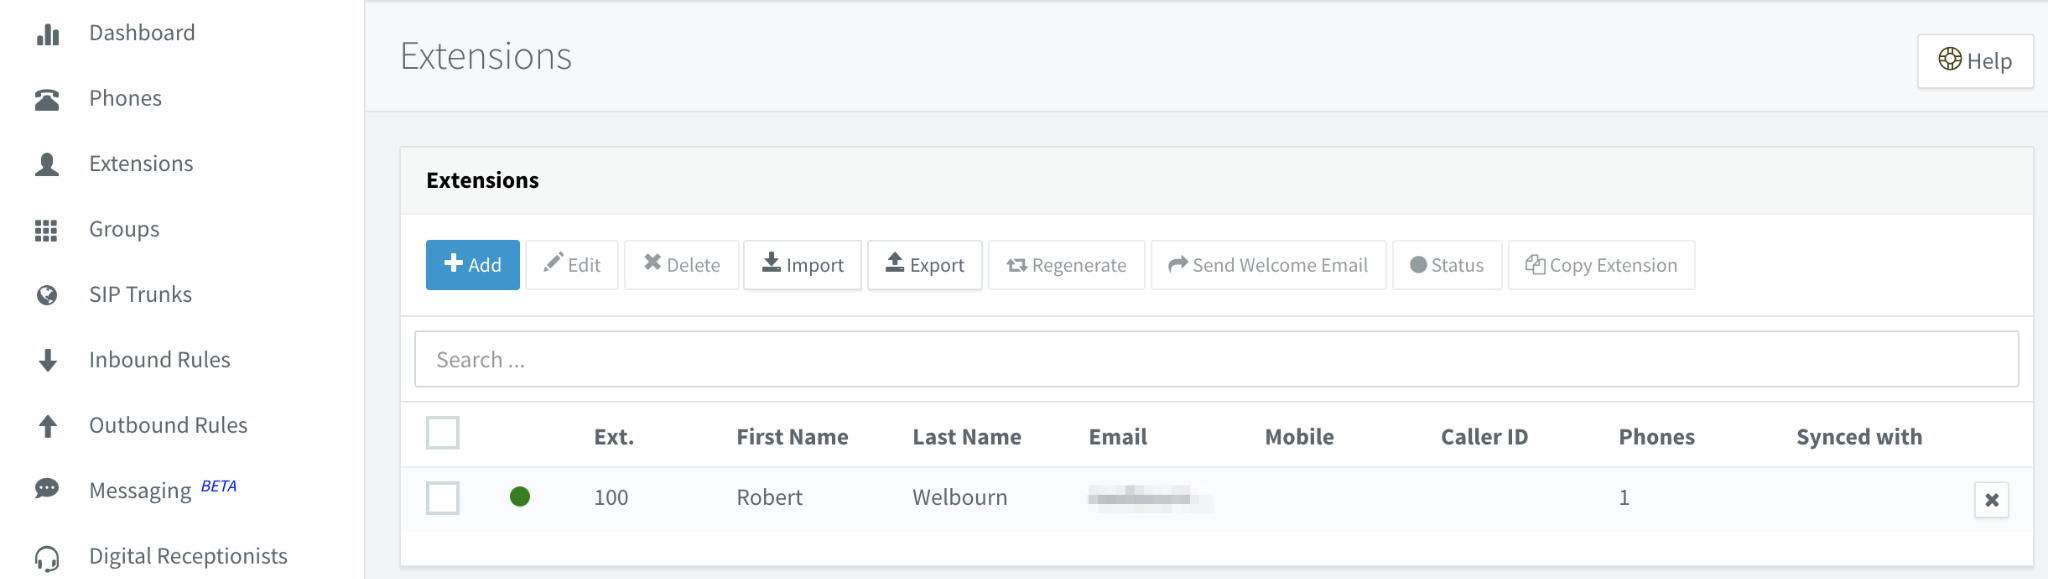
You should have received an email to the administrator's email address with login information for the extension, consisting of the extension number and an auto-generated password. Login using these credentials to activate the extension:

This user portal also includes a WebRTC client, so you can make and receive calls directly in your browser. 3CX also provides Chrome and Microsoft Edge browser extensions, which embed the softphone directly into the browser so you don't have to keep a tab open to handle calls.
It's no fun if you don't have anyone to talk to, so let's create another extension by clicking on Add and supplying the user's name and email address:
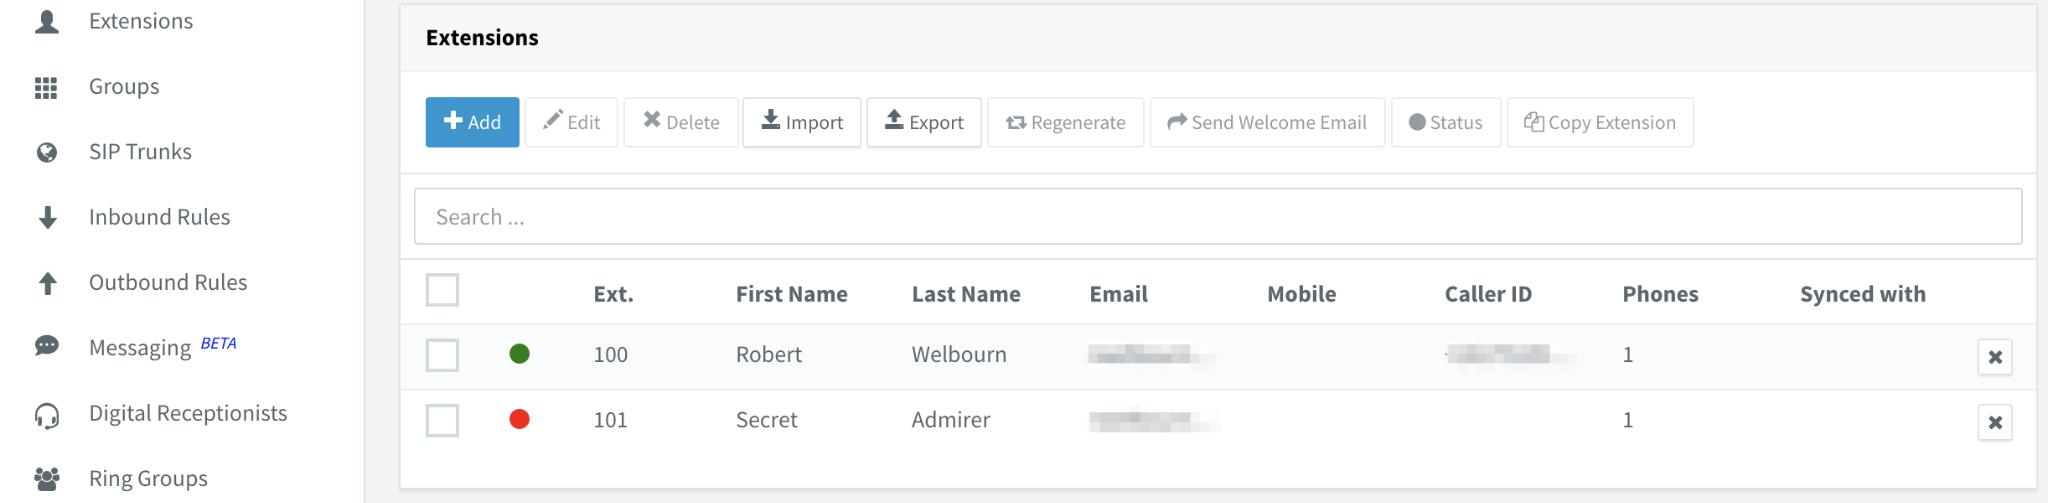
The new user will also receive a welcome email with similar login instructions.
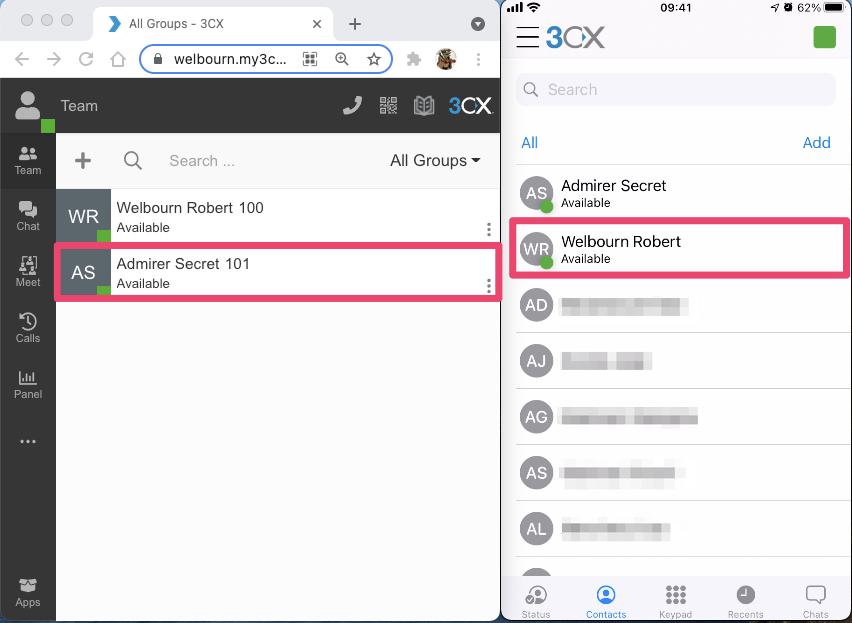
At this point it would be useful to have a second device to make and receive calls, so download the iOS or Android 3CX mobile app. Provision the extension using the QR code that was included in the welcome email. The QR code is also available from within the portal under the user profile.
Check that you can now make and receive calls between your web browser and the mobile app by simply clicking or tapping on the contact for the other extension:
Other things you can do with an extension include:
- Configure voicemail.
- Define rules for call forwarding.
- Configure a mobile number to use with call forwarding or simultaneous ring.
- Configure a phone number to be used for outbound caller id instead of the number associated with the SIP trunk.
Create a SIP trunk
Twilio configuration
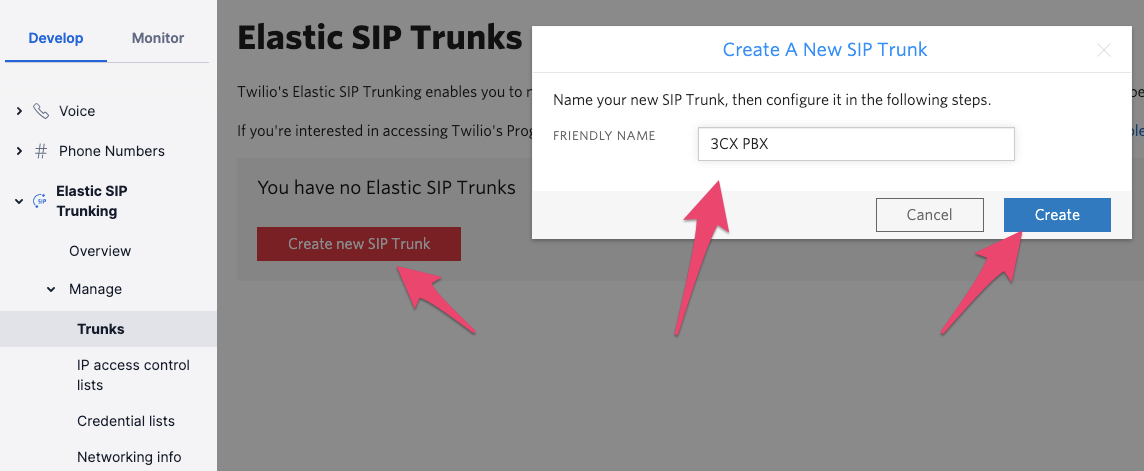
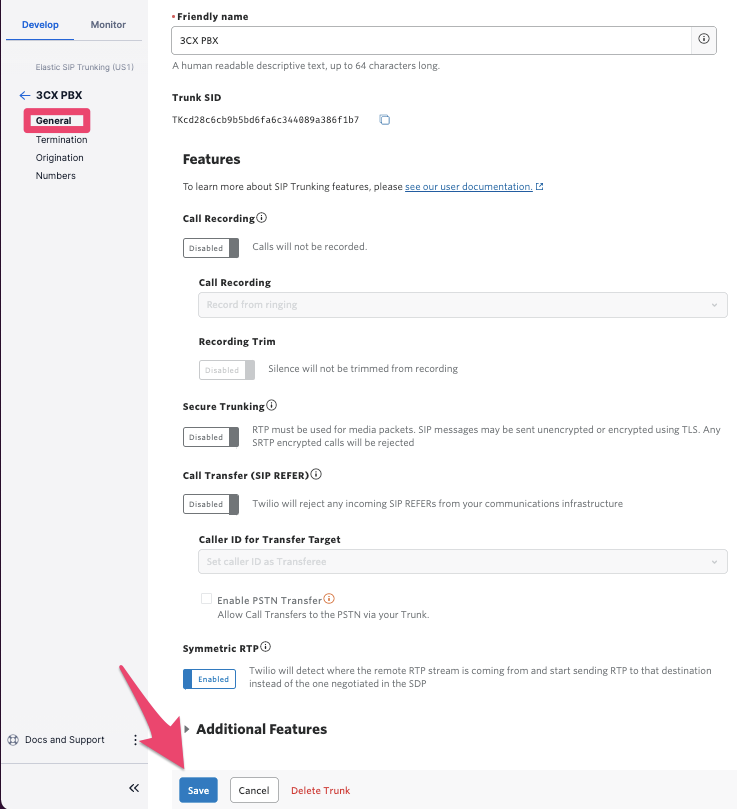
From the Twilio Console, select Elastic SIP Trunking > Trunks and click on Create new SIP Trunk. Give your trunk a descriptive name and click on Create:
Accept the defaults under General Settings and click on Save:
Next, click on Termination in the menu bar, which handles outbound calls from your PBX through Twilio to the PSTN.
You will need to find a name, unique among all Twilio customers, for your SIP domain. The following screenshot helpfully shows the domain name I chose as being available as I typed it in.
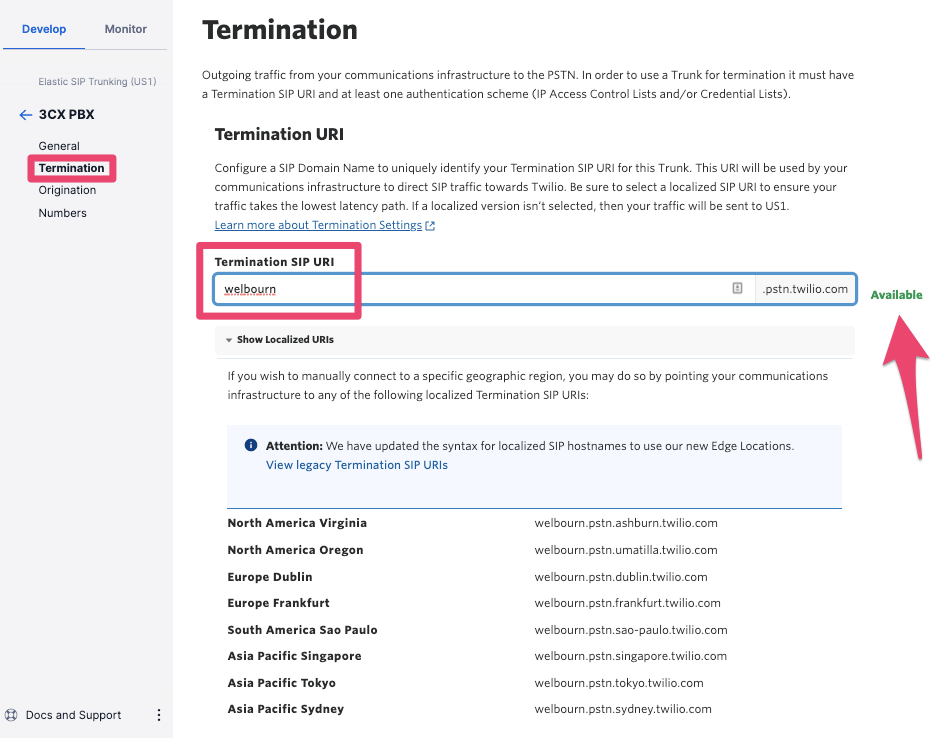
The domain name has the following purposes:
- It identifies the Twilio account to which your calls belong. When you make an outbound call from your PBX this domain name should appear in the SIP signaling, and for this reason you cannot instead use Twilio's SIP server IP addresses.
- As the terminology implies, it is used in DNS lookups to get the IP addresses of Twilio's SIP servers. As you can see, there are regional variants. When you configure your PBX, use the one that is closest to you for the best call quality.
The second part of the Termination settings specifies how Twilio is going to authenticate calls. The two choices are to use an IP access control list (ACL), or username/password credentials. Since our IP address is not static, we cannot use an ACL, so we will instead use credentials. Click on the plus sign next to Credential Lists, give your credential list a descriptive name, and add a username and password:
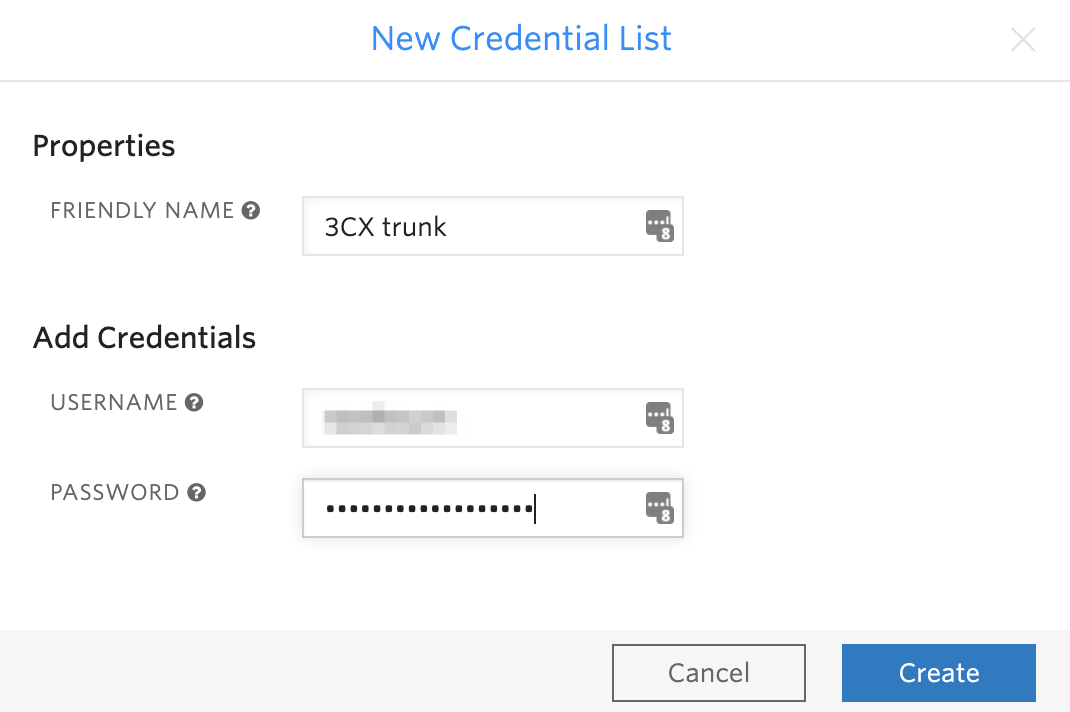
Click to Create the credential list, and then Save. If you need to change your credentials later, they can be found under the Elastic SIP Trunking > Authentication menu.
Now click on the Origination tab. This is for inbound calls from the PSTN to your PBX. Here you will specify how Twilio can contact the PBX.
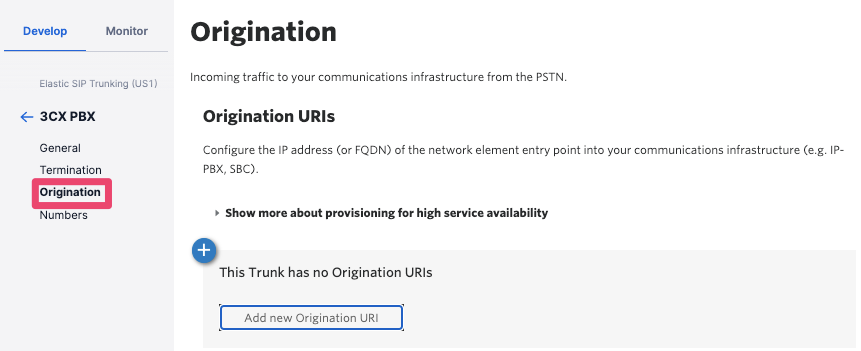
Click on the plus sign to create a new Origination URI (Uniform Resource Identifier, informally also called a SIP address). Fill in the details of your 3CX PBX's domain name prepended with the string sip: (in my case, sip:welbourn.my3cx.us). Click on Add and then Save:
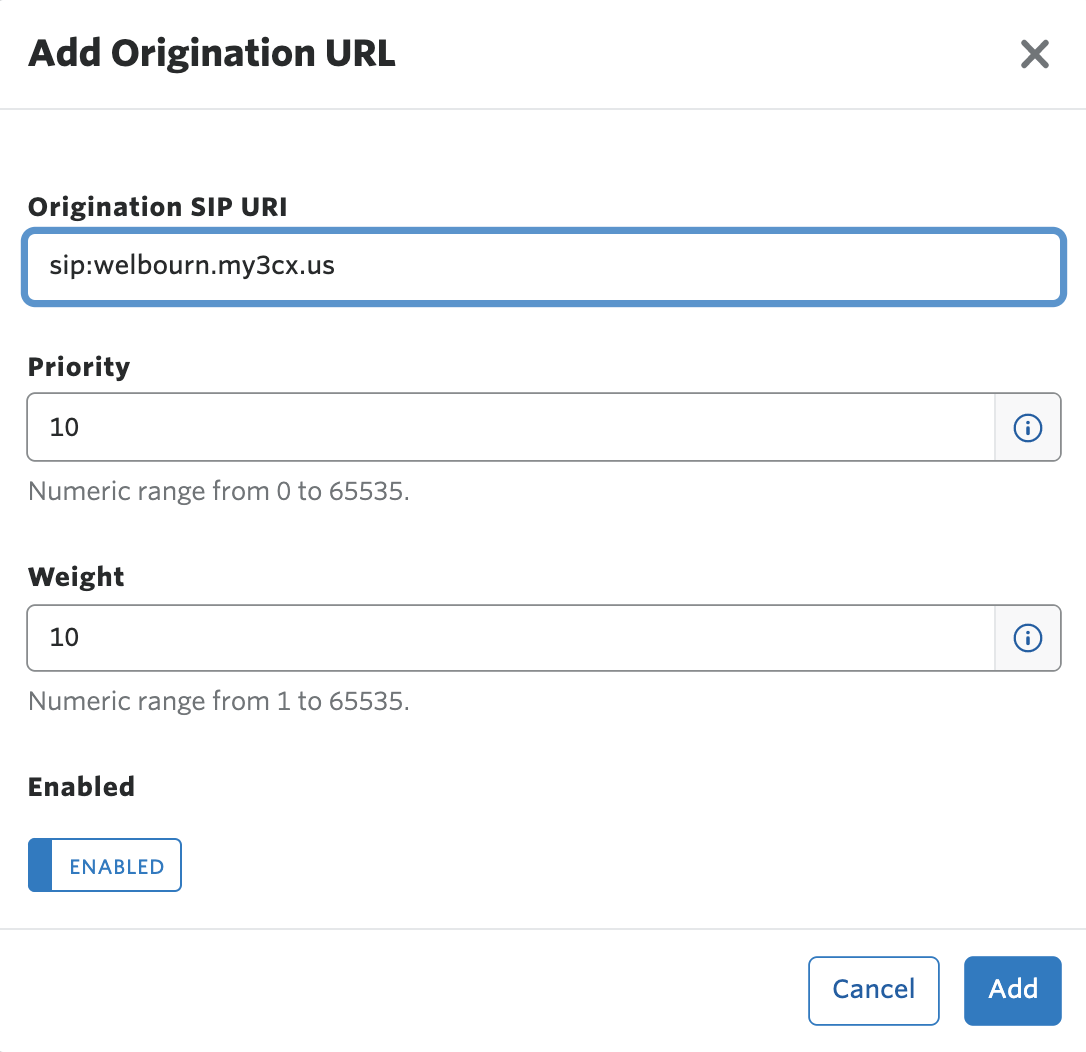
You can leave the Priority and Weight settings at their default values, as they are used for load balancing and failover, and only have an effect if there are multiple origination URIs.
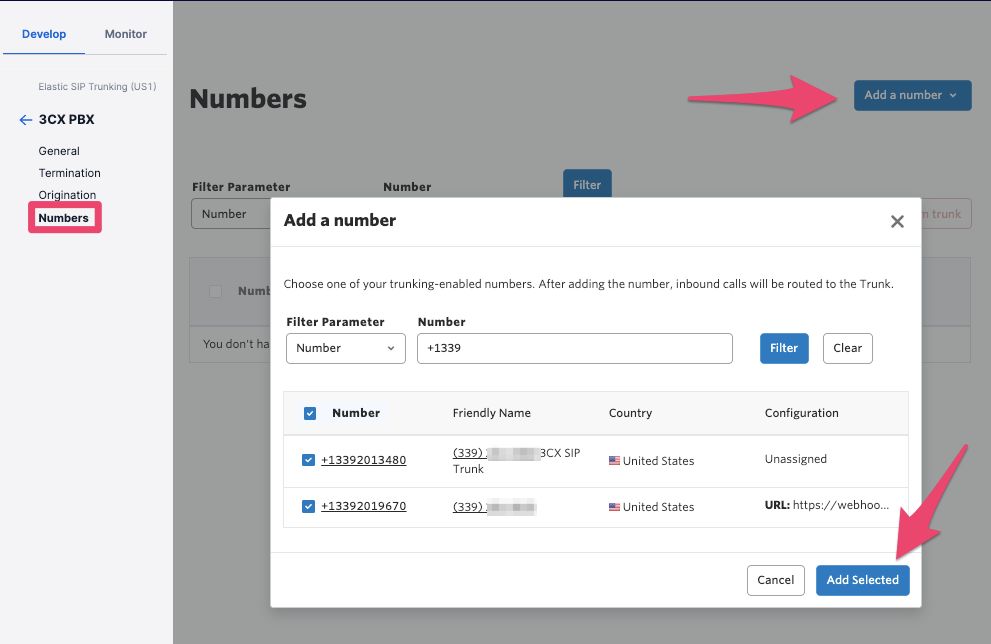
As the final part of configuring your SIP trunk on the Twilio side, you will need to add one or more phone numbers for inbound calls. Under your SIP trunk configuration, select Numbers and then Add a number. You can add one or more existing numbers from your account, or you can proceed to buy a new number:
3CX configuration
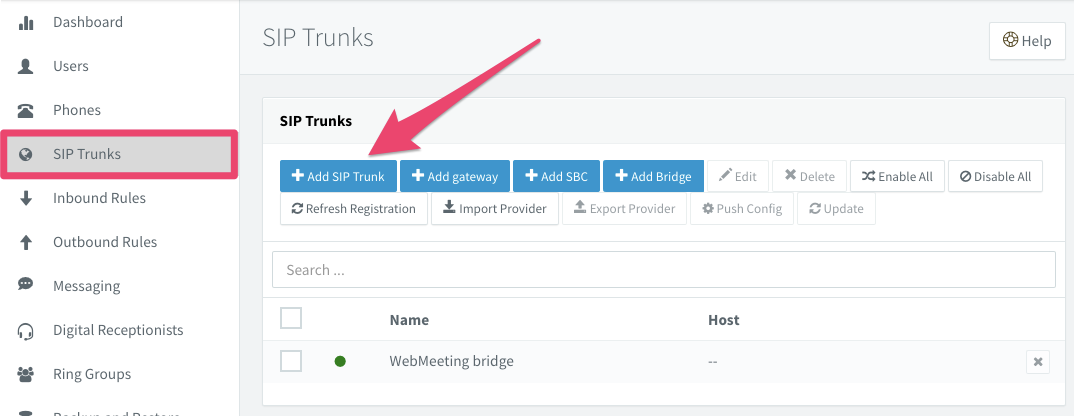
From the 3CX portal, select SIP Trunks > Add SIP Trunk:
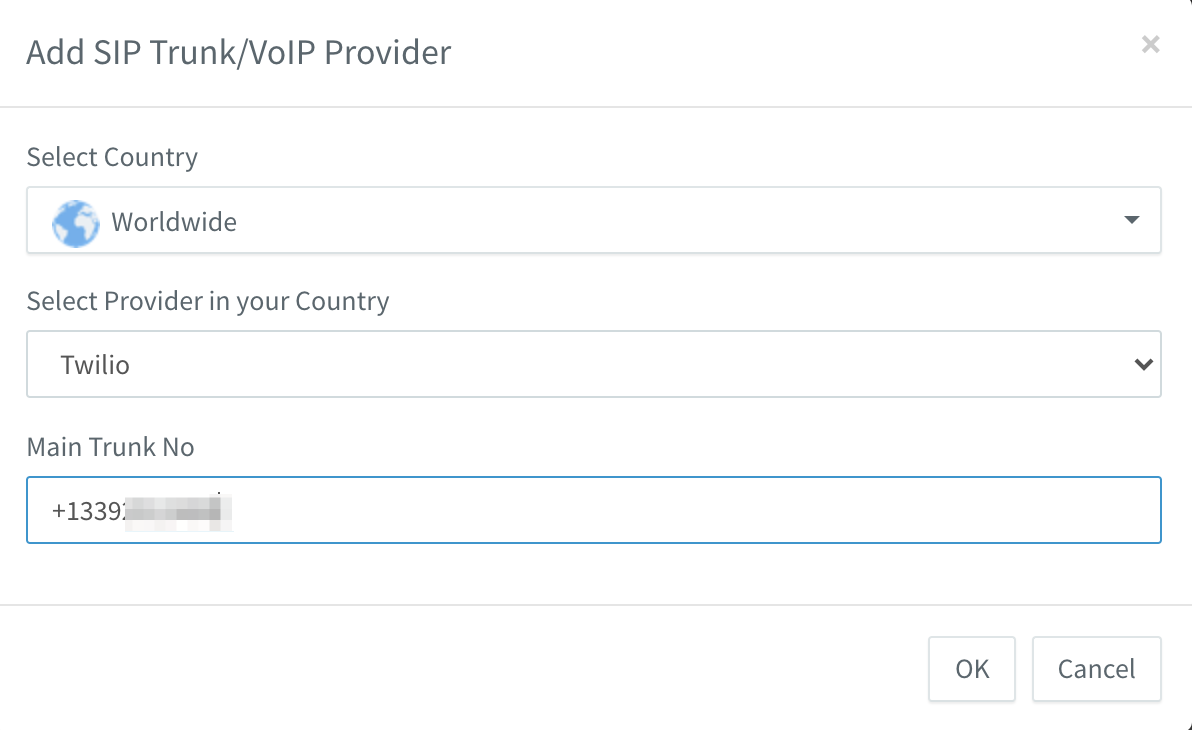
Under Country, select Worldwide, and then Twilio as your provider. Use one of the phone numbers you added to your trunk in the previous step as your Main Trunk Number, and then click OK. This number will be used as the default caller id for outgoing calls:
Now fill in the details of the newly created trunk:

Input the regional variant of the Twilio SIP domain name (in my case, welbourn.pstn.ashburn.twilio.com). Leave Type of Authentication as Do not require - IP Based, and enter the username/password we created within the Twilio Console. Note that the type of authentication is somewhat misleading, since Twilio will challenge the PBX to authenticate using the credentials. Click on OK when done.
Now make a call from the PSTN to your main trunk number, and verify that the default operator extension receives the call. If the call fails, check the following:
- If the call is not reaching the 3CX PBX at all, verify that the Origination URI matches the 3CX FQDN, that the 3CX server is running, and is accessible from the Internet. Try using the external management URL to test its accessibility.
- Check that the phone number you are calling is associated with the trunk in the 3CX trunk configuration, and that it is configured in the E.164 format (see below).
Create a dial plan
If all is well, inbound calls will now be routed to the operator extension we initially created. You can also make calls between extensions. What you cannot yet do, however, is make outbound calls to the PSTN. For that, you need a dial plan.
From the 3CX Dashboard, select Outbound Rules > Add:
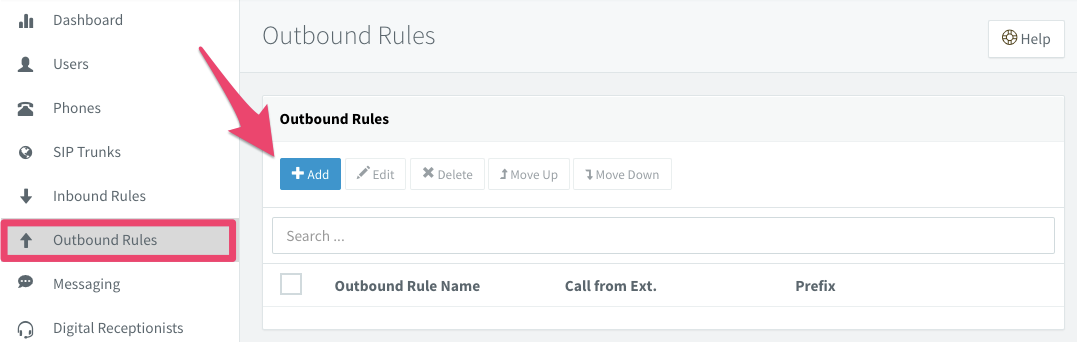
Create a rule that routes E.164 format numbers to your Twilio SIP trunk. Simply look for numbers which start with the '+' sign and forward them to the trunk:
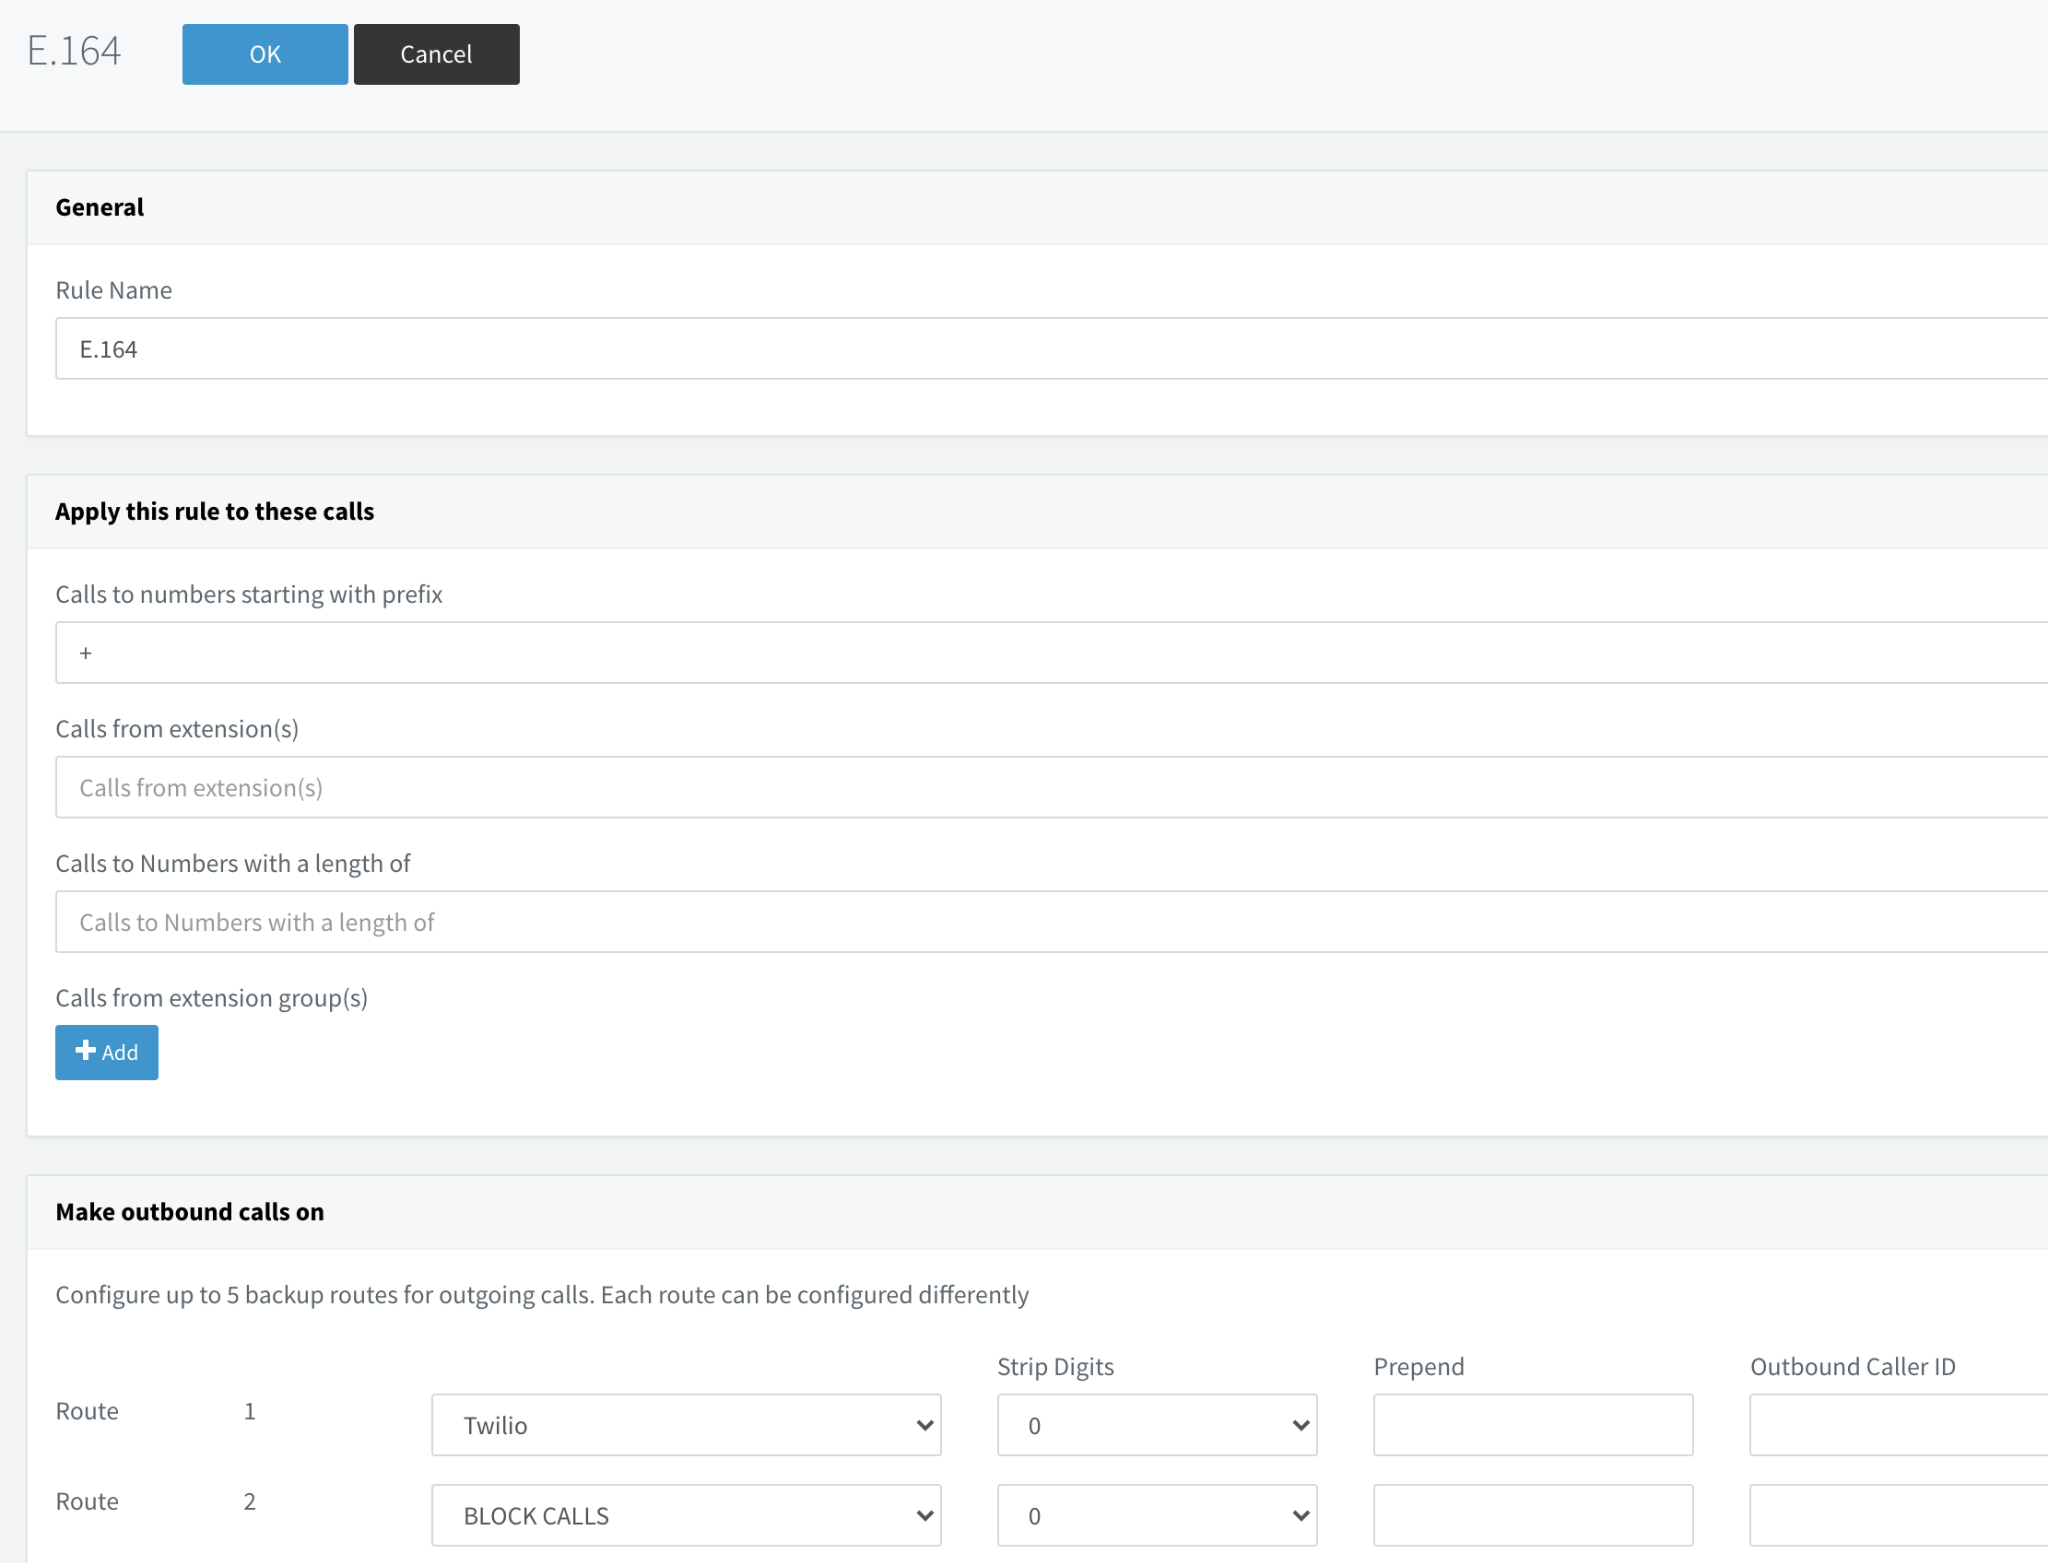
This is the minimum you need for a dial plan, which will work globally with Twilio. That said, it is normal to support national dialing conventions, depending on where your PBX will be deployed. Here are some sample dial plans for selected countries:
|
Country |
Rule |
Match Prefix |
Number of Digits |
Strip Digits |
Prepend |
|
US/Canada |
International |
011 |
3 |
+ | |
|
North American Numbering Plan (NANP) |
10 |
+1 | |||
|
UK |
International |
00 |
2 |
+ | |
|
Standard Trunk Dialing |
0 |
1 |
+44 | ||
|
Irish Republic |
International |
00 |
2 |
+ | |
|
Standard Trunk Dialing |
0 |
1 |
+353 | ||
|
France |
International |
00 |
2 |
+ | |
|
National dialing |
0 |
10 |
1 |
+33 | |
|
Australia |
International |
0011 |
4 |
+ | |
|
National dialing |
0 |
10 |
1 |
+61 | |
|
FreeCall |
1800 |
10 |
+61 | ||
|
FreeCall (short) |
180 |
7 |
+61 | ||
|
Local rate |
1300 |
10 |
+61 | ||
|
Local rate (short) |
13 |
6 |
+61 |
The rules are evaluated in the order given, so, for example, matching the international prefix '00' should be done before matching the national dialing prefix '0'. See here for a comprehensive set of examples of outbound rules.
Note that emergency calling should not be configured as part of the regular dial plan; see below.
Once you have built your dial plan, make outbound calls to verify that E.164 and national dialing rules work correctly. If the calls fail, check the following:
- That you have spelled the Twilio SIP domain for your account correctly in the 3CX configuration.
- That the credentials at both ends match.
- That you have matching entries in your 3CX dial plan for the number you have dialed, and that they do indeed forward to the Twilio SIP trunk.
Direct Inward Dialing
If you want to route inbound calls directly to individual extensions, you will need to assign additional phone numbers to the trunk, both in the Twilio Console and in the 3CX dashboard. These phone numbers are known as Direct Inward Dialing numbers, or DIDs.
In the Twilio Console, click on the Numbers tab of your 3CX SIP trunk, then either buy a new number or use a number you already have available in your account.
In the 3CX dashboard, select the trunk, then the DIDs tab:
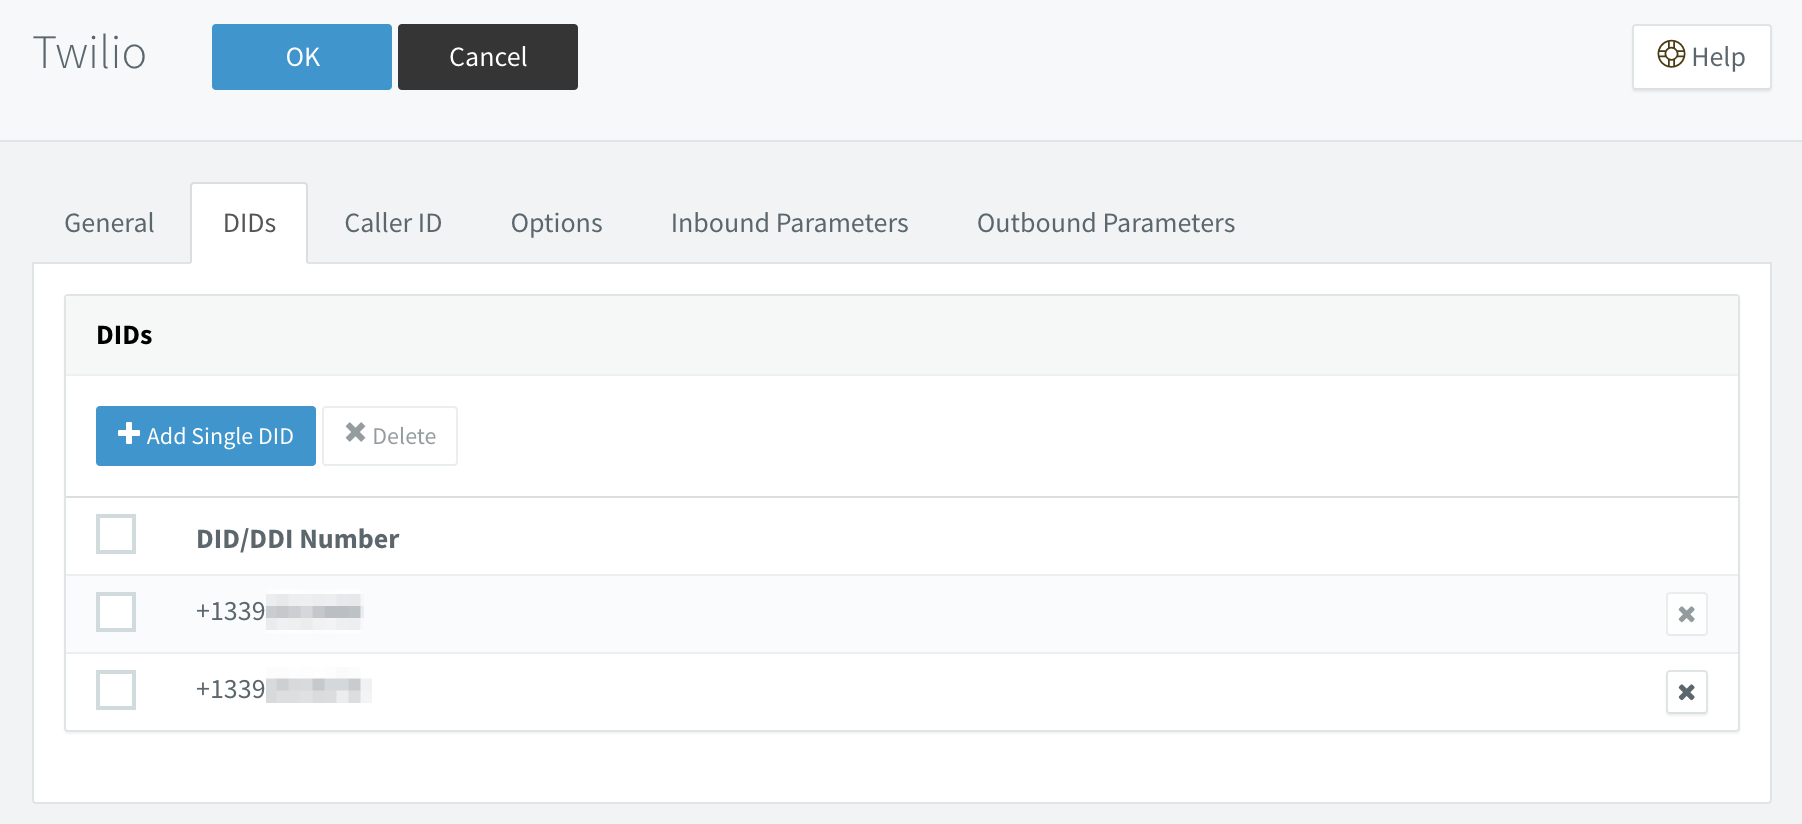
Click on the Add Single DID button, type in the phone number, and then click OK.
Next, select the extension for which you want to add the DID, and click on the General tab:
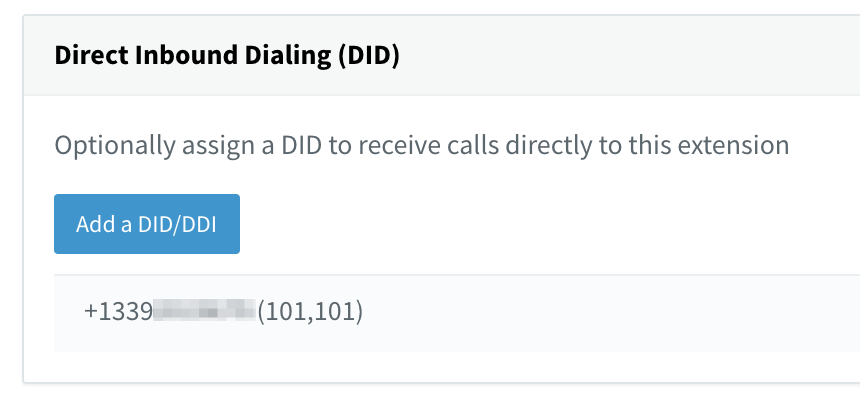
Click Add a DID/DDI, select the number from the drop-down list of available numbers, and then click OK. Now call the DID and verify that it routes to the expected extension.
Configure SIP phones
The 3CX mobile apps and browser client are enough to make and receive calls. However, many people prefer to have a real phone handset to use when their computer is not readily available. To use a SIP phone with 3CX, make sure it is on the list of supported phones, and that the firmware is a supported version.
We cannot cover all the supported devices here, but suffice it to say that you will most likely have to upgrade the firmware after you have unboxed your phone(s). Please follow your phone's documentation to access its management functions and upgrade the firmware. It is good practice to reset your phone to its factory default settings as a first step.
Once the phone has been upgraded, it will advertise its presence on your local network using the multicast IP address 224.0.1.75. The 3CX PBX will automatically detect the phone and it will be displayed in the Phones tab of the 3CX dashboard:
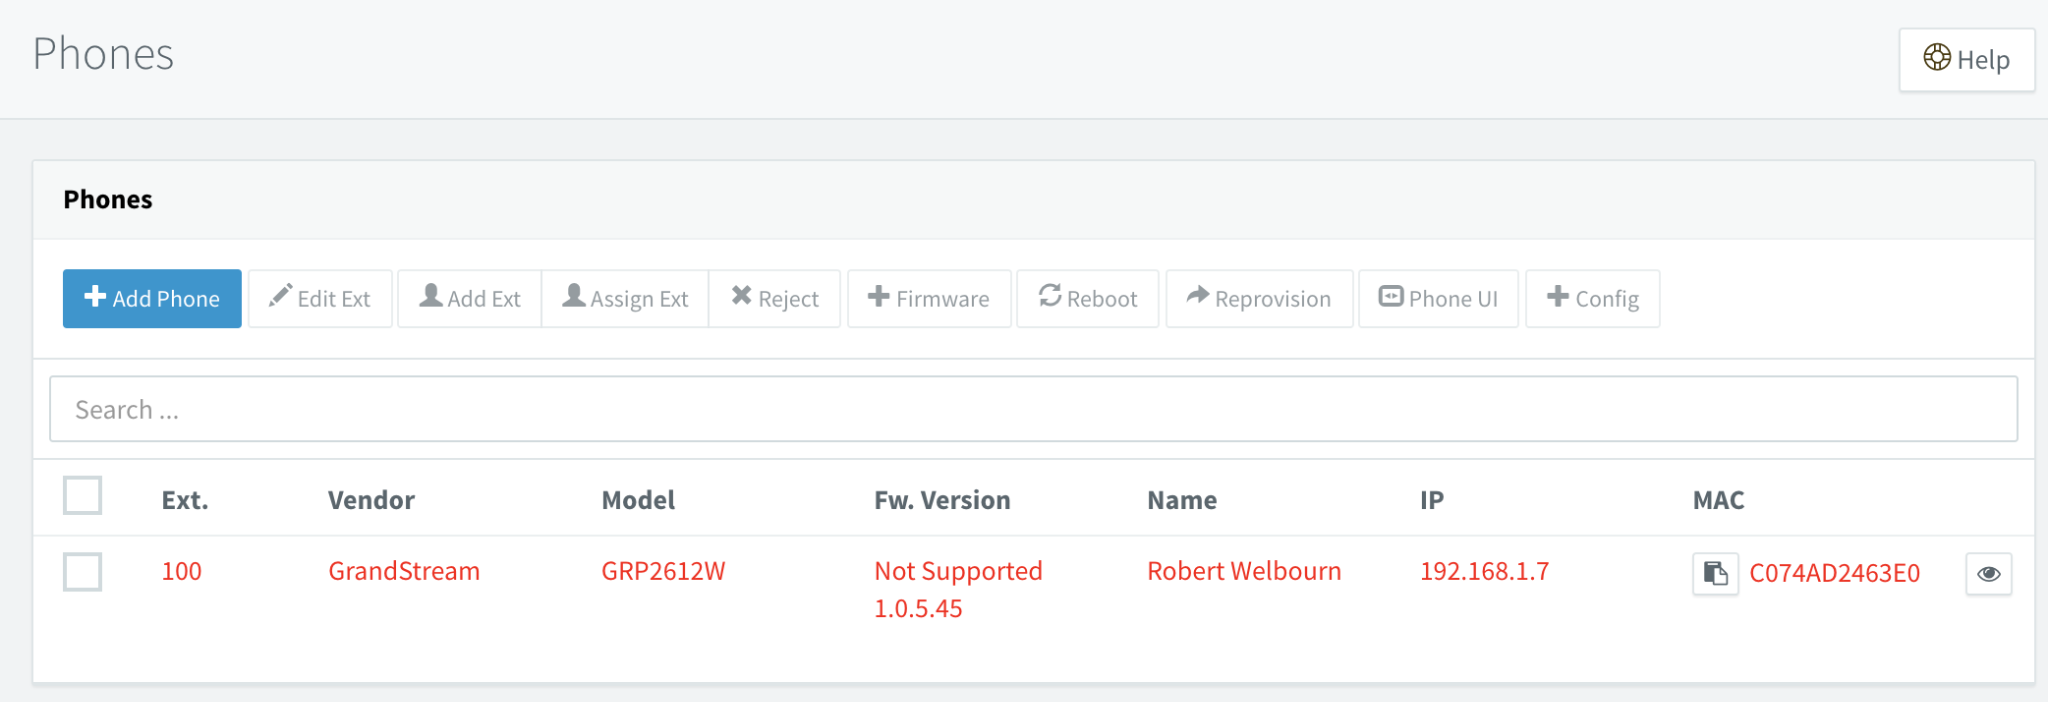
You can then assign the phone to an extension, and map capabilities to the phone's soft keys. See the section on plug-and-play provisioning in the 3CX Configuring IP Phones web page. Note that in the example above there is a more recent version of the phone firmware loaded than the one that 3CX officially supports, which is nevertheless backwards-compatible.
If the phone does not automatically appear in the list, here are two possible causes:
- The phone's IP address may have been blocklisted if it previously had credentials configured and was attempting to register with the PBX. This can happen if you have reinstalled the PBX software. From the 3CX dashboard, click on IP Blacklist and clear the entry if applicable.
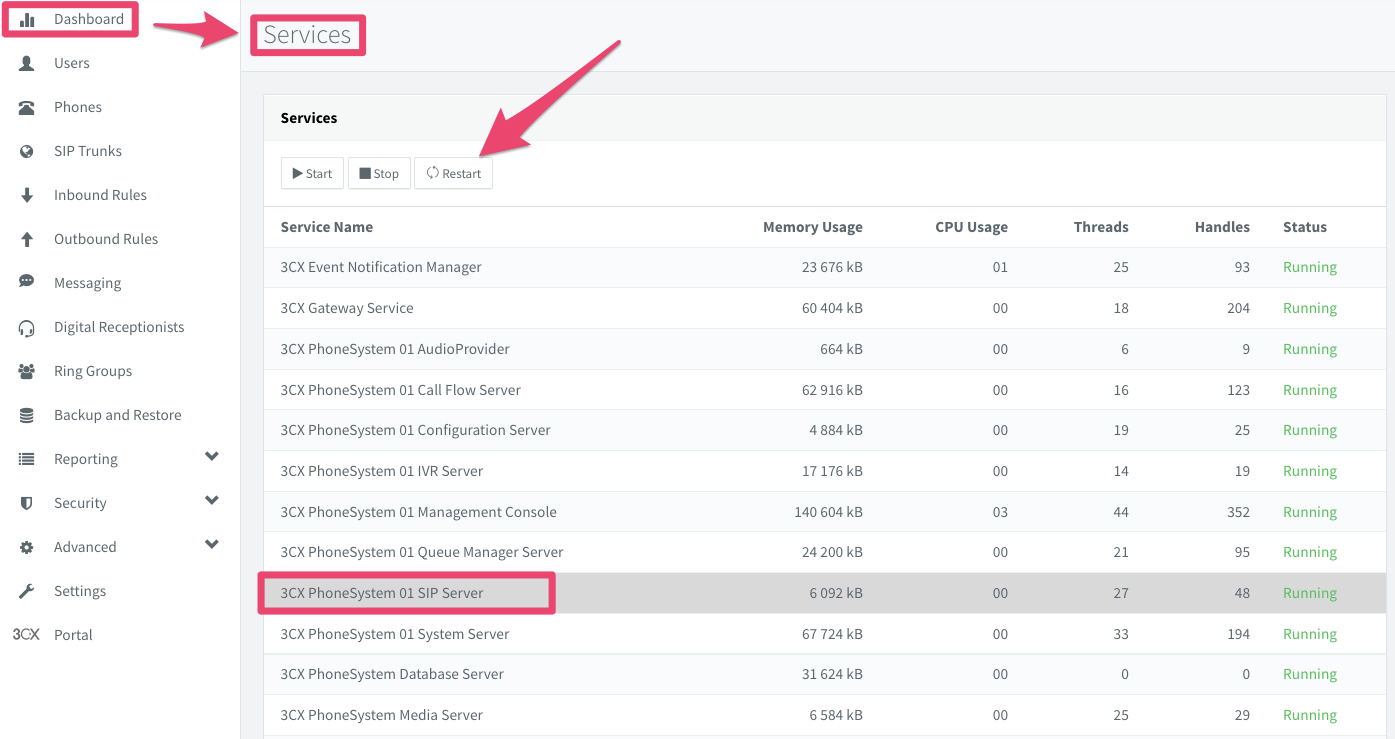
- The PBX may not be listening to the SIP multicast group. Run the
netstat -gcommand on your Pi to discover whether or not it is:
If sip.mcast.net is missing from the list, you will need to restart the SIP Server process. From the 3CX dashboard, click on Services, then select 3CX PhoneSystem 01 SIP Server and click on the Restart button. Once the server has restarted, re-run the netstat -g command to verify that the server is now listening on the SIP multicast group. Note that this situation can occur after the Raspberry Pi has been rebooted, specifically if you are using the WiFi interface. Running the firewall check also causes the SIP Server process to rebind to the SIP multicast group.
If you cannot get plug-and-play provisioning to work, I recommend that instead you follow the procedures for provisioning legacy phones which are outlined in the 3CX guide.
Dial extensions directly using Twilio Programmable Voice
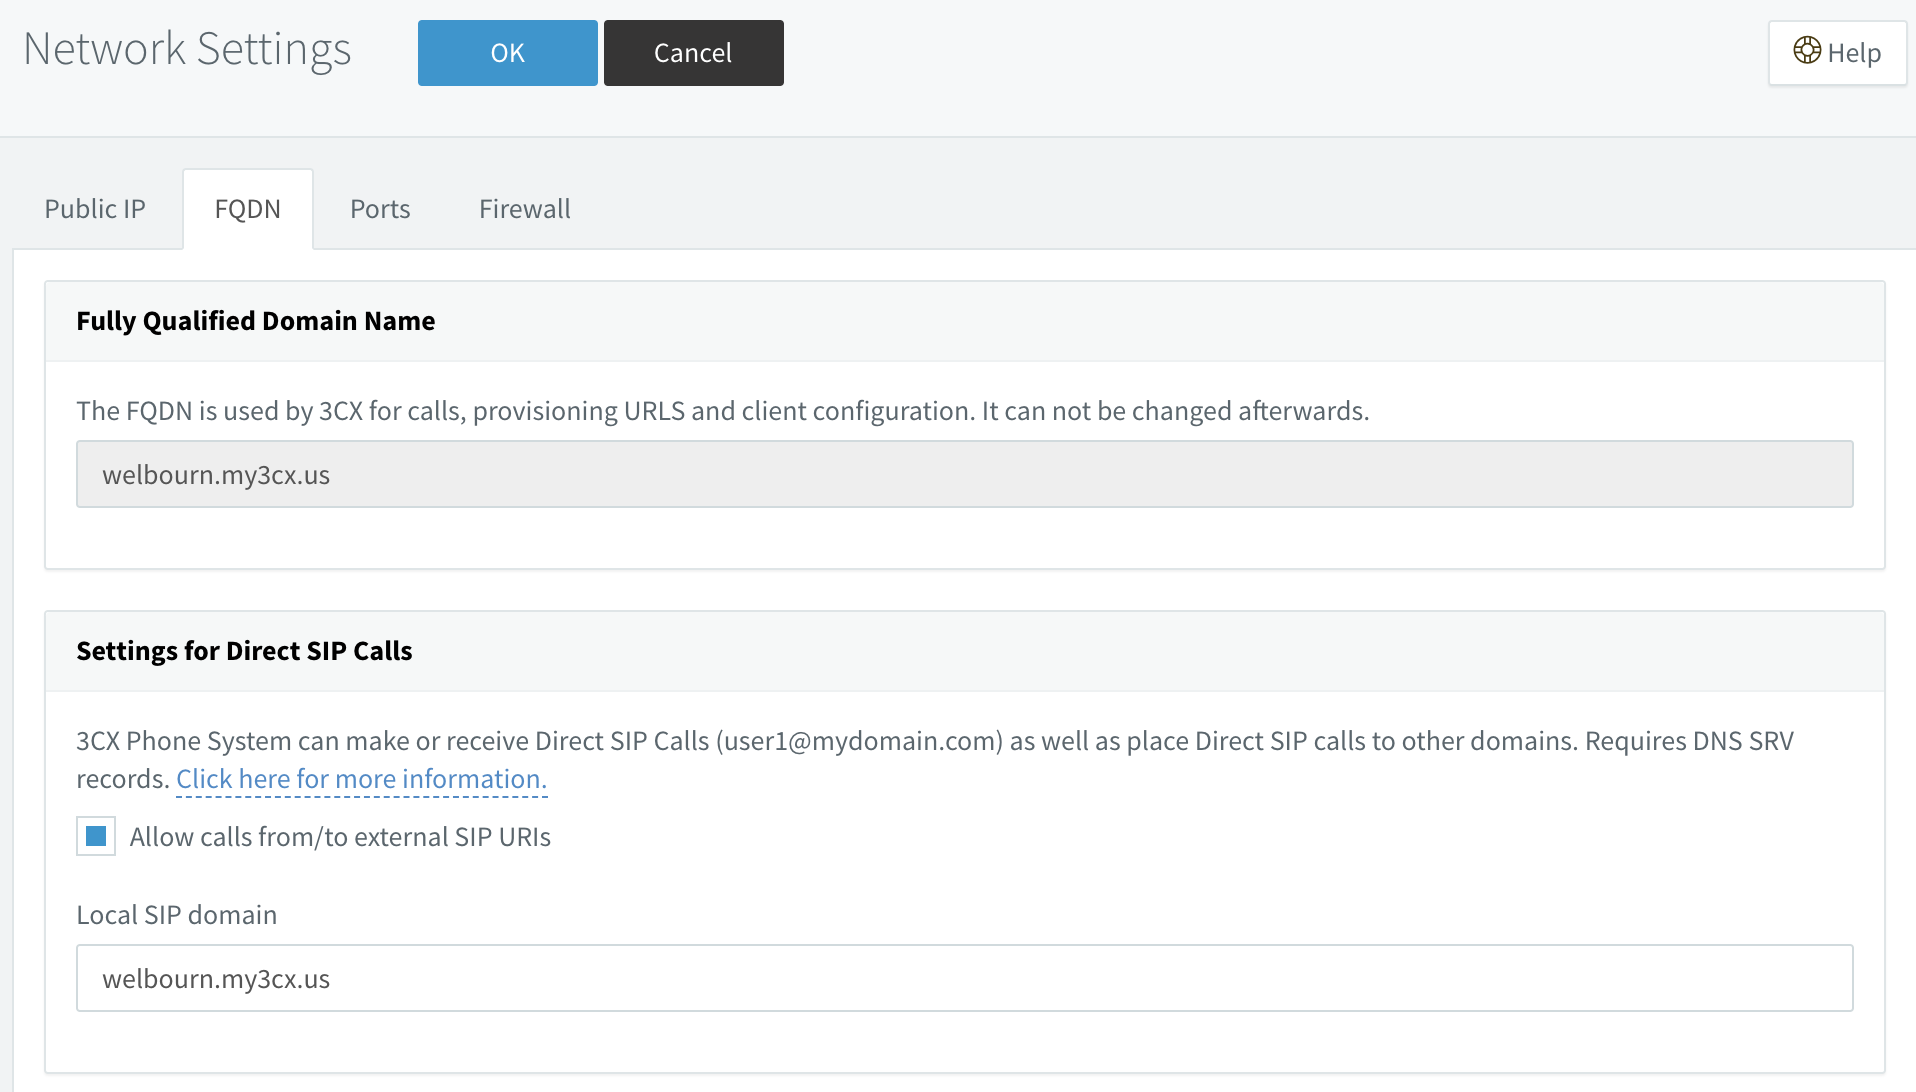
Rather than assigning a DID to each extension, you can call them directly using their individual SIP addresses. If you want to do this, you must first enable it in the 3CX portal, under Network Settings > FQDN > Allow calls from/to external SIP URIs:
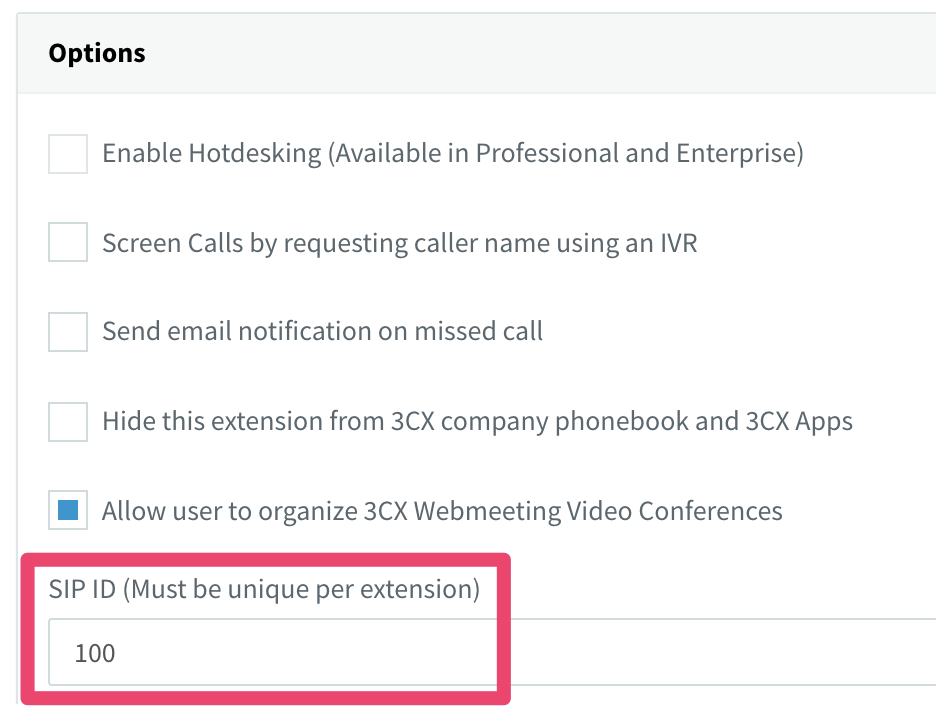
But what is the extension's SIP address? The answer is that it won't have one until you configure it. I suggest adopting the convention that the extension number will be the user portion of the SIP address, so an example address on my PBX might be sip:100@welbourn.my3cx.us. You could, if you prefer, use some variation of the user's name, such as sip:secret.admirer@welbourn.my3cx.us.
To set the user portion of the address, select the extension and click on the Options tab. Fill in the box labelled SIP ID and click OK:
We can now dial the extension directly using the following TwiML:
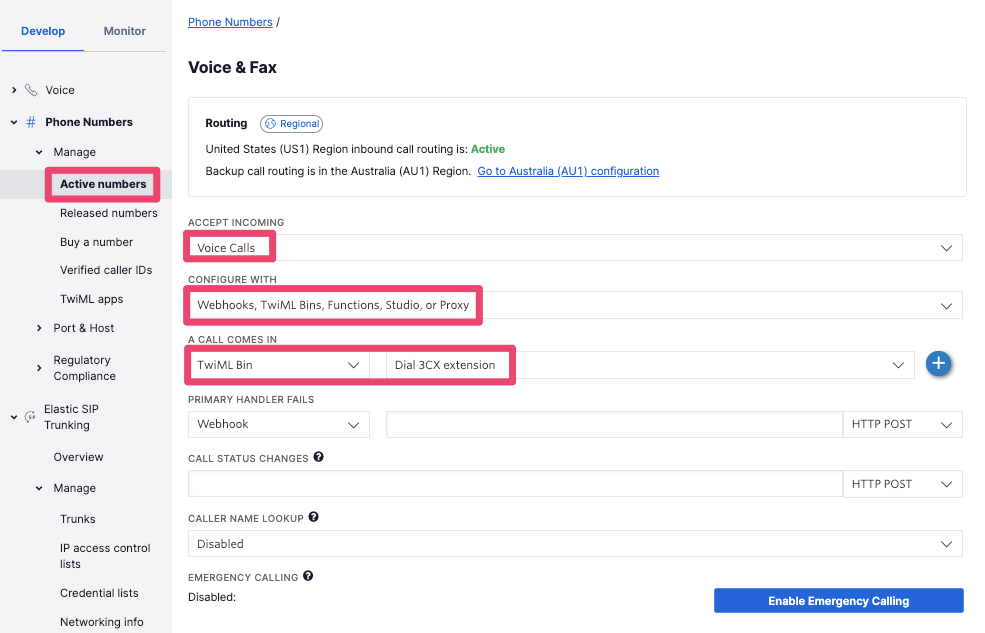
Check that this works by copying and pasting this XML into a TwiML Bin—making sure that you substitute your own extension number and 3CX FQDN—and by configuring an available phone number in your account to use the TwiML Bin. In the Twilio Console, navigate to Phone Numbers > Active numbers, click on your desired phone number, then configure its voice capabilities in the Voice & Fax section:
- Under ACCEPT INCOMING, select the drop-down item Voice Calls.
- Under CONFIGURE WITH, select the drop-down item Webhooks, TwiML Bins, Functions, Studio or Proxy.
- Under A CALL COMES IN, select the drop-down item TwiML Bin, and then the TwiML Bin you created earlier. (Mine is called 'Dial 3CX extension'.)
- Click on Save.
Here are some of the things you could build using this capability:
- In Twilio Flex, set an agent's contact URI as their direct SIP extension.
- Build a dial-by-name directory using an exported list of extensions.
- Use the caller's direct SIP extension with an outbound dialer app.
Emergency calls
Before you consider making emergency calls, you need to register an address where the police, fire brigade or ambulance service will show up when you are in need. In the Twilio Console that can be found under Phone Numbers > Regulatory Compliance > Addresses. Navigate to that page in the Twilio Console and click on Create an Address:
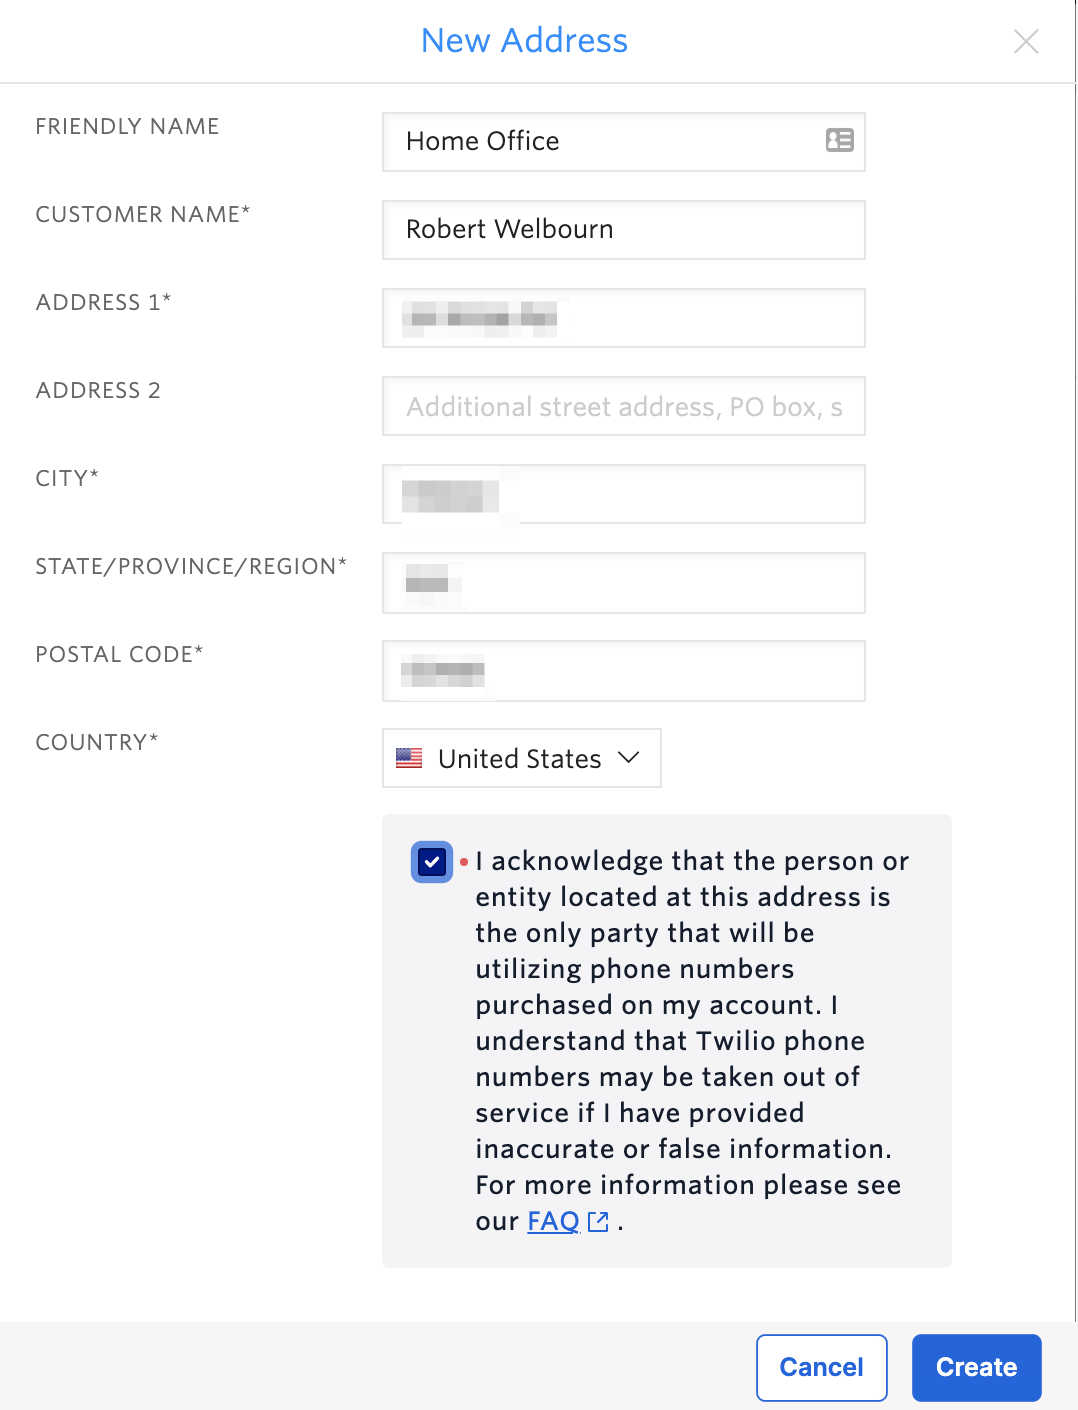
Fill in the details and click on Create.
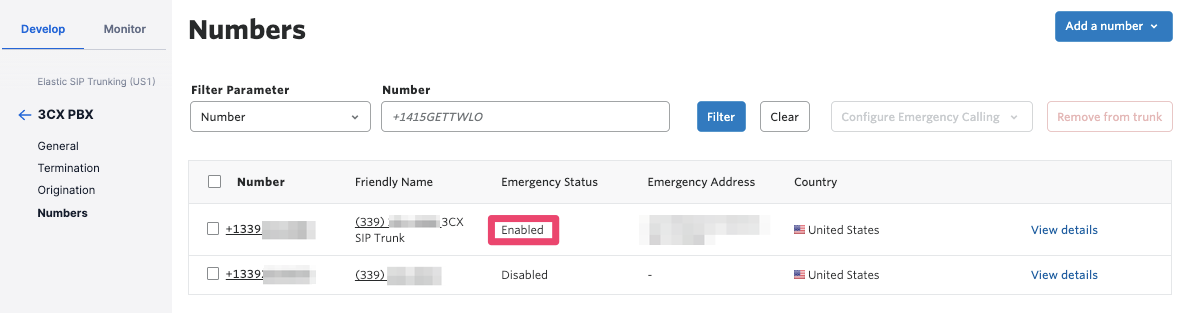
Next, you will want to associate your SIP trunk phone number with the address and enable emergency calling. Follow the instructions in the Twilio SIP trunk documentation to do this. It will take a few minutes for emergency calling to be activated on your number, so be patient and refresh the page occasionally until this happens:
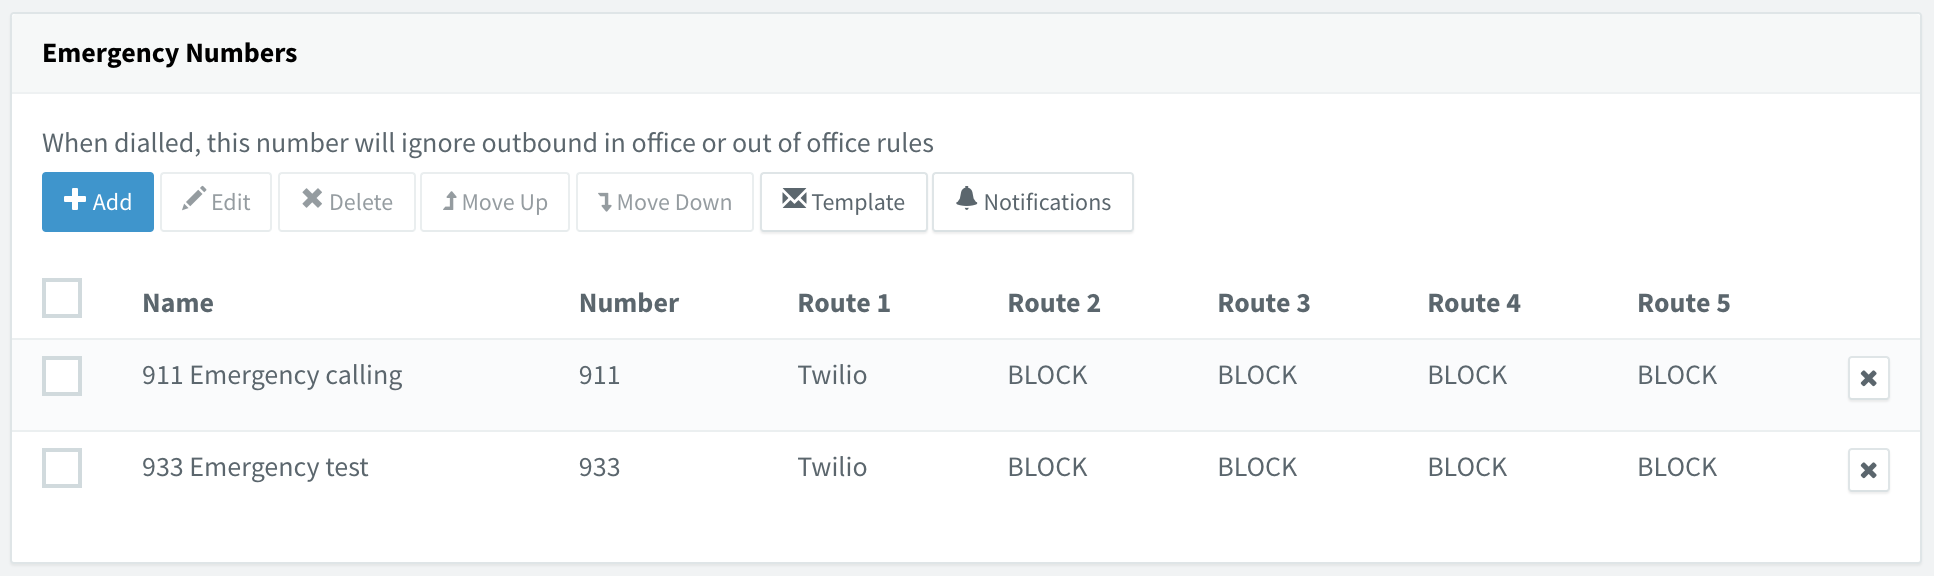
Next, you will need to configure emergency calling in 3CX. This is performed under Settings > General > Emergency Numbers, and very much resembles configuring the dial plan. For reference, my US emergency settings look like this, with no digits stripped or prepended:
One important thing to do when configuring emergency calling is to make sure the caller ID used is one enabled for emergency calls. If you have not given an extension its own specific caller ID, it will use the number associated with the trunk. If you are using a different caller ID and that caller ID is not a phone number associated with your registered street address, then you should override the caller ID to be your SIP trunk's main number.
For emergency calling, the desired result is that if the public safety dispatcher calls back, then they should reach the person making the emergency call, or failing that, the receptionist or security desk.
3CX has some additional settings for handling emergency calls that allow notifications to be sent out to site security personnel when an emergency number is dialed.
Note that inbound calls from the emergency numbers will override any out-of-office settings.
If you are in the US or Canada, you can test your configuration by dialing 933, which will route the call to the emergency test service. This should confirm that emergency calling is correctly set up, and will read back the registered street address.
Secure your PBX
The biggest challenge with securing SIP PBXs is bad actors gaining access to them through SIP registration, and then making fraudulent phone calls to high-cost destinations.
By default, any extension you define will only be allowed to access the PBX from your local network, and external attempts will be rejected. Here's an example of a hacking attempt pulled out of my PBX's event log, directed at a commonly used extension (101), emanating from a US-based hosting provider:

If you do need remote access for an extension, then that can be enabled by going to the extension configuration, and selecting Options > Restrictions, then unchecking the box labeled Disallow use of extension outside the LAN.
That said, 3CX does itself limit attempts to register SIP devices using your Pi's public IP address, and will block IP addresses after multiple consecutive failed attempts. 3CX also operates a crowd-sourced blocklist of observed bad actors, to which your PBX will be subscribed by default. In addition to the auto-block capabilities, you can also explicitly block or allow traffic from IP address ranges in 3CX itself, and fine-tune the auto-block settings in the 3CX dashboard under Security > Anti-Hacking.
If you want to block all external SIP traffic except for Twilio's IP addresses, you can build an allow-list of Twilio's SIP trunking IP addresses if your firewall supports this. Most consumer-grade routers, however, do not. As an alternative, you can use Raspbian's recommended firewall tools, briefly described here.
If you do allow extensions to have remote SIP access, then you should mitigate the impact of a successful hack by restricting the destinations your PBX can call in the Twilio console.
Finally, you may decide that you don't want to allow remote management, and can disable it by removing port forwarding on TCP port 5001. If you do allow it, ensure you’re using a strong password.
FAQs
Does 3CX support secure SIP trunking?
3CX does not currently handle Twilio's use of wildcard TLS certificates for SIP domains, so outbound SIP-over-TLS calls from the PBX to Twilio will fail. On the other hand, if you only have inbound traffic from Twilio to 3CX, secure trunking can be made to work.
Can I forward calls to external numbers using the Twilio SIP trunk?
Twilio strictly limits what caller IDs are allowed to be used for outbound calls in an effort to stop our platform from being used by bad actors using fake caller IDs. By default you must use either a Twilio phone number or a verified caller ID. Calls which are forwarded carry their original caller ID, and so are likely to be blocked. If this is an important feature for you, please contact your Twilio representative. In the future we expect this restriction to be relaxed when the original call has been attested using the STIR/SHAKEN framework.
Conclusion
Congratulations! You now have a local instance of 3CX running on your Raspberry Pi, and can practice the lost art of having phone conversations, all done through a Twilio Elastic SIP Trunk. You can read more about Elastic SIP Trunking here.
Robert Welbourn is a Voice Solutions Architect in Twilio's North American Mid-Market team. He grew up in a pub in Yorkshire, which explains quite a lot. You can find him on Twitter as @RobertWelbourn.
Thanks are due to Nick Digalakis of 3CX who provided help in this endeavor.

Related Resources
Twilio Docs
From APIs to SDKs to sample apps
API reference documentation, SDKs, helper libraries, quickstarts, and tutorials for your language and platform.
Resource Center
The latest ebooks, industry reports, and webinars
Learn from customer engagement experts to improve your own communication.
Ahoy
Twilio's developer community hub
Best practices, code samples, and inspiration to build communications and digital engagement experiences.