Process Incoming Emails with Laravel and SendGrid Inbound Parse
Time to read: 5 minutes
June 26, 2020
Written by
Reviewed by

Sending emails from your Laravel app is a common requirement, but sometimes, you want to receive and process the replies programmatically as well. SendGrid lets you process inbound emails with Inbound Parse. Inbound Parse allows you to provide a webhook URL to process all incoming emails for a domain or subdomain. Subdomains are recommended as they don’t affect your regular domain emails.
In this tutorial, we will be building a blog application where users can comment on a post by replying to a transaction email.
Prerequisites
To complete this tutorial, you will need:
- Composer and the Laravel installer on your machine.
- An authenticated domain on SendGrid. You can follow the guide here to set one up.
- Ngrok installed (for creating a tunnel on your localhost)
Create Migrations and Models
To get started, create a new Laravel project in your preferred location (I am naming mine sg-inbound), switch to the folder and install the sendgrid PHP library.
Next, visit the API Keys page on your SendGrid dashboard and click on the Create API Key button to generate a new API key. Save the generated key as the value for your SENDGRID_API_KEY in the application .env file.
This application needs a Post and Response model to wrap the blog’s posts and comments respectively. Create these models as well as their migration files by running the commands below:
Next, update the Post’s migration file in the database/migrations folder to include the required tables by replacing its content with the code below:
Similarly, replace the contents of the Response’s migration file with the following code:
Next, modify the generated models to reflect the one-to-many relationship between Posts and Responses (i.e, a post can have many responses but a response belongs to a single post) by updating the Post model app\Post.php as shown:
In the same way, add the belongsTo relationship to the Response model app/Response.php to tie it to a single Post.
With your migrations and relationships set up, run the migrate command to generate the databases. Make sure that you have set a database in the .env file.
Add Dummy Posts with Seeds
A factory will be needed to generate sample posts using sample data from the Faker library, which are in turn saved to the database using seeders. To create such a factory for the Post model, run php artisan make:factory PostFactory and replace the contents of the generated file (i.e database/factories/PostFactory.php) with the code block below:
Next, generate a seeder for the posts table with php artisan make:seed PostTableSeeder. Update the newly created seeder file (i.e database/seeds/PostTableSeeder.php) to generate a couple of posts and save them.
Make Laravel aware of the PostsTableSeeder by updating the run method in DatabaseSeeder.php as shown in the code below:
Now that your seeders are in place, run php artisan db:seed to populate the database.
Set Up App Routes
Open the web routes file at routes/web.php and replace its content with the code below.
The code above registers the following URLs on the application
GET /: Renders a list of published blog postsGET /posts/:id: Renders a single post and all of the post responses/comments.POST /posts/receive-email-response: The webhook handler for processing POST requests from SendGridGET /send-mail: The route to stimulate sending out reply-able emails. Ideally, you may want to send out such emails each time a new post is published instead
You will notice that the routes reference a PostsController which doesn’t exist yet. Run the artisan command for creating a new controller in your project directory.
The command will generate a new file at app/Http/Controllers/PostsController whose content is just an empty PHP class declaration. Let’s go over the methods specified in the route file before implementing them.
index: Uses Laravel pagination to load the blog posts and renders themshow: Renders a single blog post, as well as all responses to the post.receiveEmailResponse: The webhook handler which receives POST requests (from SendGrid), parses and extracts the data it needs from the request payload, and creates a new response in the database. It then sends back a200 OKresponse back so SendGrid knows we have successfully received the payload.sendMails: A fill-in method to send out emails to an array of addresses which can then be replied to comment. It works by appending the post ID to the email address so that they are in the form (replies+{POST_ID}@example.com). That way, we can extract the ID when replies come back in and process it accordingly.
Open the PostsController file and replace its content with the code below:
NOTE: Remember to include your own email address in the $mails array (in the sendMails method) and update the $from domain when testing so you can receive the email also.
Set up Views
The index and show methods in the preceding section referenced some view templates (i.e posts and post), but before implementing that, create a layout template file in resources/views to hold code and CSS styles common to both of our views.
Paste the code block below into the layout.blade.php file:
Next, create the actual views by running the command below:
The command uses bash expansion to create both posts.blade.php and post.blade.php at the same time. Paste the code below in To posts.blade.php to render a list of published posts.
Similarly, paste the following in post.blade.php to render an individual post as well as all of the responses to it.
Disable CSRF for Webhook Route
Laravel requires every incoming POST request to provide an extra token to protect the application from cross-site request forgery (CSRF), but we need to disable this for our webhook handler (since SendGrid won’t know what CSRF token to send). To achieve this, add the webhook route to the $except property of the VerifyCsrfToken middleware (app/Http/Middleware/VerifyCsrfToken.php).
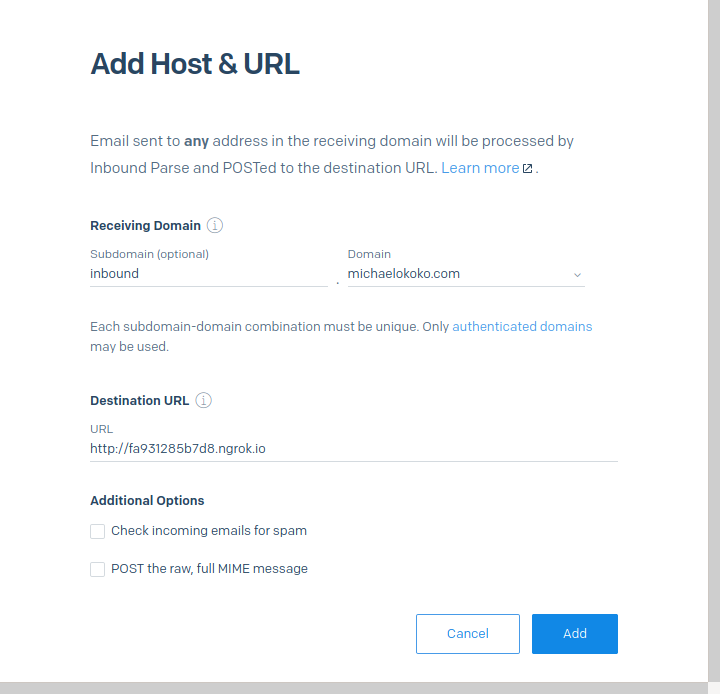
Configure Inbound Parse
Start the Laravel server with php artisan serve and open Ngrok tunnel on the server port with ngrok http 8000. Note the generated Ngrok Forwarding URL as you will be needing it shortly.
Next, head to your Inbound Parse settings page on SendGrid and click on the “Add Host & URL button”. Select your preferred domain and specify a subdomain if applicable.
NOTE: In production, you really should use a subdomain, as SendGrid will trigger your webhook for every email that is sent to the domain (or subdomain) you provided.
Also, paste in the Ngrok Forwarding URL you copied earlier combined with the endpoint /posts/receive-email-response into the Destination URL field and save the information using the “Add” button.
Simulate Automated Emails
With your Laravel server running, visit http://localhost:8000/posts/send-email/1 to send out emails to the specified recipients. Each reply will be processed and added as a response to the post whose ID is 1.
Conclusion
With this post, we have explored how to process inbound emails from our Laravel application using SendGrid. The complete source code is on Github and if you are looking to explore further, you could:
- Lookup the official Inbound Parse Documentation
- Notify your users of new blog posts with Twilio Notify
- Learn how to Send Bulk Emails in PHP using Twilio SendGrid
Michael Okoko is a software engineer and computer science student at Obafemi Awolowo University, Nigeria. He loves open source and is mostly interested in Linux, Golang, PHP, and fantasy novels! You can reach him via:
- Email: michaelsokoko@gmail.com
- Github: https://github.com/idoqo
- Twitter: https://twitter.com/firechael
Related Resources
Twilio Docs
From APIs to SDKs to sample apps
API reference documentation, SDKs, helper libraries, quickstarts, and tutorials for your language and platform.
Resource Center
The latest ebooks, industry reports, and webinars
Learn from customer engagement experts to improve your own communication.
Ahoy
Twilio's developer community hub
Best practices, code samples, and inspiration to build communications and digital engagement experiences.