Pub/Sub in Laravel - An In-depth Understanding
Time to read:
October 20, 2022
Written by
Reviewed by

What is Pub/Sub?
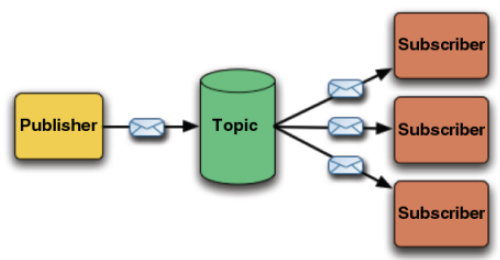
Pub/Sub is a message-driven software design pattern that facilitates communication between complex system components through an efficient communication mechanism that utilises message passing. In a typical pub/sub system, there is the producer (publisher) who creates a message to be sent out to Subscribers.
The Producers do not explicitly fashion the messages for specific consumers, but instead, messages in the system are grouped into categories and the consumers indicate interest in a specific group of messages without caring about the creators of the messages as seen in the image below.
In a typical distributed real-time system setting where each component of the system performs a specific task without knowing about other parts of the system, pub/sub comes in handy because it decreases communication complexity for the parties involved. A component generates a message at the end of its task and passes it to the appropriate channel. The next component can receive the message and Initiate the next needed task and so on.
Prerequisites
To follow along with this tutorial, you will need the following:
- PHP 7.4 or above with the Redis extension
- Redis
- Composer installed globally
- curl
So what will this guide cover?
In this guide, we will cover the following things in great detail
- How pub/sub works
- Importance of pub/sub in real-time systems
- Some pitfalls of pub/sub in real-time systems
- Frameworks that implement pub/sub
- How to implement pub/sub in Laravel
How pub/sub works
The pub/sub-system consists of four essential components which play unique roles in how the system works. Below are the roles of each component.
Publishers: Publishers, also called producers, are any part of the system that produces data. The publishers create and propagate messages through a channel to the interested receivers without any knowledge of the receiving party. This implies that the message they send is not fashioned specifically for a specific receiver since they do possess any knowledge of the interested subscribers or whether any subscriber is interested.
Subscribers: Subscribers are any part of the system that consumes data. They retrieve messages when available and perform operations based on the information. In a typical pub/sub system, a single receiver can subscribe to many channels.
Channels: The channel is the data stream through which data is transmitted from the publishers to the subscribers.
Messages: The messages are data being sent through the channels. The message sometimes comprises the header(metadata) and the body of the payload.
In the pub/sub system, a publisher typically publishes a message to a channel and the subscribers of the channel receive the message and perform the needed operation(s) on them. But the unique thing about the pub/sub system is that the identities of the parties involved are not essential and therefore can be left out.
Also, the publisher of the system can also serve as the subscriber and this makes the whole system much more flexible.
The channels on the other hand can be viewed as categories or a stack of similar items which in this case would imply that message propagation is the process of pushing new or similar item(s) to the stack. Going with the stack analogy, this implies that messages sent through the channel are always guaranteed to arrive in the same order.
It is worth noting that in order for a subscriber to receive a message they must have subscribed to the channels before the message is sent. This is in-line with all message-driven designs, a subscription has to be made before the message is received.
Pub/sub frameworks
The following are several well-known frameworks that support pub/sub:
Redis: Redis is an in-memory data structure stored as a database, cache, message broker, and streaming engine but it also comes strapped with a pub/sub system of its own.
Apache Kafka: is a popular and robust messaging tool that has the usual Pub/Sub features. Apache Kafka is also designed to include a message log. Subscribers can step back and forth in time to ‘replay’ messages.
RabbitMQ: is a message queue that does not really follow the pub/sub pattern. However, it can be configured for direct message exchange between two or more components of the system.
Importance of pub/sub in real-time messaging
- Ease of communication: With the introduction of pub/sub into a real-time system, all components of the system benefit from the ease of communication it brings as the components can communicate in an asynchronous way.
- Loose Coupling Between System Components: For a real-time system where each part performs a special task of its own, pub/sub fit in well and benefit from loose-coupling. This further strengthens the system as each part can be tested independently without depending on the other components.
- Frugality With Resource Consumption: With pub/sub, components of the system do not need to poll each other for updates but can instead rely on the channels for updates. This reduces the consumption of network bandwidth as well as other resources involved.
- Guaranteed Consistent Reliability: Since communication is facilitated by message passing, modification of one component of the system can be done without affecting other parts of the system as long as the message they publish is valid.
- Scalability: The introduction of pub/subs into a system allows the system to be scaled without the fear of breaking functionality because both the subscriber and consumers are separate entities and function independently.
How to implement pub/sub in Laravel
Now, you'll learn how to set up Redis Pub/Sub in a Laravel project.
Step 1: Creating A Project
To create a new Laravel project in a new directory named pub-sub, run the command below.
Change into the folder and start the application on your local machine, by running the commands below.
After running the commands above, your app should be listening on localhost on port 8000. Navigate to http://localhost:8000 to view your Laravel app.
Step 2: Installing Redis
Next, in a new terminal session, run the code below to add the application's dependencies: predis and the Illuminate Redis package.
After the installation, in .env, add REDIS_CLIENT=predis above REDIS_HOST=127.0.0.1. Then, if you need to, update the value of REDIS_PASSWORD with your Redis password .
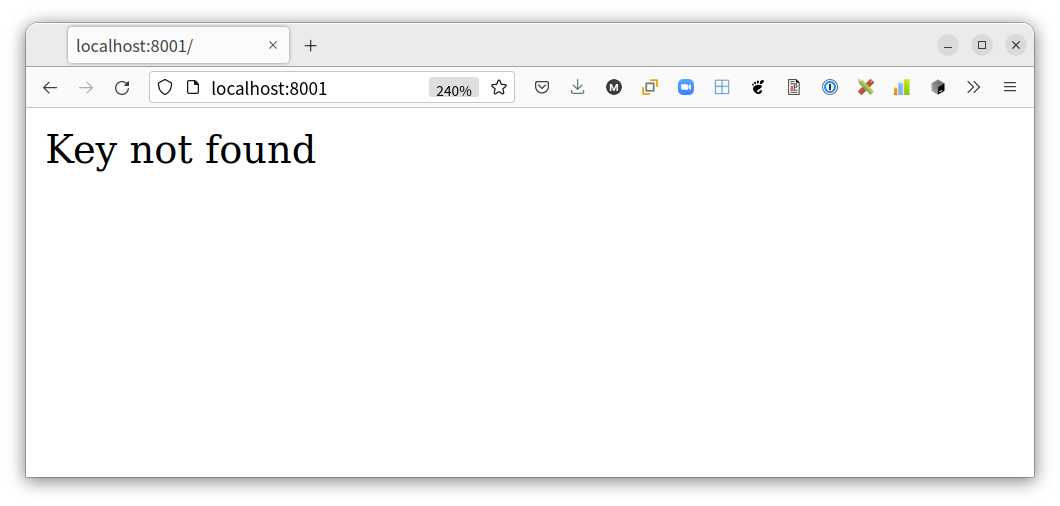
Next, test if the Redis installation was successful. To do that, update the default route's handler in routes/web.php to match the code below.
Then, reload your browser. You shouldn’t get an error if installation of the Redis extension was successful. And, as there is no key in Redis named hello, you should see the string "Key not found".
Implementing Redis Pub/Sub in Laravel
To demonstrate pub/sub in Laravel, we are going to create a small blog that covers a range of topics. Users can subscribe to one or more topics of their choice and will be notified when posts on such topics are made.
To start, generate a blog post controller by running the command below.
Then, add the method below to handle the blog creation request.
After that, add the use statement below.
This method grabs the blog data from the request body, publishes the data to our brand channel with Redis::publish, and then returns the same value.
Whenever we call the Redis::publish method, Redis first checks if the channel was created and if not it creates one and publishes the message to the queue. The same applies to the Redis::subscribe method you’ll see later.
In routes/api.php, add a new route pointing to the controller create method, by adding the code below.
Then, add the following use statement at the top of the file.
When you make a POST request to http://localhost:8000/create, the data you send in the request body will be sent back as a response, and a new message will be sent to the create:blog channel.
So far, all you have is a publisher which feeds the create:blog channel, whenever the /create endpoint is requested. Now let’s create a subscriber.
For the subscriber, you’ll be using a command since the subscription is a continuous process and will not stop running until you stop it, or an error occurs.
To start it, run the command below to create a new command.
If you check the app\Console\Commands folder, you will find a new file named NotifierCommand.php. Update it to match the code below.
The code above asks Redis to listen to the create:blogchannel and execute the provided function whenever a message is available using the Redis:subscribe method. Every time a new message is received, it will inspect the list of users and print out users with topics matching the blog’s topic.
Now, start the notifier command by running the command below.
To test it, run the following command in the terminal.
Now, check the command line interface where you ran the notifier command. You should see something like the following:
If you change the topic in the request, you will notice that the logs will change accordingly. This is because it matches the new blog’s topic with the users’ topics. Congratulations on implementing a pub/sub system in Laravel.
Pitfalls of pub/sub in real-time systems
It is worth noting that while introducing pub/sub into your system might bring immense benefits, it also has several pitfalls.
One of the most prominent pitfalls of pub/sub is failed message delivery. Once a message is sent, there is no guarantee that the message was received or acted upon.
You can salvage this by introducing a channel where the producers can listen for replies from the consumers, but that will rob the system of its loose coupling. Perhaps a better solution might be switching to a message queue and ditching pub/sub entirely.
Real-world applications of Pub/sub
Armed with an understanding of how works, you are only limited by your imagination when it comes to what you can do with pub/sub, but here are some cool applications of pub/sub in real-world contexts which are worth mentioning:
- Streaming data between two devices in IoT
- An event bus to facilitate communication between distributed enterprise systems.
In this article, you learned about how pub/sub works and its importance in real-time systems. You also learned about some of the prominent pitfalls of pub/sub as well as a potential solution.
I hope this helped broaden your knowledge of pub/sub system design and also informed your choice on when to pull pub/sub into your application. Thank you for reading.
Kenneth Ekandem is a full-stack developer from Nigeria currently in the blockchain space, but interested in learning everything computer science has to offer. He'd love to go to space one day and also own his own vlogging channel to teach the next generation of programmers.

Related Resources
Twilio Docs
From APIs to SDKs to sample apps
API reference documentation, SDKs, helper libraries, quickstarts, and tutorials for your language and platform.
Resource Center
The latest ebooks, industry reports, and webinars
Learn from customer engagement experts to improve your own communication.
Ahoy
Twilio's developer community hub
Best practices, code samples, and inspiration to build communications and digital engagement experiences.