Push Two-Factor Authentication in Python with Twilio Authy
Time to read: 9 minutes
January 17, 2020
Written by

Two-Factor Authentication (2FA) is one of the most effective ways to increase the security of online accounts and consequently reduce online identity theft. The 2FA implementation used by most applications is based on the Time-based One-Time Password algorithm, which requires users to read a numeric code from a hardware token generator or smartphone app and enter it on an application’s website to confirm their login attempts.
Unfortunately, many users find this extra login procedure tedious and inconvenient. There have been efforts to simplify the 2FA flow with the goal of increasing adoption.
A new method that is gaining popularity is Push Authentication, where instead of expecting a numeric code, the application server sends a push notification to the user’s smartphone. The only action for the user is to tap a button in this notification to confirm that the login attempt is legitimate.
In this article, I will go over the steps required to add Push Authentication to a web application using the Twilio Authy API. While the techniques I’m going to discuss are generic and apply to all languages and technologies, I will be showing code examples in Python.
What is Push Two-Factor Authentication?
Before we delve into how push authentication is implemented, let me give you a quick overview of how it works from the user’s perspective.
Registering Users for Authy Push 2FA
The procedure to enable push authentication is similar to that of the more traditional two-factor authentication implementations based on numeric codes. The application displays a QR code on the screen that the user must scan with their chosen two-factor authentication app. For push authentication with the Authy service, the app must obviously be Authy, which is available on the Android and Apple stores for free. The QR code that enables push authentication is specifically designed for push authentication with the proprietary Authy service. Standard TOTP QR codes cannot be used for push authentication with Authy.

Once the QR code is scanned, the user is registered for push authentications. These will be sent to the Authy app running on their smartphone (the Authy service can also send these push authentications to your own iOS or Android app if desired).
The Authy service provides an API call that the application can invoke in a polling cycle to find out when the QR code was scanned. Alternatively, a registration webhook URL can be configured, and the Authy service will invoke it to notify your application when the QR code is scanned or times out.
Using one of these registration status options makes it unnecessary to add any buttons or other UI elements to the page that shows the QR code. This is because you can have JavaScript logic in the background waiting for the QR code to be scanned and at that time automatically redirect the user back into the application.
Logging In with Push 2FA
When the user logs in to the application after enabling two-factor authentication, they’ll have an additional step after entering their username and password. In traditional 2FA this would be a web form where the user needs to type a numeric code obtained from the 2FA app. For push 2FA, this is a page that just waits for the user to approve the login request on their phone, without asking for any information.
A common implementation of this page just shows a spinner, to indicate that the application is waiting for the user to take action.
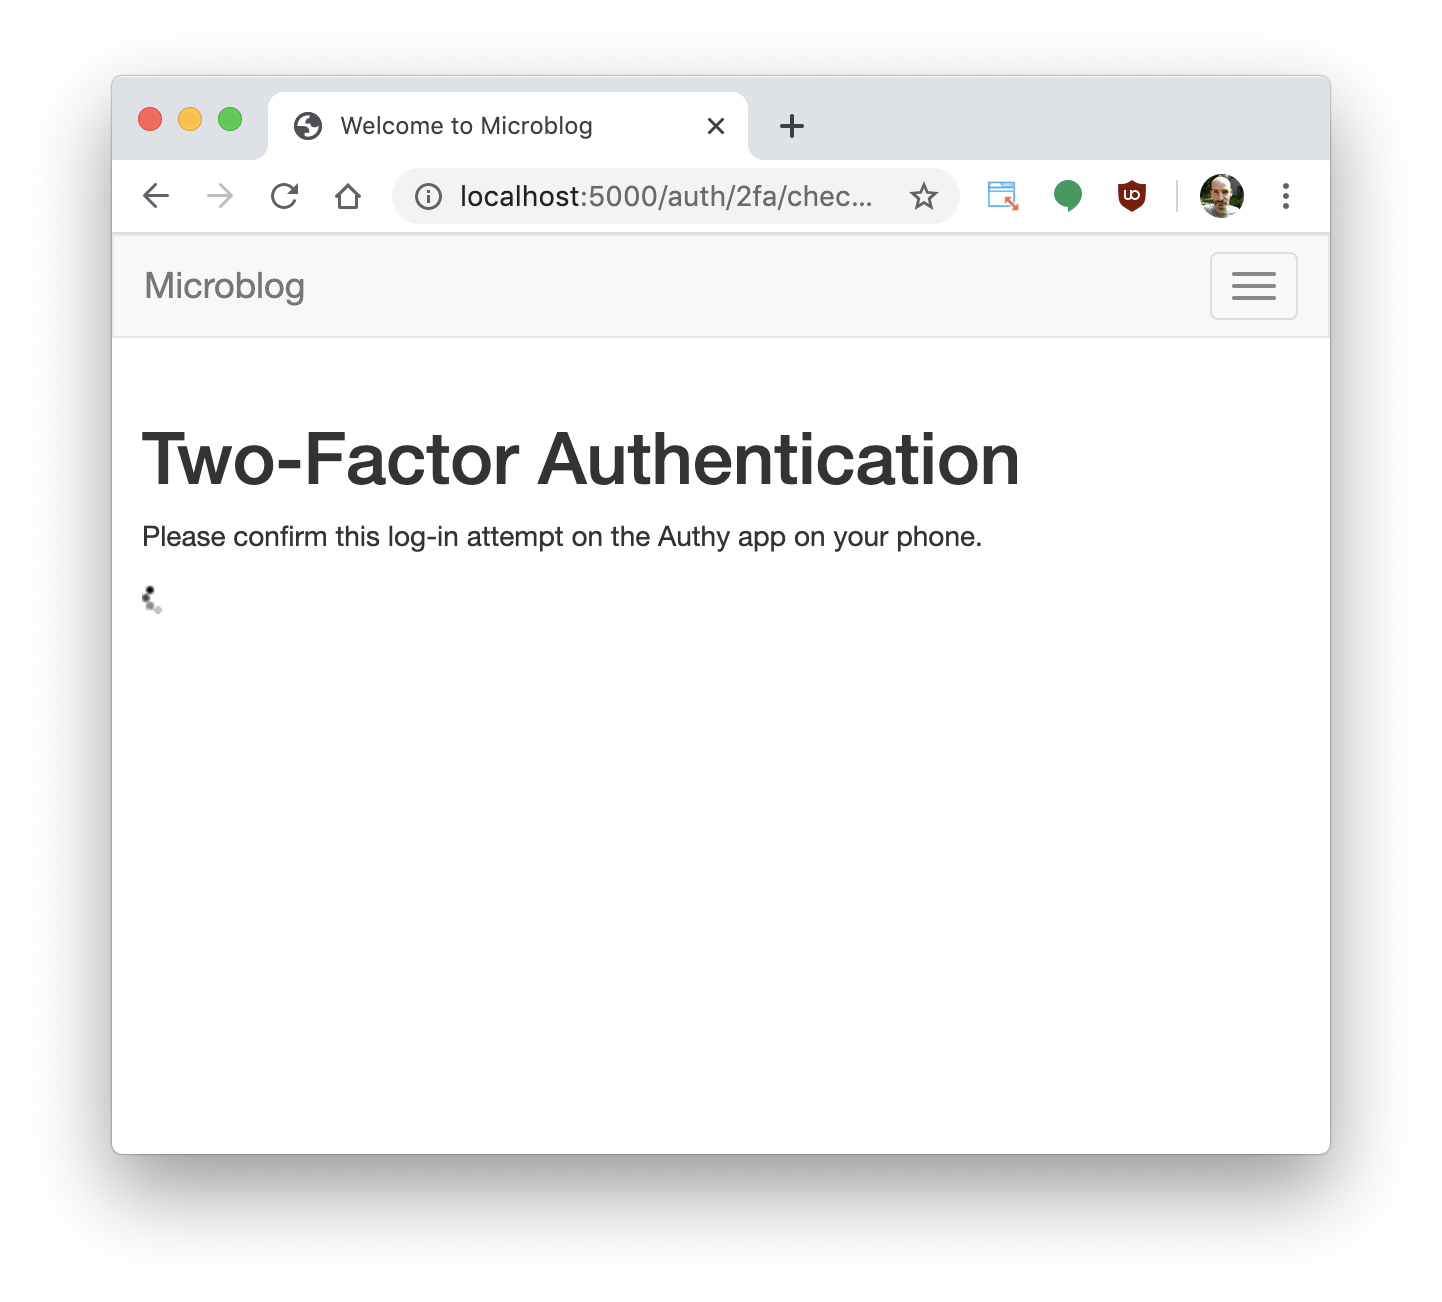
The Authy service provides an API endpoint that the application can call to issue a push notification to the user. When the user opens the notification on their phone, this is what they’ll see:
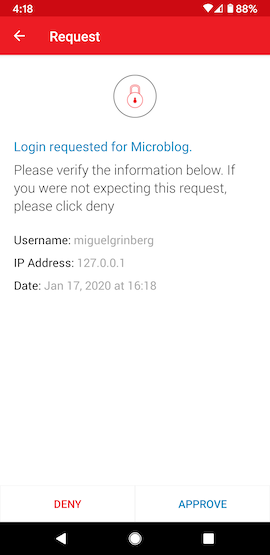
At this point the application can once again poll the Authy service, or define a webhook to receive a notification when the user takes action. The user will tap the “Approve” or “Deny” buttons, and as soon as they do the Authy service will report it back to the application which can allow or reject the login request.
Implementing Push 2FA in Python
In the following sections I’m going to describe the highlights of my implementation of push 2FA into one of my open-source Python applications.
The application I used is called Microblog, and you can try a fully working version of it extended to support Authy push authentications in the Microblog-Authy repository on GitHub.
Authy Configuration
If you don’t have a Twilio account yet, you can open a free account to work with the Authy service. You will need to verify your account by providing your mobile phone number, but you will not be asked to enter a credit card or other form of payment until you decide to upgrade to a paid account.
From the Twilio Console, click on “All Products & Services” on the left sidebar, and then find Authy in the menu. The main Authy configuration panel will show a “Create Application” button. Click on it, and then provide a name for this application. In most cases you will want to use the name of your own application here, as this is the name that users will see on the Authy app on their phones. I will demonstrate Authy by adding it to Microblog:
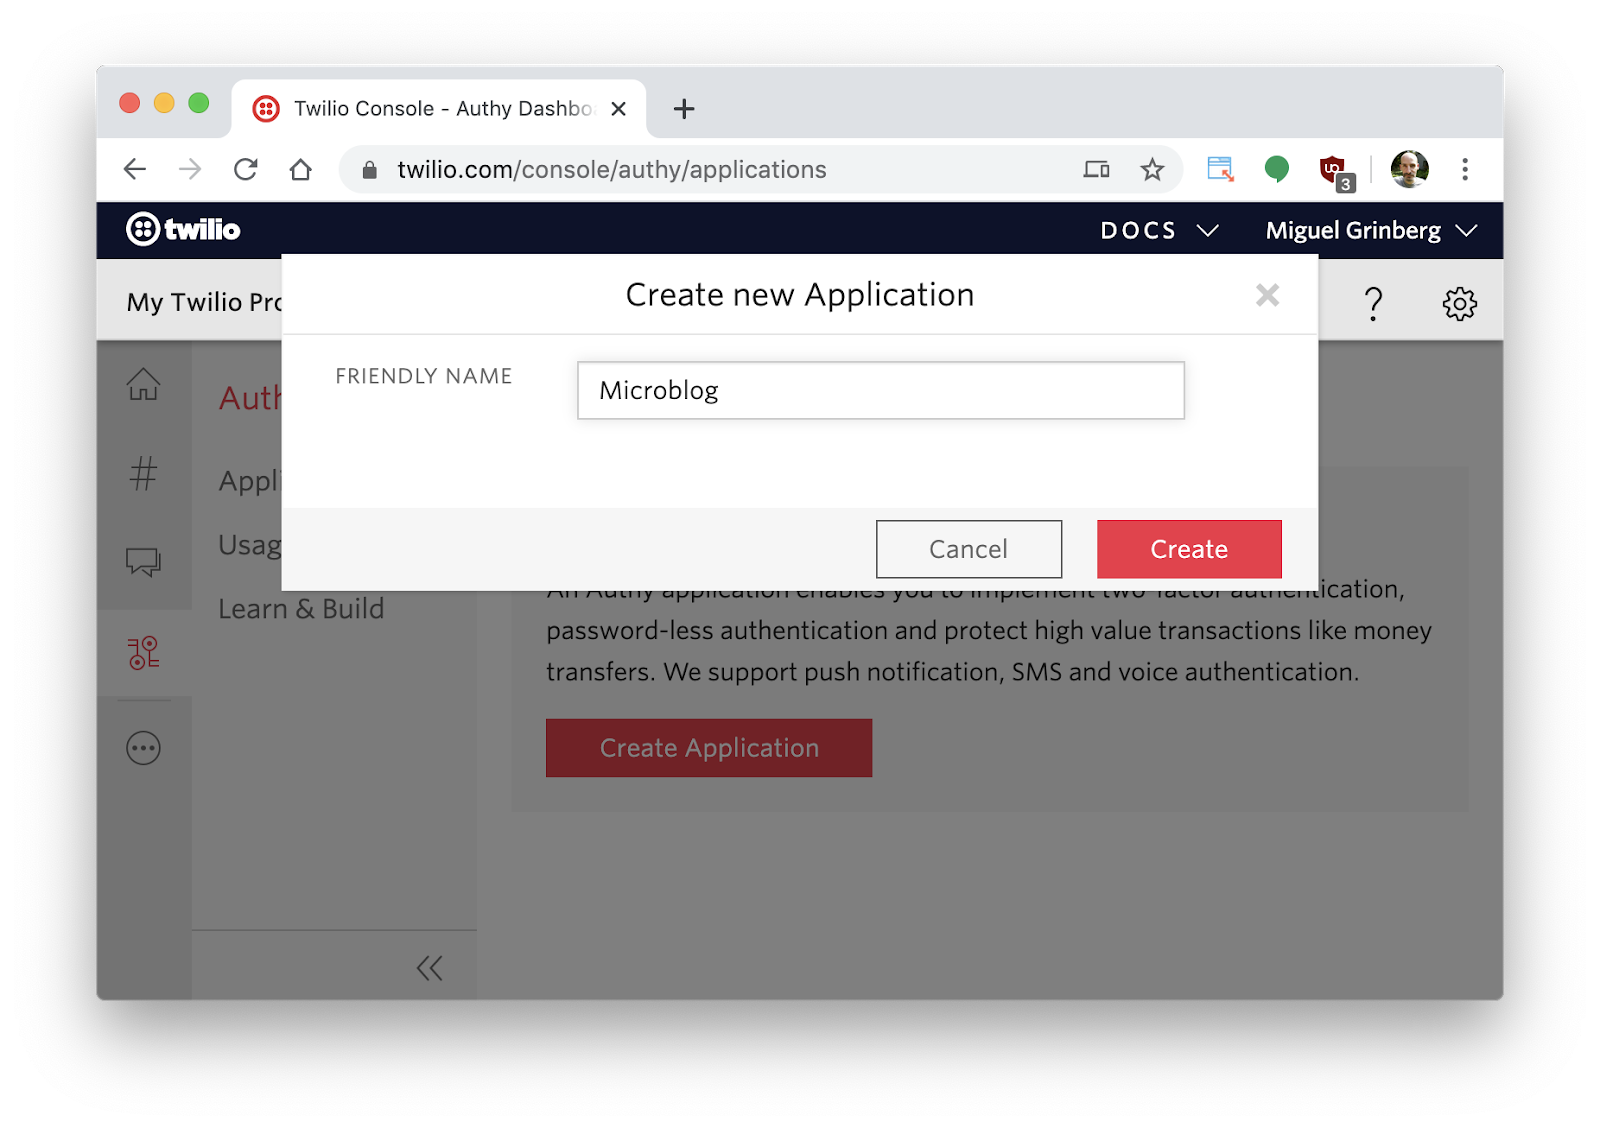
Once you have decided on a name, click the “Create” button.
Python Dependencies
To add push authentication to your Python application you will need to include the Authy client for Python:
Note that the client library for Python must be version 2.2.5 or newer, as older versions lack some of the functionality required for this project.
The registration flow for Authy uses JSON Web Tokens and QR Codes, so your application will need to generate these. The packages that I’m going to demonstrate in the example code below are pyjwt and qrcode respectively:
Generating the Registration QR Code
A QR code is a graphical encoding for a short text, typically a URL. The Authy app recognizes QR codes that have the following URL encoded in them:
The token field of the above URL must be set to a JSON Web Token with the following payload:
The iss, iat and exp fields are part of the JWT specification, corresponding to the “issuer”, “issued at” and “expiration” fields respectively. The issuer must be set to the Authy application name you defined in the Twilio Console. The issued_at and expiration fields are integers in Unix time format.
The custom_user_id field is the identifier for the user in your own application, typically the primary key assigned to the user in your database. This is going to help map your own user identifiers to those used by the Authy service for the same users.
The authy_app_id field must be set to the identifier assigned by Authy to your application. You can find it in the application settings page:
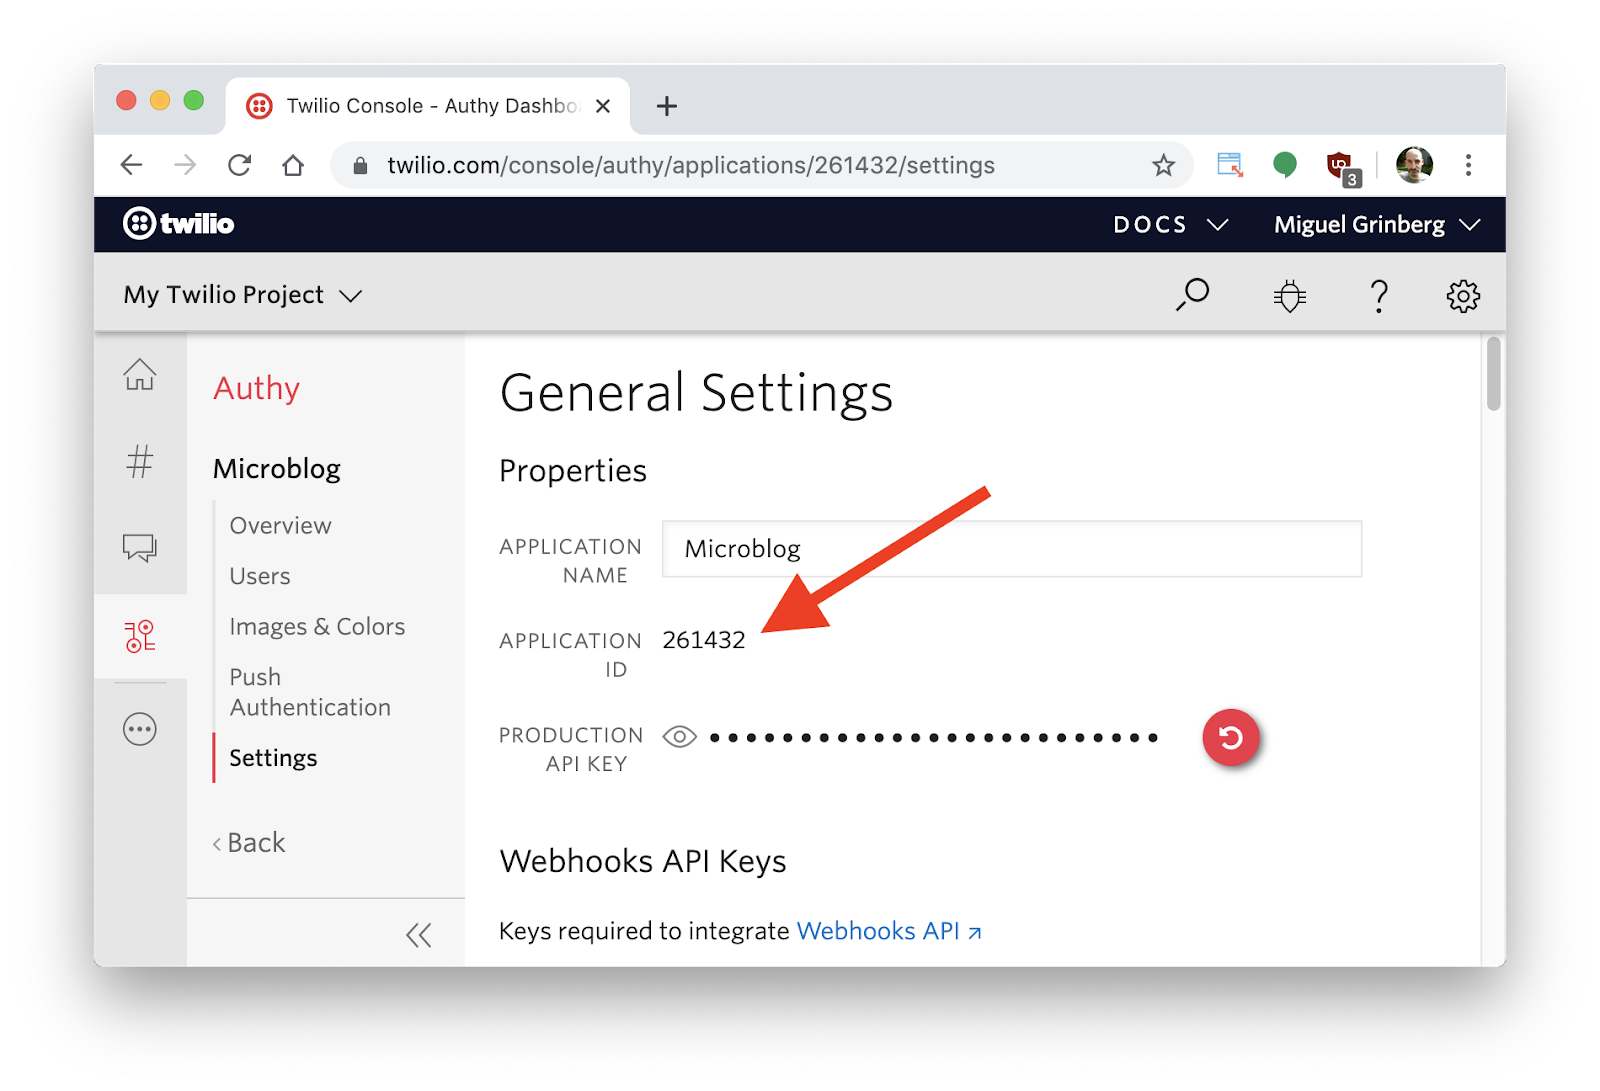
To ensure that registration requests are legitimate, Authy requires that you sign your JWT using the standard HS256 algorithm, with the Authy production API key assigned to your application as the signing key. This key appears in the settings page right below the application ID.
Here you can see a Python function that generates a registration JWT for a user using the pyjwt library:
The function takes the user identifier and an optional expiration time, which defaults to five minutes if not provided. This function is specifically coded to work within a Flask application, so it uses the Flask configuration object. There I obtain the Authy application name, id and production API key. For other frameworks, you will need to replace all the references to the current_app.config dictionary with the appropriate configuration object.
Now that we have a JWT, we are ready to generate a QR code for Authy using the qrcode package:
This function generates the URL in the format required by the Authy app for the JWT that is passed as an argument, and then creates a QR code with it.
The image format that I used is SVG (which all browsers support) but other browser-friendly formats such as JPEG, GIF or PNG would work as well. The image data is written to a byte stream, and then the contents of the stream are returned. This function can be invoked from an HTTP route handler so it returns the image data to the web browser for display.
Waiting for the User to Scan the QR Code
To complete a user registration, the application needs to wait for the user to scan the QR code. As I mentioned above, Authy supports two methods for the application to do this: polling and webhook. While the polling option is a little bit less efficient, it is easier to implement and has the advantage that it can be used from the application running on a development machine, without having to set up a domain and an SSL certificate.
To implement the polling method, I’ve included the following JavaScript code in the page where the QR code is displayed:
The function check_registration() sends a request to the registration polling route defined in the application. The setTimeout() call at the bottom schedules the function to be called five seconds after the page loads. The response from the polling route is going to be the string ’pending’ if the user hasn’t scanned the code yet. In that case we schedule another run of the function after five more seconds pass. This will keep going until the response from this polling route is different, at which point we redirect back to an application page. In my implementation the polling route set a “flash” message that indicates the success of failure of the scanning operation, which will be displayed after the redirect.
Checking on the registration status of a user in the backend is extremely simple with the Authy client for Python:
Once again, keep in mind that I coded this function to work within a Flask application. This means that when I instantiate the AuthyApiClient object, I obtain the Authy production API key from the Flask config object.
This function is interesting because the Authy service allows you to ask for the status of a registration by passing the user ID used by your own application. Recall that the JWT we encoded in the QR code has this identifier, so Authy now knows the user ID we assigned to this user and can tell us when a mapping between that ID and an Authy user has been made.
While the user hasn’t scanned the QR code the registration key in the response from the Authy service will be as follows:
After the user scans the QR code, the response will change to:
This response indicates the identifier that the Authy service uses to reference the user. From this point on, when you want to interact with the Authy service, you will use this identifier to refer to the user. You’ll need to store it in your user database so that you can retrieve it when you need it.
Any other status value besides ’pending’ and ’completed’ indicates that an error has occurred, so the application should cancel the registration request.
Sending a Push Authentication to a User
Right after a user logs in to the application, you need to check if the user has 2FA enabled on their account. If they do, you now have to ask the Authy service to send a push notification to their phone.
The following function shows how to implement this with the Authy client:
The authy_api.one_touch.send_request() is the function that initiates the push notification. The first argument is the authy_id for the user, which is the identifier that was reported back to the application when the user registered for 2FA. The Authy ID will be typically stored in the user database, so in my case I can access it as user.authy_id. The second argument is a message that will appear in the login approval screen displayed by the Authy app.
The details argument is a dictionary with information that will be shown to the user in the Authy app, to help the user identify login attempts that are illegitimate. Here I included the username and the IP address for the user logging in. A more sophisticated implementation could also run the IP address through a geolocation API to also present a location from where the client is logging in.
The seconds_to_expire argument is set to the number of seconds Authy will wait for the user to respond to this notification. See the documentation to learn about other optional arguments you can use in this call.
The function returns a UUID that the Authy service assigns to this push authentication request. We will use it in the next section to check the status of this request.
Waiting for the User to Authorize a Login Request
Once a push authentication request has been initiated, the application needs to wait for the user to approve or reject it. This is done in a very similar way to how we waited for a registration. Like in that case, the application can wait using a polling cycle from background JavaScript code, or a webhook.
A simple check that a backend application can execute that can be integrated into the polling cycle could be coded as follows:
The function uses the UUID returned by Authy when we issued the push notification to the user. The response returned by Authy will have a status key (among other fields) that is ’pending’ until the user taps the Approve or Deny buttons, at which point it will change to ’approved’ or ’denied’ respectively. If the user does not handle this request before the timeout set in the push authentication request, then the status will change to ’expired’.
Conclusion
I hope you found that this article nicely complements the official Authy documentation and gives you some starter code that you can adapt to your needs. As I mentioned above, I have created a complete and working example with the techniques I discuss in this article, all on top of an existing Flask application. You can find the code in the Microblog-Authy repository on GitHub.
I’m excited to see what you build with Twilio Authy!
Miguel Grinberg is a Python Developer for Technical Content at Twilio. Reach out to him if you have a cool Python project you’d like to share on this blog!

Related Resources
Twilio Docs
From APIs to SDKs to sample apps
API reference documentation, SDKs, helper libraries, quickstarts, and tutorials for your language and platform.
Resource Center
The latest ebooks, industry reports, and webinars
Learn from customer engagement experts to improve your own communication.
Ahoy
Twilio's developer community hub
Best practices, code samples, and inspiration to build communications and digital engagement experiences.