Build a Real-Time Kanban Board with Python, JavaScript and Twilio Sync
Time to read:
February 08, 2021
Written by

The barriers to setting up a persistent data store for your web or mobile app seem lower than ever. One product that lowers these barriers in a delightfully simple yet feature-rich way is Twilio Sync. Twilio Sync's JavaScript SDK provides a straightforward abstraction using websockets to:
- persist data in a handful of data structures ("objects"),
- subscribe to data stores on multiple clients,
- and alter persisted data from multiple clients.
In this tutorial we're going to leverage the convenience Twilio Sync affords us, along with a fantastic open-source project, to make a fully functional multi-client Kanban board.

Ingredients
- Python 3.6 or newer. If your operating system does not provide a Python interpreter, you can go to python.org to download an installer.
- A Twilio account. You can create one here if need be. You can review the features and limitations of a free Twilio account here.
Mise-en-Place
In a French kitchen "mise-en-place" means "preparing all your ingredients for easy access".
Creating a project directory
Begin by creating the directory where you will store your project files. Open a terminal window, find a suitable parent directory, and then enter the following commands:
This project is going to have a Python back end and a JavaScript front end. Create separate subdirectories for these two:
Creating a Python virtual environment
Following Python development best practices, let’s create a virtual environment where you will install your Python dependencies.
If you are using a Unix or MacOS system, open a terminal and enter the following commands to do so:
If you’re using Windows (PowerShell), enter the following commands in a command prompt window:
The last command uses pip, the Python package installer, to install the Python packages that you are going to use in this project, which are:
- The Twilio Python Helper library, for generating access tokens for the front end
- The Flask framework, to create the web application
- Python-dotenv, to import the contents of your .env file as environment variables
- Flask-CORS, to provide cross-origin request sharing support to the Flask application
- Faker, to generate random usernames
To preserve the list of dependencies it is a good idea to generate a Python requirements file:
Configuring Twilio Sync
Log in to your Twilio account to access the Console. In this page you can see the “Account SID” assigned to your account. This is important, as it identifies your account and is used for authenticating requests to the Twilio API.
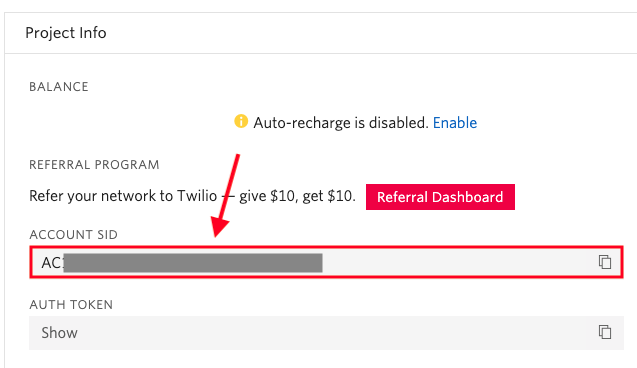
Because you are going to need the Account SID later, click the “Copy to Clipboard” button on the right side. Then create a new file named .env, still in the back subdirectory and write the following contents to it, carefully pasting the SID where indicated:
The Twilio Sync service also requires a Twilio API Key for authentication, so in this next step you will add one to your Twilio account. To begin, navigate to the API Keys section of the Twilio Console.
If you’ve never created an API Key before, you will see a “Create new API Key” button. If you already have one or more API Keys created, you will instead see a red “+” button to add one more. Either way, click to create a new API Key.
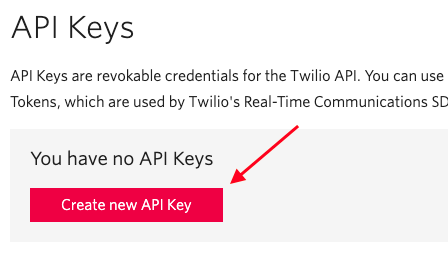
Enter kanban as the name of the key (or any name you like), leave the key type as “Standard” and then click the “Create API Key” button.
Now you will be presented with the details of your newly created API Key. The “SID” and “SECRET” values are used for authentication along with the Account SID value that you saved earlier.
Open the .env file again in your text editor, and add two more lines to it to record the details of your API key:
Once you have your API key safely written to the .env file you can leave the API Keys page. Note that if you ever lose your API Key Secret you will need to generate a new key.
To complete the Twilio account setup, you need to create a Twilio Sync service. Go to the Twilio Sync section of the Twilio Console, click on Services, and then on the red + sign to create a new service. Give it the name kanban or something similar. The next page is going to show you some information about the new service, including the “Service SID”. Copy this value to your clipboard, go back to your .env file and add a fourth line for it:
The information contained in your .env file is private. Make sure you don’t share this file with anyone. If you plan on putting your project under source control it would be a good idea to configure this file so that it’s ignored, because you don’t want to ever commit this file by mistake.
Back end
The Python back end of this project is going to be dedicated to generating access tokens that will enable the front end to access the Twilio Sync service from the browser.
Copy the code below into a file named app.py in the back subdirectory of the project:
The application starts by loading the .env file, which will make all the variables included in it part of the environment.
An instance of the faker package is also initialized.
Next a Flask application instance is created, and the Flask-CORS extension is initialized with default settings, which will allow any origins to make calls into the server.
The /token route is going to be called by the front end to request a Twilio access token. The implementation of this endpoint uses the Twilio Python Helper Library to generate the token using the credentials imported from the .env file. Note that the token is given a SyncGrant configured with the Sync service created earlier.
In a normal application the client would be submitting login credentials, which would be verified. Since this application is not going to have a user database, the faker package is used to generate a random username that is added to the token as the user identity.
You can start the back end server with the following command:
The output should look like the following:
An important note, especially if the above didn't’t work: If you have any Twilio credentials in your computer’s environment which use the same names as any of those in .env, they will be used instead of the .env variables: Remove them from your environment if necessary, then open a new terminal, activate the virtual environment and run the above command again.
The back end is done and ready. 🚀
Minimum viable front end
Now let's use our single /token endpoint to sprint towards a nice, fulfilling "hello world", shall we?
Twilio provides a twilio-sync.js library that can be used from the browser. According to the documentation we need to instantiate a Sync client using a token obtained from our back end endpoint.
Open a second terminal window (leave the first terminal running the back end server), and go into the front directory:
Create an index.html file in this directory with the following contents:
Here we're using the async/await syntax instead of promises, mostly to keep things nice and readable. What are we doing? We are:
- Loading the Twilio Sync JavaScript SDK from the Twilio CDN.
- Waiting for the page to load (
window.onloadevent). - Calling our Flask endpoint to get a token.
- Using that token to instantiate a
syncClientinstance.
Make sure your Flask back end is running, then open the index.html in your browser. For this use the “Open File…” option in the browser, navigate to the front directory and select index.html.
The web page is going to be completely blank, but if you open your web browser’s console you should see this message, indicating the front end is able to connect to Twilio Sync:
Actually display something
Is this an MVP yet? I'd say we need at least one thing painted on the screen before we pitch investors.
The Twilio Sync service allows you to store data in the cloud. When several clients are connected at the same time and one of them makes a change to this data, the others are notified so that they can refresh. For this application we’ll store a list of tasks.
Let's get ready to add a few things at the end of the setupTwilioClient() function:
These two new methods — syncClient.list() and tasks.getItems() — are documented in the ”Client” and "List" sections of the JavaScript SDK documentation, respectively. The first creates or retrieves a list object with the name tasks, and the second obtains the list of items stored in it.
Refresh the page in your browser to run the updated code. The output of the above in the browser console should be:
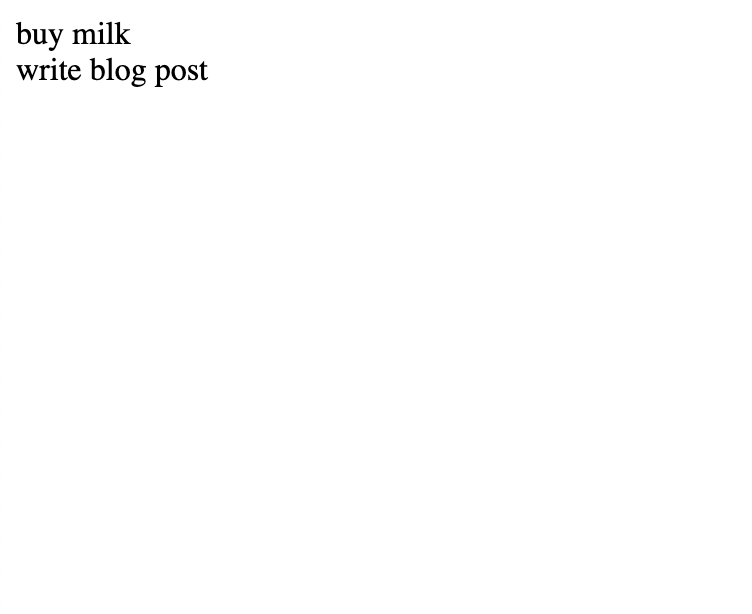
Let's add a few items to the list using list.push():
Refresh the page once again. The list should now show two items. If you expand the items attribute it should look like this:
As a next step let’s now render the items from the list on the page. First add a new <div> element at the start of the <body>:
Then update the bottom of the setupTwilioClient() function to look as follows:
If all went well, when you refresh the page you should now have a very simple display of the two tasks added earlier:
User Interface
Now that we've gotten the Sync client working and our page rendering the list's contents, let's enable a user to add new items to the list.
If we weren't concerned with sharing our "tasks" list's state across devices, we could just make an <input> field, have it populate and append additional task-item divs, then pop open a cold brew. However, this is not the magic we're after: We want to push() an item on to the tasks list and then have it show up on this and any other device which is connected to the application.
In our current state of the art, what happens to the tasks div if we add an item to the list after the page was rendered?
Let’s try this by adding a push() right after the forEach render loop:
Reloading the page after this change yields... absolutely nothing. This is because there's nothing telling the page the task list has changed. Refreshing the page once more will render the new item, but what we're after is real-time rendering of state changes without having to reload the page.
Delete the push() added above before you continue.
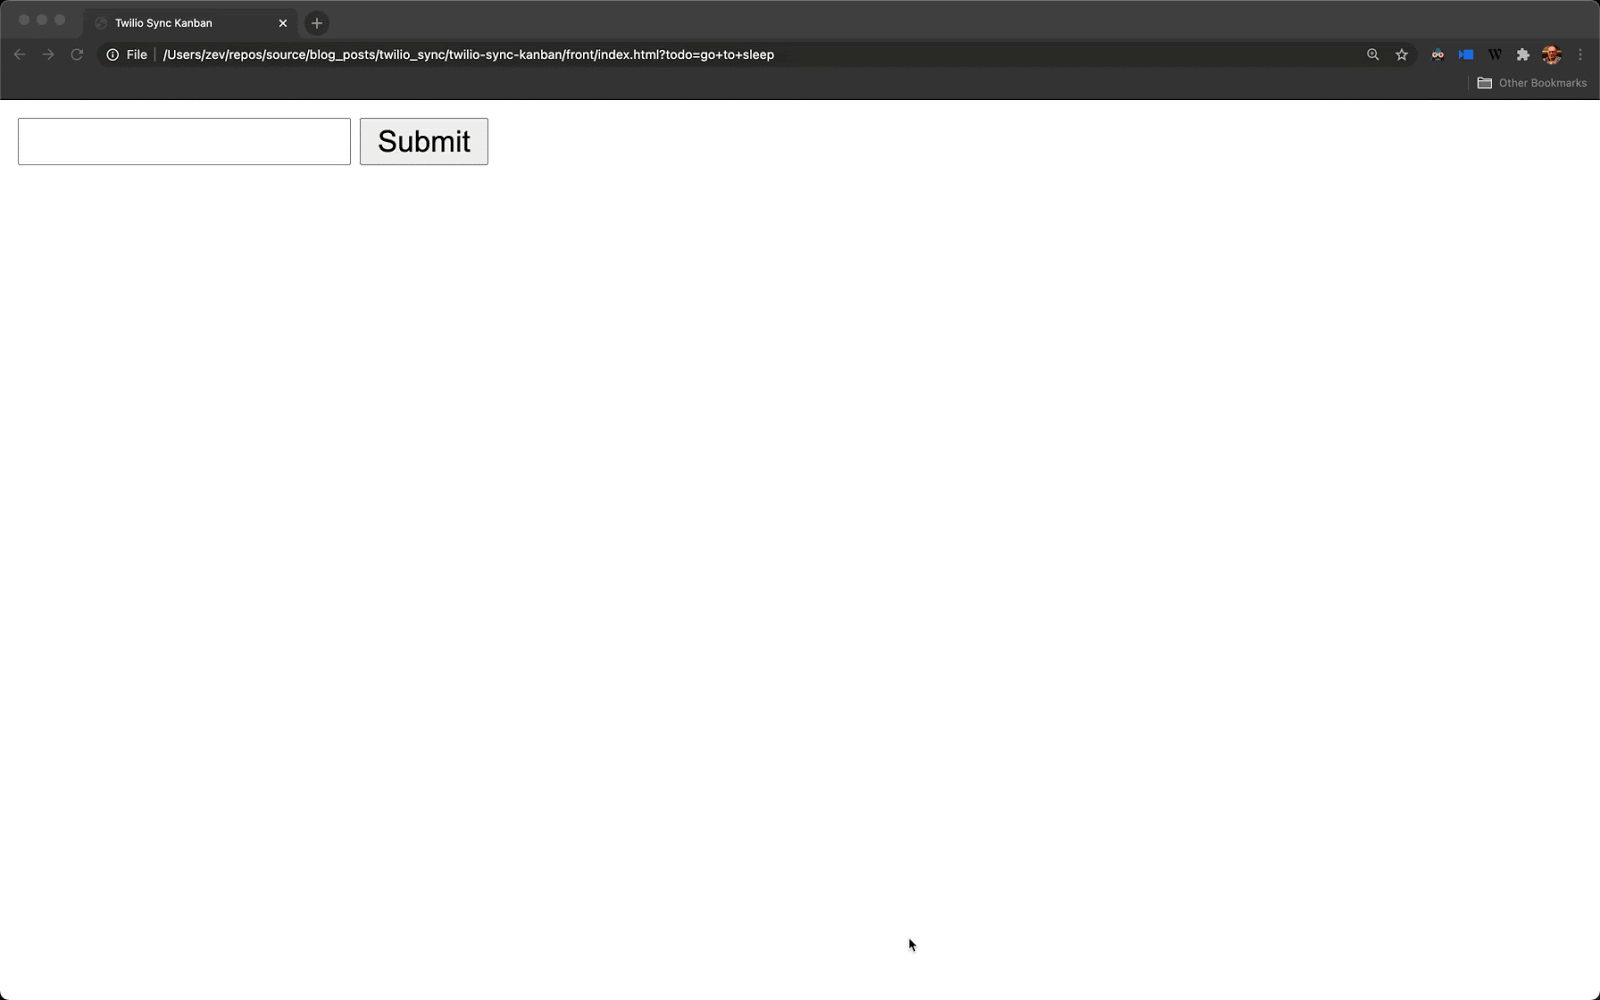
Knowing this flaw in the current code, let's push forward and create an <input> which does such a push() call, then work to ensure this update is rendered.
Add a form at the top of the page <body> element:
Then add the addTask() function that handles the above form submission below setupTwilioClient():
Here we collect a new task item, clear the input field, then push the item to the Twilio Sync list. As before, we can't see the new item until we manually reload the page.
One of the key features of the Twilio Sync JavaScript SDK is the ability to add event listeners for changes to a given Sync object. Let’s add an event handler for the itemAdded event, where we can update the list as new items are inserted. Add the following code right after the forEach loop that renders the task list:
Now, when you (or anyone else using the application) add an item to the tasks list, it will be rendered on the page within a fraction of a second. Go wild!
A Wee CR(no U)D Library for Sync
There are a few helper functions we can anticipate needing in our forthcoming Kanban board. We've got “Create” and “Read” handled, and now we are going to add “Delete”. For our MVP we’ll omit any “Update” functionality.
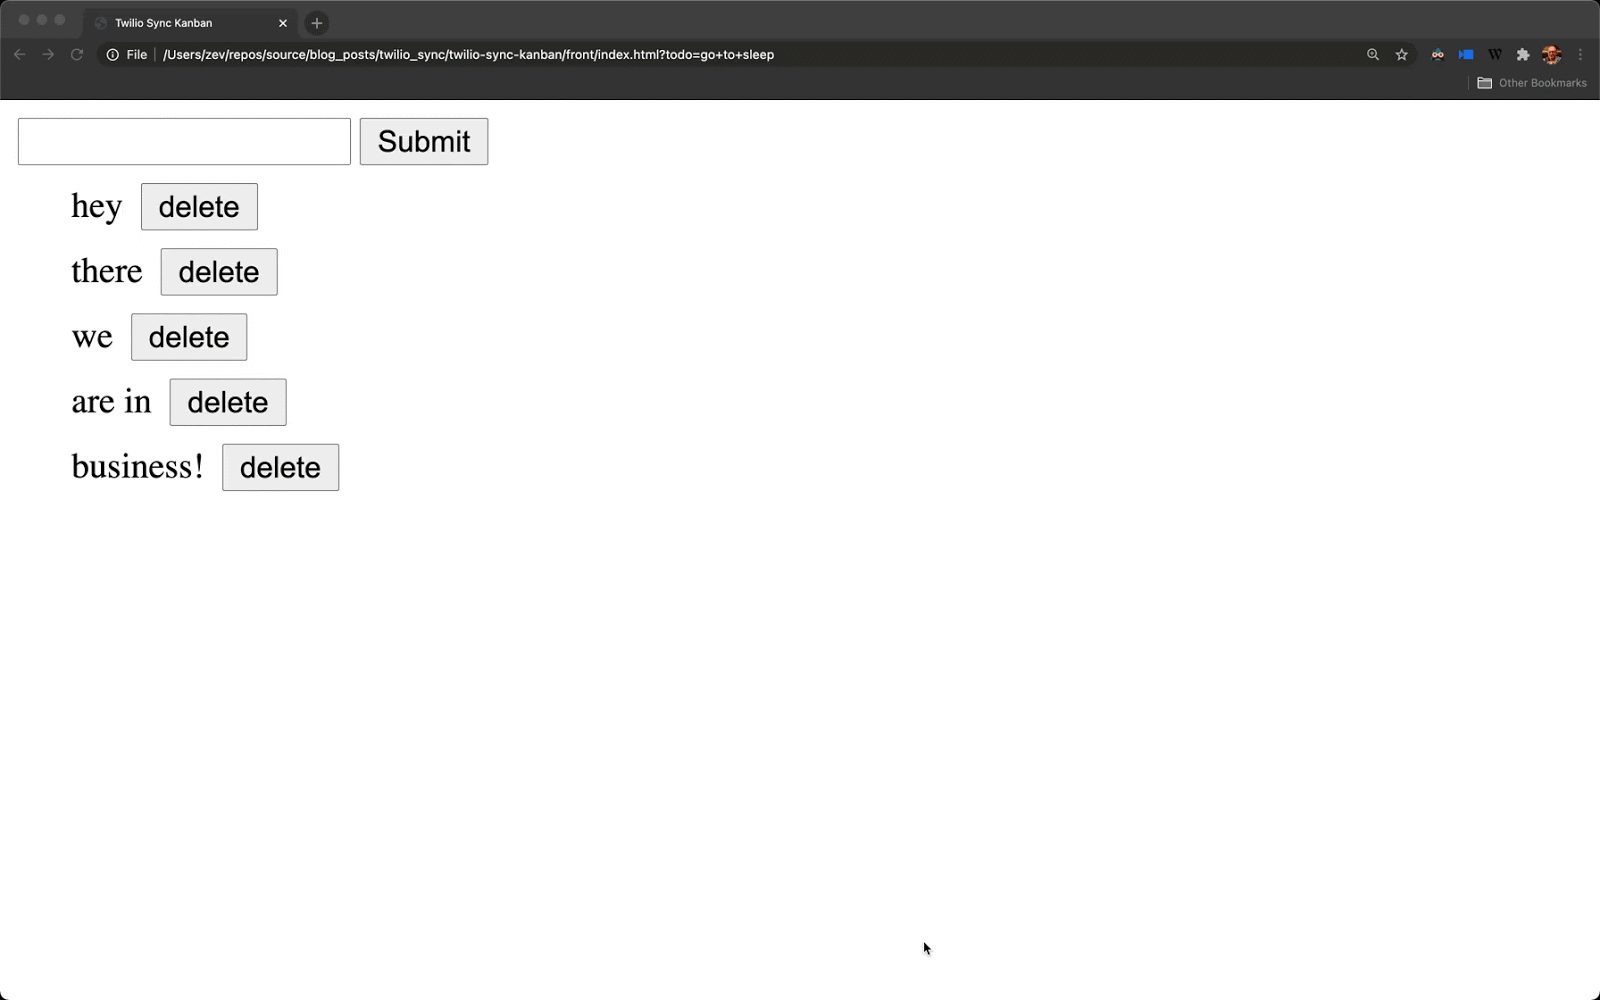
Let’s begin by adding a “Delete” button next to each list item. Below you can see the complete updated version of the index.html page, with all the changes necessary to add the delete functionality:
The most important change is the addition of the renderTask() function. This function contains what before was inside the forEach render loop, extended to add the “Delete” button next to each item. We extract this logic into a function here because we need to use it both a) when we render the initial list and but) when we create a new task through the form. Now that both the render loop and the itemAdded event handler call this function.
To make the tasks and the delete buttons look nicely spaced we have added a small <style> block in the <head> section of the page.
The delete button next to each task has an event handler associated with it which invokes the deleteTask() function with the item index as the argument.
To make this work we add the index of each item to it’s container <div> element as a data attribute. We reference this attribute in an event handler for the Sync list’s itemRemoved to specify which element to remove.
Refresh the page after making the above updates. The application should now function like so:
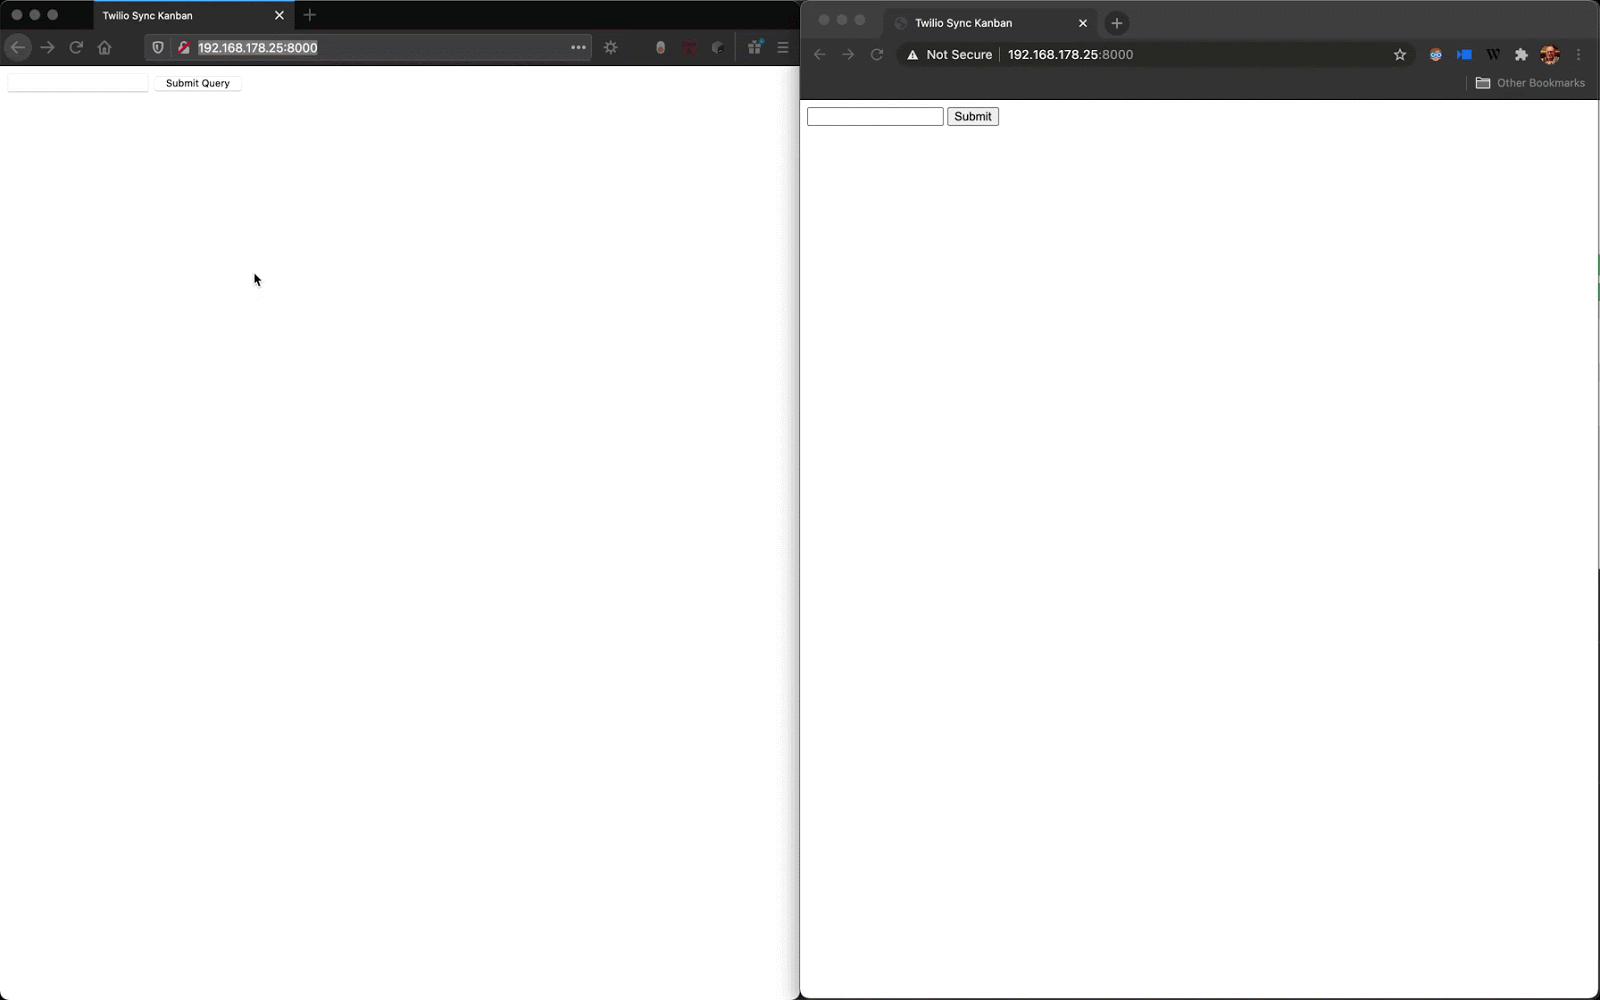
Quick Detour: Multiple Client Demo
Backtracking just a tiny bit, let's quickly prove the magic of Twilio Sync. An interesting experiment that you can try is to open a second browser window on this application and see how changes made in one of the windows update in real time in the other.
jKanban
This is where I tell you about Sir Riccardo Tartaglia, the contemporary Italian noble who has done the public service of creating a fully functional, open-source vanilla JavaScript Kanban board. Please follow links there to buy him a cup of coffee: I bought several. ☕☕
To incorporate jKanban in the project we can follow the documentation and download and add two files to the front subdirectory. Use the links below to get these files:
After you add the files to your front end, you can add them to the index.html page, and at the same time update our CSS definitions:
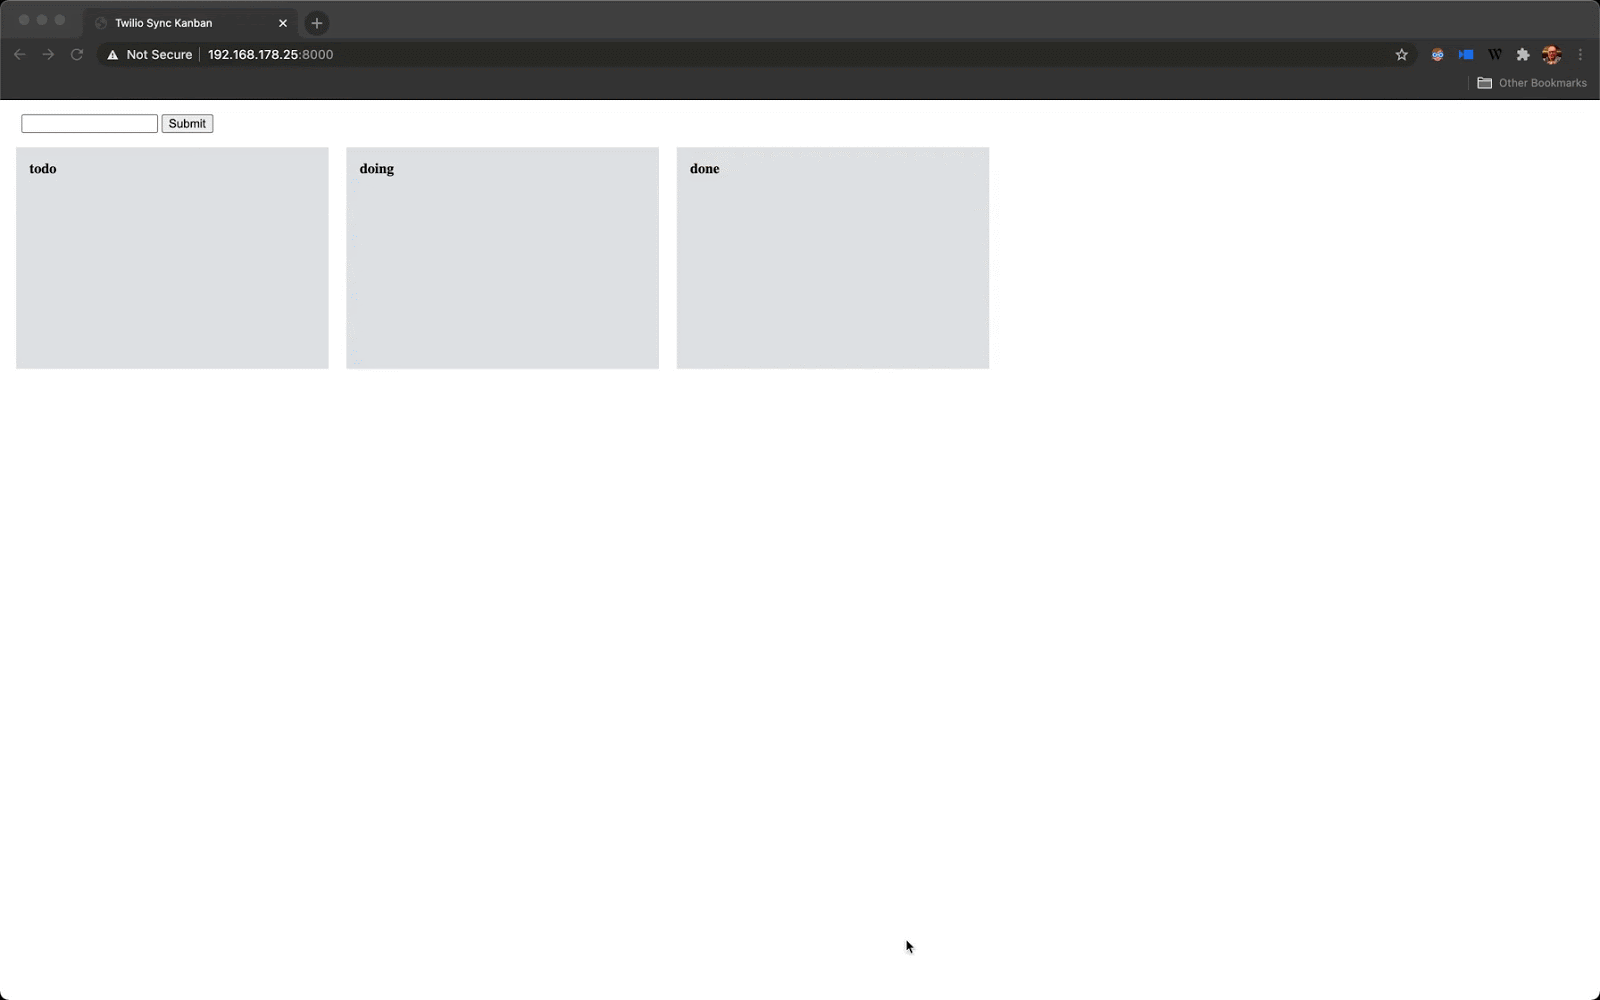
At the top of the <script> element, instantiate a kanban board instance with three columns labeled “todo”, “doing” and “done”:
Next, change the implementation of the renderTask() function to create kanban cards using the addElement() method of the board. Let’s also change the “Delete” button to a nice icon from Hero Icons:
And finally, update the itemRemoved event handler to properly remove list items from the kanban board using the removeElement() method:
Refresh the page to see the first version of the kanban board in action. For now all the items in the Sync list render in the first column, but you can drag them to other columns. For now these column changes aren’t shared to other clients.
Note how we toggle the cursor between "grab" and "grabbing" when a task is being dragged. There are also some nice default animations that come with the jKanban for adding/moving/deleting cards.
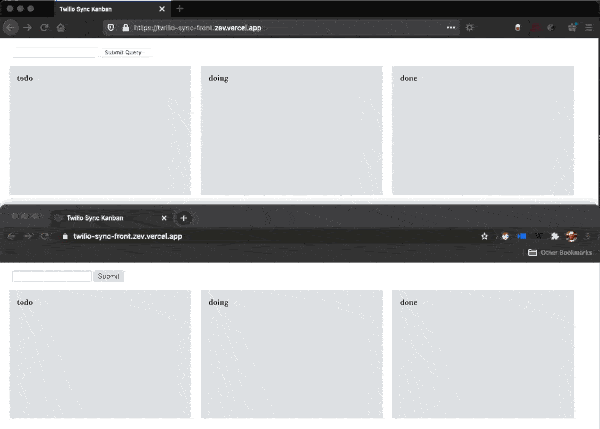
Last Thing: Persisting the Columns
We're getting close to having a fully functional Kanban board! But you may notice that if you drag cards to other columns, those changes are lost when you refresh the page and all the cards go back to the first column.
To persist the column each card is associated with, let’s add a second attribute to each item that we save to the Sync list. The current items have the structure {“name”: “task text”}, to which we’ll add a list attribute indicating which of the three lists the task is located.
In the addTask() function we add the new list attribute set to todo, which is the first column, to all new tasks that are created:
Next we add a “drop” event handler for the kanban board. This is added as an attribute in the initialization options of the board:
When we add a task to the page in the renderTask() function, we use the list attribute of the list item if available, defaulting to the first column if not:
Finally, we add an event handler for the itemUpdated event of the Sync list, so that we can update all connected applications when a task is moved between columns:
Wrapping Up
I don't know about you, but I find it so enjoyable to be building on the web at this moment. It's difficult to estimate how many lines of code Twilio Sync and its JavaScript SDK saved me here, let alone the massive savings of having a great open-source library like jKanban. However, 116 lines of HTML + JS later I have to imagine that it's significant. For such a simple application it's also great to have real-time data synchronization out of the box without deploying any microservices or databases.
Something I want to make note of, too, is how "cheap" it was to incorporate Sync into the flow of data in this application: we've used an event-driven pattern not unlike Svelte's store or React's Redux, and without any additional logic the kanban board is synced across all clients.
Testing Outside Your Wifi Network
If you'd like to try the application out with your friends and family, here's what I'd suggest:
- Install ngrok and run
ngrok http 5001on a separate terminal window to create a temporary public URL that tunnels requests into your locally running Flask server. - Add the ngrok forwarding URL to the singular
fetch()call in index.html. - Share the ngrok URL with your friends!
Next Steps
If I was going to spend another several hours on this project, I'd work on these tasks:
- Add undo/redo with keyboard shortcuts
- Make the cards editable
- Make it look nicer, probably using Tailwind UI so as to not get lost in the weeds
- Lock a card when it's being dragged or edited to prevent conflicts between clients
- Show visually that a card is being dragged by another user
- Add an "Add card" button at the bottom of each column
- Support and preserve reordering within a single column
- Wrap jKanban in a Svelte component and go to town
What about you?
Zev Averbach does data engineering at Caterpillar Inc., runs (and codes for) a transcription company and does web development on the side. Find me here (averba.ch) or on Twitter.
Related Resources
Twilio Docs
From APIs to SDKs to sample apps
API reference documentation, SDKs, helper libraries, quickstarts, and tutorials for your language and platform.
Resource Center
The latest ebooks, industry reports, and webinars
Learn from customer engagement experts to improve your own communication.
Ahoy
Twilio's developer community hub
Best practices, code samples, and inspiration to build communications and digital engagement experiences.