Send SMS Notifications from Google Sheets with Twilio
Time to read: 10 minutes
October 29, 2021
Written by
Reviewed by

Have you ever used a spreadsheet to keep track of a list of people? Maybe you keep a list of friends' birthdays, or a list of active customers for your side hustle. Wouldn't it be cool if you had an easy way to contact these folks?
In this tutorial, we are going to use Twilio’s Programmable Messaging API and the Google Sheets API to send payment reminders to customers listed in a Google Sheet. We will be using Google’s JavaScript-based language called Apps Script from within the Google Sheets interface to programmatically send SMS reminders when a customer’s payment is past due or coming up. You could easily make a few small changes to this use case to fit your own unique needs.
Follow along with the code snippets below!
Prerequisites
- A Google account
- A Twilio account
- A Twilio phone number that has been verified
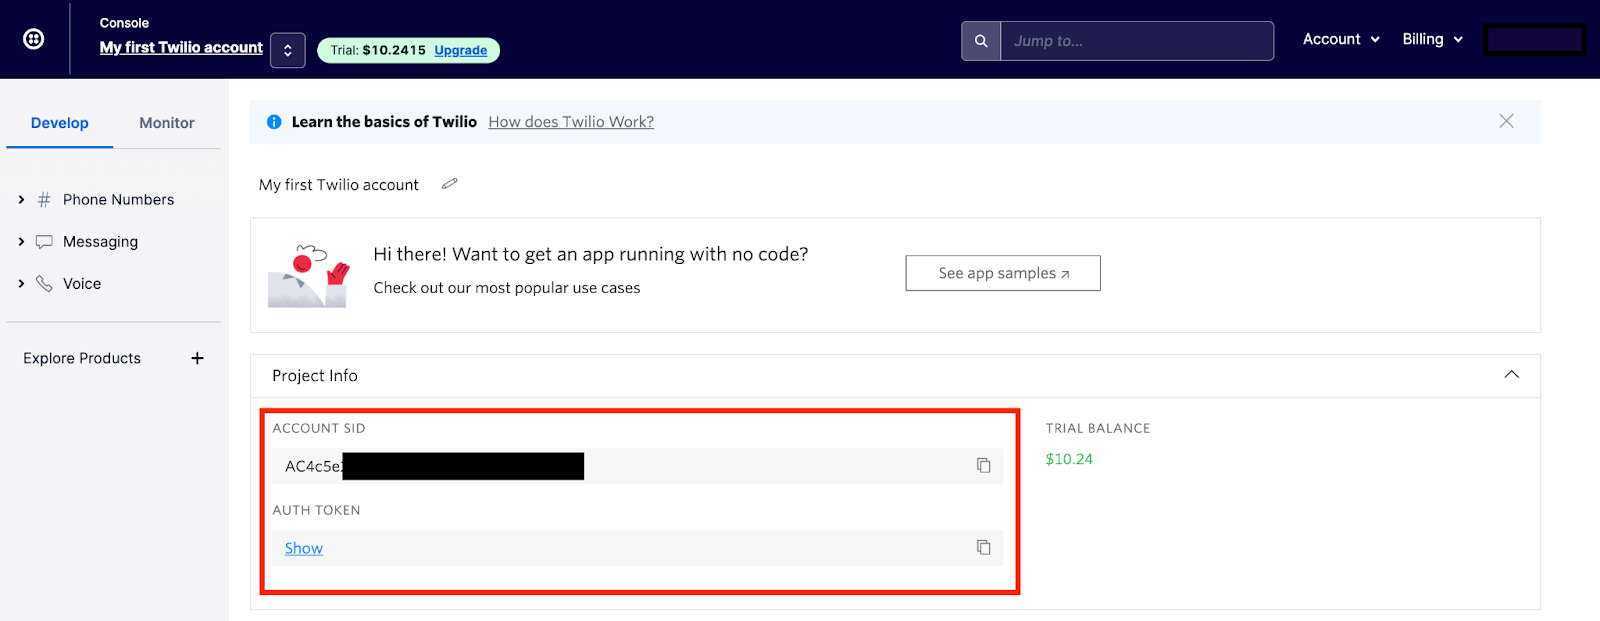
- Your Account SID and Auth Token, found in your Twilio account dashboard as shown below:
Create the Google Sheet
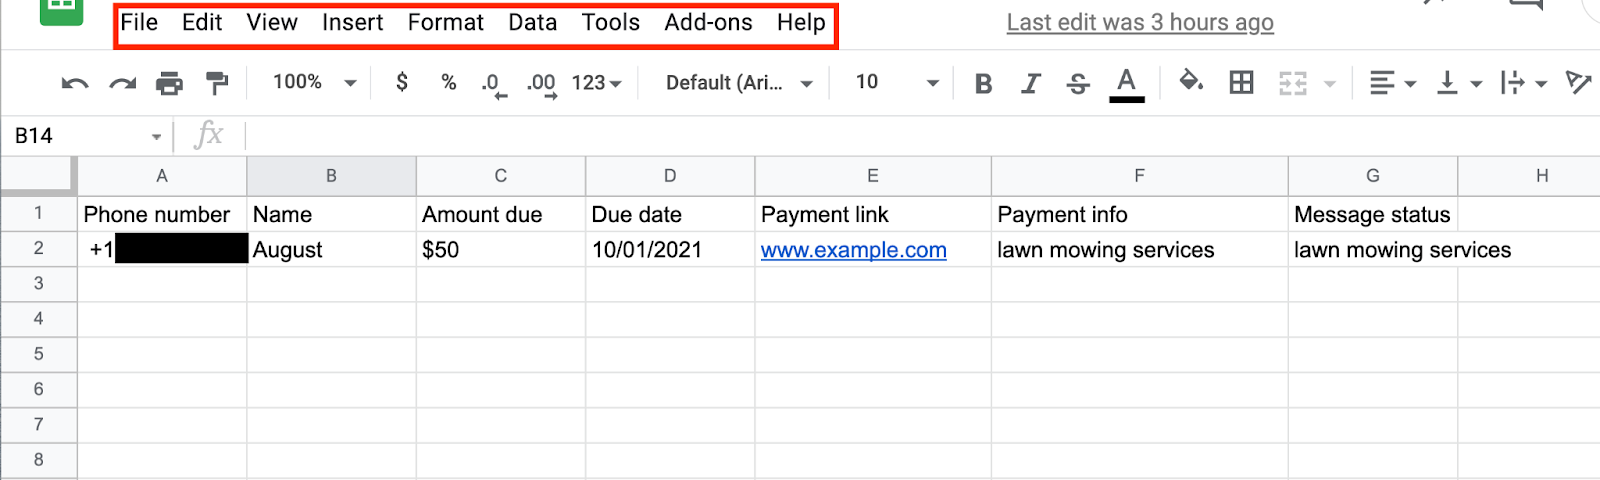
First, create a Google Sheet. In row one, type in each of these seven column names in the following order:
- Customer phone number - use the “plain text” cell format
- Customer name
- Amount due
- Payment due date - must be formatted as
yyyy-mm-dd, like 2021-10-27 - Payment link
- Payment info - brief description of what is being paid for
- Status of message - our script will update this cell after it runs
Next, add a complete row of sample data using your own name and regular (non-Twilio) phone number so you can test the script later.
Make sure the phone number you enter in the spreadsheet is in the E.164 format. If Google Sheets gives you problems when you try to enter a phone number in this format, try one of the alternativevs suggested in this StackOverflow thread and ensure the cell formatting is “Plain text”. Doing so should resolve the issue.
Your spreadsheet will look like this now:

Define the Google Sheet columns as variables
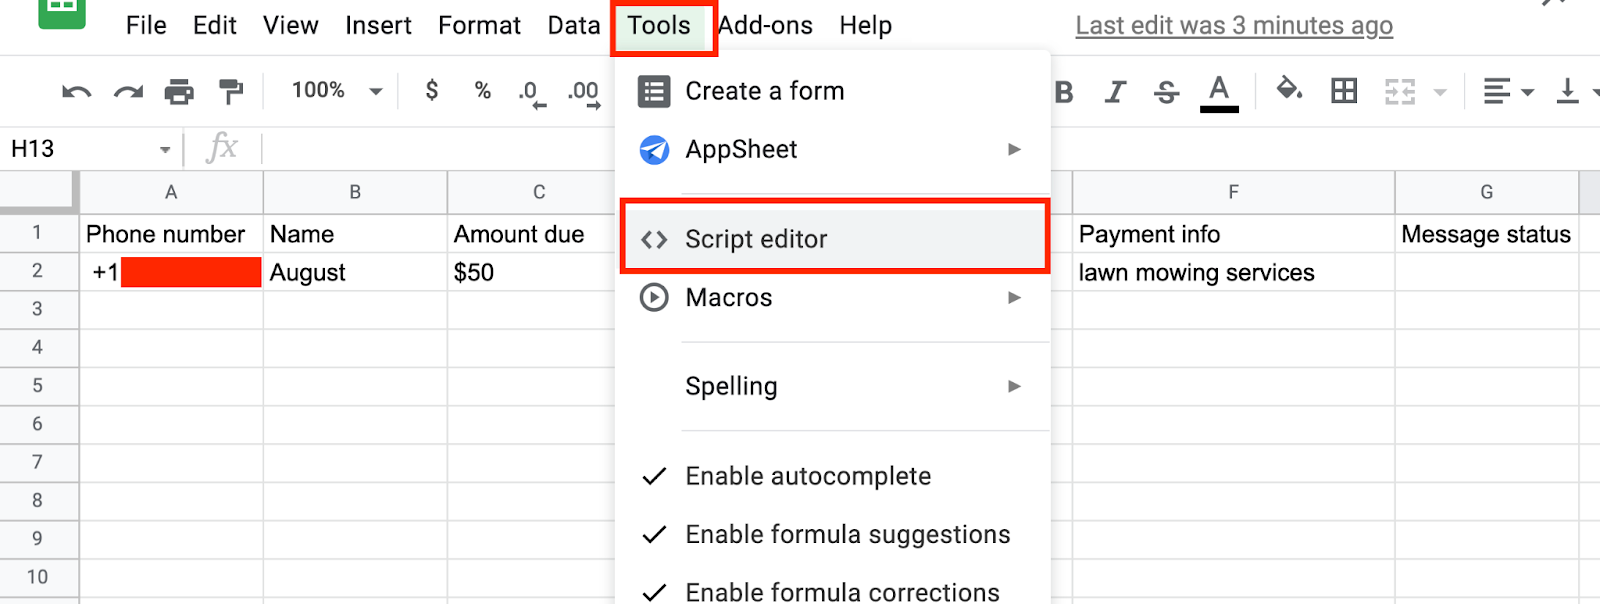
Now that we’ve created the columns in Google Sheets and seeded one row of sample data, we need a way to represent the columns in the code we’re going to write. To access the code editor for Google Sheets, first click on the Tools tab and then open the Script Editor as shown below:
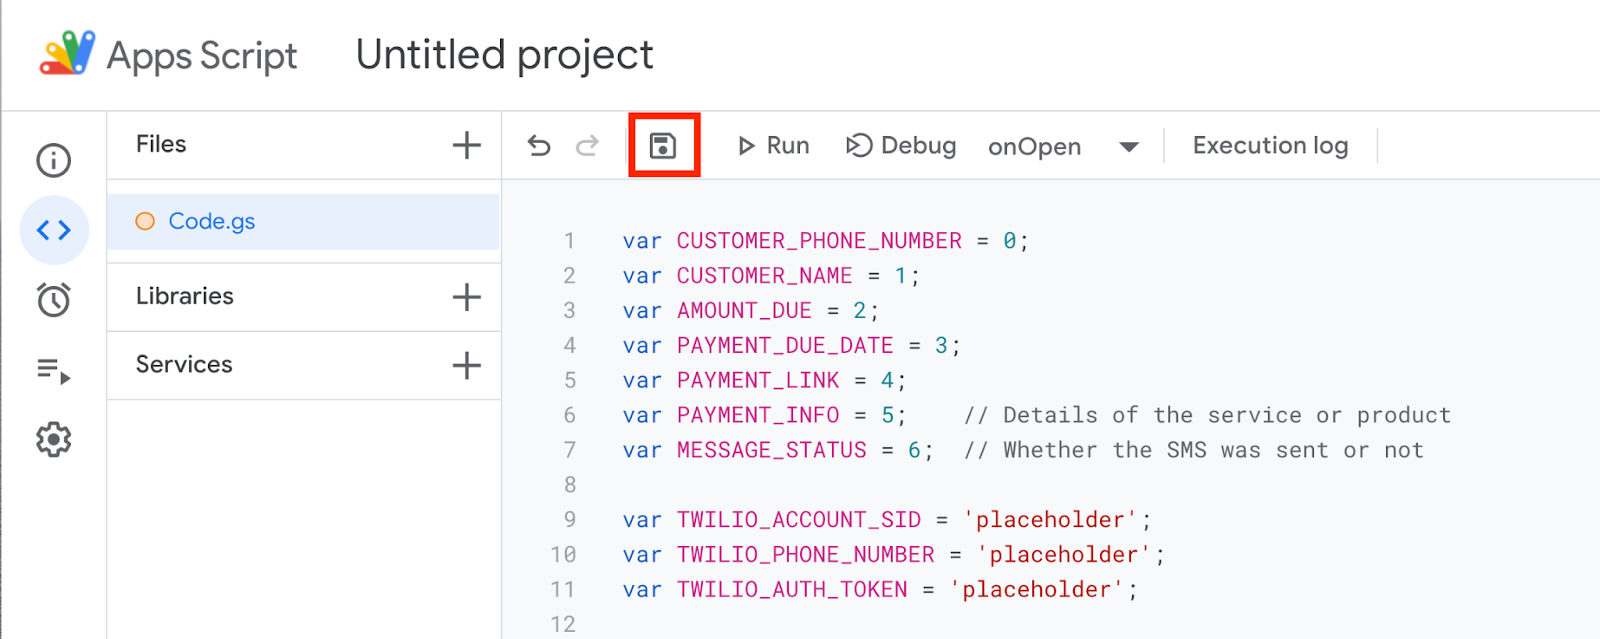
When the Apps Script Editor opens, delete the placeholder code (function myFunction() {}).
In the Apps Script Editor, define the columns as variables by copying and pasting the following code:
Notice that the variables representing the column names are defined according to the column number, using a zero-based index. This means that the first column in the sheet (CUSTOMER_PHONE_NUMBER) is associated with 0, the second column in the sheet (CUSTOMER_NAME) is associated with 1, and so on.
Securely store your Twilio credentials
In order to interact with any Twilio API, you need to supply your Twilio Account SID and your Twilio Auth Token within your code. Because we’ll be sending SMS notifications from your Twilio phone number for this tutorial, you’ll also need to supply your Twilio phone number. If you haven’t already located these three values in your Twilio Console, go back to the Prerequisites section of this tutorial for further instructions on where to find them.
When it comes to digital security, all API keys, authentication tokens, and any other values that are uniquely provided to you and no one else should be treated as critically private information (just like a credit card number). For this reason, it is NOT a good idea to copy and paste your Twilio credentials into the Apps Script Editor. Your credentials would then be readable by anyone who had access to your spreadsheet, and hackers could use your credentials to rack up charges on your Twilio account!
In addition, it’s very important to keep your private Twilio credentials secure and out of version control. Do not check them into git or publish them anywhere on the internet, including on GitHub.
Fortunately, there is a way we can securely provide your credentials to your Google Sheet through the use of UserProperties and custom menus. In the steps that follow, we’ll create a custom menu in the Google Sheet that will allow you to enter your Twilio credentials in a pop-up modal. Your credentials will then be saved in the background without being revealed in the Apps Script Editor.
Create a custom menu for inputting Twilio credentials
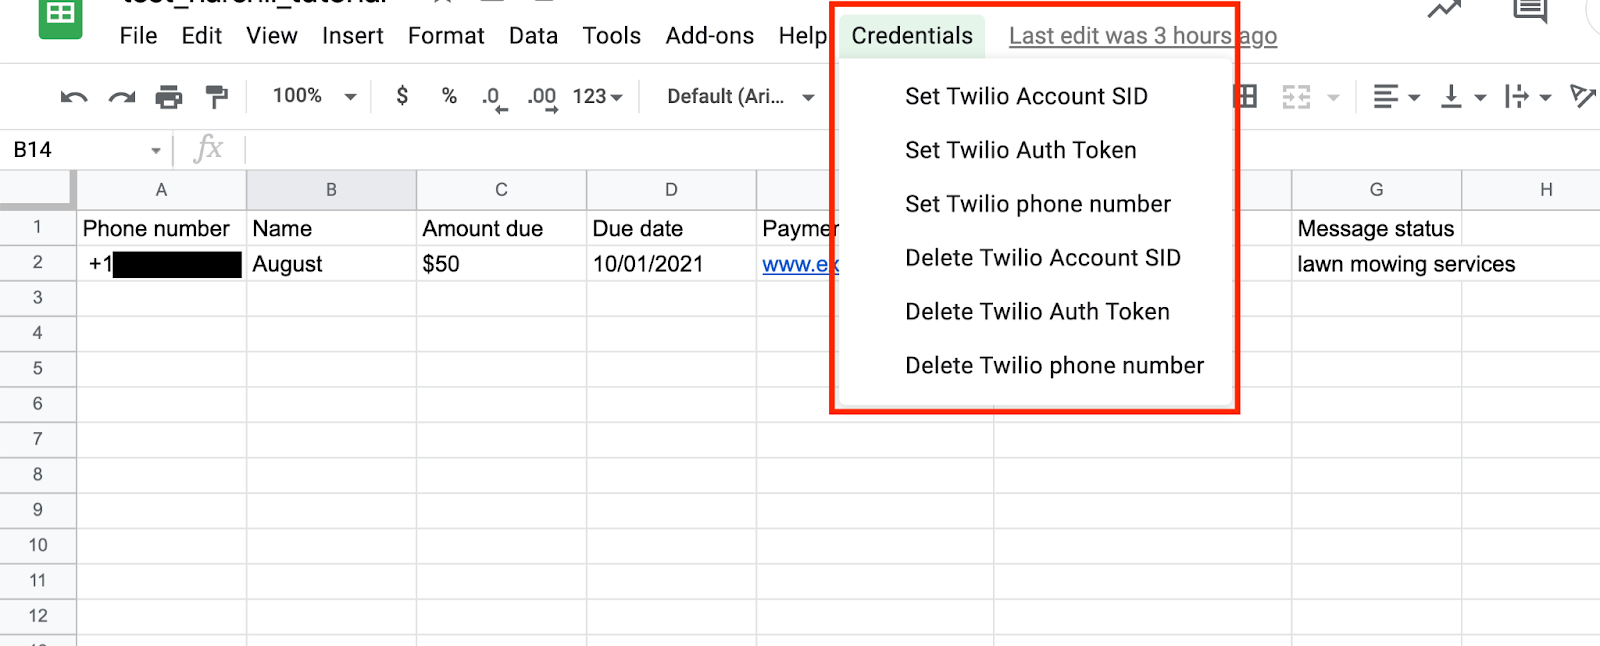
A custom menu is a menu item that will appear in the Google Sheet’s menu bar, alongside the typical menu choices like File, Edit, View, etc.
The custom menu is associated with one or more functions that define what actions happen when the custom menu is selected. We’ll create a custom menu called Credentials which will include dropdown selections for setting and deleting the Twilio Account SID, Twilio Auth Token and Twilio phone number.
Copy and paste the following code into the Apps Script Editor, underneath the variables you’ve already pasted there. An explanation is provided after the code snippet.
In the example above, we first define each of the three credential types as variables and assign them each a string value of placeholder. The Apps Script language doesn’t allow you to use null values or empty strings when instantiating variables that are UserProperties, which is why we’re using a string of arbitrary text. This arbitrary text will be replaced later, once the functions are complete and you use the custom menu for the first time.
We then define variables to represent the Google Sheets UI (ui) and the UserProperties (userProperties). These two variables will be used by the six functions we’ll create in the next step to handle setting and deleting each of the 3 types of credentials we need to store.
Next, we create a built-in function called onOpen() which runs the code inside of it whenever a spreadsheet is opened. This ensures that our Credentials menu will always be present in the spreadsheet.
Within the Credentials menu, each of the six actions for setting and deleting the credentials will appear and can be selected at any time. We have to provide the name of each of the six functions even though we haven’t written them yet. We’ll create these functions in the next step.
Create six functions within the Credentials custom menu
Now that the six credentials-related functions are named in the onOpen() function, it’s time to define them in the code. Copy and paste this code snippet into the Apps Script Editor, below the existing code:
The first 3 functions will prompt the user to enter the specified credential when they select the action from the Credentials custom menu. The last 3 functions will delete the specified credential when the user selects the option from the menu.
It's time to test out the code! Save the code in the Apps Script Editor by clicking on the floppy disk ("Save project") icon:
Navigate to your Google Sheet and reload the page. A few moments after reloading, you should see a Credentials menu appear to the right of the Help menu in the main menu bar. Click on the Credentials menu and you should see each of the 6 options, 3 for setting credentials and 3 for deleting credentials.
If you don’t see the Credentials menu, try completely closing the web page and opening it again.
Select each of the three “set credential” options one by one, and follow the prompts that appear to load your credentials into the script. For example, this is what you’ll see when you select the “Set Twilio Account SID” option from the Credentials dropdown:
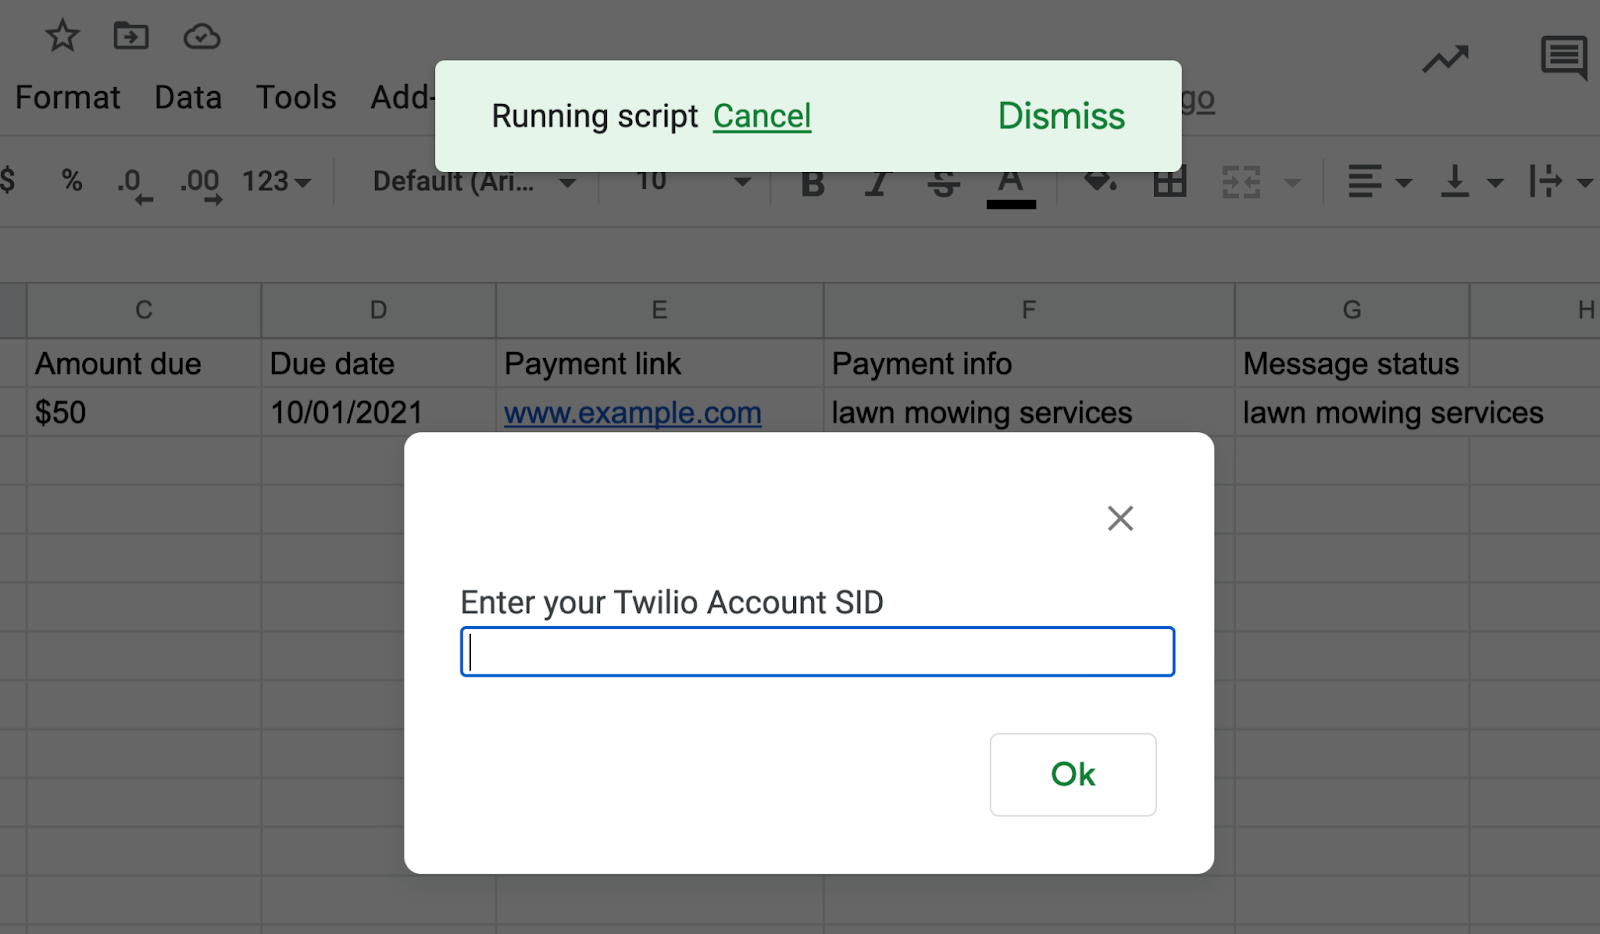
There is no input validation on these simple forms, so you’ll need to ensure that the value you enter matches the value that’s being asked for by the form (Account SID with Account SID, auth token with auth token, phone number with phone number).
Once all three of your Twilio credentials have been loaded successfully, it’s time to move on to the next step.
Watch out! You will need to re-enter your credentials every time you reload or refresh the browser page that shows the Google Sheet.
Create a custom menu for sending SMS notifications
We need an easy way to trigger the SMS notifications for payments that are due. We can create another custom menu by adding a few lines of code to the onOpen() function we wrote for inputting Twilio credentials, and then write some functions that will run when we make selections from this new custom menu.
Below, you’ll see a code snippet of what the onOpen() function will look like in its final state. Copy and paste the highlighted lines into your existing onOpen() function so that it matches what is shown below.
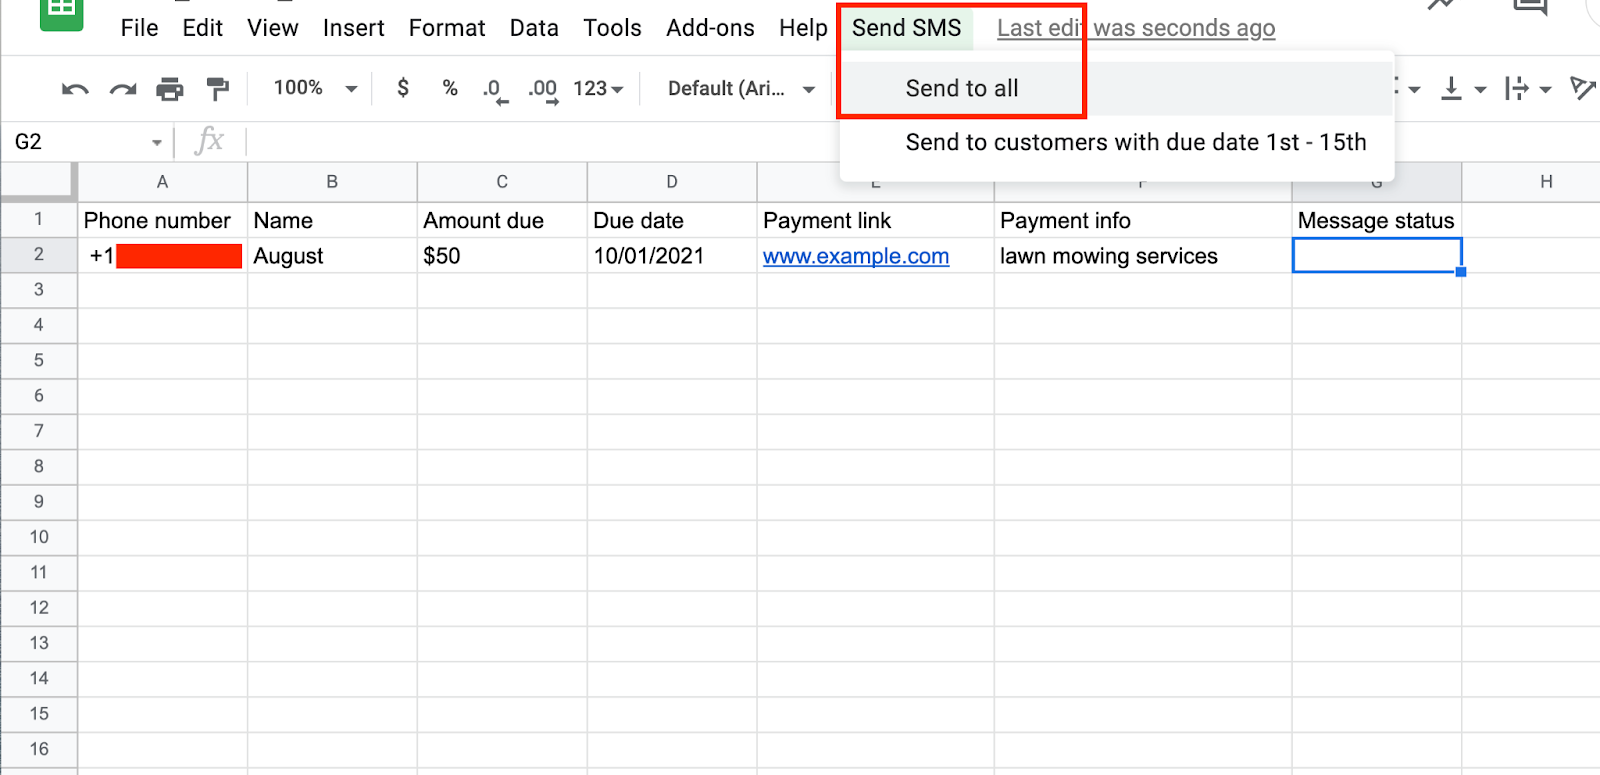
The onOpen() function will now create both a Credentials custom menu and a Send SMS custom menu whenever the Google Sheet is opened. When the Send SMS menu tab is clicked, two options are presented: “Send to all” and “Send to customers with due date 1st-15th”. We’ll write the code for each of these options next.
Create a sendSms() function
The sendSms() function is the primary function of our script. It uses Twilio’s API and the data in the Google Sheet to send a message that’s customized to each person in the sheet. Copy and paste the following code into the Apps Script Editor below all of the existing code:
In the code snippet above, we get our Twilio credentials and store them as variables, then use those credential variables to make a POST request to the Twilio Messaging API. The POST request includes the message details, which are stored in the payload parameter. If the POST request is successful, the customer will receive their payment notification via SMS and the “Message status” column in the Google Sheet will be updated!
Create a sendSmsToAll() function
Now that we have a function to send SMS messages, the next function we’ll create leverages the sendSms() function we just wrote in order to send an SMS notification to all of the contacts in the Google Sheet. Copy and paste the following code snippet into the Apps Script Editor, below the sendSms() function you pasted in the previous step:
This code snippet will collect the data for each contact in the Google Sheet, then call the sendSms() function for each contact so they receive an SMS notification.
Run the sendSms() function
It's time to test out the code! Save the code in the Apps Script Editor again, then navigate back to the Google Sheet and refresh or reload the page. The Send SMS menu should appear. If it doesn’t, try closing and re-opening the web page that contains the Google Sheet.
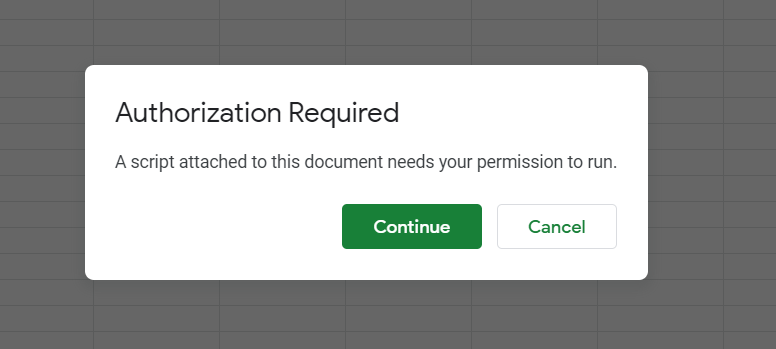
You’ll need to re-enter your Twilio credentials using the custom Credentials menu we created earlier before you proceed. In the process of re-entering your Twilio credentials, you may see a pop-up indicating that authorization is required. Click through the prompts to authorize the new application.
Once you’ve entered all three of your Twilio credentials, click on the Send SMS menu tab, and select “Send to all”.
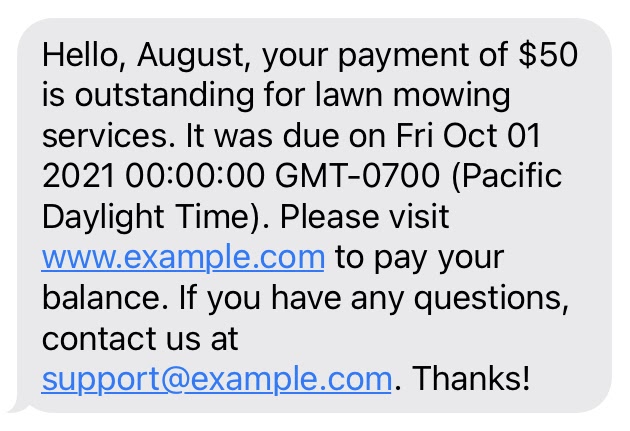
You should receive an SMS notification at the non-Twilio phone number you entered as sample data in the spreadsheet!
If you aren’t receiving the SMS notifications, check for the following common issues:
- Ensure the phone number format in the Phone number column is E.164. If you’re unable to type the leading plus sign (+), enter a space in the cell before typing the plus sign (+) as suggested in this StackOverflow thread, which should resolve the issue.
- Re-enter your Twilio credentials using the custom Credential menu
- Inspect the payment status column for error messages generated by the
sendSms()function. - Use the Apps Script Editor’s debugging tool to check the code for typos.
Send SMS notifications based on a date range
We now have a function that sends SMS notifications to all the customers in the Google Sheet, but it’s likely that not all of the customers in the sheet will need a notification at the same time. Some customers may have already paid, or some people in the sheet may no longer be customers.
The next step is to add filtering so that customers in different user segments can receive notifications at the right time. For our example, we’ll add a date filter and only send the notification to customers whose payments are due between the 1st and 15th of the month.
The function below checks to see if there are any customers whose payment due dates fall within the specified range. If there are, those customers’ information is sent to our sendSms() function so they can be notified.
Copy and paste the code below into the Apps Script Editor, underneath the code that’s already there. You can change the date range on line 11 of this function if desired.
The function above checks the payment date in each row and compares it to the specified range (1st to 15th of the month, in this case). If the payment day falls within that range, an SMS notification is sent to the customer.
Save the project in the Apps Script Editor again. Reload or refresh the web page, then re-enter your Twilio credentials using the custom Credentials menu.
Change the due date in your sample data row so that it falls within the date range specified in the sendSmsByDateFilter() function. Run the function by selecting the custom Send SMS menu, then the option to Send to customers with due date xx - xx. You’ll receive another notification!
Finally, change the due date in your sample data row so that it does not fall within the date range specified in the sendSmsByDateFilter() function. Run the function by selecting the custom Send SMS menu, then the option to Send to customers with due date xx - xx. You should not receive another notification.
Congratulations!
Nice job working through this tutorial! You just learned how to:
- Write a program in Google’s Apps Script programming language
- Create a custom menu in Google Sheets
- Send an SMS notification using Twilio’s API
Next Steps
SMS is one of many ways you could send payment reminders to customers from a Google Sheet. You could also use:
- Twilio’s WhatsApp API
- Twilio SendGrid’s Email API
- Twilio Voice for a phone call alert
Or, check out some of the other tutorials on the Twilio blog for ideas on what to build next:
- Keep a Journal of Special Moments Using Twilio Programmable SMS and Google Sheets
- Build A Community SMS Group Chat with Twilio Functions and Google Sheets
- How to Send WhatsApp Messages from Google Sheets with JavaScript and Node.js
I can’t wait to see what you build!
Harshil Patel is an Android Developer experienced in designing, developing, and maintaining Android applications. He’s also a Machine Learning enthusiast and enjoys writing about a variety of technology-related topics. You can find him online at his personal website or on Linkedin.

Related Resources
Twilio Docs
From APIs to SDKs to sample apps
API reference documentation, SDKs, helper libraries, quickstarts, and tutorials for your language and platform.
Resource Center
The latest ebooks, industry reports, and webinars
Learn from customer engagement experts to improve your own communication.
Ahoy
Twilio's developer community hub
Best practices, code samples, and inspiration to build communications and digital engagement experiences.