How to Send SMS with Twilio and Micronaut
Time to read:
November 04, 2022
Written by
Reviewed by

Micronaut is a framework for building JVM web and serverless apps, first released in 2018. It aims for fast startup and low memory overhead for your web applications, and supports Java, Kotlin, and Groovy, with an eye on Scala support in the future.
You might be familiar with Spring Boot as a popular framework in this space, and Baeldung has an overview article comparing it with Micronaut.
In this post I'll show how to set up a web app with Micronaut to handle Twilio webhooks for incoming SMS so your app can reply to them automatically. If you're interested in starting your Micronaut journey or looking to learn enough to start building your next Twilio app with it, then read on.
You'll need:
- A recent version of Java. I used Java 18 but anything from 11 onward will work
- A Twilio account. Sign up here if you don't have one, a trial account is fine
- ngrok or a similar tool to create public URLs for localhost servers
Project Setup
You can set up and download a starter for your project from https://micronaut.io/launch/ or by using the mn command line tool. If you use the website:
- Use "Maven" as your build tool
- Select "JUnit" as the Test Framework
- Set the project name to "twilio-micronaut"
Click "Generate Project" then "Download ZIP" and unzip the file once it's downloaded.
If you prefer to use a CLI tool, a convenient way to install mn is with SDKMAN, which I recommend for managing installations of Java and other useful tools.
Install the Micronaut tool and generate a new project with the following commands:
Either way, you will now have the same project files in a folder called twilio-micronaut, so import the project into your favourite Java IDE. I'm a fan of the JetBrains IDEs so I use IntelliJ IDEA for Java.
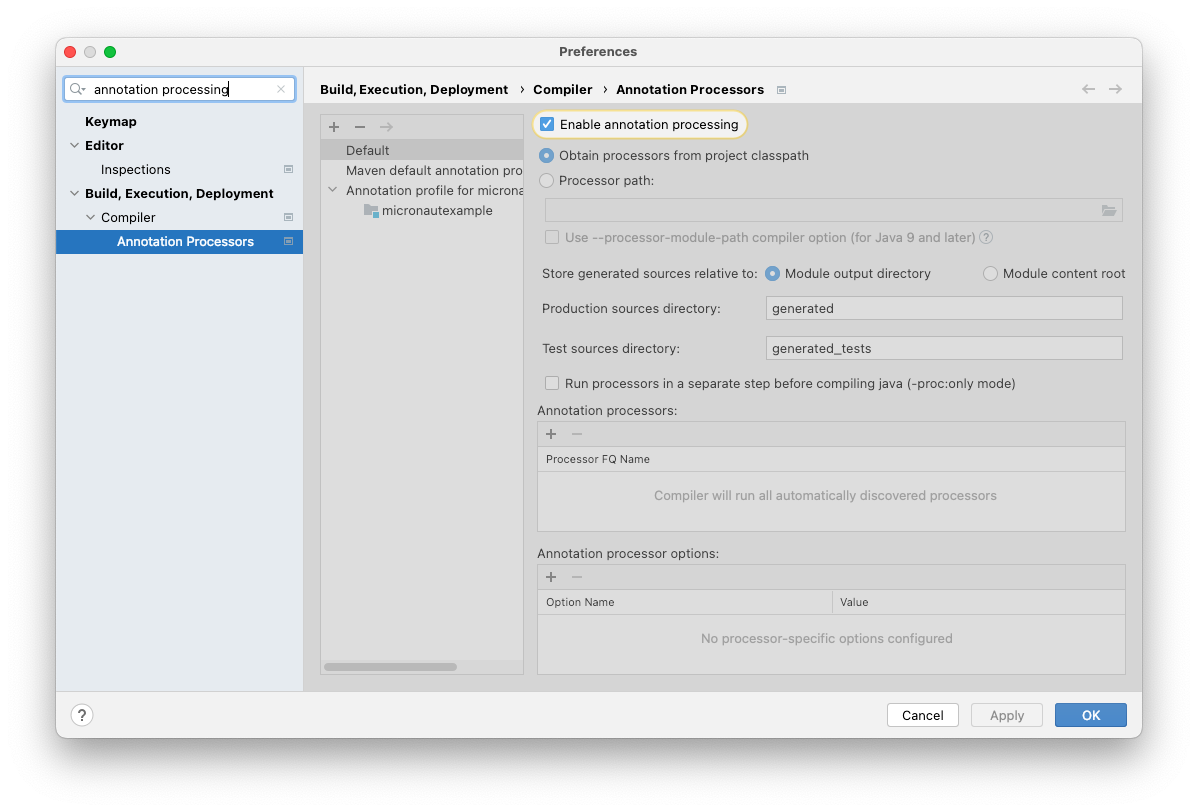
You will need to enable annotation processing to enable Micronaut to do a lot of work when your app is compiled, rather than every time it starts up. This is one of the ways that Micronaut keeps its promise of fast startup and low memory usage.
In IntelliJ it is done in the Preferences like this:
Now that you've generated the project, loaded it into your IDE, and configured the annotation processing, it's time to get coding.
Build your first Micronaut web app
First, let's look at what's already in the project:
- A README.md file with helpful links to documentation and guides for Micronaut
- A pom.xml file with some dependencies and plugins already configured
- An
Applicationclass with amain()method
You won't need to edit any of these for this project, but it's good to see what's there. The main() method is how you will start the application. You can run it from your IDE or on the CLI with ./mvnw mn:run.
You can run it now, but you haven't added any code yet so you will have an app running at http://localhost:8080 which returns a 404 for any URL. Let's fix that.
Add a new Java class called HelloController in the same package as the Application class, with this code:
By adding the @Controller("/hello") annotation you're telling Micronaut that this class will handle HTTP requests for that path, and the @Get annotation says to use the index method for GET requests. Micronaut defaults to application/json for the response's content type but because this function is returning a String use produces = MediaType.TEXT_PLAIN with the @Get annotation.
Specifying an Optional<String> for the @QueryValue("name") means that the name parameter in the URL is, well, optional. If you used String it wouldn't be.
Run the app as before, and you can see the code in action by browsing to http://localhost:8080/hello, or with the name parameter at http://localhost:8080/hello?name=Matthew.
Handle SMS from Twilio with Micronaut
Now that you know how to create a web app with Micronaut, it's only a few more steps to be able to receive and reply to SMS messages using a Twilio phone number:
- Modify your app to handle Twilio's SMS webhooks
- Buy and configure a phone number from Twilio to use your app
Let's look at those in order.
Modify your app to handle Twilio's SMS webhooks
Webhooks are a flexible way to handle incoming SMS with Twilio. You have to create a web app to handle HTTP requests. The incoming SMS is converted into an HTTP request which Twilio makes to a URL you provide, and your app's response is used as the reply.
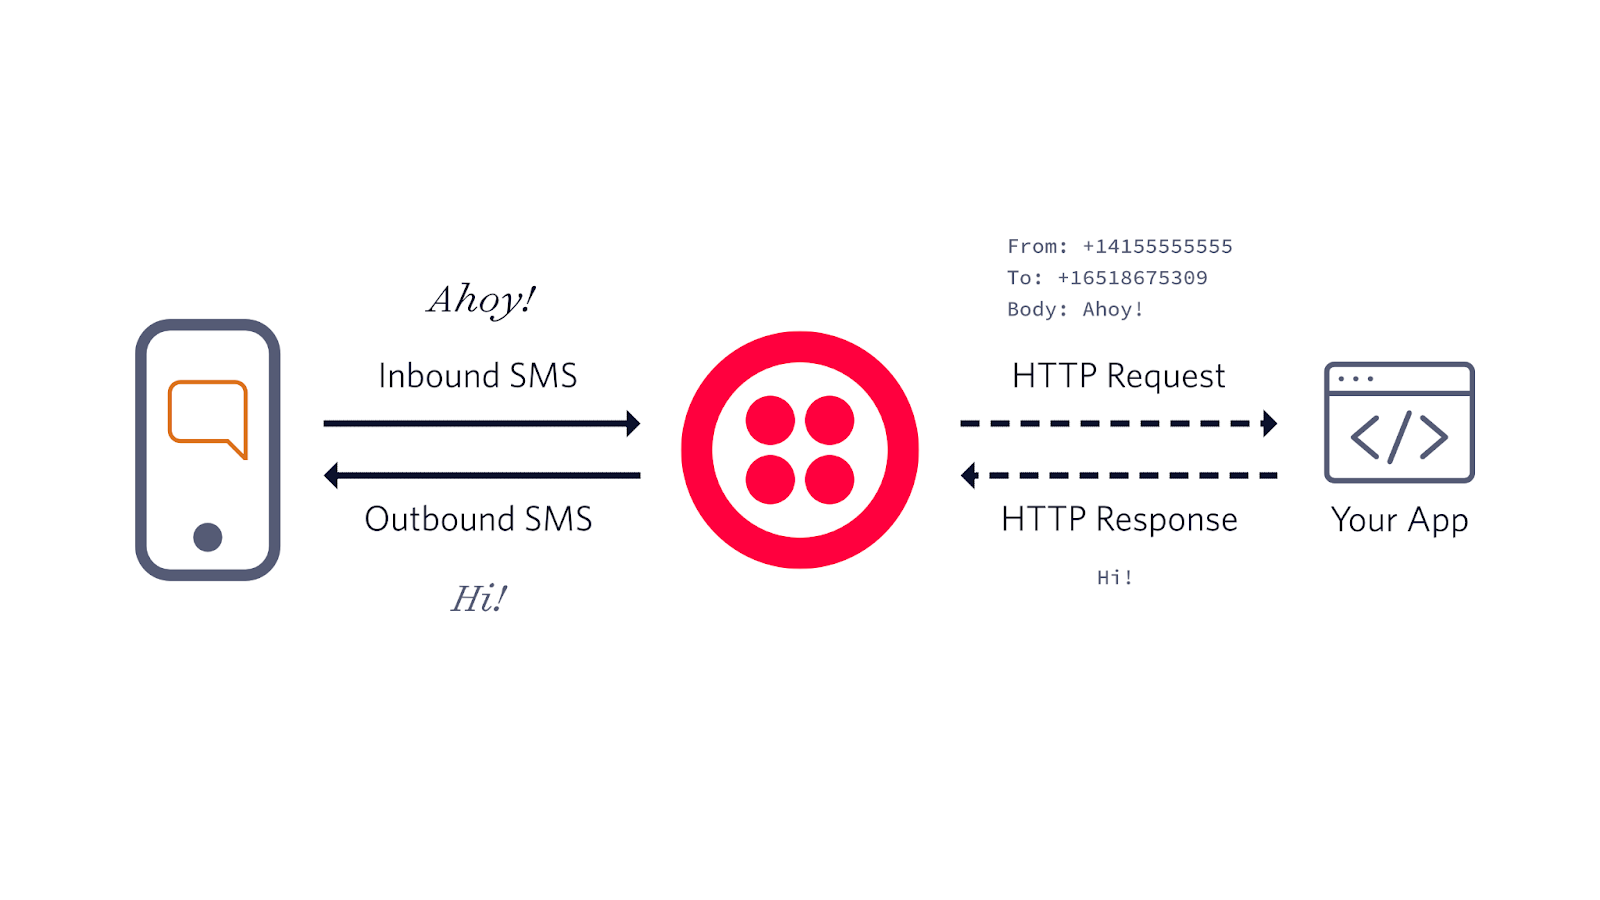
If your app returns plain text then this is sent straight back as a reply to the original SMS. For more complex behaviours you can also return TwiML, but for a direct SMS response returning text is enough.
The HTTP request from Twilio will include all the relevant data about the incoming message, including the message body and who it's from, etc. You can configure Twilio to use either HTTP GET or POST. As we've already looked at handling GET with Micronaut, let's use POST this time.
Create a new class alongside your HelloController and call it SmsController. Here's the content:
There are a few new things in this method:
- Using
@Postmeans you are expecting the details of the incoming SMS to be in the request body. You need to tell Micronaut what format to expect this data to be in usingconsumes = MediaType.APPLICATION_FORM_URLENCODED. - Using the
@Bodyannotation you can get access to all the request data in a singleMap<String, String>. The full list of these parameters is rather extensive, but for this app you're only using theFromphone number and theBodyof the message.
Because this new endpoint takes POST requests and expects data in the request body it's not trivial to test directly from the browser. However, if you're comfortable with a tool like curl you can test it on the command line.
Restart your app, then paste the following command:
You should see the following response printed to the CLI.
Configure a Twilio phone number to use your Micronaut app
Start by getting a new phone number from Twilio at twilio.com/console and selecting Phone Numbers > Manage > Buy a number. After buying it you can head to the configuration page for that number. You will want to set a URL that points to your Micronaut app for "When a message comes in". But what URL should you use?

Twilio needs a publicly accessible URL, so localhost isn't going to be good enough. Luckily, there are several tools to create temporary public URLs that forward to localhost - my favourite is ngrok.
Running ngrok http 8080 in the terminal gives a response like this:
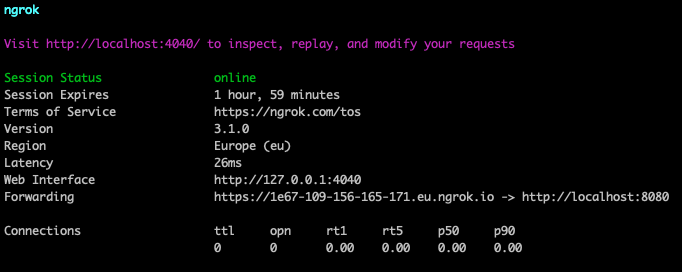
The Forwarding URL is what you need, not forgetting that you need to add /sms to the end:

Save this setting with the Save button at the bottom of the phone number configuration page, and you're good to go!
See it in action
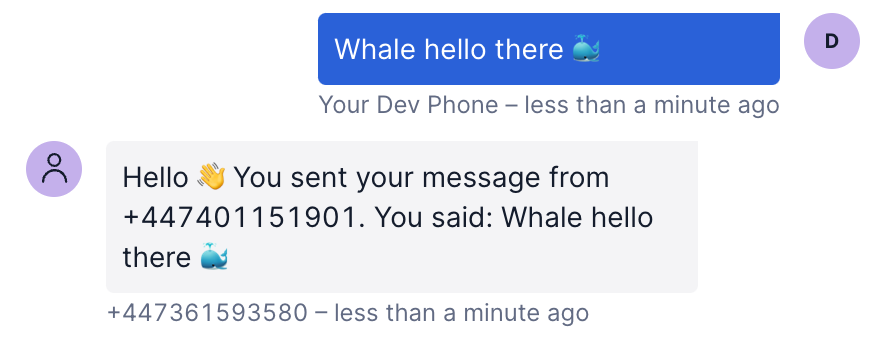
Text your Twilio number from your cell phone and see the response from your app - that's all! If you can't use your cell phone (or don't want to) have a look at Twilio Dev Phone which works like a softphone that runs in your browser and is backed by your Twilio account.
Deploy your Micronaut app
If you want to leave your app up and running so that your SMS responder can handle messages without having to keep it running on your laptop, you can package it for distribution with ./mvnw clean package in your project directory. This creates a self-contained jar (Java ARchive) in the target/ directory. You can run the app on a cloud instance with java -jar twilio-micronaut-0.1.jar, configure your network and add the public URL to the phone number configuration.
Wrap up
Congratulations 🎉 You've successfully built your first Micronaut Twilio integration! Where you go next is up to you. Check out the API Reference and Guides for more inspiration about Micronaut, and Twilio's documentation and other posts on this blog for ideas about what to build. Almost every Twilio API can be enhanced with webhook calls to your own apps, so let your imagination flow and tell me about what you're building:


Related Resources
Twilio Docs
From APIs to SDKs to sample apps
API reference documentation, SDKs, helper libraries, quickstarts, and tutorials for your language and platform.
Resource Center
The latest ebooks, industry reports, and webinars
Learn from customer engagement experts to improve your own communication.
Ahoy
Twilio's developer community hub
Best practices, code samples, and inspiration to build communications and digital engagement experiences.