Serverless Calendar Notifications via SMS with Postman and Twilio
Time to read: 7 minutes
May 26, 2021
Written by

I love to eat fresh fruit, but I never know what’s in season until I go to my local grocery store. Imagine my delight when I discovered national fruit holidays! Yes, it’s probably a marketing gimmick in my country, but it can also alert me to what’s in season.
This tutorial shows you how to set up custom calendar notifications. Even if you don’t care about fruit, learn how to trigger a notification on a certain date using a Postman monitor, so you never miss any special events. In this tutorial, we will do the following:
- Set up a Postman collection
- Add an example response for data storage
- Mock the API on Postman servers
- Set up an SMS notification with Twilio
- Run the collection locally in Postman
- Schedule a monitor to run on Postman servers
Tutorial requirements
- A personal phone number to receive SMS notifications
- A free Twilio account and a Twilio phone number to send SMS notifications
- A free Postman account to store your data and trigger the notifications
To use Postman in a web browser, as we will do in this example during development, you’ll be prompted to download and run the Postman agent on your local machine to overcome cross-origin resource sharing (CORS) limitations. The agent is not the same as the app. On a Mac, you will see an icon for the Postman agent running in the status menu at the top right of your computer screen. On a Windows machine, the Postman agent icon displays in the system tray at the bottom right of your computer screen.
If you don’t want to use Postman in a web browser with the agent, you can instead download and install the Postman app for Mac, Windows, or Linux.
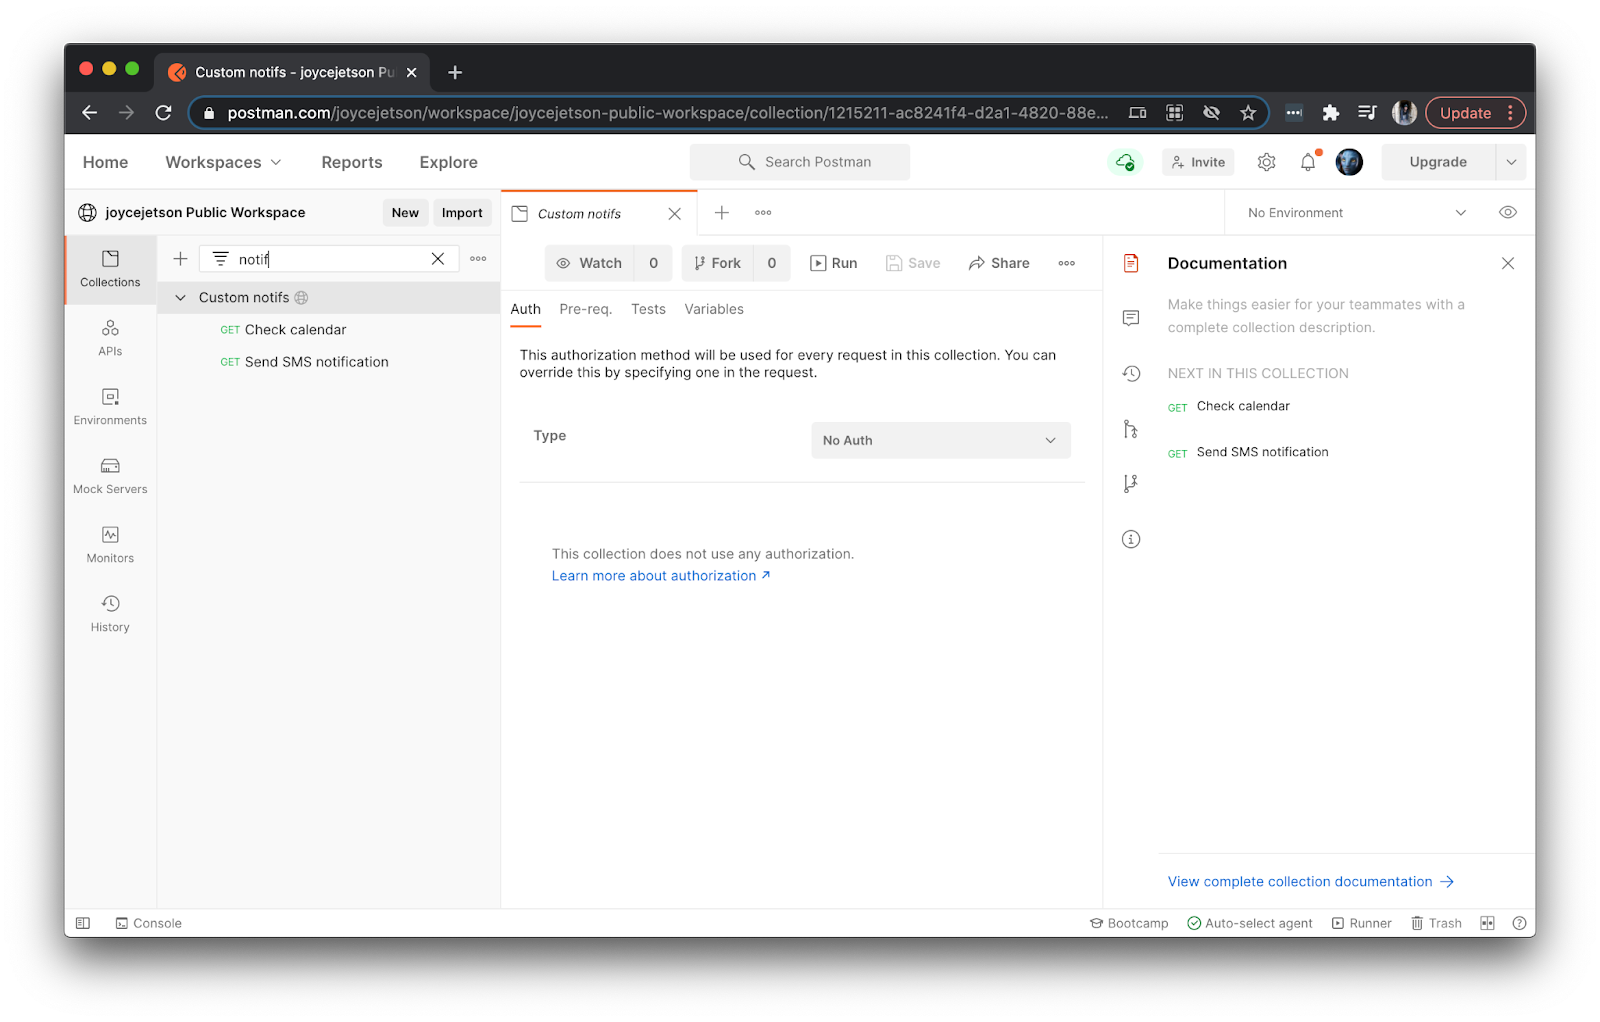
Set up a Postman collection
Sign into Postman. At the top left, create a new personal workspace to contain your work. Then select the Collections tab on the left, and create a new collection.
Add two requests to the collection called Check calendar and Send SMS notification. We will complete the details for these requests later. The first request will check for important events. The second request will send an SMS message from your Twilio phone number to your personal phone number.
Add an example response for data storage
To store something simple like a list of dates, we can use a mock API server to return static data instead of using a full-fledged API talking to a database. Let’s mock up the data on Postman’s servers by describing an example outlining the data we’d like returned from the mock server. In other words, for an API request that looks like this, we’ll expect a response that looks like that.
While we don’t need to add the mocked data directly to our collection, having it nearby makes it easy to see and update. So under the first request Check calendar, go to the overflow menu (...), and select “Add example”.
For the example request, leave the HTTP method as GET, and enter {{url}}/fruits as the address. For the example response, enter 200 OK for the HTTP status code, and the body can be JSON and structured like an array of objects, like this:
Tab over to the response Headers in the example, and add a key of Content-Type with a value of application/json. Make sure you’re adding this header to the response on the bottom, and not the request at the top.
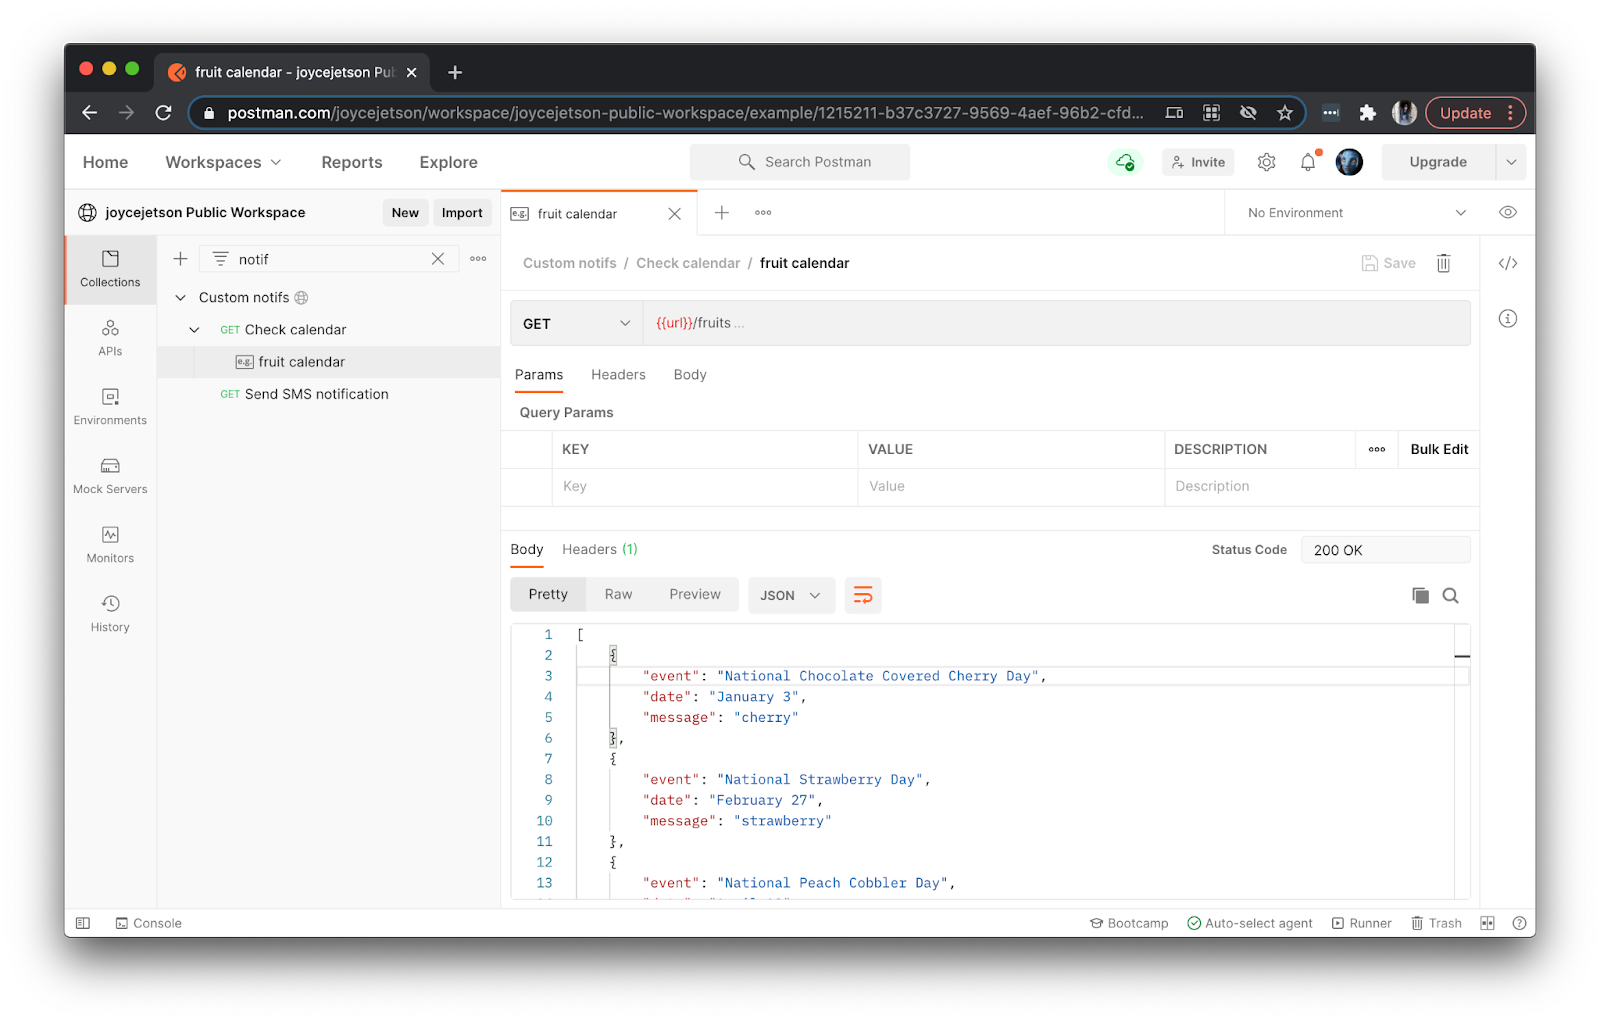
When you’re satisfied with the mocked data, save the example. You will see the example listed as “e.g.” beneath the first request. This example is the basis of the mock API we’ll create in the next step.
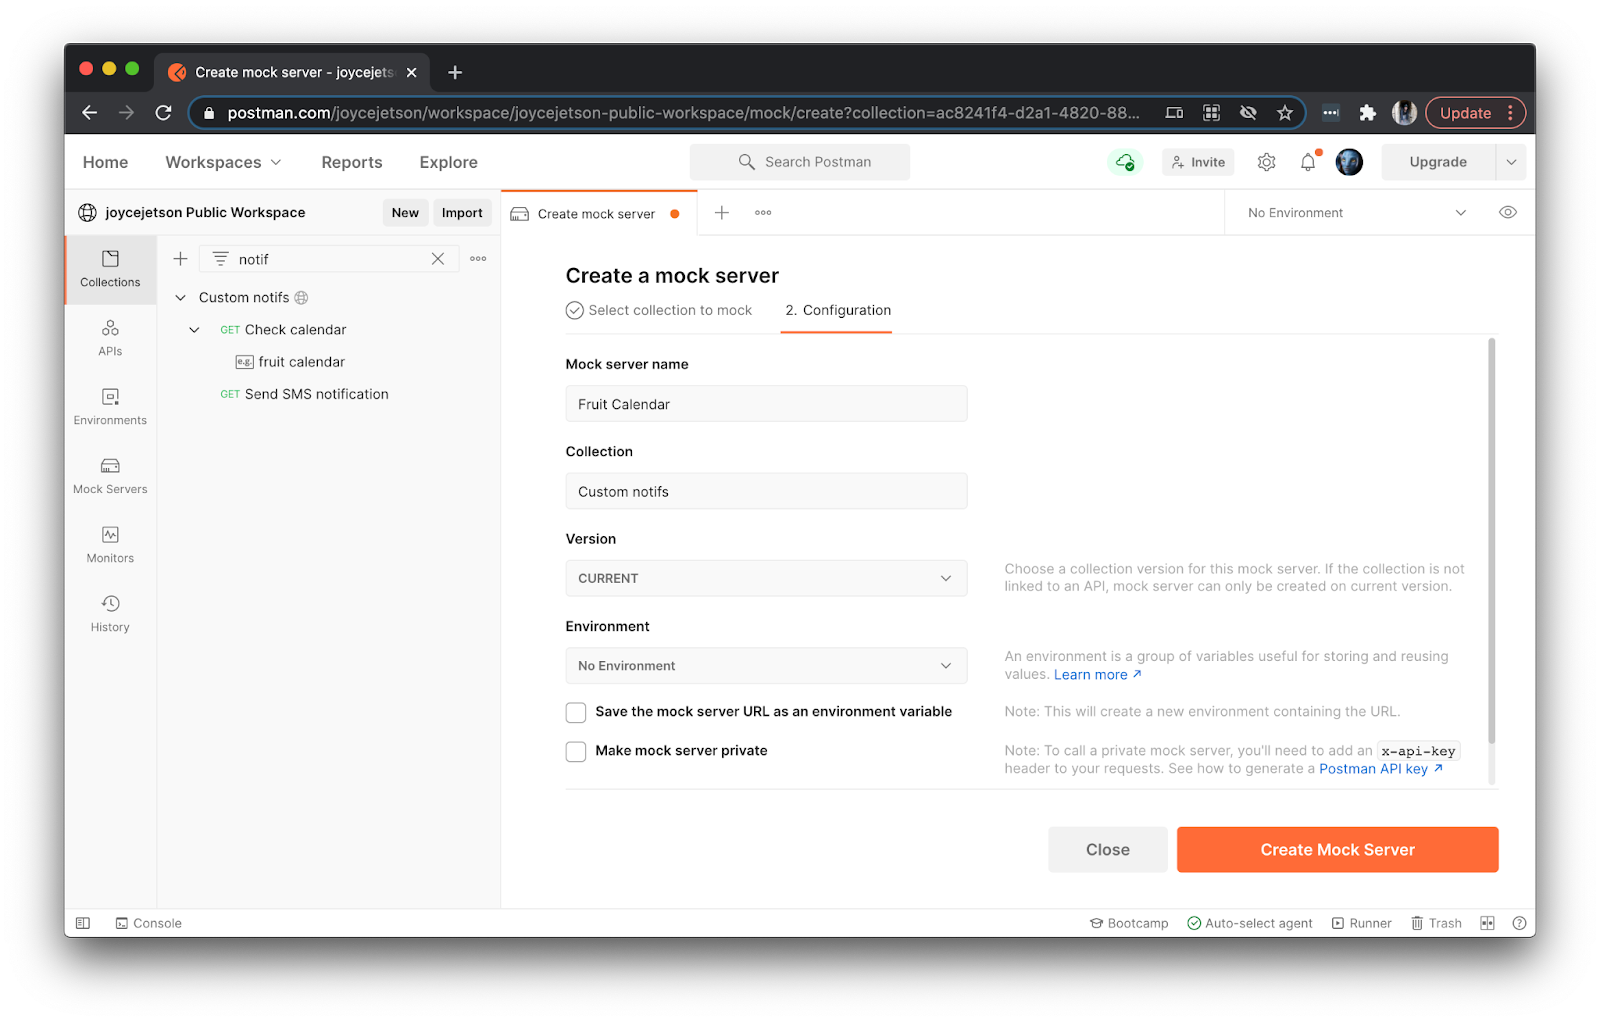
Mock the API on Postman servers
Since we added the example to our collection in the previous step, we must add our mock server to this collection too. Go to the overflow menu (...) of the collection, and select “Mock collection”. Give your mock a name. You can uncheck “Save the mock server URL as an environment variable” since we are not using an environment. Confirm your configuration options by clicking the Create Mock Server button.
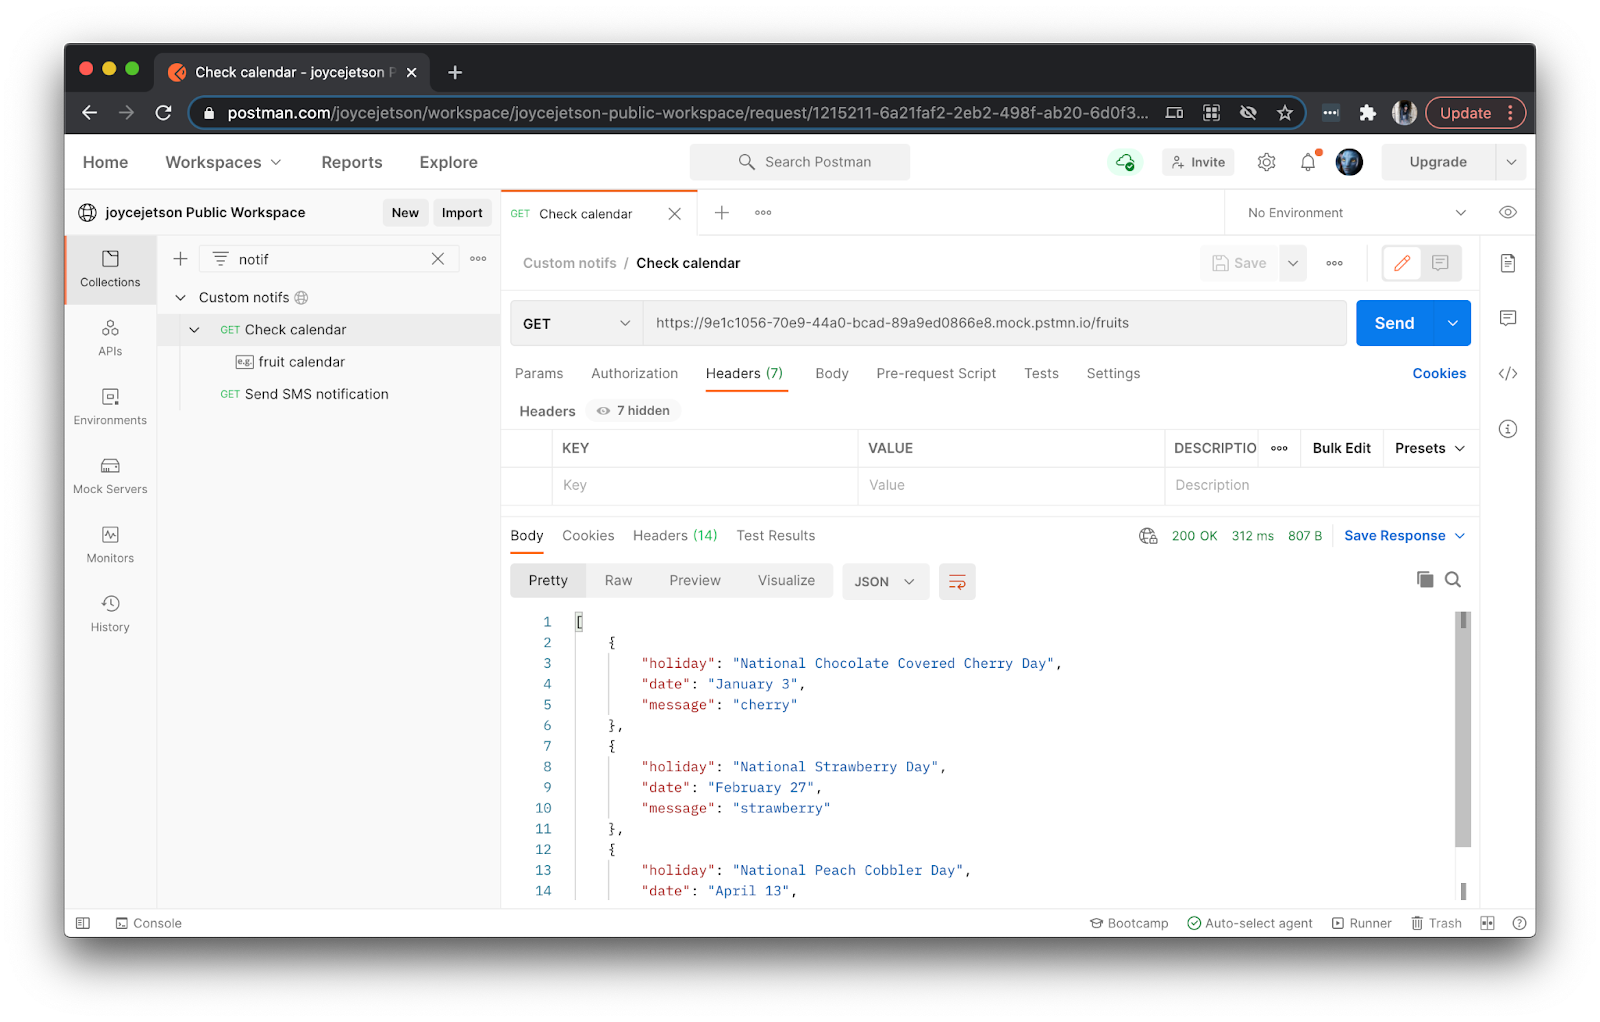
Once you create a mock, copy the mock URL provided by Postman and return to the first request in your collection called Check calendar. Input the mock URL as the request address. Remember to append /fruits to the end of your mock URL, according to the example request path you saved in the previous step. Then hit the Send button to see your mocked data in the response body.
Write a conditional trigger in Postman
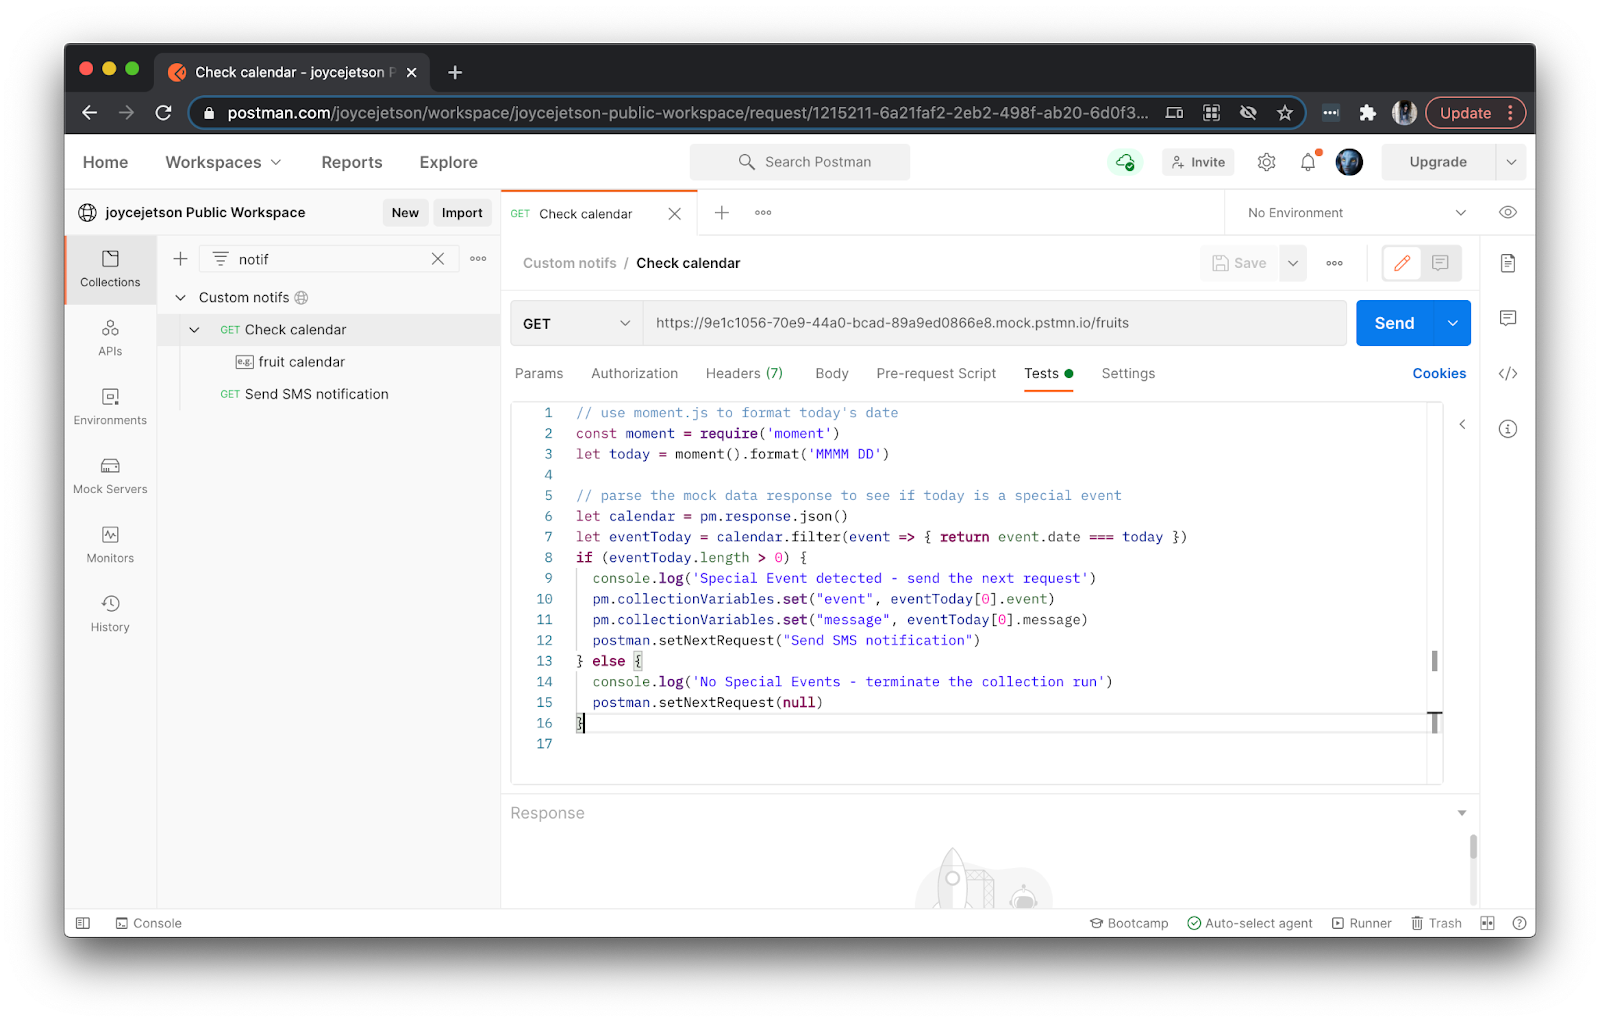
In Postman, you can write JavaScript that runs either before or after your API call, under the Pre-request Script and Tests tabs, respectively. These tabs are a good place to control your workflow when running an entire collection. For example, we only want to receive an SMS notification if there’s an event coming up. If there’s no event, then we can’t be bothered.
To do this, Postman provides a pm.* API which can be used in a script under the Tests tab to access data returned in the response, like pm.response.json(). You can also use a built-in function postman.setNextRequest() to override the waterfall execution order of a collection.
Under the Tests tab of the Check calendar request, add the following code to run after we retrieve the calendar data.
If the current date is an important date, then we’ll store some data to pass along to the next call in our collection. If not, we’ll stop the collection run immediately.
Set up the SMS notification for Twilio
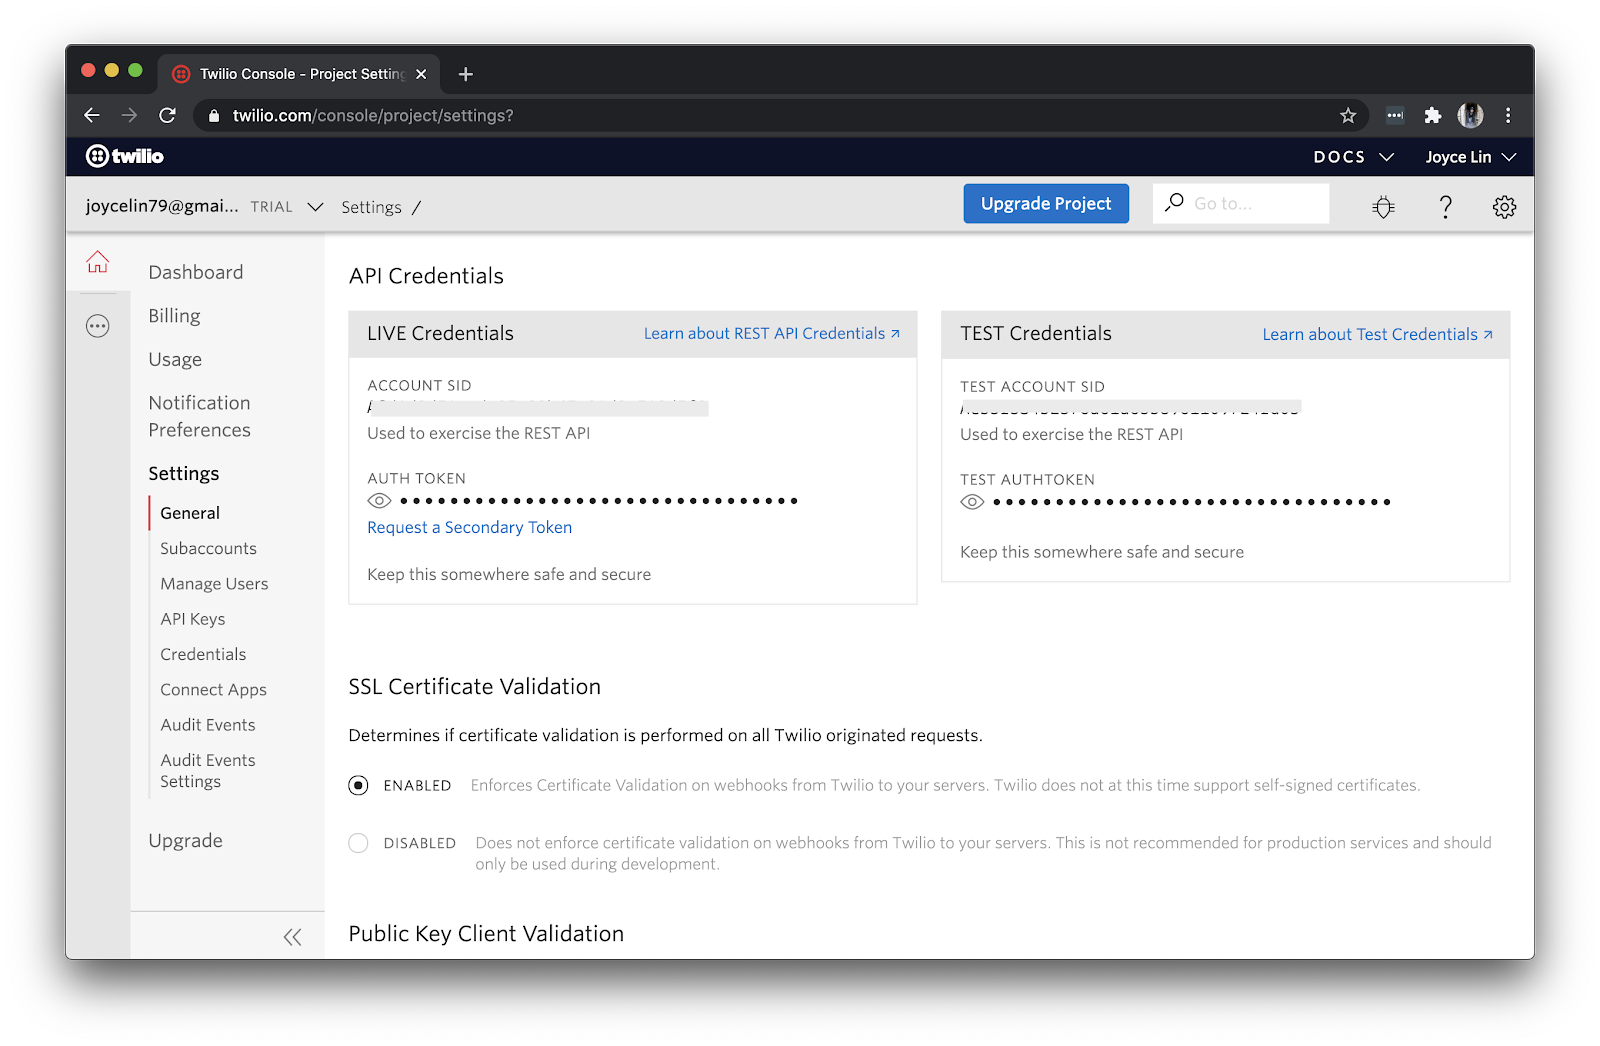
To set up the API call to send our SMS notification, we’ll first need our Twilio credentials to authorize the request. Find your Twilio Account SID and Auth Token by logging into the Twilio Console. Then click on “Settings” in the sidebar and scroll down to “API Credentials”. You will also need your Twilio phone number to send the SMS.
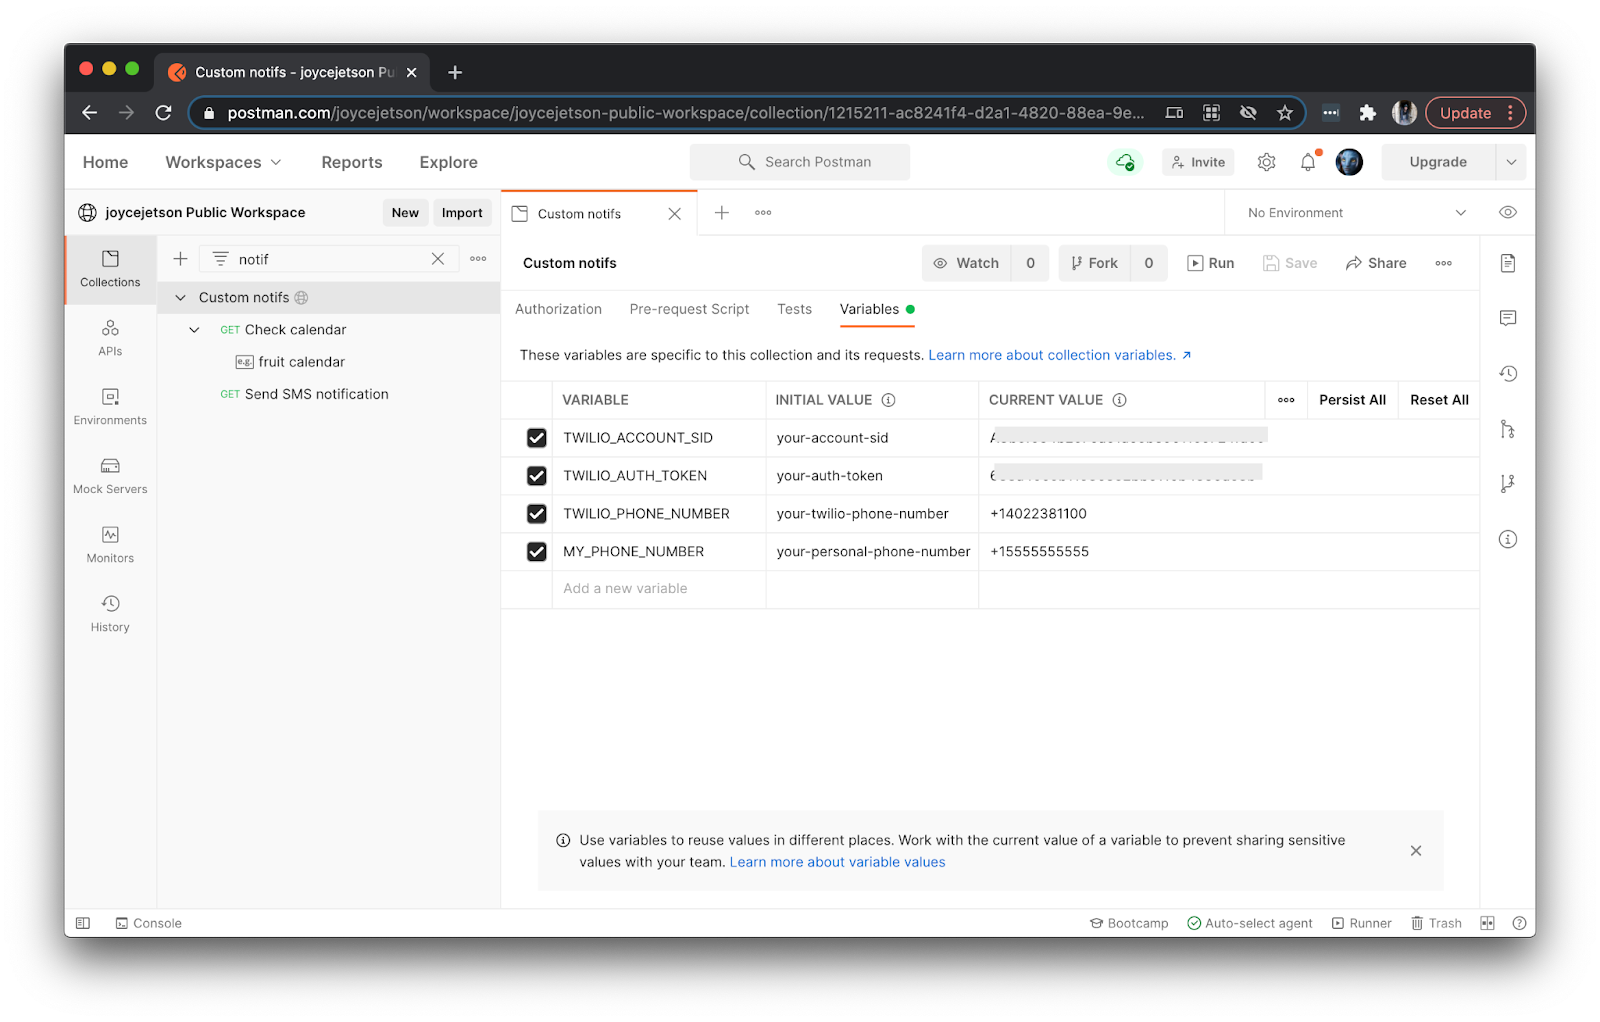
Since we are only working with a single collection in Postman, let’s store our variables at the collection scope. If you wanted to use these credentials with a bunch of other Postman collections, you can use a Postman environment instead. In Postman, click on the collection name to see the collection details. Select the Variables tab to input the following variables, and save your changes.
Security note: if you’re working in a Team or Public workspace in Postman, and you don’t want to share your credentials, make sure you enter the values under the “CURRENT VALUE” column and not “INITIAL VALUE”, as shown in the following screenshot.
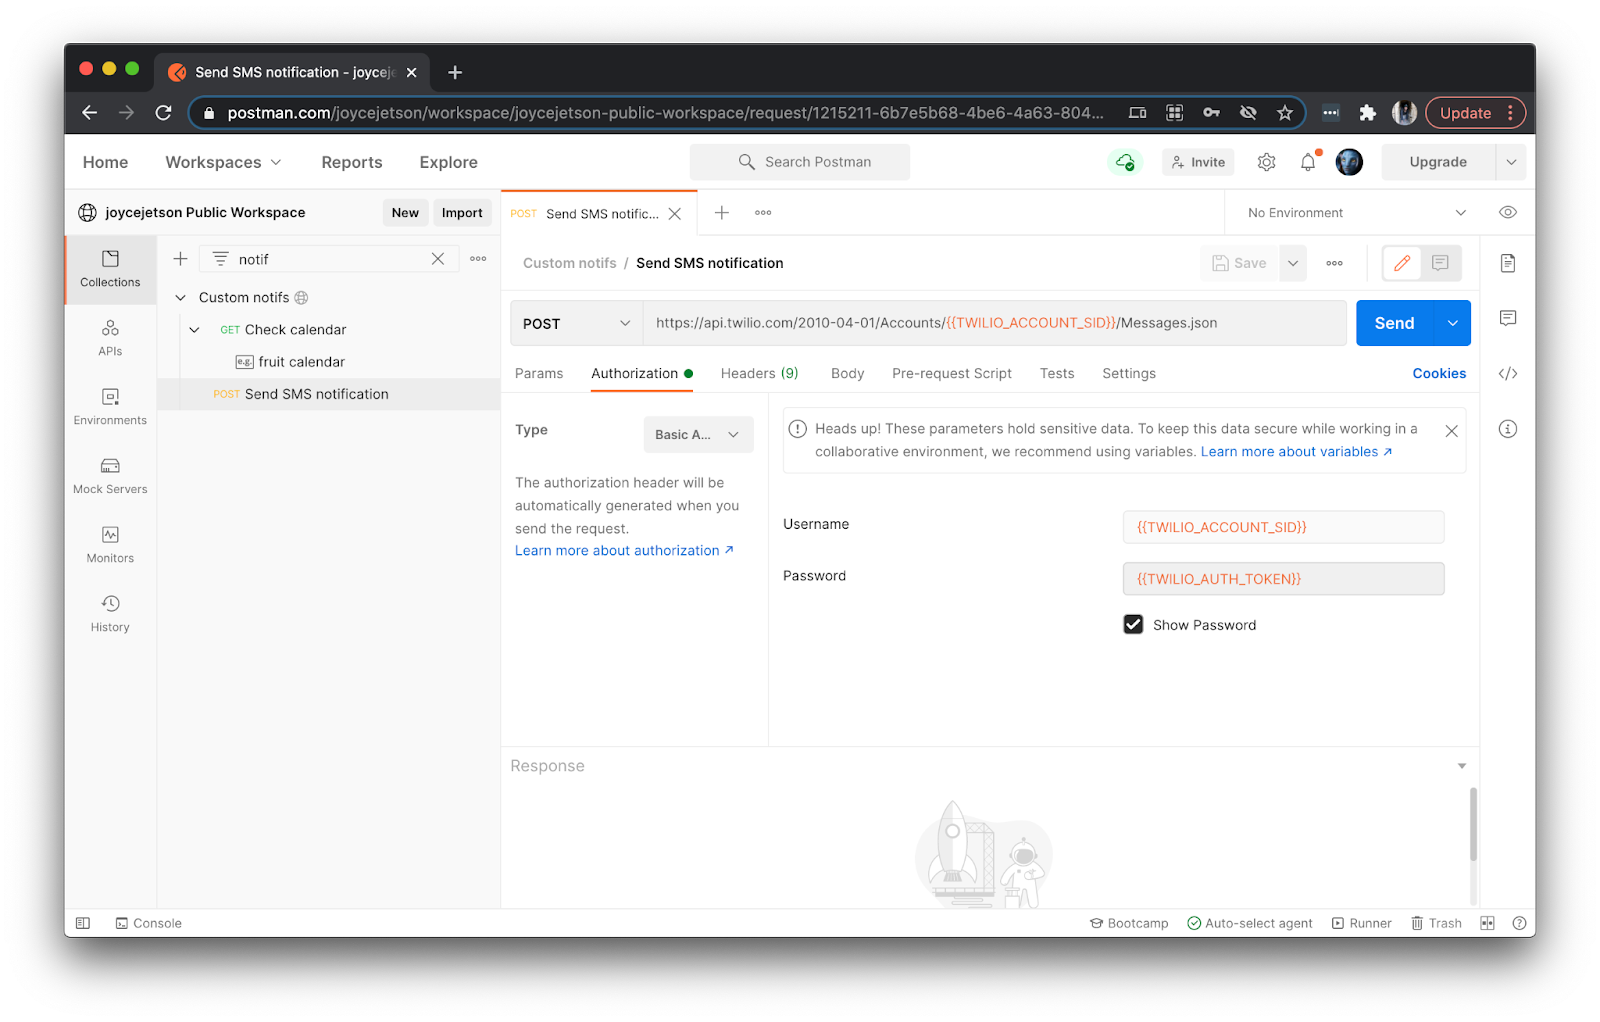
Find the second request called Send SMS notification. Update the HTTP method to POST, and input the following request address.
We are using double curly braces to get variables in the text fields of Postman. Hover over {{TWILIO_ACCOUNT_SID}} in the request address to see how Postman resolves that variable.
Under the Authorization tab, select the “Basic Auth” type. Input {{TWILIO_ACCOUNT_SID}} for “Username”, and {{TWILIO_AUTH_TOKEN}} for “Password”.
If you peek under the Headers tab, you can see how Postman generates the appropriate Authorization header based on the information you entered.
Under the Body tab, configure the SMS details. Select “x-www-form-urlencoded”, and add the From, To, and Body parameters. The SMS sends from your Twilio phone number, to your personal phone number, and contains information to include in the SMS message.
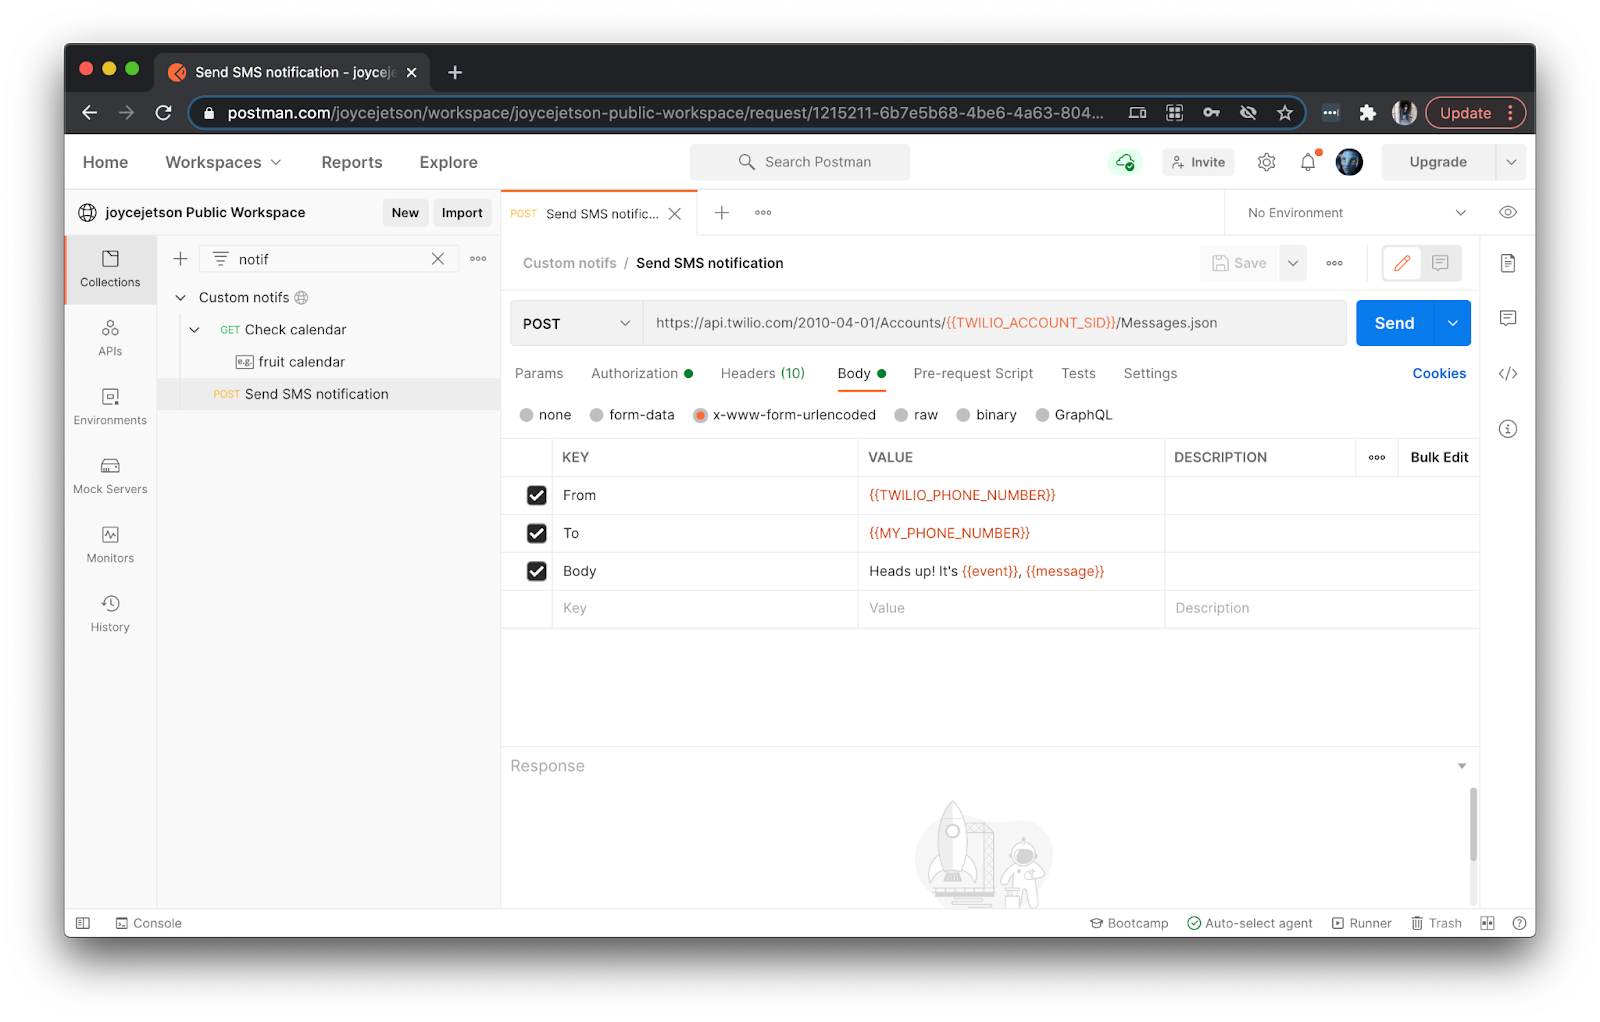
Most of our variables, like TWILIO__PHONE_NUMBER and MY_PHONE_NUMBER, were manually entered into Postman. However, event and message will be dynamically set during the preceding Check calendar request if there’s a special event. Let’s verify our code is working properly in the next step.
Run the collection locally in Postman
If there’s no events happening today, update the mock data by editing the Postman example (under “e.g.”). Add a dummy event with today’s date, and save your changes.
Let’s step through each call, one at a time. Send the first request Check calendar, and verify that the collection variables event and message are set. You can do this by checking the collection variable editor or hovering over those variables in the second request.
Send the second request Send SMS notification, and verify that the correct event and message are sent in the SMS. You can do this by checking your phone or by checking the Postman console in the bottom left.
Once you’re satisfied that you are setting and getting your variables as expected, click the Runner icon in the bottom right. Drag the collection into the new tab, and then hit the Run button to run the full collection. Both requests should run.
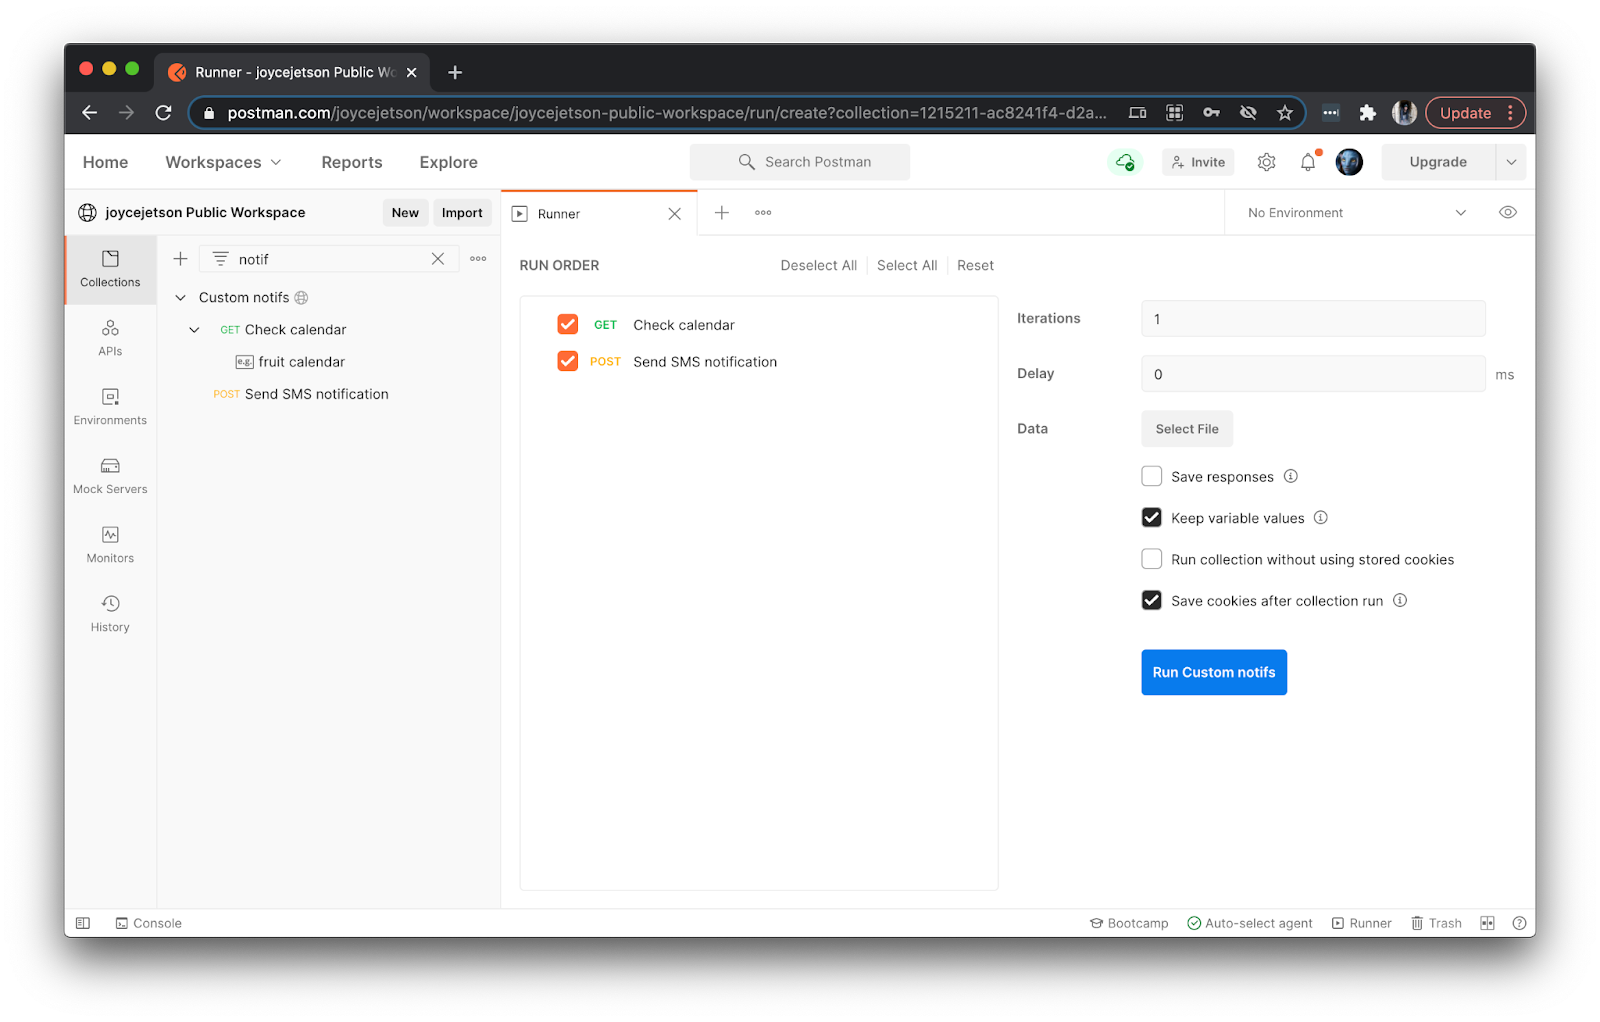
Our final check is that we don’t send an SMS when there isn’t a special event occurring. Once again, edit your example (under “e.g.”) to remove the dummy event and save your changes. Run your collection again using the Runner, to make sure only the first request runs.
Now that we’re confident our code is working, let’s schedule the collection to run every day from Postman servers in the next step.
Schedule a monitor to run on Postman servers
A Postman monitor is a collection run scheduled on Postman servers. Go to the overflow menu (...) of the collection, and select “Monitor collection”. Give your monitor a name. Under “Run this monitor”, update the frequency to “Weekly” so that you can run the collection “Every Day”. Confirm Create.
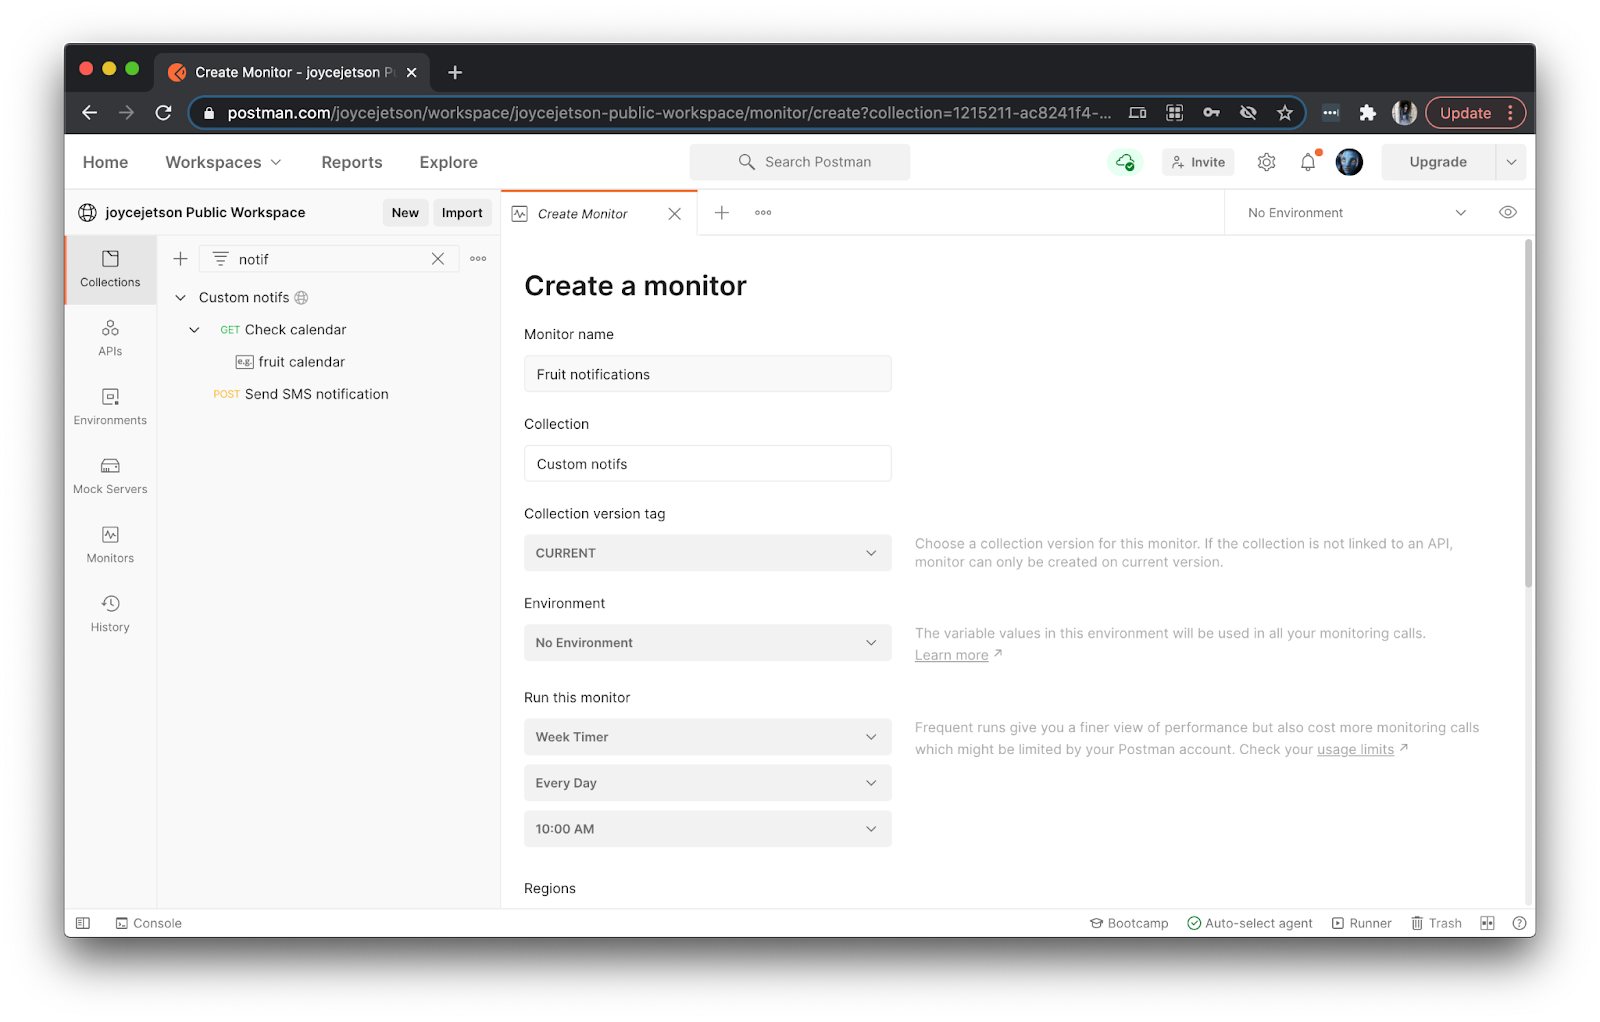
Under the Monitors tab on the left, you will see a history of monitor runs. Postman will automatically run this check every day, and I will receive an SMS notification on special fruit celebrations.
In conclusion
Creating an SMS notification is straightforward, but there’s a bunch of ways to trigger one. I previously shared how to schedule a CronJob on Kubernetes. Scheduling a Postman monitor is even easier, and doesn’t require deploying any code. Fork this example and follow the steps under the “Quickstart” to get up and running quickly.
Once you set up this collection, there’s even more to explore.
- Update the conditional trigger: When you discover new events you don’t want to miss, add it to the example containing your mocked data. Or fork the collection to create a new conditional trigger in the first request, like sending an alert when your stocks dips below a certain price.
- Change the notification method: If you don’t like receiving SMS notifications, swap out the second request in the collection to send an email. Or you can program cascading notifications. The team at Twilio has published a Postman collection to help you automate even more workflows.
Joyce likes coding, cats, and second lunches. Find her on Twitter and LinkedIn.

Related Resources
Twilio Docs
From APIs to SDKs to sample apps
API reference documentation, SDKs, helper libraries, quickstarts, and tutorials for your language and platform.
Resource Center
The latest ebooks, industry reports, and webinars
Learn from customer engagement experts to improve your own communication.
Ahoy
Twilio's developer community hub
Best practices, code samples, and inspiration to build communications and digital engagement experiences.