Twilio Serverless Status Callback Handler built in AWS

Time to read: 10 minutes
March 22, 2023
Written by
Reviewed by
Status callbacks are key to Twilio’s Communications APIs. For every status change, Twilio will make an asynchronous webhook to the URL provided in your API requests' StatusCallback parameter with the new status, as well as several other helpful parameters.
In short, status callbacks give you real time data on your customer engagements – it is worth paying attention! This blog post will show you how to build a status callback handler using Amazon Web Service and serverless technologies (Lambda) and managed products (API Gateway, SQS, SNS, S3, DynamoDB).
Using managed products like API Gateway and SQS allows you to enable queue based leveling to handle spiky demand. Using Serverless Lambdas means you will only pay for compute resources consumed and will not have idle capacity waiting for status callbacks.
Twilio’s status callback recommendations and possible solutions
Twilio recommends configuring status callbacks and processing them in your data analytics pipelines and also watching out for errors in real time.
Would you also like the ability to pass custom parameters in your API calls and receive them back in your status callbacks? You aren’t alone – many people do.
Let’s get started.
Serverless Status Callback Handler solution architecture
First, let me show you what we’ll be building together. Here’s an overview of the architecture:
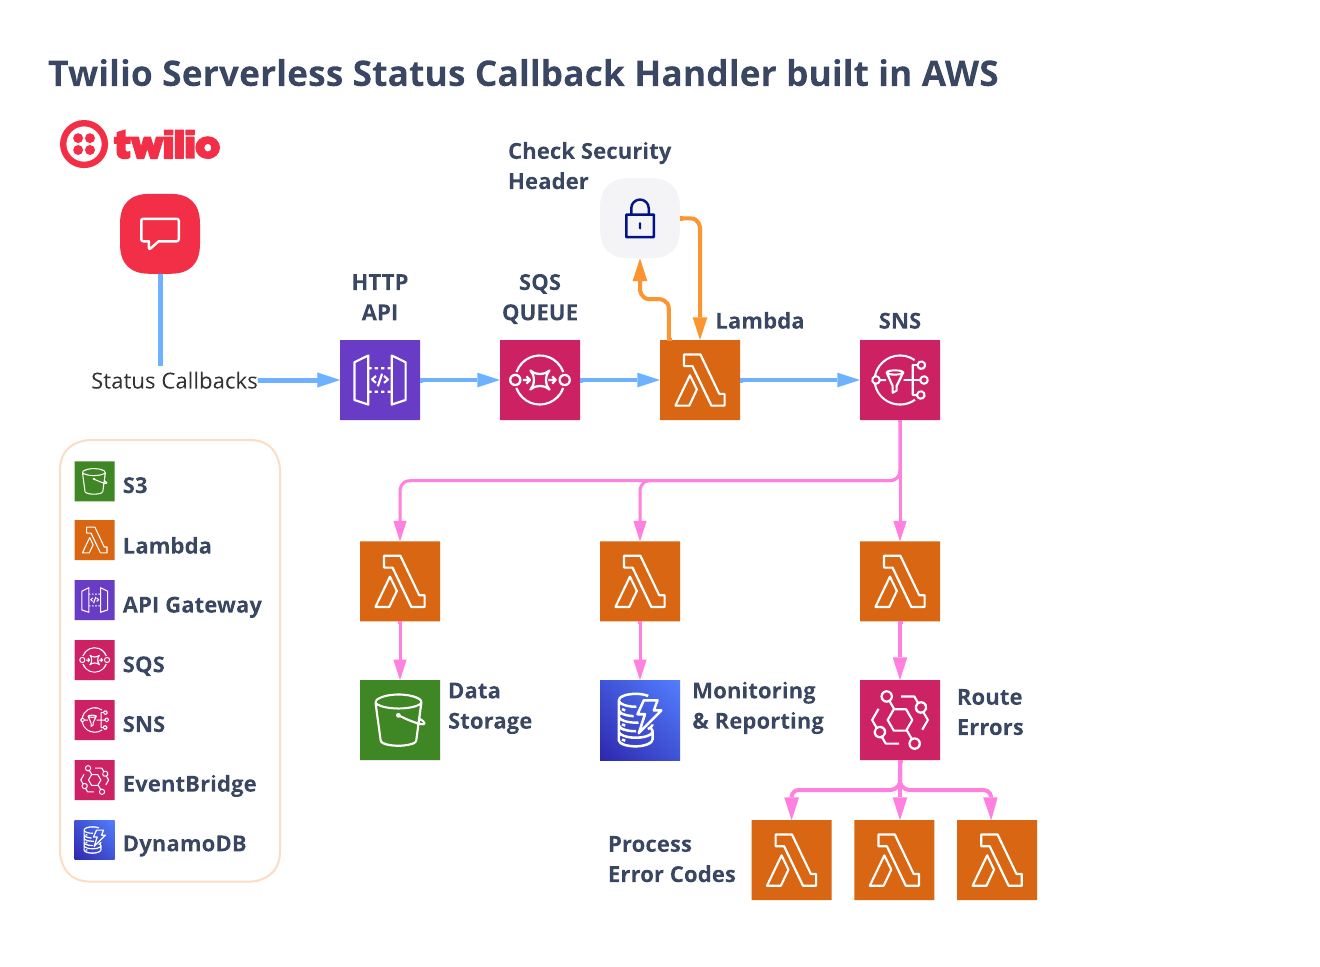
Let’s walk through the flow starting from the top left…
1. Publicly accessible URLs
Many Twilio channels such as Messaging, Voice, and Video use status callbacks. Once you spin up this project, you can configure these channels to use the URLs created by AWS’s API Gateway.
These URLs need to be publicly accessible so Twilio can reach them, which makes them a potential target for fraud. Included in this post is the ability to check the security headers in each request, so you can be sure that each request is legitimate and coming from Twilio.
2. Queue in SQS
Twilio will post all status callbacks to this new public URL, and API Gateway will dump all requests into an SQS queue. This combination (API Gateway to SQS) sets up queue based leveling to be able to handle spiky demand. The process lambda in the next step will pull messages from the SQS queue in batches.
3. A lambda for validating and then processing each request
For each message, the lambda will check the x-twilio-signature header to validate that the request was sent from your Twilio account. If it passes the test, the message is published to an SNS topic for additional processing. Incoming messages that do not pass this test are assumed to be fraudulent and are discarded.
4. SNS enables downstream processing
Since the response from Twilio is published to an SNS topic, you can easily include downstream processors to intelligently process feedback from your API calls to Twilio. This project includes three examples:
- Save Responses to S3 ⇒ Save all status callbacks to an S3 bucket that can be sent to other analytics tools, data lakes, or warehouses. These customer engagements are important data points that should be a part of your data pipeline! In fact, status callbacks from these customer engagements should be a part of your CDP strategy – find out more about Twilio Segment!
- Save Responses to DynamoDB => Similar to above, putting all status callbacks into a DB (NoSQL or relational database), allows you to have real time visibility into your Twilio API calls.
- Check For Errors ⇒ Using EventBridge, you can check every status callback for errors and handle them as needed. someone right away to take action!
Sound good? Let’s get started…
AWS Resources
All of the AWS components of the serverless application are provided as "Infrastructure as Code" (oft-shortened to IaC) and deployed via CloudFormation into AWS. Here is an overview of the components:
- AWS SAM => an open-source framework that enables you to build serverless applications on AWS
- AWS CLI => Not required, but recommended because it simplifies credential management when deploying
- AWS Lambda => serverless compute service
- AWS Step Functions => step functions
- S3 => Object Storage
- SQS => simple queue service
- SNS => simple notification service
- EventBridge => serverless event bus
Prerequisites
This is not a beginner level build! You need to have some knowledge of AWS, serverless computing, and programming.
- Twilio Account. If you don’t yet have one, you can sign up for a free account here.
- AWS Account with permissions to provision Lambdas, step functions, S3 buckets, IAM Roles & Policies, an SQS queue, SNS topics, and a custom EventBus. You can sign up for an account here.
- AWS SAM CLI installed
Let’s Build it!
Here are the basic steps of our serverless multichannel build today.
- Add your Twilio Credentials to AWS Secrets Manager
- Download the code
- Deploy the stacks in sequence
- Try it out!
1. Add Twilio Credentials to AWS Secrets Manager
Making sure that you never include credentials in your code is a core security tenet. We are going to use AWS Secrets Manager to save our Twilio credentials. The compute components will be able to access these credentials at runtime to call the Twilio APIs.
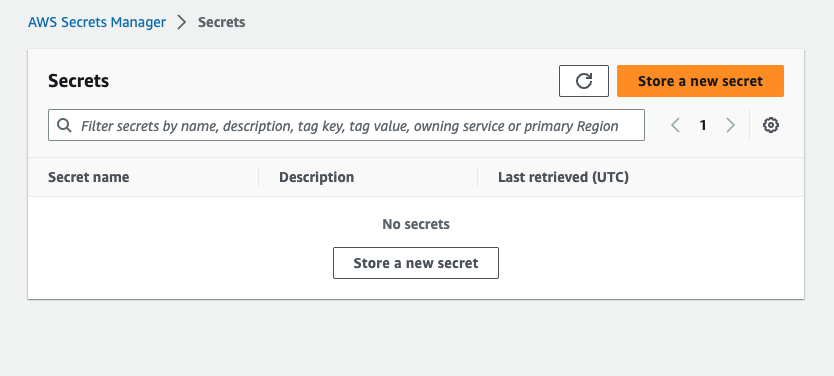
From your AWS Console, be sure that you are in the AWS Region where you wish to deploy this project! Next, go to Secrets Manager.
In order to validate requests coming from Twilio, we need to use the AUTH TOKEN from your account. We will save that value to Secrets Manager.
The Auth Token is found on the home page for the Twilio Account in a panel that looks like this:
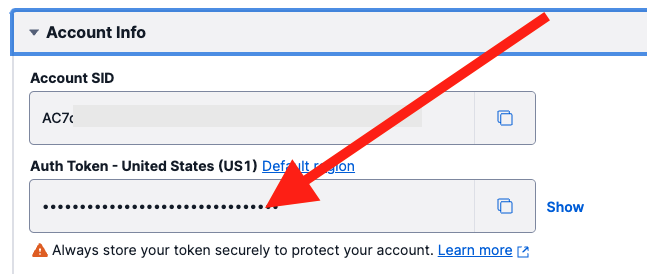
Copy the Auth Token value, as you will paste it into Secrets Manager shortly…
Back at the AWS Console and in Secrets Manager, select Store a new secret.
You will enter only key/value pair:
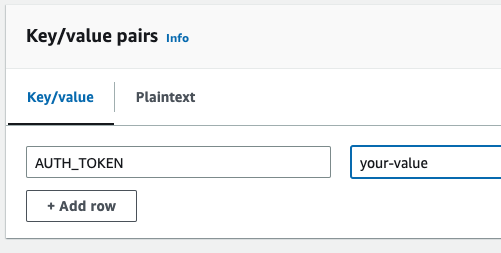
- AUTH_TOKEN ⇒ paste the Auth Token you just copied into the value.
On the next screen, enter “TwilioStatusCallbackHandler” as your secret name like below…
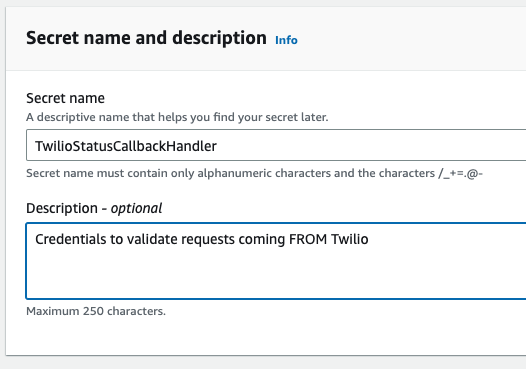
After this step you can configure rotation options for this secret. You can accept default values for now, or configure to your requirements. The CloudFormation stack will pull this value when deploying so you do not save these credentials in your code base.
2. Download the Code for this Application
Download the code from this repo.
The repo contains a directory called aws_stacks that contains 4 stacks that are deployable to your AWS account. The StatusCallbackHandler stack is the “primary stack” and must be deployed first.
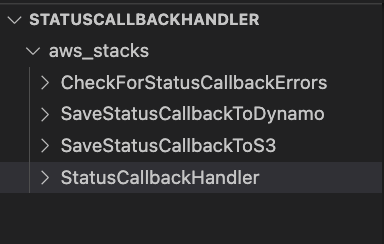
From a terminal window, first go into aws_stacks/StatusCallbackHandler.
Using AWS SAM makes deploying serverless applications straightforward. Now from the aws_stacks/StatusCallbackHandler directory, run:
This command goes through the yaml file template.yaml and prepares the stack to be deployed.
In order to deploy the SAM application, you need to be sure that you have the proper AWS credentials configured. Having the AWS CLI also installed makes it easier, but here are some instructions.
Once you have authenticated into your AWS account, you can run:
This will start an interactive command prompt session to set a basic configuration and then deploy all of your resources via a stack in CloudFormation. Here are the answers to enter after running that command (however, be sure to substitute your AWS Region of choice – use the same region as step 2 above!):
After answering the last questions, SAM will create a changeset that lists all of the resources that will be deployed. Answer “y” to the final question to have AWS actually start creating the resources.
The SAM command prompt will let you know when it has finished deploying all of the resources. You can then go to your AWS Console and then CloudFormation, and you can browse through the new stack you just created. All of the Lambdas, Lambda Layers, S3 buckets, Custom EventBus, IAM Roles, API Gateway, SQS queues, SNS topics are all created automatically. (IaC – Infrastructure as Code – is awesome!)
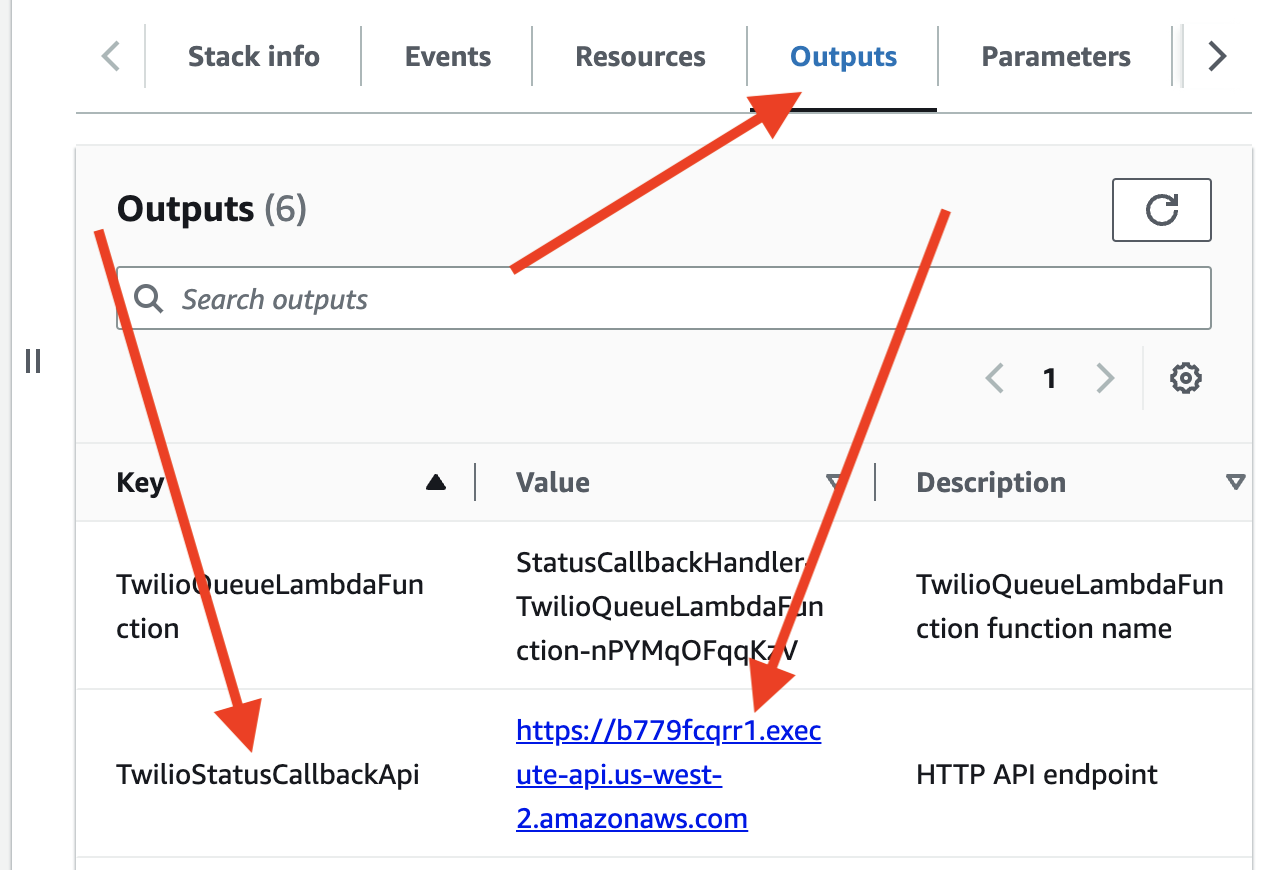
When this first stack has finished deploying, copy down the value for TwilioStatusCallbackApi as you will use that to tell Twilio where to send status callbacks.

This value will also be available at any time from CloudFormation in the AWS Console. Just click on the stack “StatusCallbackHandler”, and then the OUTPUTS tab, and then find the value for TwilioStatusCallbackApi.
Also, note that the first time you run the deploy command, SAM will create a samconfig.toml file to save your answers for subsequent deployments. After you deploy the first time, you can drop the --guided parameter of sam deploy for future deployments.
Once that stack has successfully deployed, you can continue on to the other three “downstream” stacks and repeat the same process as above:
You do not have to use all of the downstream stacks, but you should use at least one. If you want to choose just one to start, SaveStatusCallbackToS3 is the most straightforward.
4. Make an API Call and generate some status callbacks to handle!
We will use the Messaging API to try this out, but any Twilio API that supports Status Callbacks can use this system.
Here is a short video showing status callbacks after sending SMS messages to a mobile (SMS-capable device) and another to a landline (not SMS-capable).
Before we begin, let’s determine the status callback URL. In the previous step, you should have copied the output when you deployed the first stack. Take the value of the TwilioStatusCallbackApi output and add /twilio to it.
Your Status Callback URL should look something like this:
https://fsdfkdfk.execute-api.us-region-1.amazonaws.com/twilio
Now that you have your status callback URL, you can put it to work!
When calling the messaging API create endpoint, you are able to specify a StatusCallback parameter for each call. In the sample curl command below…

… the last line adds a StatusCallback.
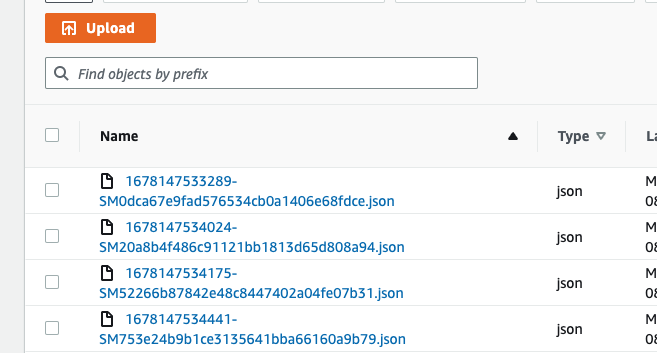
Using your own Twilio account, try a command like the one above to send a message. If everything was set up correctly, you should see data populating in your downstream stacks.
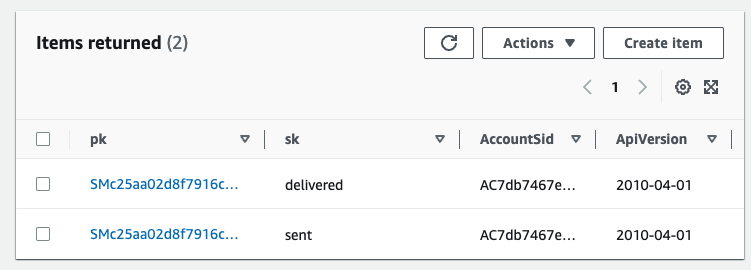
In the S3 bucket you will start seeing JSON objects:
In the DynamoDB table you will start seeing items:
Finally, review the CheckForErrors Stack. This stack uses an Event Bridge event bus to look for error codes and route errors for additional processing. You can generate an error by trying to send a message to a known landline that cannot handle SMS messages. That should generate a 30006 error code.
You can check the logs for the ErrorCode30006Function to make sure that it is getting called.
In addition to setting Status Callbacks on every API call, they can also be configured at the service level. For example, the screenshot below shows where you would set a status callback for a Messaging Service:
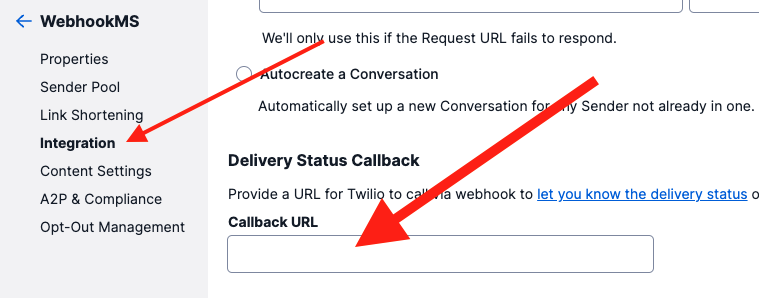
Setting the Status Callback URL at the Service level will be preferable in many cases.
It works! You now have a Serverless System that securely handles Status Callbacks from Twilio!
I would like to pass custom parameters and get them back in the Status Callbacks – can I do that too?
Yes you can!
To further enhance analytics and reporting capabilities, many customers want to add additional parameters to their API calls that are returned in status callbacks. Some examples are unique IDs for a customer or API call, or a “category” that denotes a type of message or campaign. Having those parameters in the status callbacks allows businesses to report on them.
To make this happen using my repo, we use the /twilio-params Status Callback endpoint instead of the /twilio endpoint, and then append the additional parameters as query string parameters. Here is the same curl command from above with the changes indicated:
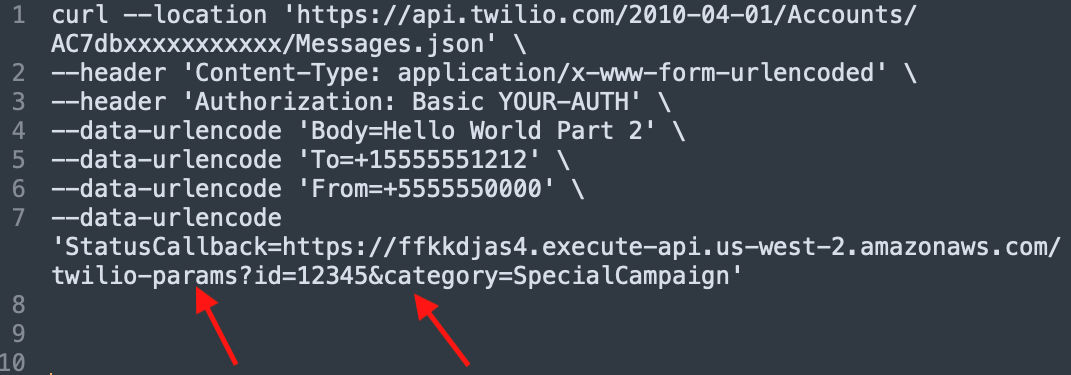
Twilio will use the full status callback URL so this system will simply parse the query string parameters and add them to the status callback object. The parameters are then available to any of your downstream processors.
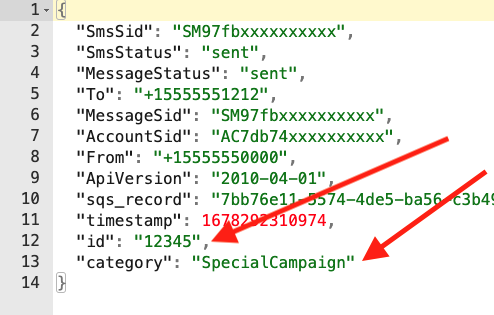
Here is an example of showing id and category in an object saved to the S3 bucket:
The default configuration in this code base is to expect both an id and a category parameter when using the /twilio-params endpoint. You can certainly change this to meet your requirements. Open up the api.yaml file in the StatusCallbackHandler, find the /twilio-params path, and make changes there. You can also add additional params or change the defaults.
Being able to include customer parameters in your API calls can unlock many additional reporting, monitoring, and analytics capabilities!
Customization, Developing and Debugging
Building applications with AWS SAM takes a little practice but can be very efficient. In addition, writing code in an IaC paradigm means that you end up with solutions that are straightforward to deploy. Dig into the Cloudwatch logs to debug and explore.
For debugging lambda functions, go to the AWS Console, and then select a lambda. Click on the Monitor tab and then the View logs in CloudWatch button as shown here:
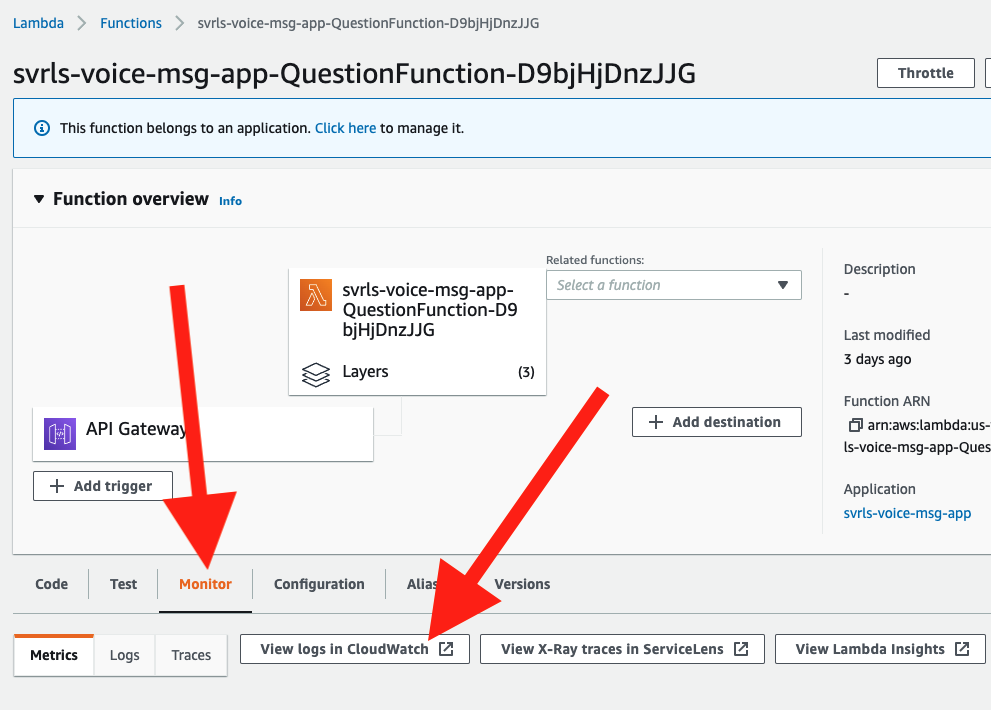
This will give you access to logs from all executions of this function. Note that runtime data and data from the console.logs will show up in the logs to help you build and debug.
The examples in this post use our Messaging API but it could be used with any other Twilio API that uses status callbacks (Programmable Voice, Studio, Verify, Lookup…).
Cleanup
To avoid any undesired costs, you can delete the application that you created using the AWS CLI and the console.
First, delete the S3 buckets. From the S3 “home” page, first empty the buckets by selecting the bucket and then select the EMPTY option. Next, delete the actual bucket by selecting the bucket and then the DELETE button.
Next, delete the stack from CloudFormation in the AWS console. Select the DELETE STACK option. AWS SAM also creates a stack and an S3 bucket to manage deployments. You can delete them from CloudFormation in the AWS console following the same procedure as above.
AWS SAM does have a sam delete command, but it does not delete the S3 buckets by default. More details on the sam delete command.
Deploying to production
While you can get this system working pretty quickly, it is not ready for your production environment. Be sure to customize and refine this codebase for your needs, thoroughly test your version of this system in your environment, and configure error handling.
Conclusion
In short order, you have the foundation for a serverless system to handle Status Callbacks from your communication engagements using Twilio APIs.
First and foremost, you now have consumable data in your own system to monitor, report, and analyze. As important, you now have the foundation to monitor and act on errors as they occur in real time. You can quickly update incorrect phone numbers and opt out preferences, or do whatever you need to keep your system running smoothly – you can even set up notifications to you and your team when you catch certain exceptions.
Finally, because of the benefits of serverless computing (speed, cost, agility), this template could be a terrific way to build a proof of concept for projects of any size.
Awesome, what’s next?
You have the foundation (or at least the inspiration!) to implement your own system to handle Status Callbacks from Twilio. Start with just getting Status Callbacks into your own data pipeline and then enable triggers to act on errors either by updating your data profiles and/or sending system alerts.
Combine this system with the Twilio Serverless API Call Queueing System built in AWS, to build a complete system to call Twilio’s APIs!
Dan Bartlett has been building web applications since the first dotcom wave. The core principles from those days remain the same, but these days you can build cooler things faster. He can be reached at dbartlett [at] twilio.com.

Related Resources
Twilio Docs
From APIs to SDKs to sample apps
API reference documentation, SDKs, helper libraries, quickstarts, and tutorials for your language and platform.
Resource Center
The latest ebooks, industry reports, and webinars
Learn from customer engagement experts to improve your own communication.
Ahoy
Twilio's developer community hub
Best practices, code samples, and inspiration to build communications and digital engagement experiences.