How to Set Up and Deploy a Java Spring Boot Application
Time to read: 5 minutes
April 25, 2022
Written by
Reviewed by

It might seem intimidating to build projects using Java especially when it seems confusing to know how to start and set up. Fortunately, using the Spring Boot and ngrok tools will reassure you that writing code for Java applications can be fast and seamless.
Spring Boot reduces the problem of figuring out how to structure the project hierarchy and provides sufficient documentation for developers to create standalone applications without relying on external web servers.
Many articles on the Twilio blog utilize ngrok, a localhost tunneling tool that exposes webhooks on public URLs that can be reached by Twilio. The excellent ngrok tool is also used to generate temporary public URLs for your development web server.
In this article, you will learn how to set up a Java Spring Boot application and create a tunnel from a URL on the ngrok.io domain to the local application running on your computer.
Prerequisites
- Java Development Kit (JDK) version 11.
- Maven 3.3 or newer.
- IntelliJ IDEA Community Edition for convenient and fast Java project development work. The Community Edition is sufficient for this tutorial.
Create and import Spring Boot project
This project utilizes a resource called Spring Intializr. This tool generates the basic structure of a Spring Boot project for developers to get started quickly.
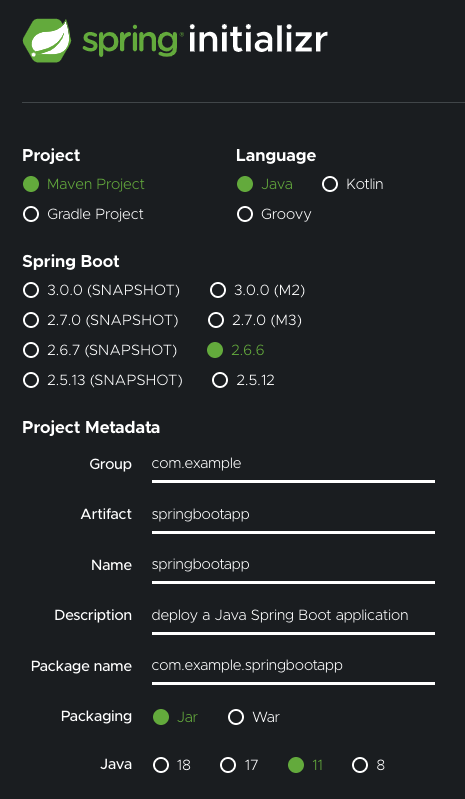
Go to the Spring Initializr site. Under Project, choose “Maven” and then “Java” as the language. Note that this tutorial is built with Spring Boot version 2.6, so select the same version in Spring Initializr.
For the Project Metadata, change the name of the project listed in the Artifact section. Name this application artifact "springbootapp". Give the Name section the same name, as this is the display title that creates the entry point for the project.
Feel free to add in a description for the project to help you organize better.
Choose “Jar” as the Packaging type as the application will run in the embedded Tomcat server provided by Spring Boot, as well as Java version 11.
Refer to the image below to ensure your Spring project matches up.
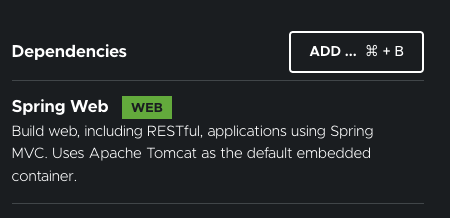
On the right-hand side, click on the Add Dependencies button and search for "Spring Web" under the Dependencies section.
Click on the Generate button at the bottom of the page and the browser will download a .zip file containing the boilerplate code for the project. Extract the .zip file.
Open IntelliJ IDEA and open the root folder of the extracted contents from the springbootapp.zip folder. Click on Finish to import your project into your IDE.
Explore the file structure
Examine the project directory and expand the src/main/java folder to see the com.example.springbootapp subfolder. The file structure should look similar to the screenshot below:

Expand the com.example.springbootapp package to reveal a class file named SpringbootappApplication. This class exists to compile and execute the code later on in the article.
Notice that the pom.xml folder was also generated for your convenience with the information regarding the "Spring Web" dependency. The pom.xml file stands for Project Object Model which is essential for Maven projects as it consists of details used to build the project. If you added more dependencies, they would be listed in this file as well.
Build the web controller
A controller is required in Java projects to handle the HTTP requests made from the user to the web application. In this case, the user will make a request to the Spring Boot application website and view a message on their web browser.
Right click on the com.example.springbootapp package to create a new Java class named WebController.java.
Copy and paste the following code to the newly created file:
The @RestController annotation marks the request handler required to build and provide the RESTful web service during runtime. The only endpoint in this service is mapped to the "/" route.
Feel free to change the return string message. Save the file.
Open the ngrok tunnel
After defining the web controller, the ngrok client and tunnel needs to be initialized.
As mentioned, ngrok is a handy utility to connect the development version of the Java application running on your system to a public URL that Twilio can connect to.
Unfortunately, ngrok no longer allows users to anonymously serve HTML content with an ngrok URL. Therefore, you are required to sign up for an ngrok account to generate an authtoken. Download ngrok onto your machine and read the instructions to configure the ngrok authtoken.
Navigate to the SpringbootappApplication.java file. Import the following lines to the top of the file:
Copy and paste the following highlighted code inside the void main() function:
The final keyword is added to restrict the variables from being modified. The withAddr() object method is added to specify the port number for the Spring Boot application to run on.
You can view the documentation for declaring and using the ngrok client in the java-ngrok GitHub README.
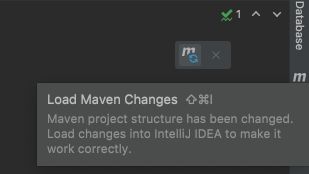
Navigate to the pom.xml file to add the following dependency to the list of dependencies:
Look at the top-right corner of the IntelliJ IDEA window and find the little icon with an "M" shape with a little blue recycle logo on top. Click it to load Maven changes.
In order for the ngrok tunnel to be opened successfully, the port must be changed to port 8080 to match the tunnel address established in the SpringbootappApplication.java file. Navigate to the src/main/resources/ subfolder and open the applications.properties file. Add the following line and save:
Run the spring boot application
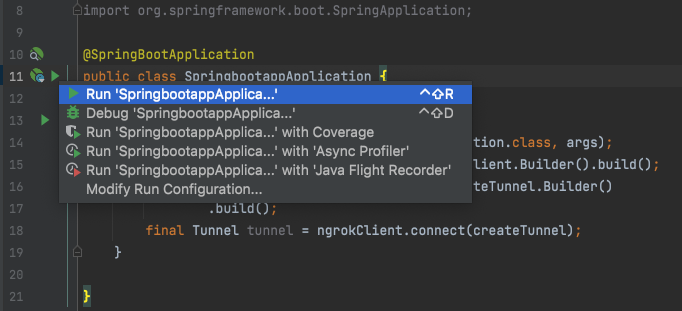
In the SpringbootappApplication.java file, click on the green play button next to the public class definition and select the Run option as seen below:
Wait a few seconds for the project to build, download the project's dependencies, and compile.
Soon, the terminal should display a link to port 8080 as well as a randomly generated URL link. You may have to scroll down the output text for a bit until you find a URL similar to “https://ad7e4814affe.ngrok.io/”. Here's an example of the output you might have to scroll through:
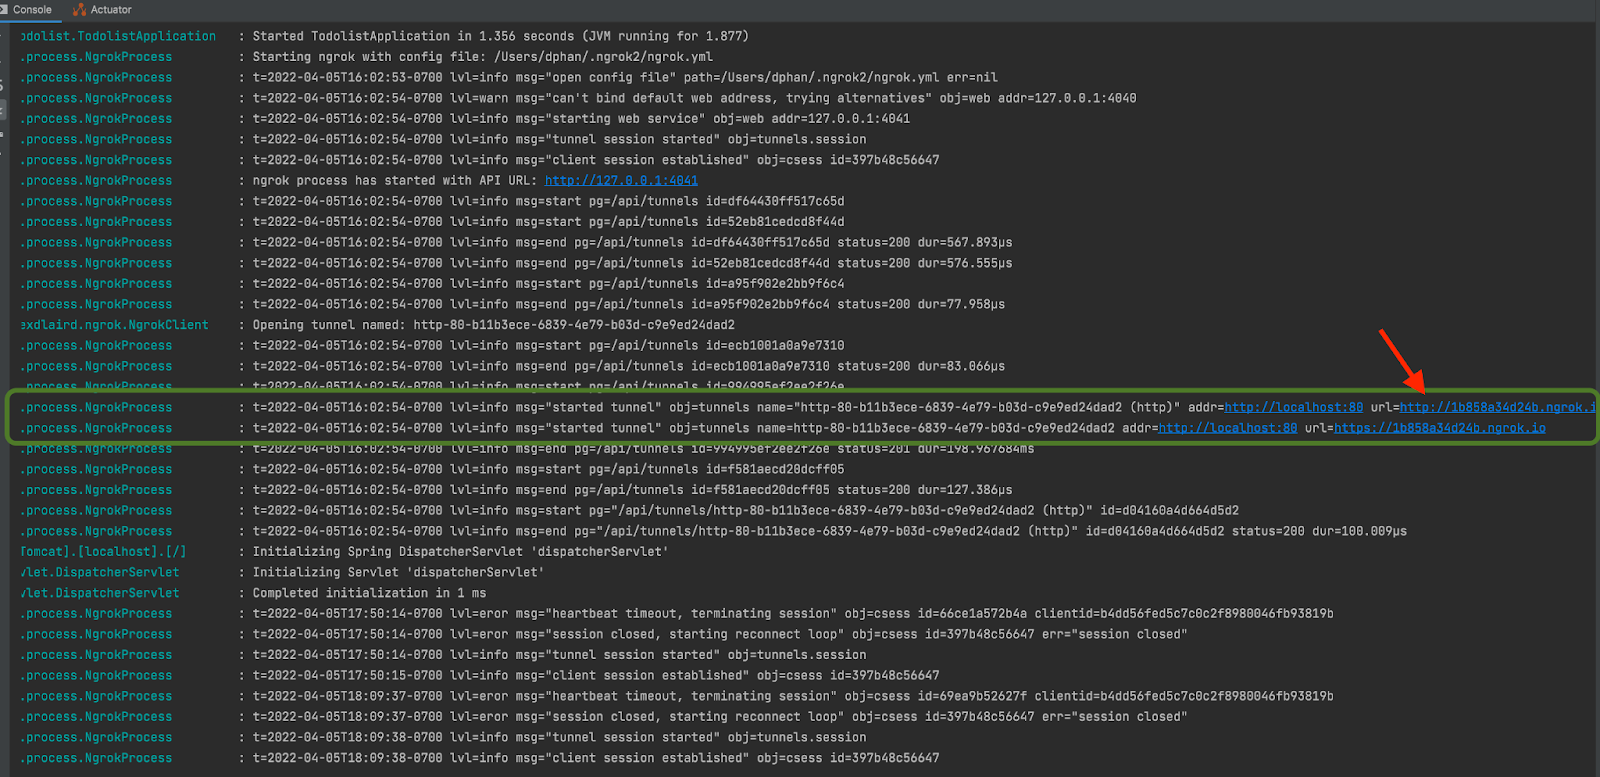
NOTE: Keep in mind that this URL is no longer active and only presented here for demonstration purposes.
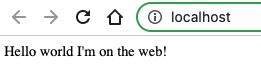
Click on the ngrok URL to be redirected to the web browser. The output should be the same as clicking on the localhost:8080 URL, as seen below:
Make sure that you are using an ngrok account if you are having trouble seeing the string message on the web browser.
What's next for building Java Spring Boot projects?
Congratulations on setting up and deploying a Java Spring Boot application with ngrok! Now that the application is exposed publicly on the web, you can integrate webhooks into your project and share the application with other users.
Check out the following articles to quickly integrate Twilio and more to your Spring Boot application:
- Organize a Lunch Order with Java and Twilio SMS
- Start a Ghost Writing Career with OpenAI's GPT-3 Engine and Java
- Make a Mysterious Phone Call with Twilio Voice and Java
Diane Phan is a software developer on the Developer Voices team. She loves to help programmers tackle difficult challenges that might prevent them from bringing their projects to life. She can be reached at dphan [at] twilio.com or LinkedIn.

Related Resources
Twilio Docs
From APIs to SDKs to sample apps
API reference documentation, SDKs, helper libraries, quickstarts, and tutorials for your language and platform.
Resource Center
The latest ebooks, industry reports, and webinars
Learn from customer engagement experts to improve your own communication.
Ahoy
Twilio's developer community hub
Best practices, code samples, and inspiration to build communications and digital engagement experiences.