Starlink Satellite SMS Notifications with Python, Kubernetes and Twilio
Time to read: 5 minutes
August 21, 2020
Written by

SpaceX is launching thousands of Starlink satellites to assemble a giant interconnected constellation in space. If you look up at just the right time, you might be lucky enough to spot some.
But how can you know ahead of time when a satellite is going to pass overhead?
You don’t have to count on luck to see these tiny silver ants parading across the night sky. This tutorial shows you how to set up a scheduled job to check if a satellite approaches and send an SMS alert.
Tutorial Requirements
- Python version 3
- A personal phone number to receive SMS notifications
- A free Twilio account and a Twilio phone number to send SMS notifications
- A free Docker Hub account, Docker Desktop (for Mac or Windows) or Docker Engine (for Linux) to build and share containerized applications
- A free KubeSail account to deploy your code to a Kubernetes cluster
Set up the Python virtual environment
Make a new project directory, and change into the directory from the command line.
Create a virtual environment called venv. Activate the virtual environment, and then install the required Python packages inside the virtual environment. If you’re on Unix or Mac operating systems, enter these commands in a terminal.
If you’re on a Windows machine, enter these commands in a command prompt window.
The Python packages we’re using are:
- Twilio’s Python Library - a Python module for communicating with the Twilio API
- python-dotenv - to manage environment variables
- datetime and pytz - to handle dates, times, and timezones
- skyfield - to compute positions for the satellites in orbit around the Earth
Write the Python script
The purpose of the script is to check if a visible satellite is approaching a given city location. If so, your Twilio phone number sends an SMS alert to your personal phone number.
Copy the following code into a file called tracker.py:
Update rows 16 to 17 with your own geographic coordinates and timezone. You can find your latitude and longitude here. See all the timezones by running the following code in a Python shell. Once you find the timezone that applies to your location, exit the Python shell.
The tracker.py script relies on a Python package called Skyfield to handle some of the complex space computations. The script loads the satellite dataset, looping through the satellites to find the next good sighting. Skyfield figures out when a satellite rises and sets near you and sees if the satellite is sunlit for maximum visibility. If there are any sightings predicted within the next two hours, Twilio sends the details with an SMS to your phone number.
To enable the Twilio SMS, store your credentials and other configuration information in a file called .env (notice the dot in front of this filename).
To find your Twilio Account SID and Auth Token, log into the Twilio Console, then click on "Settings" in the sidebar and scroll down to "API Credentials". You will also need your Twilio phone number to send the SMS.
Save your updates to the .env file, and then run the script from the command line. If you're running the script during the day, you might determine a satellite is passing overhead, but not be able to see it very well in the daylight. Once you set up a CronJob, you can specify when to run the script for maximum satellite visibility, like at dusk or dawn.
After you try the script and confirm that it is working, create a requirements file to store the dependencies, so that we can install them in the next step.
Now, let’s create a Docker image to run the script.
Create a Docker image and push to Docker Hub
Make sure Docker is installed and running on your machine. Add the following code in a file called Dockerfile (notice there’s no file extension) that describes how to build our image.
Next we are going to build and run a Docker image for the Python script from the terminal. In the following commands, the image we are building is called python-starlink and the container is called starlink_test. Since we don’t want to include our environment variables in the container for security reasons, we run the container using the --env-file flag in the command line. If you’re on a Linux operating system, precede these docker commands with sudo or create a docker group.
Once you verify the container runs successfully, share the Docker image on the Docker Hub registry so it can be accessed and run from the cloud. Log into your Docker Hub account from the command line with docker login. Then create a repository and push your image to Docker Hub using the following commands:
In the above commands, Your Docker ID is the username you have registered with Docker Hub.
In the next step, let’s schedule a Kubernetes CronJob to run the Python script.
Deploy a CronJob on Kubernetes
Make sure you are logged into KubeSail. KubeSail has public YAML examples. I made a CronJob template called satellites that has two kinds of Kubernetes resources:
Go to the satellites template. Under “Required Variables”, replace the default DOCKER-IMAGE with the base image you just pushed to Docker Hub. Then input the remaining environment variables.
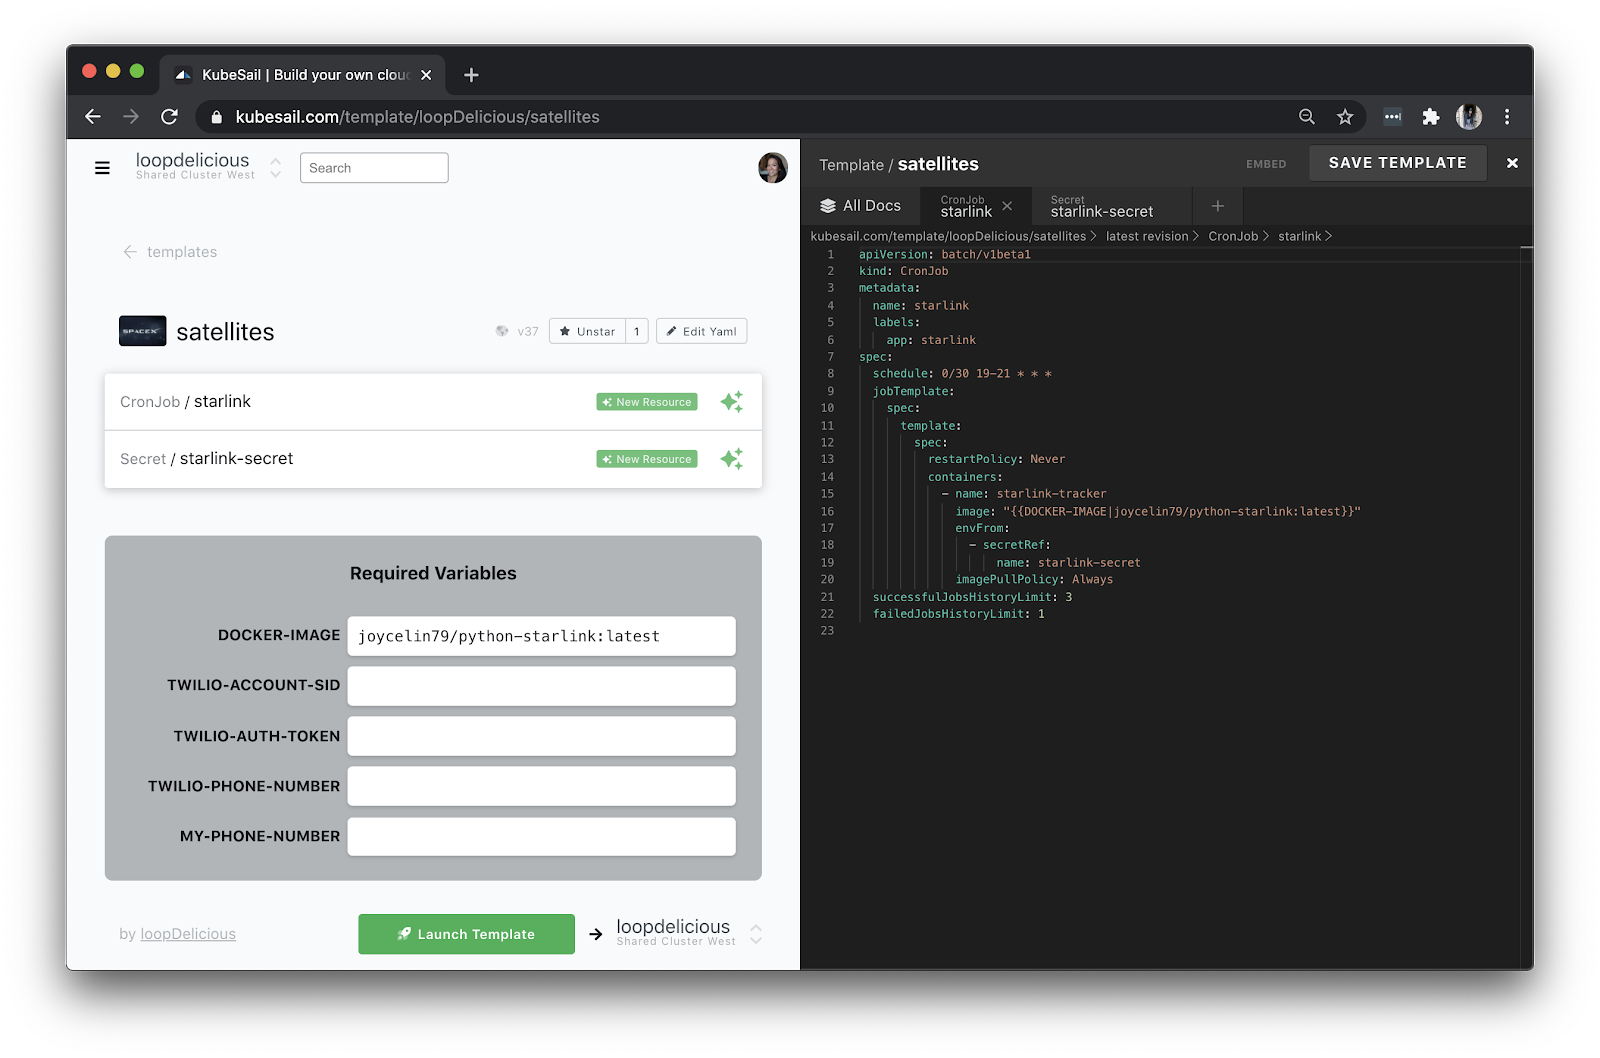
If you want to inspect the YAML, click “Edit Yaml” to expand the code editor and review the underlying configuration for each resource. This YAML describes the resource CronJob.
This YAML describes the resource Secret to store our environment variables.
When you’re ready, hit “Launch Template” to deploy a cluster to your Kubernetes namespace on KubeSail.
In the sidebar under “Resources”, you can see all the resources running in this Kubernetes context including the scheduled jobs.
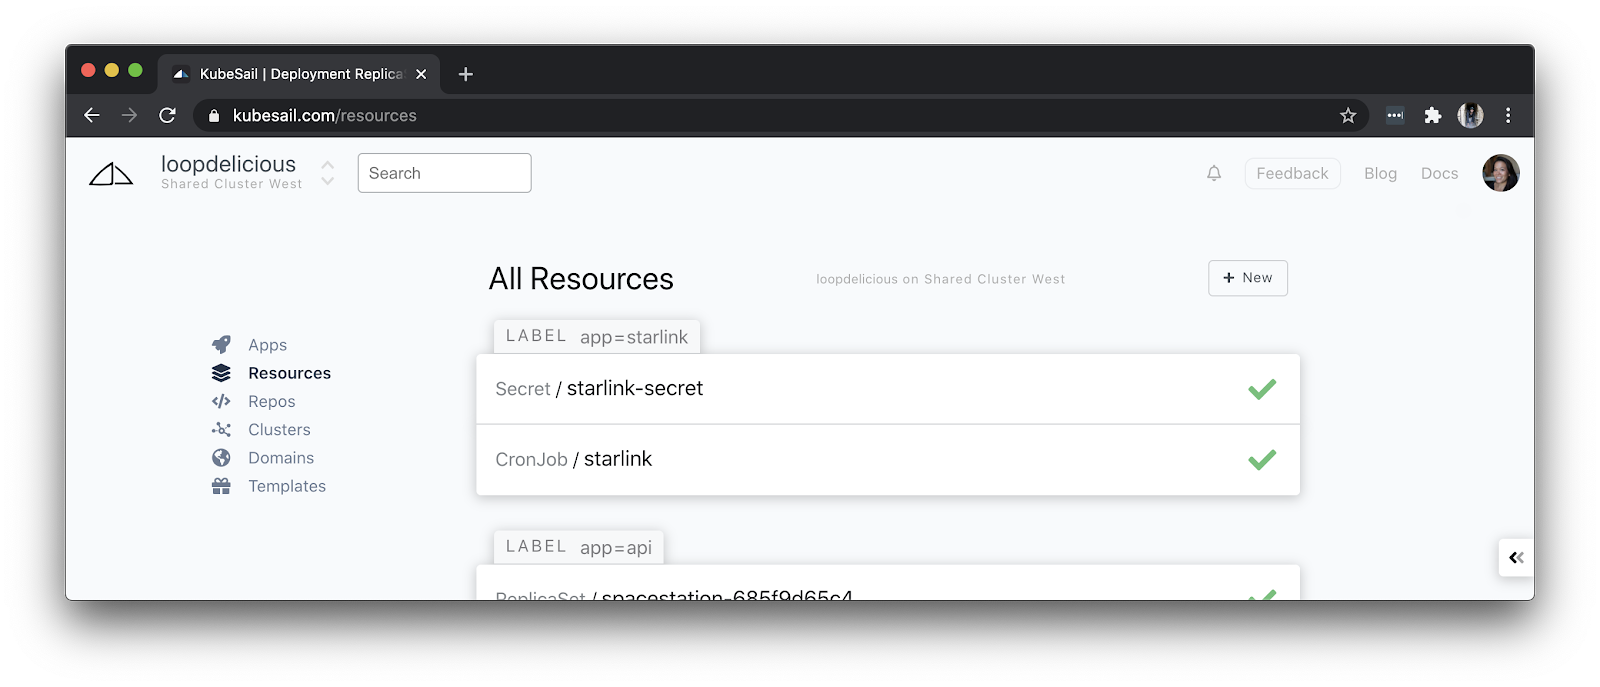
This is also where you can update the deployment. For example, update your environment variables in the Secret resource. To trigger a job every minute while you’re testing, update the YAML configuration for the CronJob resource and set the schedule to "* * * * *"(surrounded in double quotes) and Apply your changes.
To edit the underlying Python script, save the changes locally in tracker.py. Then build and push the updated image to Docker Hub like we did before. The Kubernetes CronJob in KubeSail automatically pulls the latest version in Docker Hub because we specified imagePullPolicy: Always in our container configuration.
And that’s it!
Conclusion
Creating an SMS notification is pretty straightforward. There’s a bunch of ways to do this - and now you know how to schedule a CronJob on Kubernetes.
For further exploration, you can:
- Adjust the criteria: Each batch of Starlink satellites spreads out over time traveling to a higher elevation. If you want to increase the sensitivity of your tracker to see more satellites, adjust the elevation in your script. Or update the cron schedule to run when satellites are most visible from the ground - at dusk and dawn.
- Change the deployment: Set up a different Kubernetes context in KubeSail to deploy the CronJob to a cluster running locally or on another cloud provider. Or experiment with other CronJob options in Kubernetes.
- Track something else: If satellites aren’t your thing, swap it out for a new dataset of celestial bodies.
Let me know if you spot something out of this world!
Joyce likes coding, cats, and second lunches. Find her on Twitter and LinkedIn.

Related Resources
Twilio Docs
From APIs to SDKs to sample apps
API reference documentation, SDKs, helper libraries, quickstarts, and tutorials for your language and platform.
Resource Center
The latest ebooks, industry reports, and webinars
Learn from customer engagement experts to improve your own communication.
Ahoy
Twilio's developer community hub
Best practices, code samples, and inspiration to build communications and digital engagement experiences.