How to Use Svelte Stores to Share Data Between Components
Time to read: 9 minutes
May 17, 2021
Written by
Reviewed by

In this article, you’re going to learn about Svelte stores - Svelte’s mechanism to share state and data between different, unrelated components - by building a very basic shopping app as an example.
When building React applications, you might use something like Redux to share state outside the component hierarchy, or for simpler applications, you might “lift state” to share data between sibling components.
Svelte stores are a built-in functionality that enables you to manage state in a more graceful way.
Prerequisites
To follow along with this tutorial, you’ll need the following:
- Node.js installed on your machine
- Some basic familiarity with component based JavaScript front-end frameworks
Set up your Svelte app
Open a command prompt or terminal window and run the following commands to clone a Svelte template, install any required dependencies, and start your local server (on port 5000):
The first command above will create a new folder on your computer called svelte-stores-demo. Go ahead and explore the contents of this folder, particularly the src subfolder. This is the folder where your app’s components will go.
Build the demo app
Create the first Svelte component
Open the file called App.svelte. This file is where you will write the code for your primary component, App.
Delete everything inside this file - you’ll start fresh!
The first thing you’ll do is add empty script tags at the top of the file:
The JavaScript code for your component goes in between these script tags.
Because this demo app is teaching you about Svelte stores using a basic online shopping website, you’ll need some fake inventory. You’ll use an array of strings for this.
In between the <script> tags, add the highlighted line:
Now, the idea is that each of these items will be listed on the app’s homepage, along with a button to add them each to the cart.
Below the items, you’ll display details about the cart, including:
- the total number of items in the cart
- a list of each item in the cart
- the total price of the cart.
To avoid overcomplicating the app, you’ll code it so that each item is the same price.
Double check that your server is still running. If not, run the command npm run dev to start it again. Then, open your browser and navigate to http://localhost:5000.
Once you get there, you’ll see a blank page. You’ll need to add some Svelte templated HTML to your App component in order to actually see anything on this page.
Head back to your text editor.
Below the <script> tags, add the following code:
This code is using Svelte’s logic and templating functionalities to display each of the inventory items from the array you created above in its own component, called <Item>, as shown in the highlighted lines, 3-5.
The {#each} syntax is a Svelte for-loop. It’s looping over each of the elements in the inventory array you previously created. On each iteration through the loop, the given element from the array is available via the item variable.
Next, below all the existing code, add some CSS:
Now it’s time to write the Item component referenced in this loop.
Write the Item component
Create a new file inside the src folder called Item.svelte.
Copy and paste the following code into Item.svelte:
Inside the <script> tags, this component declares the item variable it receives as props, and then imports it’s only child component, AddItem. AddItem is a button component that you’ll write shortly.
Below the <script> tags, this component renders from HTML with the name of the item followed by the AddItem component, which will be a button that allows the user to add that specific item to the cart. The AddItem component will receive the item as props.
Following the HTML is some basic styling.
Create the AddItem button component
Save and close your Item.svelte file. Create a new file, inside the src folder, called AddItem.svelte. This file will house your AddItem component.
Open the file and add the following code:
This code declares the item variable the AddItem component receives as props, and then renders a <button> element with the words “Add Item”.
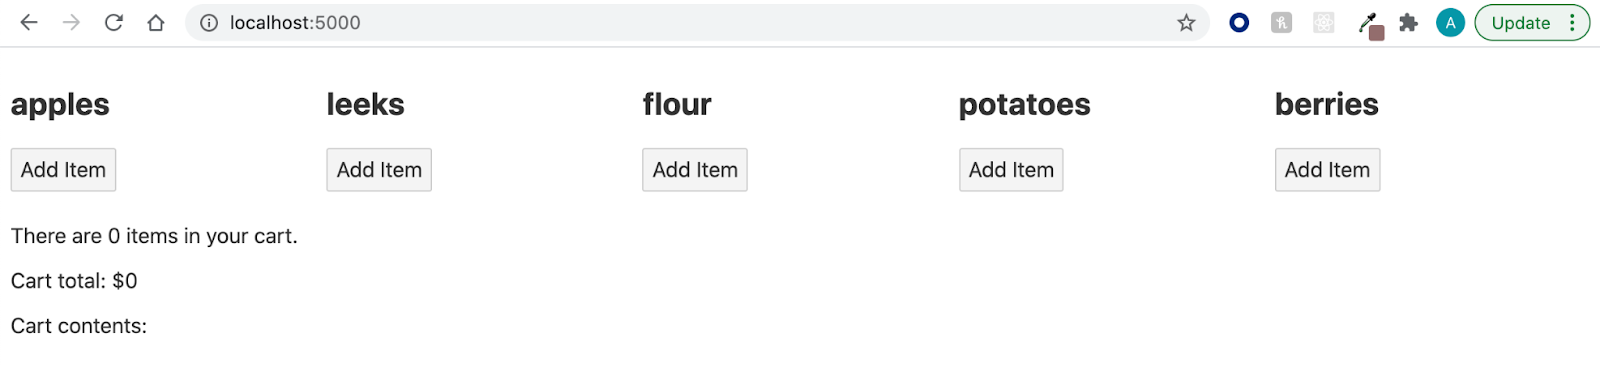
Save your file and then navigate to http://localhost:5000 in your browser.
You will see your 5 inventory items, each with a button suggesting you can add the item to the cart.

If you click on any of these buttons, you will see that nothing happens. You haven’t yet implemented that functionality. But now that the structure of the app is built, you can start integrating Svelte stores, wire up the buttons, and display information about the cart.
Integrate with Svelte stores
In this demo app, there are a few pieces of information that you’ll want your different components to be aware of.
In order to display this information to the user, your App component should know:
- Which items are in the cart
- How many items are in the cart
- The total cost of the cart (remember, you’ll be assuming that each item is the same price)
Likewise, each AddItem component should be able to access and edit the number of items in the cart, so that when the user presses any Add Item button the cart information can be correctly updated.
Instead of passing this data up and down the component hierarchy, which could get complicated and be prone to error, you can use stores to manage it all in one central location. This centrally managed state can be made available to any component you like.
Create your Svelte stores
Create a new file inside the src folder called stores.js. Note that this file ends in the extension .js and not .svelte.
In this section of the tutorial you’re going to add three pieces of state to this file: itemsInCart, cartContents, and totalPrice.
But first, I’d like to share some more information about Svelte stores. There are three different types of stores:
- Readable: These store values are read-only and are used when none of your components should be able to edit the value.
- Writable: These store values can be updated by any of your components.
- Derived: These store values are considered “reactive” values - they are derived from other store values and computed or mapped into a new value. They will automatically update when the value they are derived from changes.
Each of these types have special functions in Svelte that will need to be imported at the top of your stores.js file before you can create a state variable of that type.
itemsInCart
You’ll start with the itemsInCart state. Open your new stores.js file and add the following import to the top of the file:
The writable function you imported on that line will be used to create a writable store in your app. Likewise, if you wanted to create a readable store, or a derived store, you would import readable or derived instead.
Below the import, you’ll create the state by exporting and declaring a const variable with the name of your state, and assigning to it a call to the writable() function:
You’ll notice that this code passes a value of 0 to the writable() function. This is because when you create stores, you can pass an initial value for the store to the function. In this case, there are 0 items in the cart when the app loads, so we want to initialize the state with 0.
cartContents
Below the itemsInCart state, you’ll create the cartContents state:
This code is similar to the code for itemsInCart, only it’s initialized with an empty array, because the cartContents state will be an array holding every item in the cart.
totalPrice
The final shared state value in this app is totalPrice. This value is going to be a derived store. This is because the total price of the cart is calculated by multiplying the number of items in the cart (found in the itemsInCart state) by the uniform price of $0.50 per item. Every time the value of itemsInCart changes, you want the value of totalPrice to automatically update. Svelte’s derived stores will do this automation for you.
The first step is to also import the derived function from Svelte at the top of the file. Edit the first line of stores.js so it looks like this:
Then, below the cartContents state declaration, add the following line:
This code looks a little different than the code for the two writable stores. That’s because, in its simplest form, the derived() function receives two arguments: the store that the new value is being derived from, and a callback function that returns the derived value.
In this case, you’re passing the itemsInCart store as the first argument, followed by a callback arrow function that returns a new value: the itemsInCart value multipled by .5. The $ syntax in front of itemsInCart in the callback function is a syntax that tells Svelte to set up a subscription to that store value. This is how the automatic updating works. Because of the $, Svelte knows that every time itemsInCart is updated, the callback function should run.
Import your stores into your components
Now that your stores have been initialized, it’s time to import them into your components and begin using them.
Revisit your App.svelte file.
Inside the <script> tags, before you import the Item component, import all three of your stores:
Now that you’ve imported them, you can reference them, or in the case of your two writable stores, edit them.
App component
In the App component, you’ll be referencing these store values in order to display the total cart price and total number of items, and also list out each item individually.
Before the closing </main> tag of the HTML section of this component, add the code to display these values, as reflected in the highlighted lines:
Notice how each of the store values are prefixed with the $ symbol, just like when you created the derived state. This again tells Svelte to create an automatic subscription to this value so that it’s always up to date and displaying the correct value.
AddItem component
You can save and close your App.svelte file, you won’t need it again.
Open your AddItem.svelte file. Inside the <script> tags, below the props declaration, import the itemsInCart and cartContents stores:
Every time a user clicks the Add Item button for a given item on the UI, you want the total number of items in the cart to be updated, and the specific item to be added to the cartContents array. But right now, if a user clicks one of the Add Item buttons nothing will happen. You need to connect the button to a function that will perform the store updates.
You’ll create this function now. Inside the <script> tags, below the store imports, add the following code:
This code creates a function called addItem. Inside this function, the code is calling an update() method on both itemsInCart and cartContents.
update() is a built-in method on Svelte stores that you can use to update the value of a given writable store. update() takes one argument: a callback function. This callback function receives the current value of the store as its argument, and then returns an updated value that overrides the current value. This method is particularly useful when you want the new value to be some value relative to the current value, for example, incremented by 1.
Alternatively, you can use the set() method to update a writable store. set() takes one argument, which is the new value. Svelte will override the store’s current value with this new value.
In this case, you’re telling Svelte to both increase the itemsInCart value by 1, and add the given item to the cartContents array every time the button is clicked. As a reminder, because of the automatic subscriptions set up in stores.js and inside the App component, as you update the stores inside the AddItem component, their new values will be reflected in both those locations.
With the addItem() function complete, you can now wire it up to the button.
In the HTML section of this component, edit the <button> element to include an on:click directive. This directive tells the element what to do when it’s been clicked - in this case, you want it to call the addItem() function:
With that, your app is complete! Save and close all your files.
Test the demo app built with Svelte stores
Make sure your Svelte server is still running and head back to http://localhost:5000 in your browser.
Your app will look like this:
Try clicking any of the Add Item buttons and see what happens:
Congratulations - you’ve built your first app with Svelte stores. Svelte stores give you an opportunity to share and manipulate data between components without having to pass that data up and down the component hierarchy. Centrally located global stores can reduce the complexity of your app and reduce the likelihood of introducing bugs.
Svelte is a newcomer to the JavaScript ecosystem and I’m really excited to see what you’re building with it. For next steps, check out this post on the differences between Svelte and React, or learn how to use Svelte to send an SMS with Twilio.
Ashley is a JavaScript Editor for the Twilio blog. To work with her and bring your technical stories to Twilio, find her at @ahl389 on Twitter. If you can’t find her there, she’s probably on a patio somewhere having a cup of coffee (or glass of wine, depending on the time).

Related Resources
Twilio Docs
From APIs to SDKs to sample apps
API reference documentation, SDKs, helper libraries, quickstarts, and tutorials for your language and platform.
Resource Center
The latest ebooks, industry reports, and webinars
Learn from customer engagement experts to improve your own communication.
Ahoy
Twilio's developer community hub
Best practices, code samples, and inspiration to build communications and digital engagement experiences.