Transcribe a Voice Message with Python and Django
Time to read:
April 26, 2021
Written by
Reviewed by

In this tutorial you’ll leverage Twilio Programmable Voice to direct phone calls received at your Twilio phone number to a Django application. The caller will be asked to leave a message, which will be transcribed. This guide can be used as a foundation to build your own voicemail system.
Tutorial requirements
To get started with this tutorial, you’ll need the following:
- Python 3.6 or newer. If your operating system does not provide a Python interpreter, you can go to python.org to download an installer.
- A free Twilio account (sign up with this link and get $10 in free credit when you upgrade to a paid account)
- A Twilio phone number
- An active phone line from where you can call your Twilio number, to test the project.
Project setup
In this section you are going to set up a brand new Django project. To keep things nicely organized, open a terminal or command prompt, find a suitable place and create a new directory where the project you are about to create will live:
Creating a virtual environment
Following Python best practices, you are now going to create a virtual environment, where you are going to install the Python dependencies needed for this project.
If you are using a Unix or Mac OS system, open a terminal and enter the following commands to create and activate your virtual environment:
If you are following the tutorial on Windows, enter the following commands in a command prompt window:
Now you are ready to install the Python dependencies used by this project:
The three Python packages that are needed by this project are:
- The Django framework, to create the web application.
- The Twilio Python Helper library, to work with SMS messages.
- Pyngrok, to make the Django application temporarily accessible on the Internet for testing via the ngrok utility.
Creating a Django project
In this step you are going to create a brand new Django web application. Enter the following commands in the same terminal you used to create and activate the virtual environment:
The first command above creates a Django project called voicemail. You will see a subdirectory with that name created in the top-level directory of your project. The next command defines a Django application called calls. After you run this second command you will also see a subdirectory with that name added to the project. This is the application in which you will build the logic to handle incoming phone calls.
The migrate command performs the default Django database migrations, which are necessary to fully set up the Django project. The runserver command starts the Django development web server.
In general you will want to leave the Django web server running while you write code, because it automatically detects code changes and restarts to incorporate them. So leave this terminal window alone and open a second terminal to continue with the tutorial.
Starting an ngrok tunnel
The Django web server is only available locally inside your computer, which means that it cannot be accessed over the Internet, but Twilio needs to be able to send web requests to this server. Thus during development, a trick is necessary to make the local server available on the Internet.
On your second terminal window, activate the virtual environment and then run the following command:
The ngrok screen should look as follows:
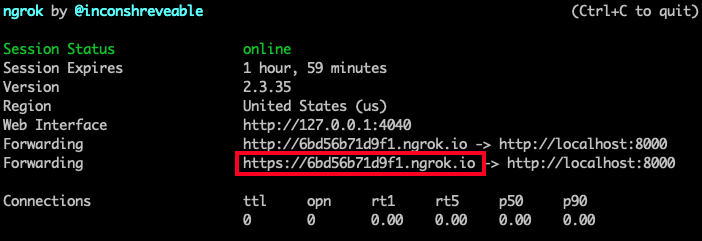
Note the https:// forwarding URL. This URL is temporarily mapped to your Django web server, and can be accessed from anywhere in the world. Any requests that arrive on it will be transparently forwarded to your server by the ngrok service. The URL is active for as long as you keep ngrok running, or until the ngrok session expires. Each time ngrok is launched a new randomly generated URL will be mapped to the local server.
Open the file settings.py from the voicemail directory in your text editor or IDE. Find the line that has the ALLOWED_HOSTS variable and change it as follows:
This will tell Django that requests received from ngrok URLs are allowed.
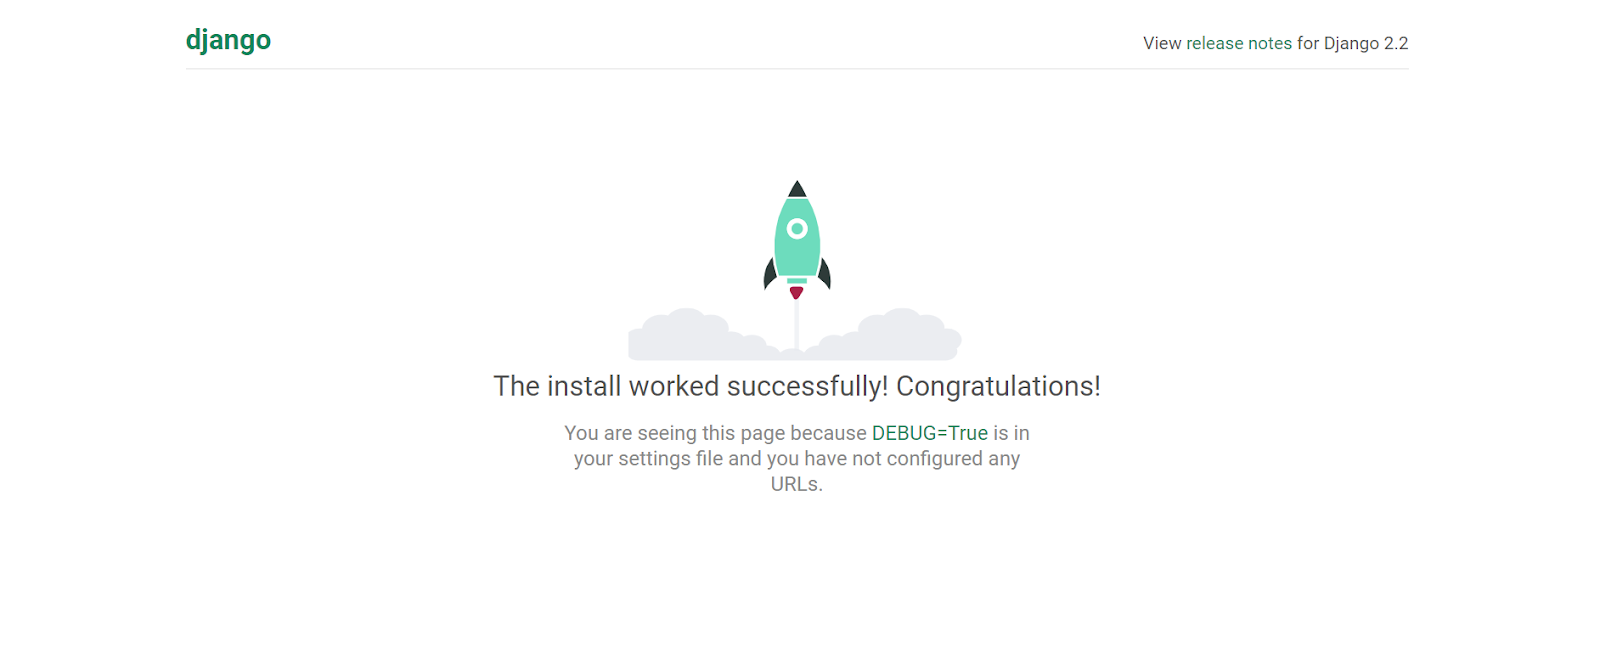
While still running the Django server and ngrok on two separate terminals, type https://xxxxxx.ngrok.io on the address bar of your web browser to confirm that your Django project is up and running. Replace xxxxx with the randomly generated subdomain from your ngrok session. This is what you should see:
Leave the Django server and ngrok running while you continue working on the tutorial. If your ngrok session expires, stop ngrok by pressing Ctrl-C, and start it again to begin a new session. Remember that each time you restart ngrok the randomly generated subdomain will change.
Creating a webhook
Twilio uses the concept of webhooks to enable your application to perform custom actions as a result of external events such as receiving a phone call. A webhook is nothing more than an HTTP endpoint that Twilio invokes with information about the event. The response returned to Twilio provides instructions on how to handle the event.
The webhook for an incoming phone call will include information such as the phone number of the caller. In the response, the application can provide instructions to Twilio on what to do with the call. The actions that you want Twilio to take in response to an incoming event have to be given in a custom language defined by Twilio that is based on XML and is called TwiML.
Adding a new endpoint
Open the settings.py file from the voicemail directory once again. Find the INSTALLED_APPS variable. This is a list of several strings, which are standard modules of the Django framework. At the end of the list, you need to add one more entry to register the calls application that you created earlier.
Open the views.py from the calls subdirectory. This is where you are going to create the endpoint that will handle the incoming phone calls. Replace the contents of this file with the following:
The incoming_call() function is the endpoint function that will run when Twilio notifies the application of an incoming call on the Twilio phone number. The function creates a VoiceResponse object from the Twilio helper library, and configures it to record a message and transcribe it. The URL passed in the transcribe_callback argument will be invoked by Twilio when the transcription is available.
To make this endpoint accessible through the web application, a URL needs to be assigned to it. Open the urls.py file from the voicemail directory and add a new entry to the urlpatterns list as shown below:
The path(‘call’, views.incoming_call) line tells Django that the incoming_call() function from views.py is mapped to a /call URL on the web application.
The TwiML <Record> verb
The code above creates a variable called twiml that is initialized with a TwiML Voice Response object.
TwiML, which stands for Twilio Markup Language, is language derived from XML that has special tags defined by Twilio. You can use TwiML to tell Twilio how to handle an incoming phone call or SMS. Instead of writing XML, you can also write TwiML programmatically using classes from the Twilio helper library, which is what you’re doing in this endpoint.
After creating the twiml variable, this code uses the record() method, which is a wrapper for the <Record> TwiML verb. <Record> is one of many TwiML verbs. TwiML verbs tell Twilio what actions to take, and these actions can be customized by providing the verb with certain parameters called attributes.
The <Record> verb will create an audio recording of anything the caller says after the call connects, and it can be modified with a number of different attributes. The attributes most relevant for this tutorial are transcribe and transcribeCallback.
transcribe is an optional attribute that, when included and set to True, will tell Twilio to create a speech-to-text transcription of the message left by the caller, with the caveat that the message has to be between 2 and 120 seconds in length. This means that some very short messages and very long messages will not be transcribed, though the actual audio recordings of the message will not be impacted.
The content of the transcription will be stored by Twilio for you, and can be accessed via the transcription API.
Alternatively, you can provide a transcription callback to the <Record> verb that will execute when the transcription is finished. In this callback, you can access the contents of the transcription and perform an action on it, like save it to a database or print it to a webpage.
If you use the transcribeCallback attribute, the transcribe=True attribute is implied and can be omitted. This all is what you’re seeing in the code above.
Before we continue, it’s important to mention that recording phone calls or voice messages has a variety of legal considerations and you must ensure that you’re adhering to local, state, and federal laws when recording anything.
Add the transcription callback function
Open the views.py module from the calls directory. Add the following at the bottom of the file:
Twilio sends the data about the transcription as POST variables. In the code above, the function checks to see if the TranscriptionStatus is failed. If so, it assigns the string No transcription available to a variable called transcription.
If the transcription was successful, this code assigns the actual content of the transcription to the transcription variable. The function then prints the value of transcription.
This endpoint also needs to be exposed through the Django application, so open the urls.py file from the voicemail directory and add a new entry to the urlpatterns list as shown below:
Configure the webhook for your Twilio phone number
In this section we are going to configure the webhook to the Twilio phone number. In your web browser, visit the Twilio phone numbers section of the Console.
Find the phone number you’re using for this tutorial in the list and click on it to open the configuration page for that number.
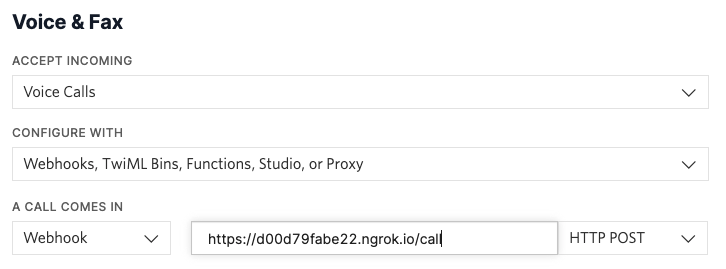
Scroll down until you see a section titled “Voice & Fax”.
Make the following adjustments to the information shown in this section:
- For “Accept Incoming”, select “Voice Calls”
- For “Configure With”, select “Webhooks, TwiML Bins, Functions, Studio, or Proxy”
- For “A Call Comes In”, select “Webhook”, then type the ngrok URL followed by /call. Make sure the right side dropdown is set to “HTTP POST”.
After making these changes, click the “Save” button to record your changes.
Test your application
Call your Twilio phone number from your personal phone. You’ll hear a beep after which you can speak into the phone and say a few words. Make sure you speak for at least a few seconds to ensure that there is enough content for the transcription to be triggered. After leaving your message, hang up the call.
While you do this, keep an eye on the terminal running the Django application. It may take a few seconds, but shortly you’ll see the transcription text printed to the screen.
Conclusion
Congratulations! Now you’ve learned how to record transcriptions, but have only scratched the surface of what the Twilio Programmable Voice API can do. Here are some other tutorials that you may like:
- Build an Encrypted Voicemail system with Python and Twilio Programmable Voice
- How to Receive a Phone Call in Python Using Django and Twilio
I can’t wait to see what you build with Twilio!
Miguel Grinberg is a Python Developer for Technical Content at Twilio. Reach out to him at mgrinberg [at] twilio [dot] com if you have a cool Python project you’d like to share on this blog!

Related Resources
Twilio Docs
From APIs to SDKs to sample apps
API reference documentation, SDKs, helper libraries, quickstarts, and tutorials for your language and platform.
Resource Center
The latest ebooks, industry reports, and webinars
Learn from customer engagement experts to improve your own communication.
Ahoy
Twilio's developer community hub
Best practices, code samples, and inspiration to build communications and digital engagement experiences.