Set Up a Dev Environment to Write Twilio Flex Salesforce Plugins
Time to read:
April 25, 2019
Written by

Writing plugins for a Flex contact center that reside within the SFDC can be a bit of a challenge. The goal of this guide is to make it a bit easier for you as a developer to set up a development environment for creating these plugins.
It is strongly recommended that you start with either a fresh Salesforce Sandbox or Developer Edition for this exercise, although there is no technical reason why an existing environment should not work. In this guide, we'll use a brand new Developer Edition of Salesforce.
Create the Salesforce Flex plugin and run it locally
We create our plugin with the create-flex-plugin npm package. Please refer to the documentation here for help getting started.
Let's name our plugin plugin-sfdc. We create the standard plugin by running:
npm init flex-plugin plugin-sfdcDuring the plugin creation process, you will be asked to provide a Twilio Flex Account Sid. You don't have to include the Admin plugin.
After the plugin has been created, run the following commands:
cd plugin-sfdc
npm install
npm start
Run ngrok to expose your development server
Salesforce will only load a Call Center running on https on a public-accessible domain. Unfortunately, this means that our local instance of Flex running on http://localhost:8080 will not load – we need to find a way to expose it to the outside world. We're going to expose this port publicly using a tool called ngrok.
After installing ngrok, connect your account by running the following command:
./ngrok authtoken <YOUR_AUTH_TOKEN>Finally, open a tunnel to your local Flex instance by running this:
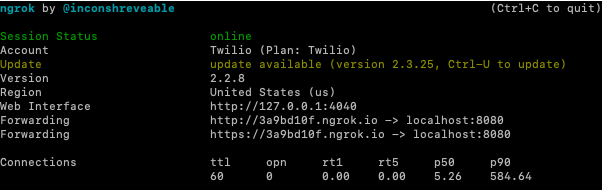
./ngrok http 8080If you're using MacOS, your terminal window should look like this:
Using Salesforce as an IdP for SSO
When Flex is embedded within Salesforce, SSO must be used even for development purposes. Due to limitations of the Salesforce environment, you cannot use Twilio Console login.
In this example, we'll use Salesforce as our Single Sign-On Identity Provider. For your own purposes, you aren't required to use Salesforce as your IdP. You are welcome to use any IdP that can provide a SAML token. Additional documentation on SSO for Flex can be found here.
- In Salesforce Setup, go to Setup > Security > Certificate and Key Management. (If you are still using Salesforce Classic, Security is named "Security Controls".)
- Select "Create Self-Signed Certificate". Your completed form should look something like this:

- Download the Certificate once it's been created
- In Salesforce, go to Setup > Identity > Identity Provider. (If you're using Salesforce Classic, you will go to Setup > Security Controls > Identity Provider.)
- If you have not configured a domain name for your Salesforce Instance, you will be asked to do so before Salesforce can be enabled as an Identity Provider. A link to MyDomain will be provided on the Identity Provider configuration page.
- Click "Enable Identity Provider". Use the Certificate you created for communicating with service providers.
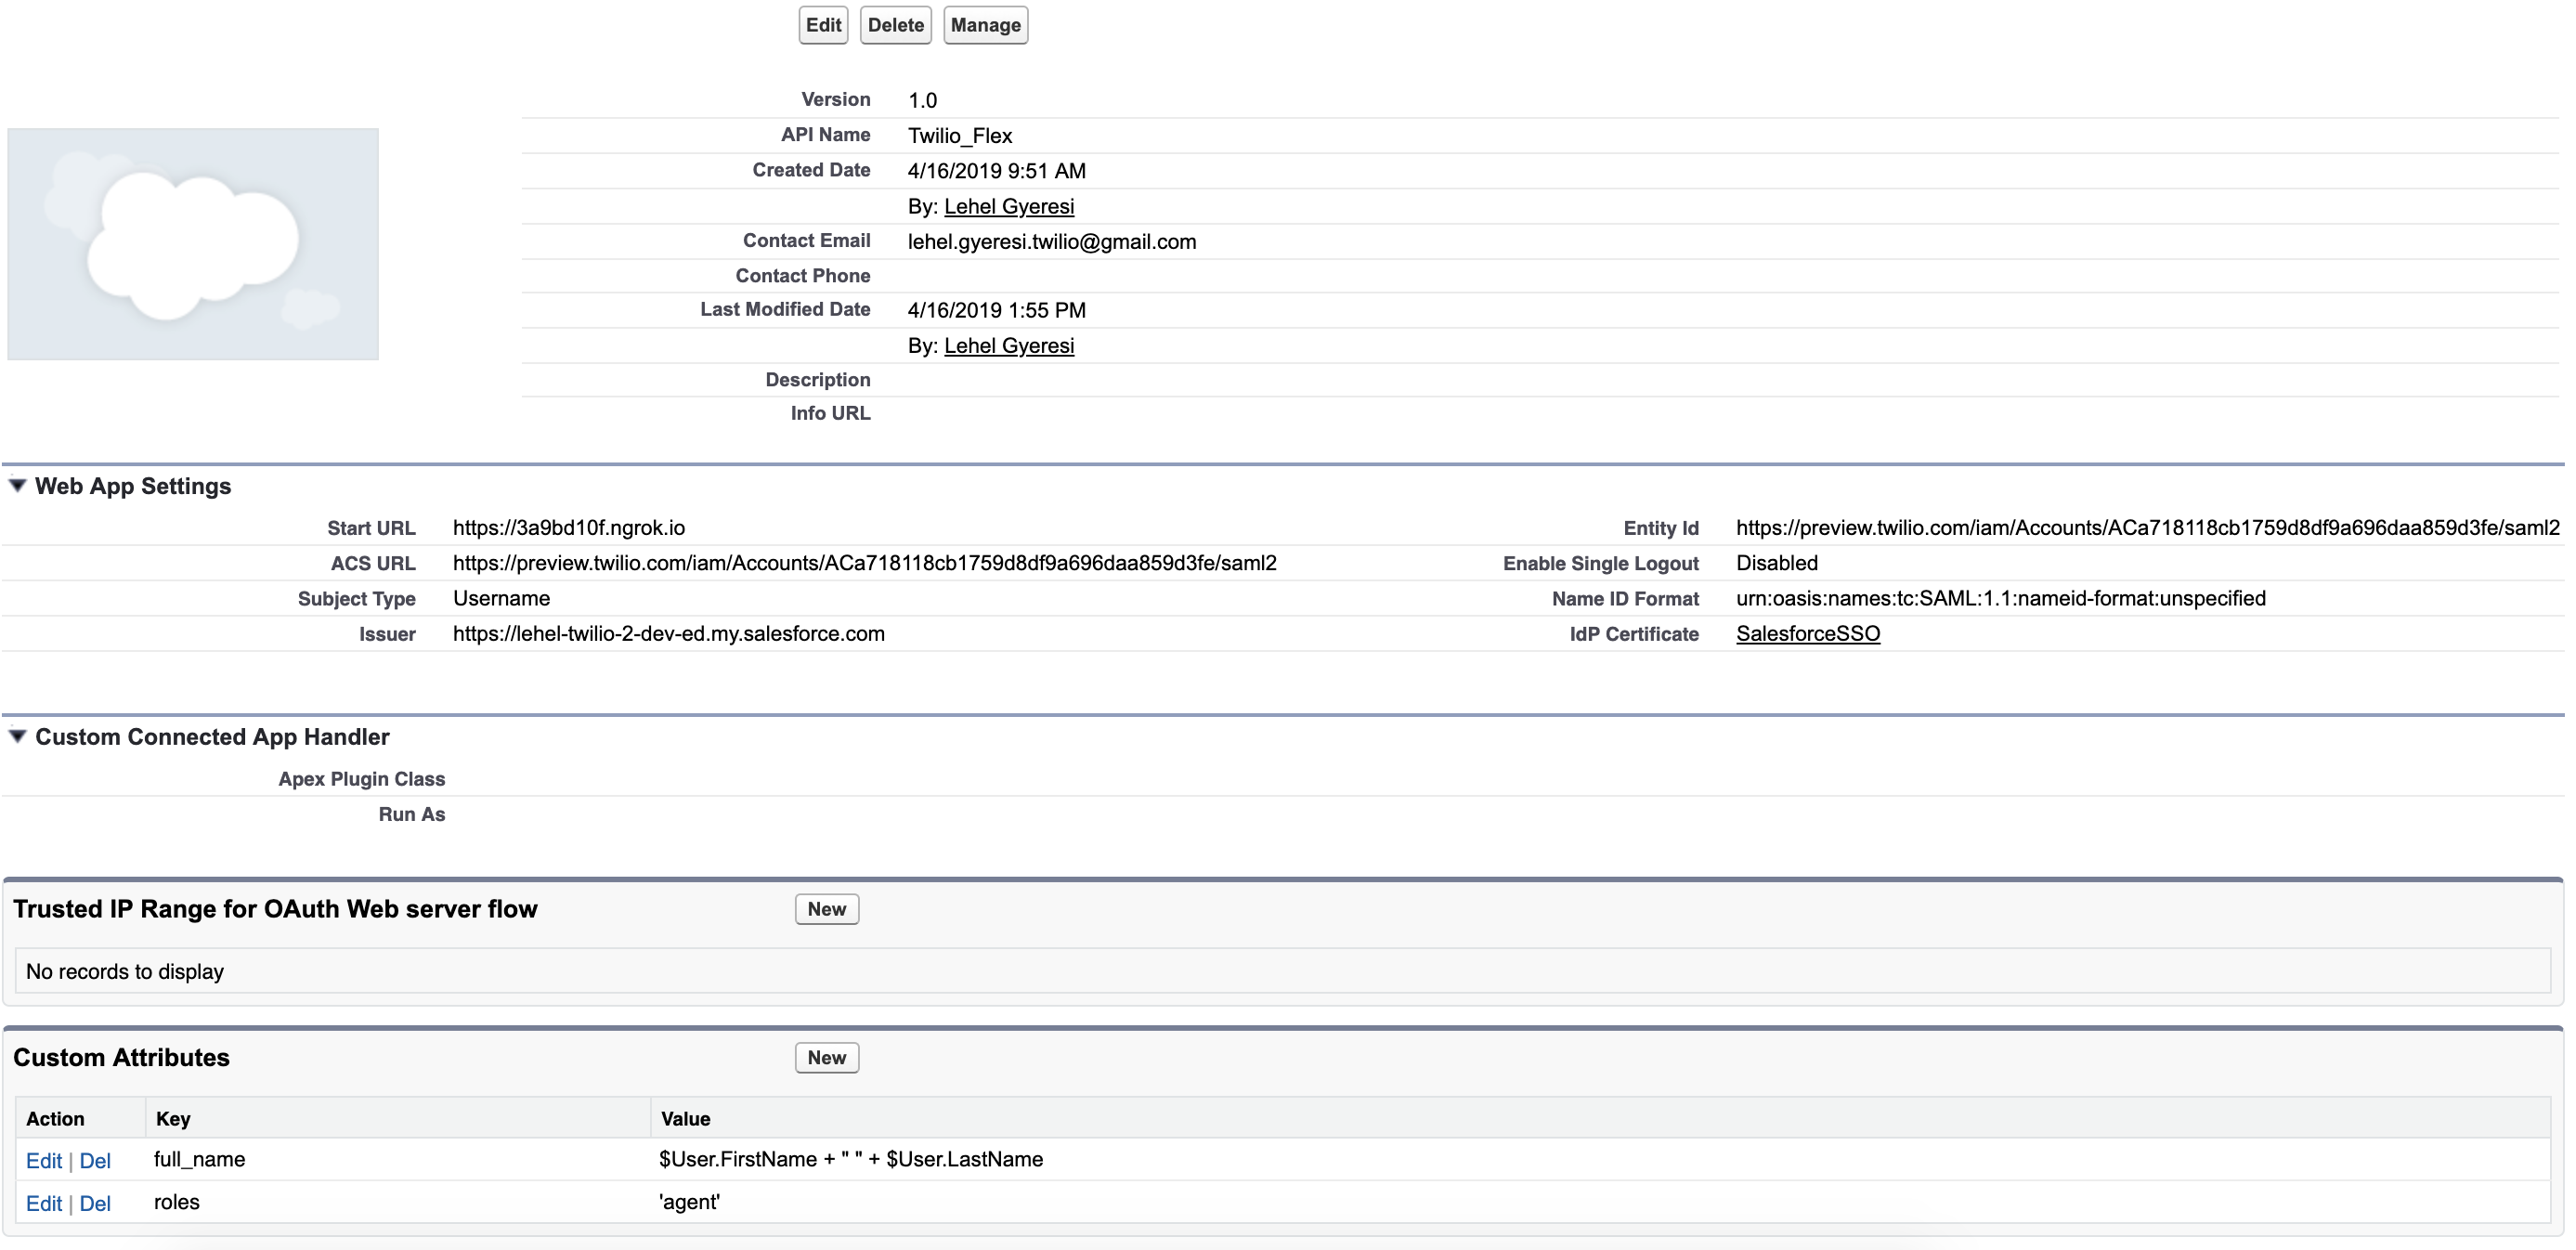
Next, we'll create a Connected App in Salesforce.
- In Salesforce, go to Setup > Apps > App Manager. (If you're using Salesforce Classic, go to Setup > Create > Apps. We will Create a new Connected App.)
- Fill out the following fields: Connected App Name, API Name and Contact Email.
- In the "Web App Settings" section, set the Start URL to the ngrok address displayed in your terminal window. (In my case, this was "https://3a9bd10f.ngrok.io".)
- Check the box for "Enable SAML".
- The Entity Id will be
https://preview.twilio.com/iam/Accounts/[ACCOUNT_SID]/saml2. (You can find the Account Sid of your Twilio project on the home page of your Twilio Console. The ACS URL will have the same value as the Entity Id field.) - Subject type should be set to "Username" and Name ID Format should be "urn:oasis:names:tc:SAML:1.1:nameid-format:unspecified".
- Verify that the Issuer is set to the "MyDomain" value of your Salesforce instance.
- Change the IdP Certificate to the certificate that you created at the beginning of this process.
- Leave "Verify Request Signatures" and "Encrypt SAML Response" unchecked.
- 'Save' the Connected App.
- In the Custom Attributes section, set up the following attributes:
full_name: $User.FirstName + " " + $User.LastName
roles: 'agent' (in quotes)
When finished, your connected app should look like this:
Finally, click on "Manage", and in the Profiles Section, click "Manage Profiles". Add your Salesforce Profiles to the Connected App.
Setup SSO in Twilio Flex
Now, let's walk through what you'll need to use Salesforce as an SSO Identity Provider in Twilio.
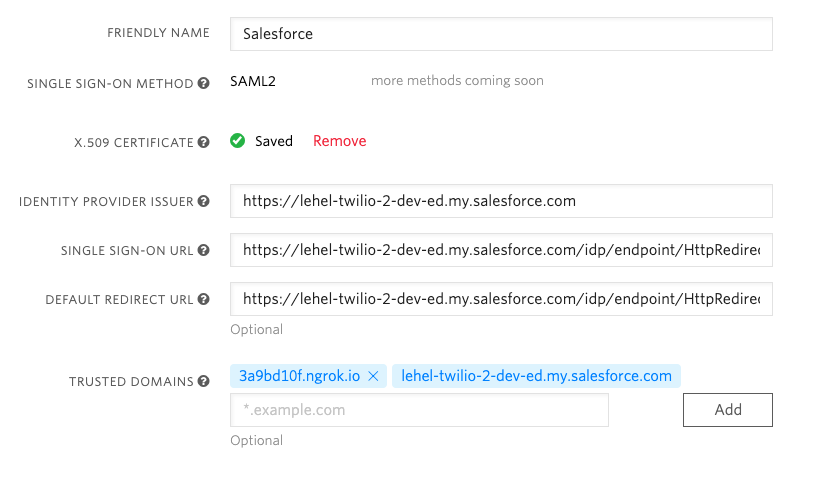
- In your Twilio console go the Flex Single Sign-on page or click here.
- Set a Friendly Name for the Single Sign-on.
- Paste the Salesforce generated certificate that you downloaded earlier.
- Set the Identity Provider Issuer to your Salesforce MyDomain url. (In my case, this is "https://lehel-twilio-2-dev-ed.my.salesforce.com")
- Set the Single Sign-on URL and Default Redirect Url to
https://yourdomain.my.salesforce.com/idp/endpoint/HttpRedirect. (In my case, this is "https://lehel-twilio-2-dev-ed.my.salesforce.com/idp/endpoint/HttpRedirect".) - Add your ngrok domain to the list of Trusted Domains.
After you are finished, your Single Sign-on Admin page should look like this:
Add the Call Center to Salesforce
Next, let's add the Call Center in Salesforce.
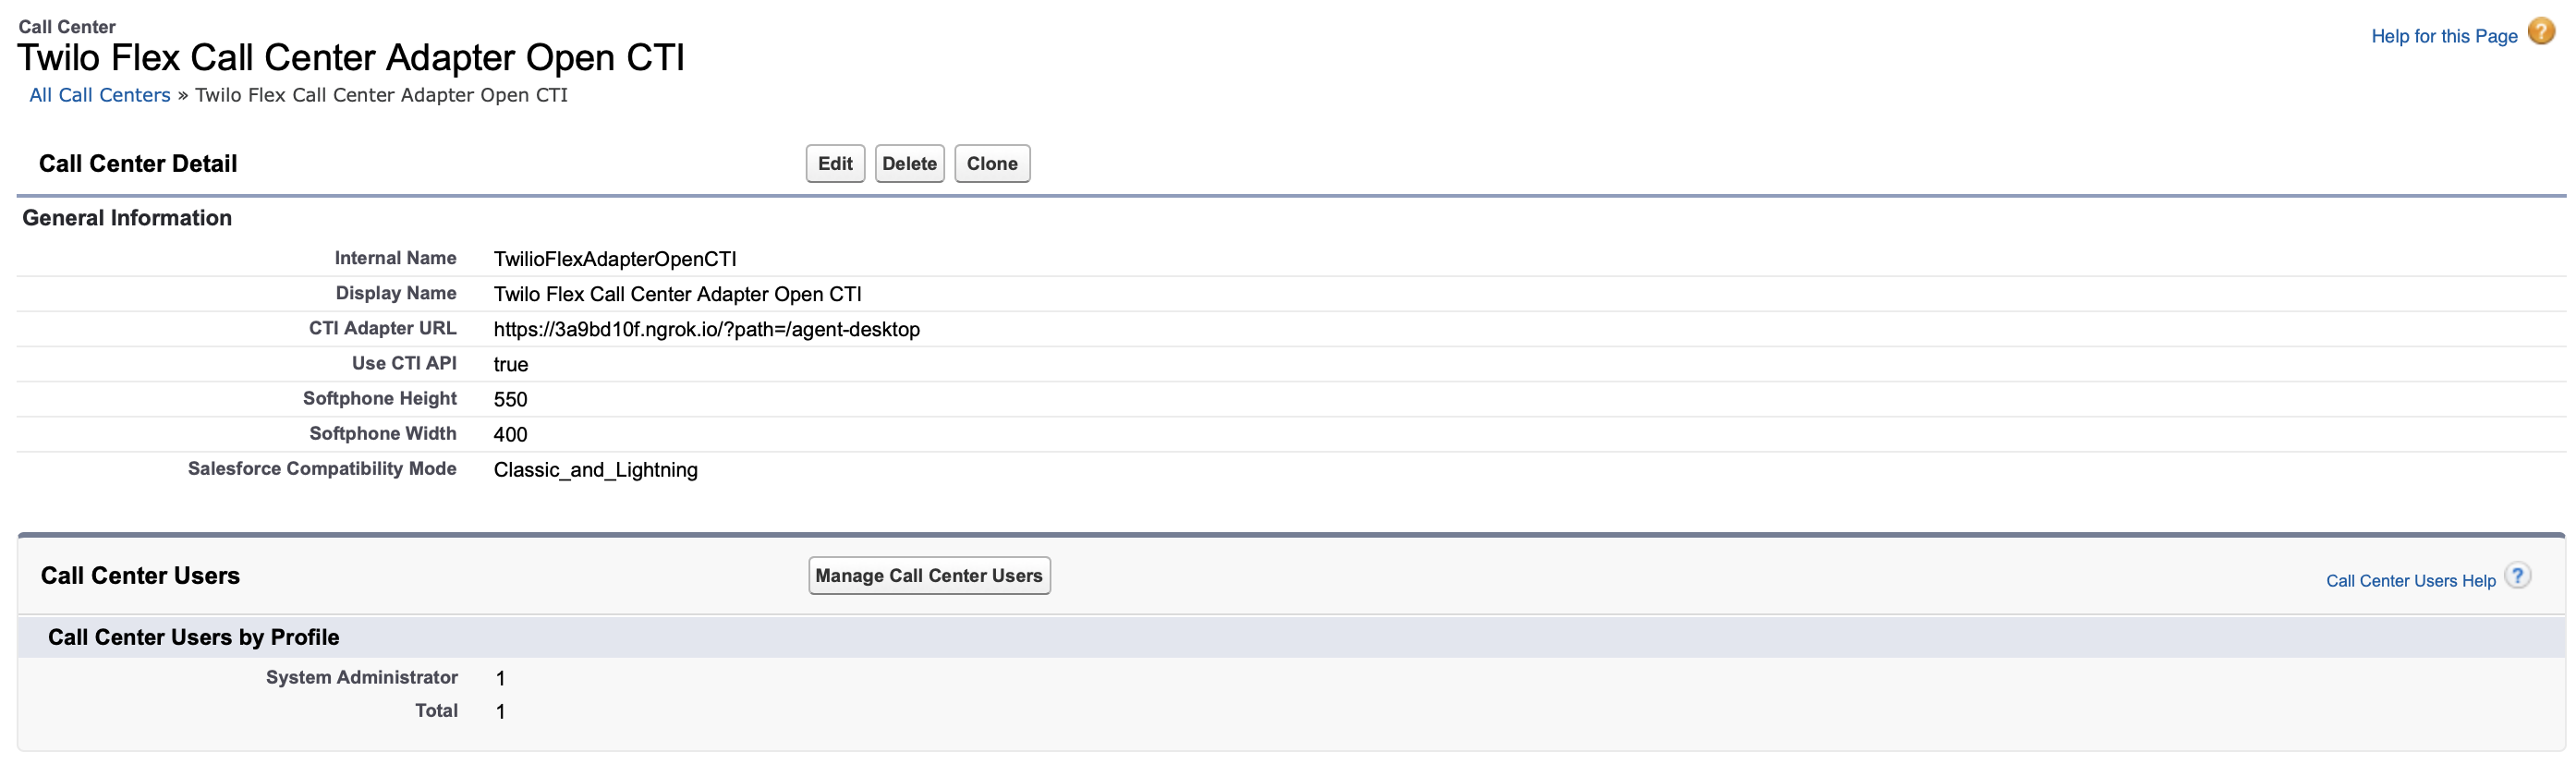
- In Salesforce, go to Setup > Feature Settings > Service > Call Center > Call Centers. (If you're using Salesforce Classic, go to Setup > Customize > Call Center > Call Centers.)
- Save the following as an XML file on your local computer:
<callCenter>
  <section sortOrder="0" name="reqGeneralInfo" label="General Information">
    <item sortOrder="0" name="reqInternalName" label="Internal Name">TwilioFlexAdapterOpenCTI</item>
    <item sortOrder="1" name="reqDisplayName" label="Display Name">Twilo Flex Call Center Adapter Open CTI</item>
    <item sortOrder="2" name="reqAdapterUrl" label="CTI Adapter URL">https://3a9bd10f.ngrok.io/?path=/agent-desktop</item>
    <item sortOrder="3" name="reqUseApi" label="Use CTI API">true</item>
    <item sortOrder="4" name="reqSoftphoneHeight" label="Softphone Height">550</item>
    <item sortOrder="5" name="reqSoftphoneWidth" label="Softphone Width">400</item>
    <item sortOrder="6" name="reqSalesforceCompatibilityMode" label="Salesforce Compatibility Mode">Classic_and_Lightning</item>
  </section>
</callCenter>
Be sure to update theCTI Adapter URLwith your instance on ngrok. - Import this Call Center Definition as a Call Center in Salesforce.
- Click "Manage Call Center Users" and add your account to this Call Center.
When you are finished, your Call Center should look like this:
Add the Call Center to your Salesforce App
Next we'll add the embedded Call Center to a Salesforce App. The App creation is quite a bit different between Lightning and Classic, so we'll start with Lightning first then finish with the Classic app example.
Add the Call Center in Salesforce Lightning
These steps allow you to add the embedded Call Center in Salesforce Lightning.
- In Lightning, go to Setup > Apps > App Manager. You can add the call center to an existing App, but in this guide we'll create a new App. Click on "New Lightning App" and give the App a Name.
- Select Console Navigation and Service Setup. Click Next.
- Click on Add Utility Item. Add the "Open CTI Softphone". Click Next.
- Add some items to the Navigation. Click Next. Click Next.
- Assign your Salesforce Profile to the New App and click on "Save & Finish".
- Click on the App Launcher and Launch your new App.
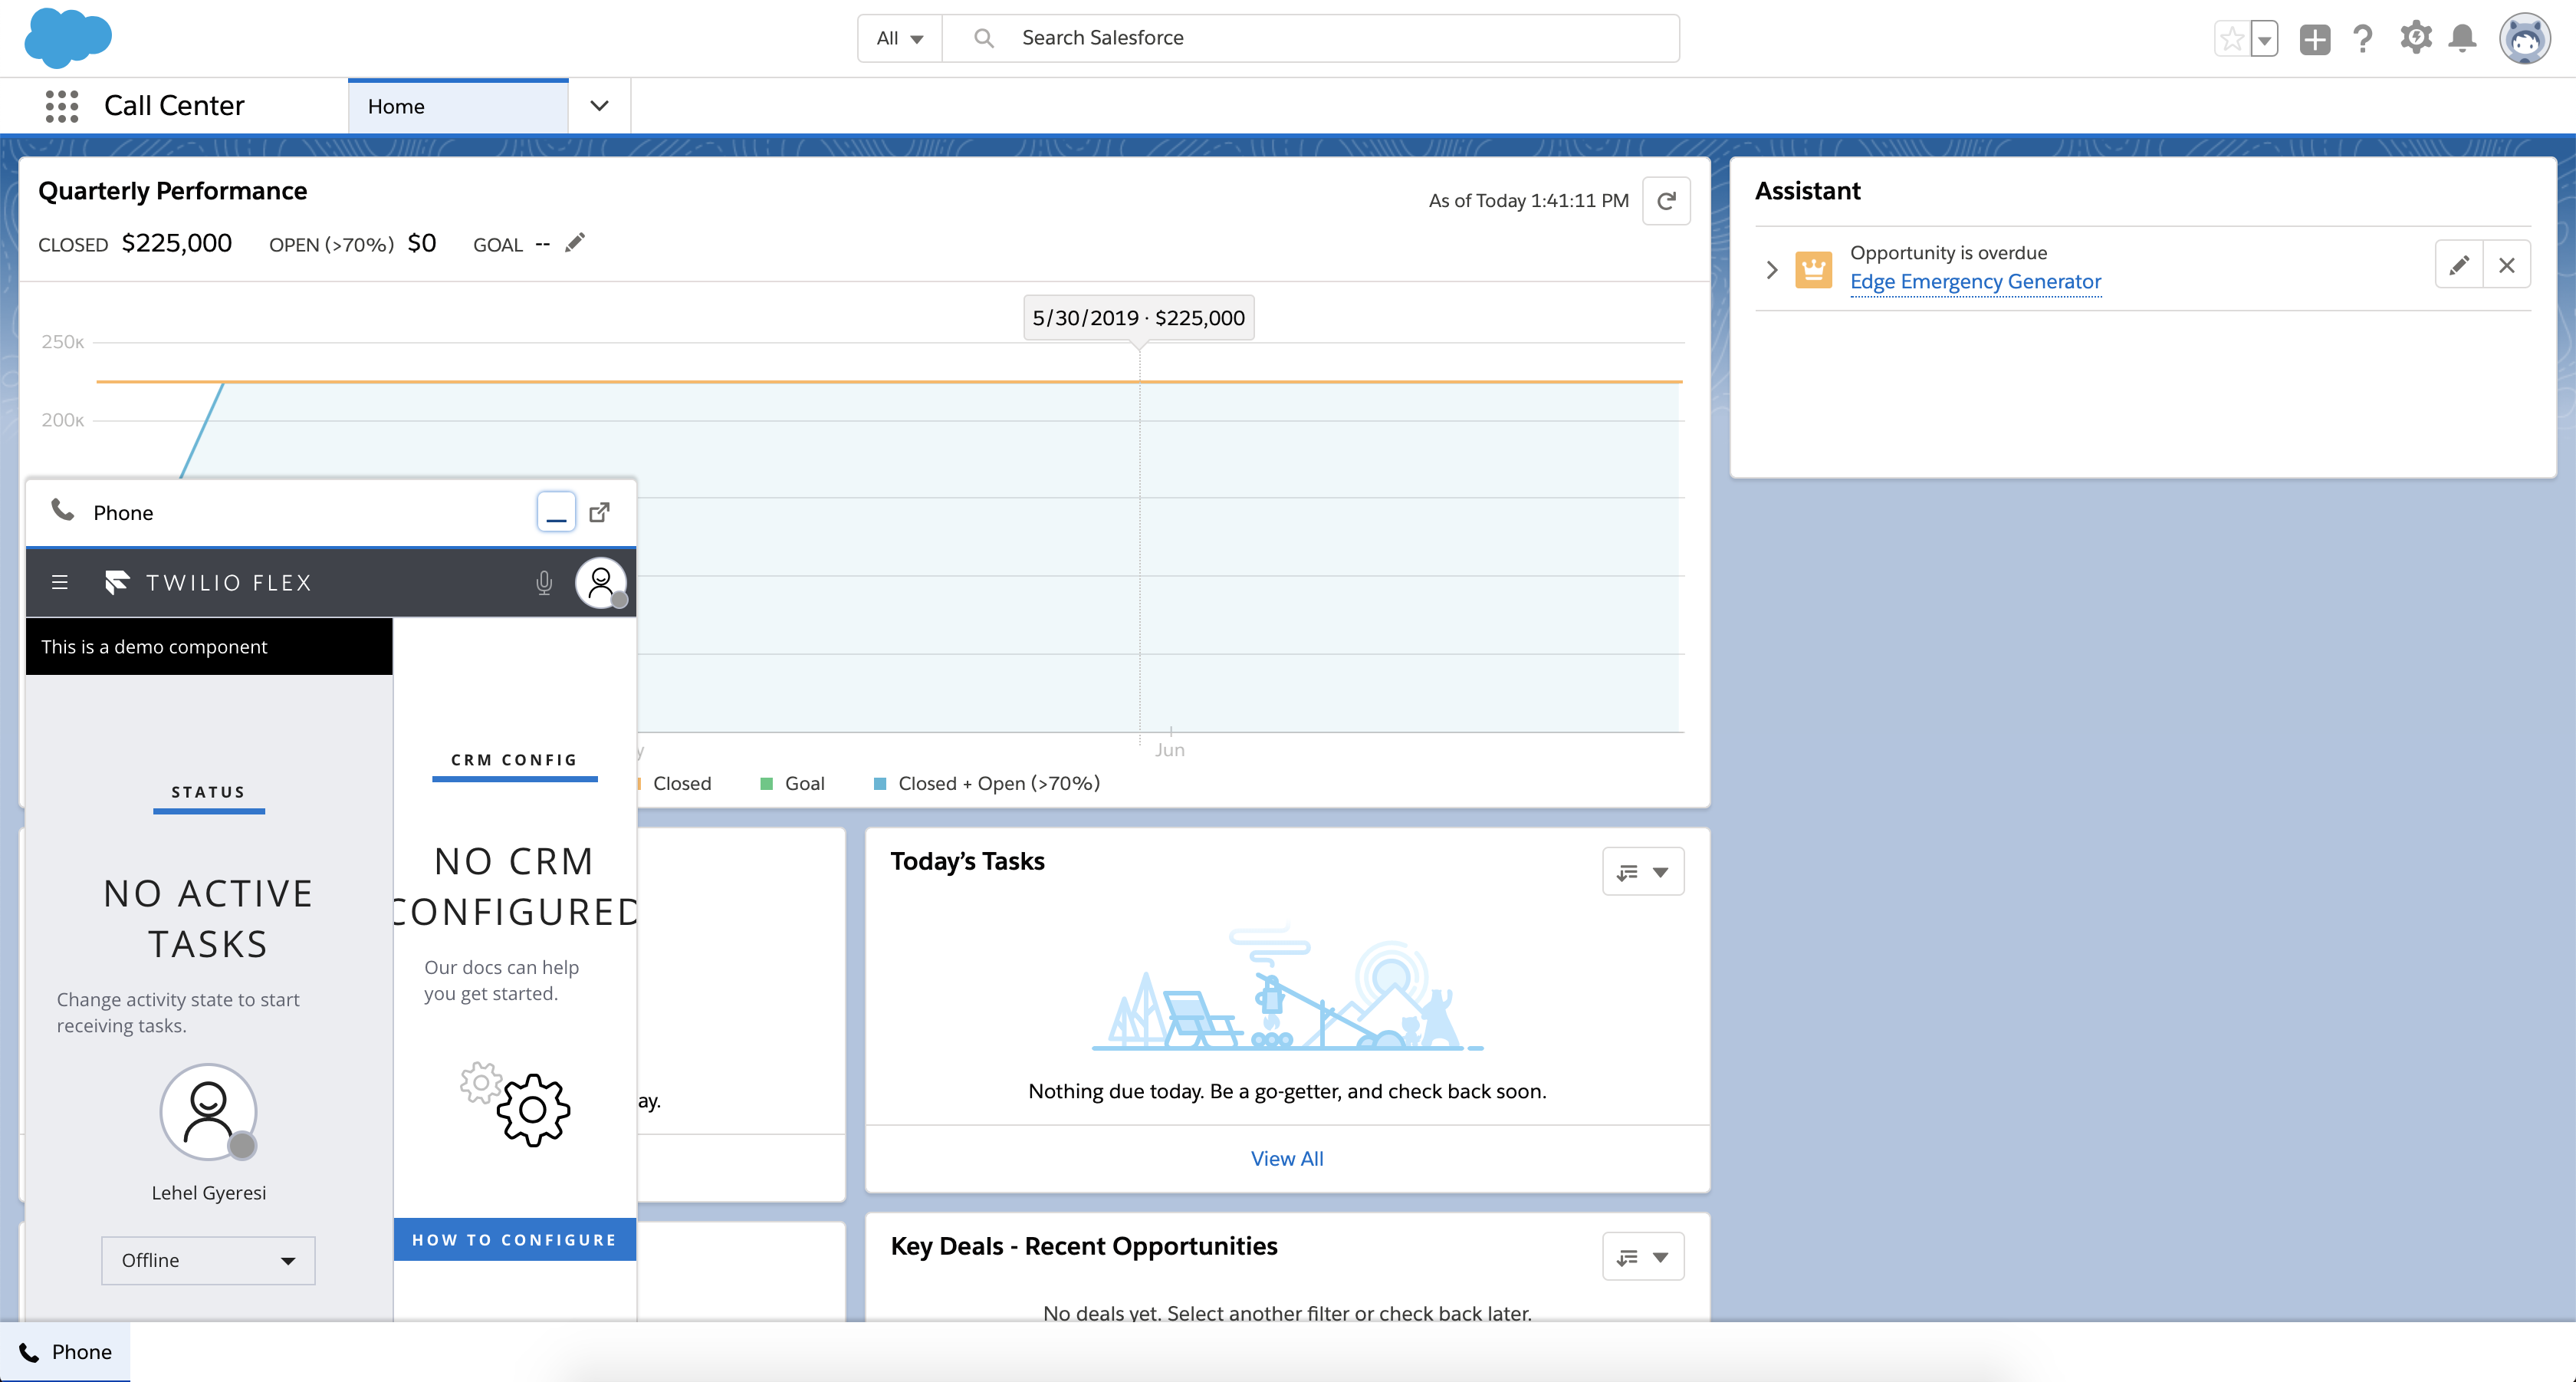
Here is my Lightning App running a locally hosted Twilio Flex:
Add the Call Center in Salesforce Classic
Here's how you'd all the Call Center in Salesforce Classic.
- In Salesforce Classic, go to Setup > Create > Apps.
- In the Apps section, click "New".
- Select Console, click Next.
- Give your App a Label and Name and click Next. Click Next.
- Add some Items to your new App and click Next. Click Next.
- Give your Salesforce Profile access to the new App and click Save.
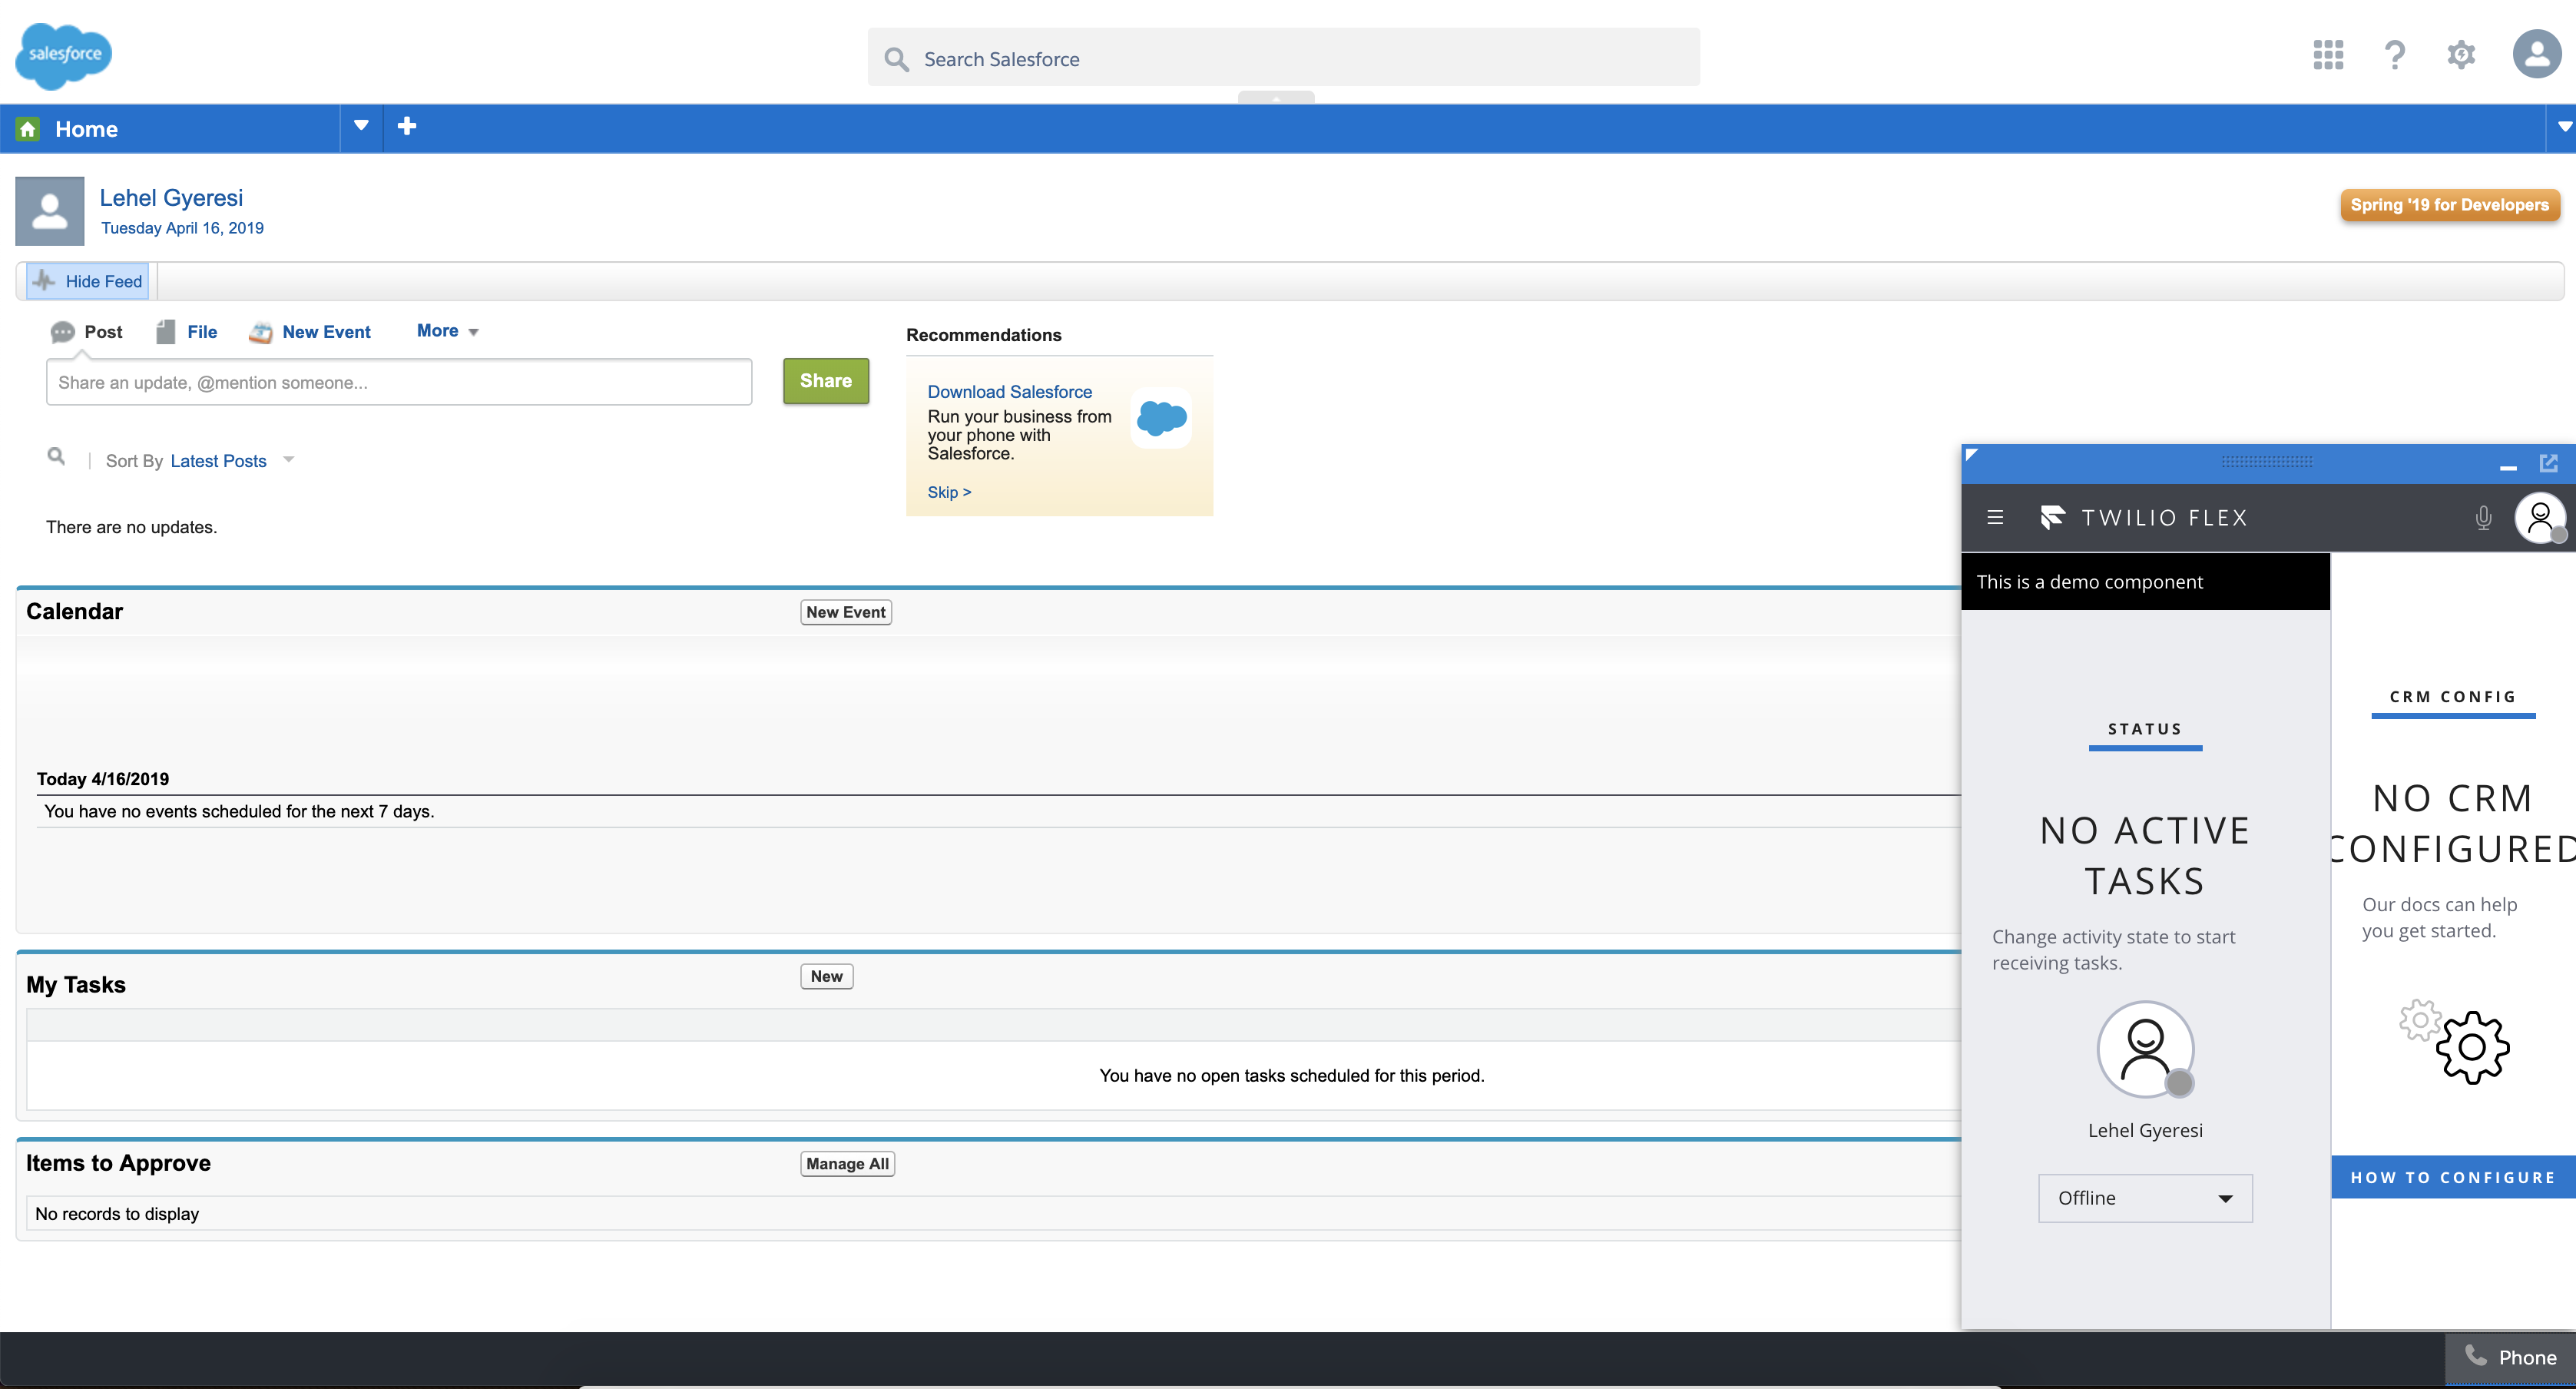
Here is a my Salesforce Classic Console App running a locally hosted Flex instance:
Adding OpenCTI to your Plugin
In order for your plugin to be able to communicate with Salesforce via the openCTI interface, we need to initiatialize the openCTI interface. Additional interfaces on the openCTI integration can be found here.
Add the following snippet to your plugin:
export const loadScript = async url =>
  new Promise((resolve, reject) => {
    const scriptRef = document.createElement('script');
    const tag = document.getElementsByTagName('script')[0];

    scriptRef.src = url;
    scriptRef.type = 'text/javascript';
    scriptRef.async = true;
    scriptRef.onerror = reject;
    scriptRef.onload = scriptRef.onreadystatechange = res =>
      (!res.readyState || res.readyState === 'complete') && resolve(res);

    tag.parentNode.insertBefore(scriptRef, tag);
  });
Customizing the UI
If you would like to remove the third panel from the UI, add the following snippet to your plugin:
manager.updateConfig({
    ...colorThemeOverrides,
    componentProps: {
      AgentDesktopView: {
        showPanel2: false,
      },
    },
  });
And that's it! With that, you now know how to set up a Salesforce and Twilio development platform and integrate your Flex contact center plugins inside the SFDC. Whether you're on Salesforce Lightning or Salesforce Classic, you're ready to continue plugin development.
We can't wait to see what you build!
Lehel Gyeresi is a part of the Expert Services team and works as a Contact Center Solutions Consultant. You can reach him at lgyeresi [at] twilio.com.
Related Posts


Related Resources
Twilio Docs
From APIs to SDKs to sample apps
API reference documentation, SDKs, helper libraries, quickstarts, and tutorials for your language and platform.
Resource Center
The latest ebooks, industry reports, and webinars
Learn from customer engagement experts to improve your own communication.
Ahoy
Twilio's developer community hub
Best practices, code samples, and inspiration to build communications and digital engagement experiences.