Get Started Testing a Yii2 API Using Codeception
Time to read: 7 minutes
April 28, 2021
Written by
Reviewed by

Testing (and TDD by extension) has drummed up more than its fair share in terms of significant debates. While proponents and opponents may disagree on specifics, they always come to one conclusion: it is unprofessional to ship untested code. Testing provides a level of assurance, not only that the code meets the provided specification but that it can handle edge cases that may be encountered upon deployment.
In this article, I will show you how to test a RESTful API built with the Yii framework (version 2)usingCodeception. Built on PHPUnit, Codeception provides support for creating and running unit, functional, and acceptance tests on PHP applications in a unified manner.
To allow us to focus on the key aspects of testing in this tutorial, we’ll be building on the result of a previous tutorial where Yii2 was used to build a secure RESTful API. You're, however, very free to use another Yii2 project, if you have one.
Prerequisites
To complete this tutorial, you’ll need the following:
- PHP 7.4 (or above)
- Composer globally installed
- A MySQL/MariaDB database
Getting started
To get started, clone the Yii2 project from the Github repository, using the command below.
The command will clone the project into a new folder named yii-library-api. Once the code has been cloned, change into the new project folder and install all its required dependencies using Composer. To do that, run the commands below.
Next, using your preferred database management application, create a new MySQL database called yii_library_api.Then, set the database connection parameters to link your application with the newly created database. To do this, open config/db.php and update the returned array to match the one shown below, but replace the three placeholders with the applicable details for your database.
The GitHub repo also contains some migrations which will create the tables and seed the database with some initial data. Run them using the command below.
When prompted, type yes and press Enter to run the migrations. When the migrations have been run, open the yii_library_api database in your preferred application to see the new table structure. It should have the following tables:
- book
- loan
- member
- migration
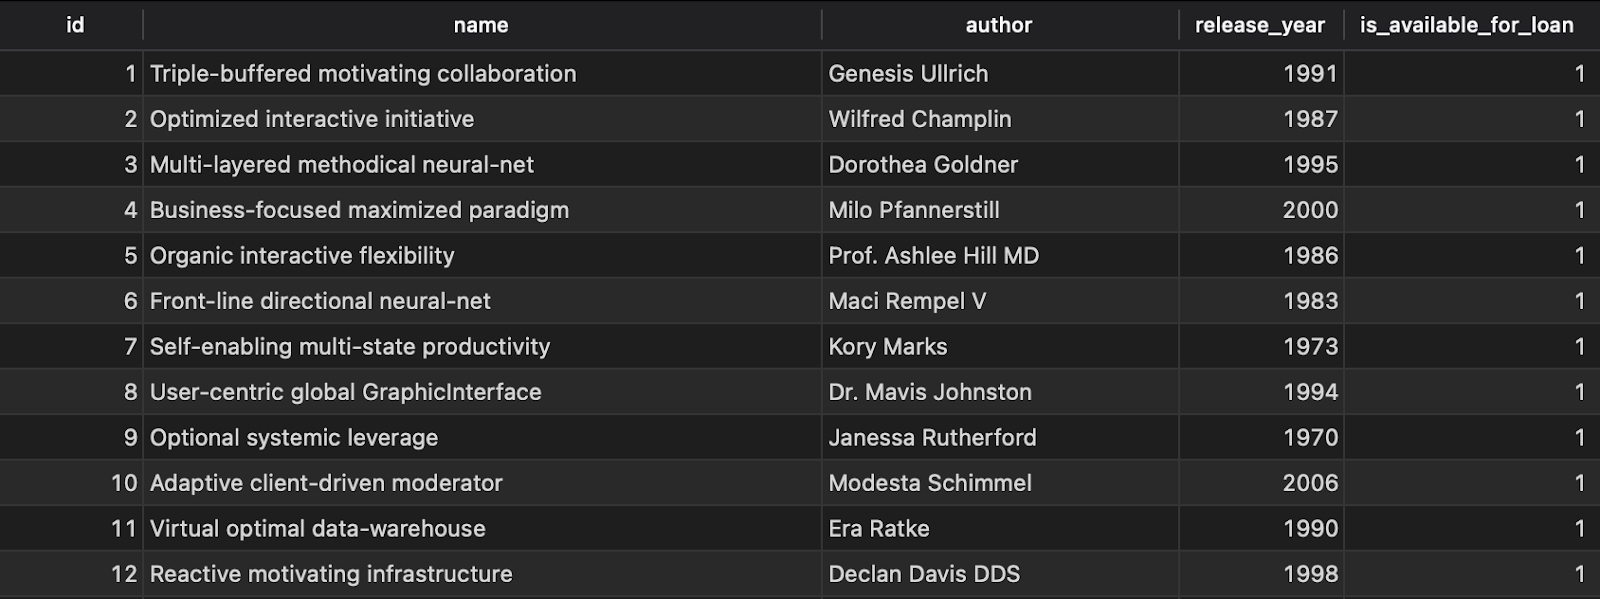
The book table with sample books is shown below.
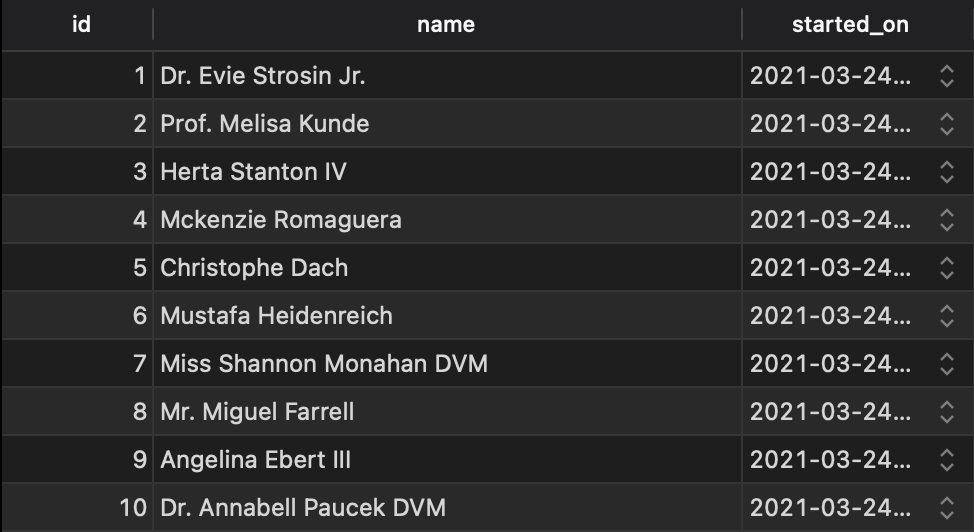
The member table with sample members is shown below.
At this stage, we have built an application that can handle the following requests:
|
Method |
Route |
Description |
|
GET |
/{members, books} |
List all members or books page by page; |
|
POST |
/{members, books} |
Create a new member or book; |
|
GET |
/{members, books}/\d+ |
Return the details of the member or book 123; |
|
PATCH and PUT |
/{members, books}/\d+ |
Update the member or book 123; |
|
DELETE |
/{members, books}/\d+ |
Delete the member or book 123; |
|
GET |
/loans |
Get a list of all the loans available |
|
POST |
/loans |
Borrow a book by providing the member id and book id |
Setting up the test environment
To avoid unwanted side effects as a result of the test cases interacting with the development database, we're going to set up a test database. Using your preferred database management application, create a new database called library_api_test.
Then, update the $db['dsn'] parameter in config/test_db.php to match the code below.
Having connected the application to the test database, create the tables, and seed them with data using the command below. Type "yes" when prompted and press "Enter" to run the migrations.
Once completed, you should have a test database with sample data and the same structure as the development database. Next, in config/test.php, update the urlManager component to match the following code.
It is important to update the routing rules in the test environment to ensure that our requests are handled as they would be in the development environment. This allows the tests to pass accordingly and in the event that there is a bug in the code, the tests will fail and bring such a bug to light.
Setting up an API test suite
With these in place, you can set up a test suite and write test cases for the API endpoints. Yii2 projects are, by default, bootstrapped with a minimal Codeception which makes it pretty easy to get started quite quickly.
Test cases and related files are located in the tests directory. Functional tests are located in the tests/functional directory. Unit tests are located in the tests/unit directory, and acceptance tests are located in the tests/acceptance directory. Take a few minutes to familiarize yourself with them before moving on.
The tests written in this article will, essentially, be functional tests. The difference between the tests we will write and those in the tests/functional directory is that, instead of testing HTML responses on user actions, the tests will make requests and responses RESTfully.
To start writing API tests, create a suite for them using the command below.
This command creates a Codeception Helper and an Actor to help with testing the endpoints. The suite configuration is also created and saved in the tests directory. Testing a RESTful API with Codeception requires the codeception/module-rest package, install it using the following command.
Next, update the API suite configuration. Do that by opening tests/api.suite.yml and updating it to match the configuration below.
Next, build the test suite by running the following command.
With the test suite in place, let's create our test classes (Cests). Create three new Cests to test the endpoints for Members, Books, and Loans, using the following commands.
Testing the endpoints
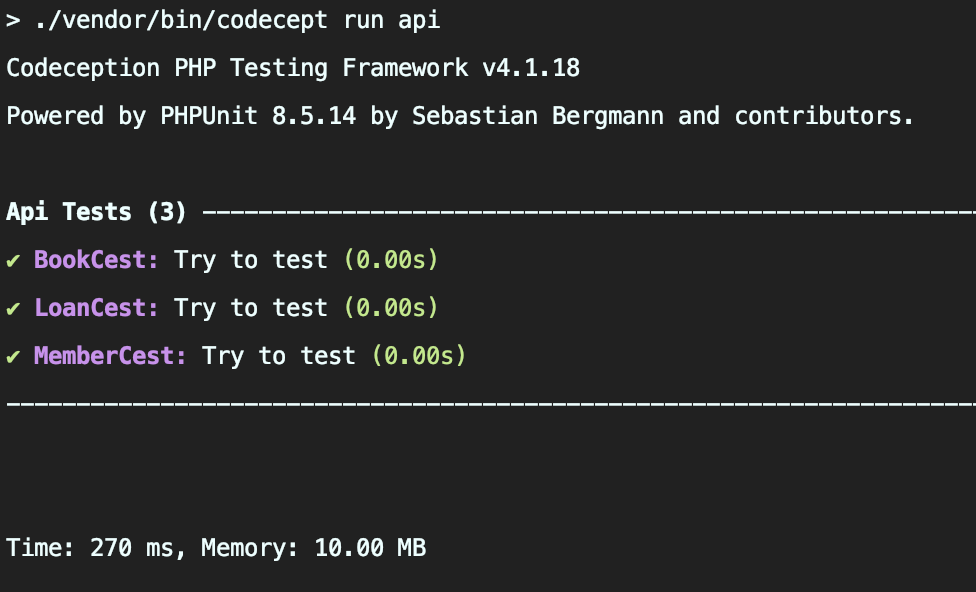
To run the tests in the API suite, run the following command.
The output should be similar to that in the screenshot below.
Because we're going to run the tests quite often, let's create an alias for the command which is easier to type. To do that, open composer.json and add the following to the scripts element.
Now, you can run your tests by typing the following command.
Writing test cases
A key selling point for Codeception is the fact that the tests are very descriptive. Functions that serve as actions (in this case, sending a request) are prefixed with a verb, such as send”. Assertions (functions that evaluate the outcome of the triggered action) are prefixed with “see” or “dontSee”. If some data from the response to the action is required for follow-up testing, Codeception provides 'grabber' functions which are prefixed with “grab”.
Each test case is a function which takes an ApiTester object (which is anActor) as a parameter. The ApiTester provides access to the functions described above.
Testing the members endpoints
The first test we will write is for the /members endpoint. When a request is sent to this endpoint, an HTTP OK (200) response is expected to be returned along with a JSON array of objects corresponding to the saved members. Each object should contain the following three things:
- The member's id, which is an integer
- The member's name, which is a string
- A string representation of the member's start date
Open tests/api/MemberCest.php and add the following code after the tryToTest method.
In the same vein, we can write a test to validate the response when we try to get the details of a single member. Because we have seeded the database with at least one user, we can run the following test. Add the following code to tests/api/MemberCest.php after the code that you just added.
Next, write a test to validate the response when a valid request is made to create a member. Add the following code to tests/api/MemberCest.php after the code that you just added.
Similar to the getMember test function, this test case evaluates the structure of the returned object, albeit with another function provided by Codeception (seeResponseMatchesJsonType) to do this.
To test the update endpoint, add the following code to tests/api/MemberCest.php after the code that you just added.
Finally, to test the endpoint responsible for deleting members, add the following code to tests/api/MemberCest.php after the code that you just added.
Note: Don't forget to add the following imports:
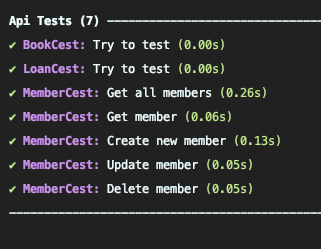
At this point, we can run our test suite using our composer test-api shortcut. Your response should be similar to the screenshot shown below.
Testing the oans endpoints
For the loan endpoints, we will add two tests. The first test will ensure that the system behaves appropriately when a book is borrowed. The second test will ensure that the system does not allow a book to be double-borrowed i.e., a book that has already been borrowed cannot be borrowed again.
Open tests/api/LoanCest.php and add the following code for the first test case after the tryToTest method.
To test that the system doesn't allow double borrowing, add the following test case to tests/api/LoanCest.php after the code that you just added.
NOTE: Don't forget to add this import:
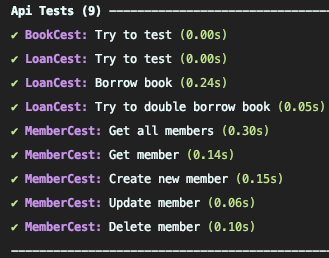
Run the tests using the composer test-api command and the results should match the screenshot below.
Conclusion
For such a critical aspect of software development, testing sometimes fails to receive the attention it deserves. Sometimes this may be due to the pressure placed on development by management.
A more common reason however is the difficulty encountered in trying to combine different tools in order to build a suite of unit, functional, and acceptance tests. This is where Codeception really shines!
By making it easy to write test cases in human-readable form, Codeception reduces the burden developers often encounter in trying to describe the expected behavior of the application without writing any code. This means that by taking advantage of Codeception, Test Driven Development becomes easier to understand and implement.
The entire codebase for this tutorial is available on GitHub. Feel free to explore further. Happy coding!
Oluyemi is a tech enthusiast with a background in Telecommunication Engineering. With a keen interest to solve day-to-day problems encountered by users, he ventured into programming and has since directed his problem-solving skills at building software for both web and mobile.
A full-stack software engineer with a passion for sharing knowledge, Oluyemi has published a good number of technical articles and content on several blogs on the internet. Being tech-savvy, his hobbies include trying out new programming languages and frameworks.
- Twitter: https://twitter.com/yemiwebby
- GitHub: https://github.com/yemiwebby
- Website: https://yemiwebby.com.ng/

Related Resources
Twilio Docs
From APIs to SDKs to sample apps
API reference documentation, SDKs, helper libraries, quickstarts, and tutorials for your language and platform.
Resource Center
The latest ebooks, industry reports, and webinars
Learn from customer engagement experts to improve your own communication.
Ahoy
Twilio's developer community hub
Best practices, code samples, and inspiration to build communications and digital engagement experiences.