Use Visual Studio dev tunnels to handle Twilio Webhooks
Time to read: 7 minutes
August 08, 2022
Written by
Reviewed by

Visual Studio recently introduced a new feature called dev tunnels. By using dev tunnels, Visual Studio will create a new public URL (tunnel URL) for you, and HTTP requests sent to the tunnel URL will be forwarded to your ASP.NET Core project running on localhost.
Dev tunnels has a lot of use cases. You could use this to easily test your web application on other devices like mobiles phone and tablets. You could also use this to make your application temporarily, publicly available for doing interactive demos and inviting your audience to participate.
How to use dev tunnels with Twilio
The most exciting use case for Twilio is that you can use dev tunnels to test webhooks. What are webhooks again?
"Webhooks are user-defined HTTP callbacks. They are triggered by some event in a web application and can facilitate integrating different applications or third-party APIs, like Twilio."
At Twilio, we heavily use webhooks throughout all of our products. You can use webhooks to respond to text messages or to manage voice calls. Here's a diagram of what it looks like when there's an incoming text message to your Twilio Phone Number and your application is handling the messaging webhook:
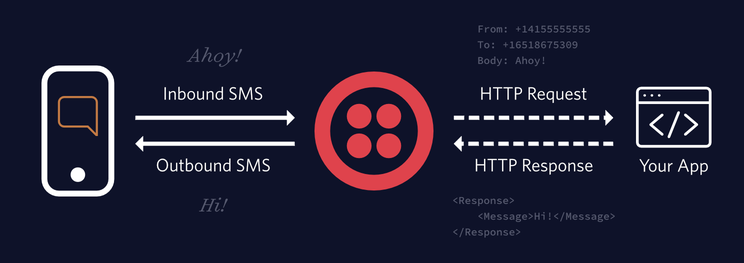
When your Twilio Phone Number receives a text message, Twilio will send an HTTP request with the message details to your application. Your application then has to respond with TwiML (Twilio Markup Language) to instruct Twilio how to respond. TwiML is XML with special tags defined by Twilio to provide instructions on how to respond to messages and voice calls. In the diagram depicted above, Twilio will respond with "Hi!" because the app responded with TwiML that looks like this:
You can learn more about TwiML for Programmable Messaging here.
Some other types of webhooks will inform you of an event and not expect instructions as a response. However, webhook requests can only be made to publicly available URLs, and when you're developing and testing applications, you are usually doing so locally. But with Visual Studio dev tunnels, you can quickly make your web application public, so you can develop your webhooks!
So when a text message comes in, instead of Twilio sending an HTTP request directly to your application, Twilio can send it to your Visual Studio tunnel which will forward it to your application running on localhost.
In this tutorial, you'll learn how to use Visual Studio to create an ASP.NET Core project that will handle the Twilio SMS webhook, use dev tunnels to make the locally running application public, and then configure a Twilio Phone Number to send webhook requests to the public tunnel URL whenever a text message comes in so you can respond to it.
Prerequisites
You'll need the following things in this tutorial:
- A Windows machine (there is no information about support for Visual Studio for Mac yet.)
- Visual Studio 2022 Preview, with the ASP.NET and web development workload installed
- In Visual Studio, you need to enable the dev tunnels preview feature
You can find details on how to do these steps in the dev tunnels announcement post by Microsoft.
Lastly, you'll also need a Twilio account (trial or upgraded). Try Twilio for free with promotional trial credit.
You can find the source code for this tutorial on GitHub. Use it as a reference if you run into any issues, or submit an issue if you need assistance
Create an empty ASP.NET Core web application with dev tunnels
Open Visual Studio 2022 preview and click "Create a new project", then search for the "ASP.NET Core Empty" project template and click Next.

On the next screen, give your project a meaningful name and click Next. Then on the last screen, leave everything as is and click Create.
Visual Studio will now generate an empty ASP.NET Core application that returns "Hello World!" using Minimal APIs. Go ahead and run your project to see it in action by pressing the green play arrow with your project name.

Visual Studio will run your application, open your browser, and then browse to the web application URL, which will look similar to https://localhost:5000. However, port number 5000 will be a random port number instead. The "Hello World!" application works as expected, but is only reachable on your machine. No other devices can reach it.
Back in Visual Studio, click on the debug dropdown menu, and then select the Dev Tunnels menu item. Now, the Dev Tunnels fly out menu shows you different options, to either select a dev tunnel (but there are none yet), to create a new tunnel, or to open the dev tunnels window.
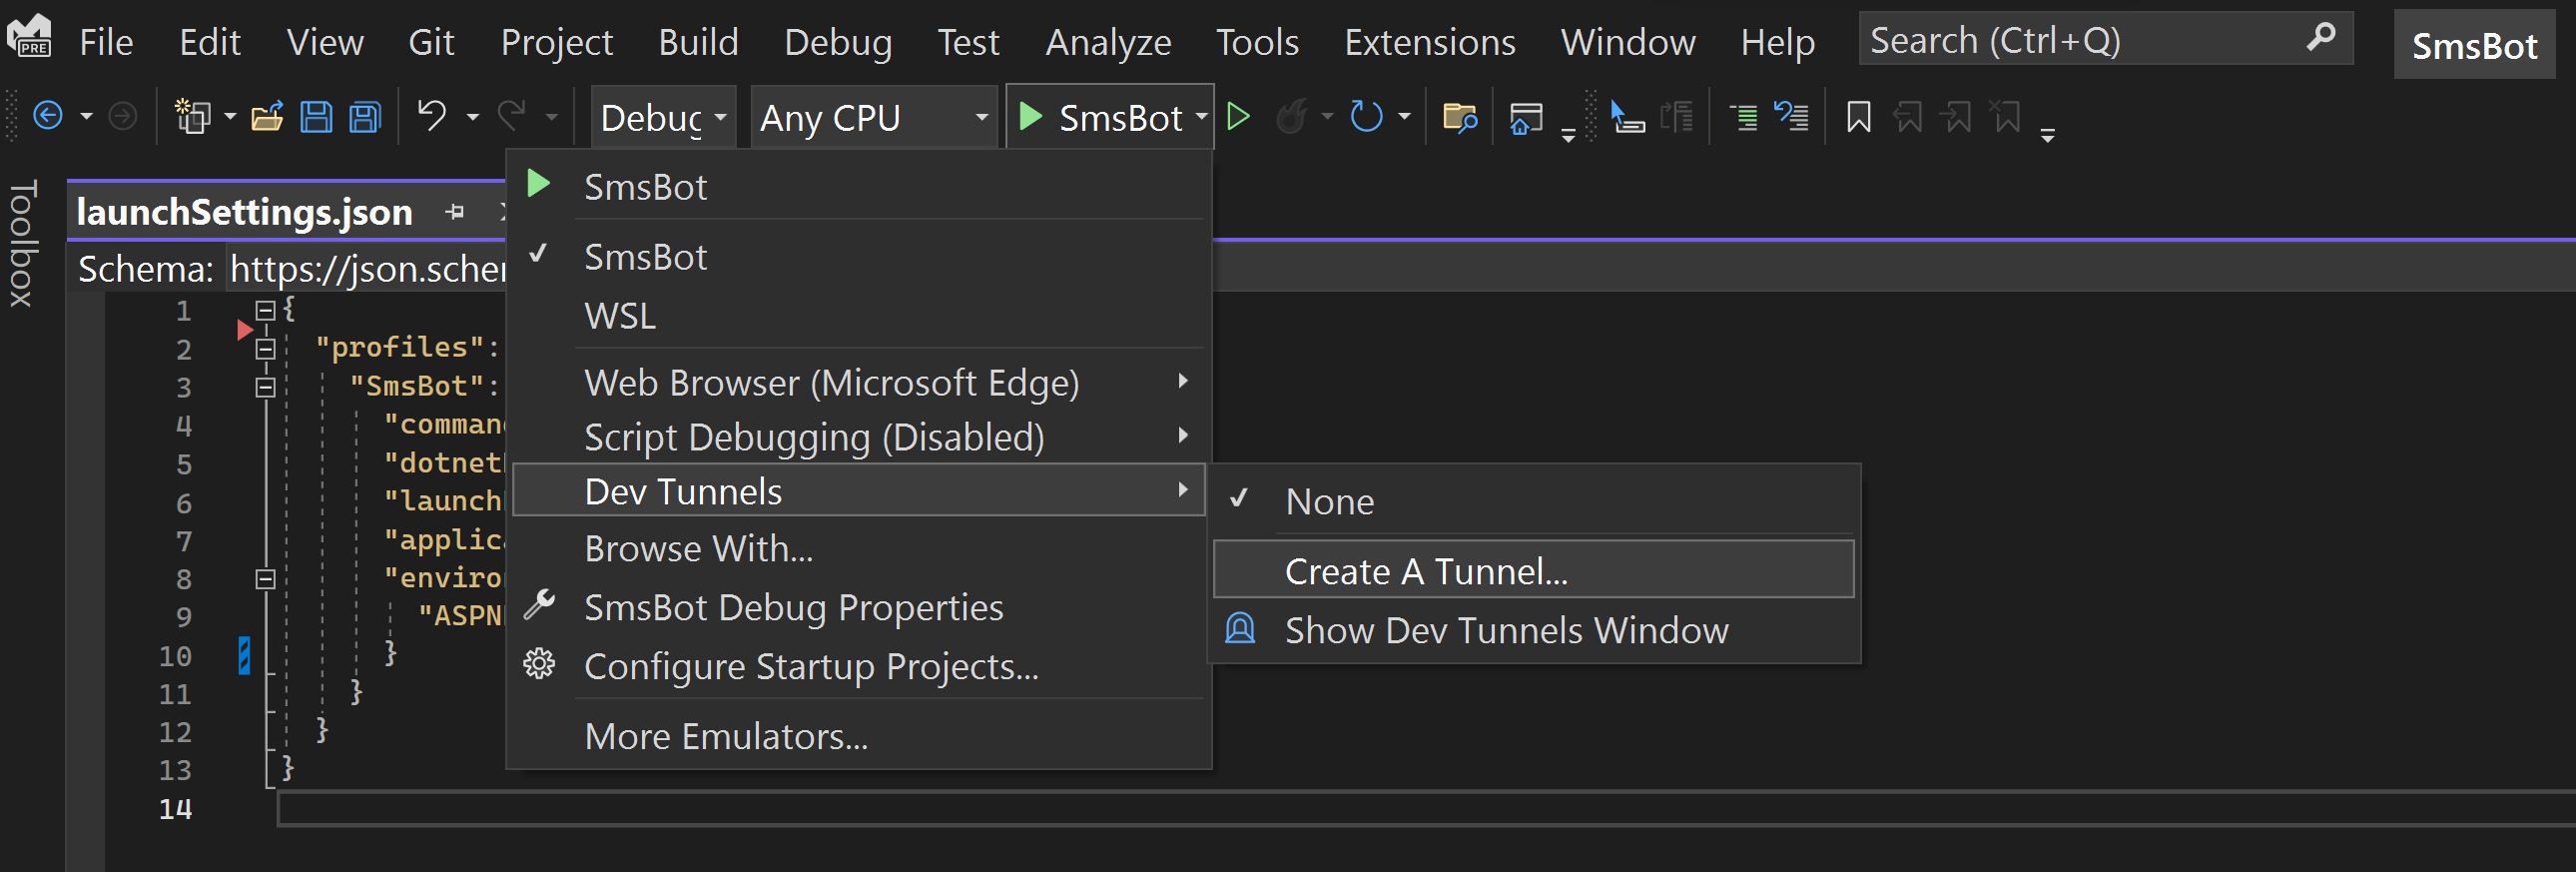
Click on Create A Tunnel... which opens a dialog to create your tunnel.
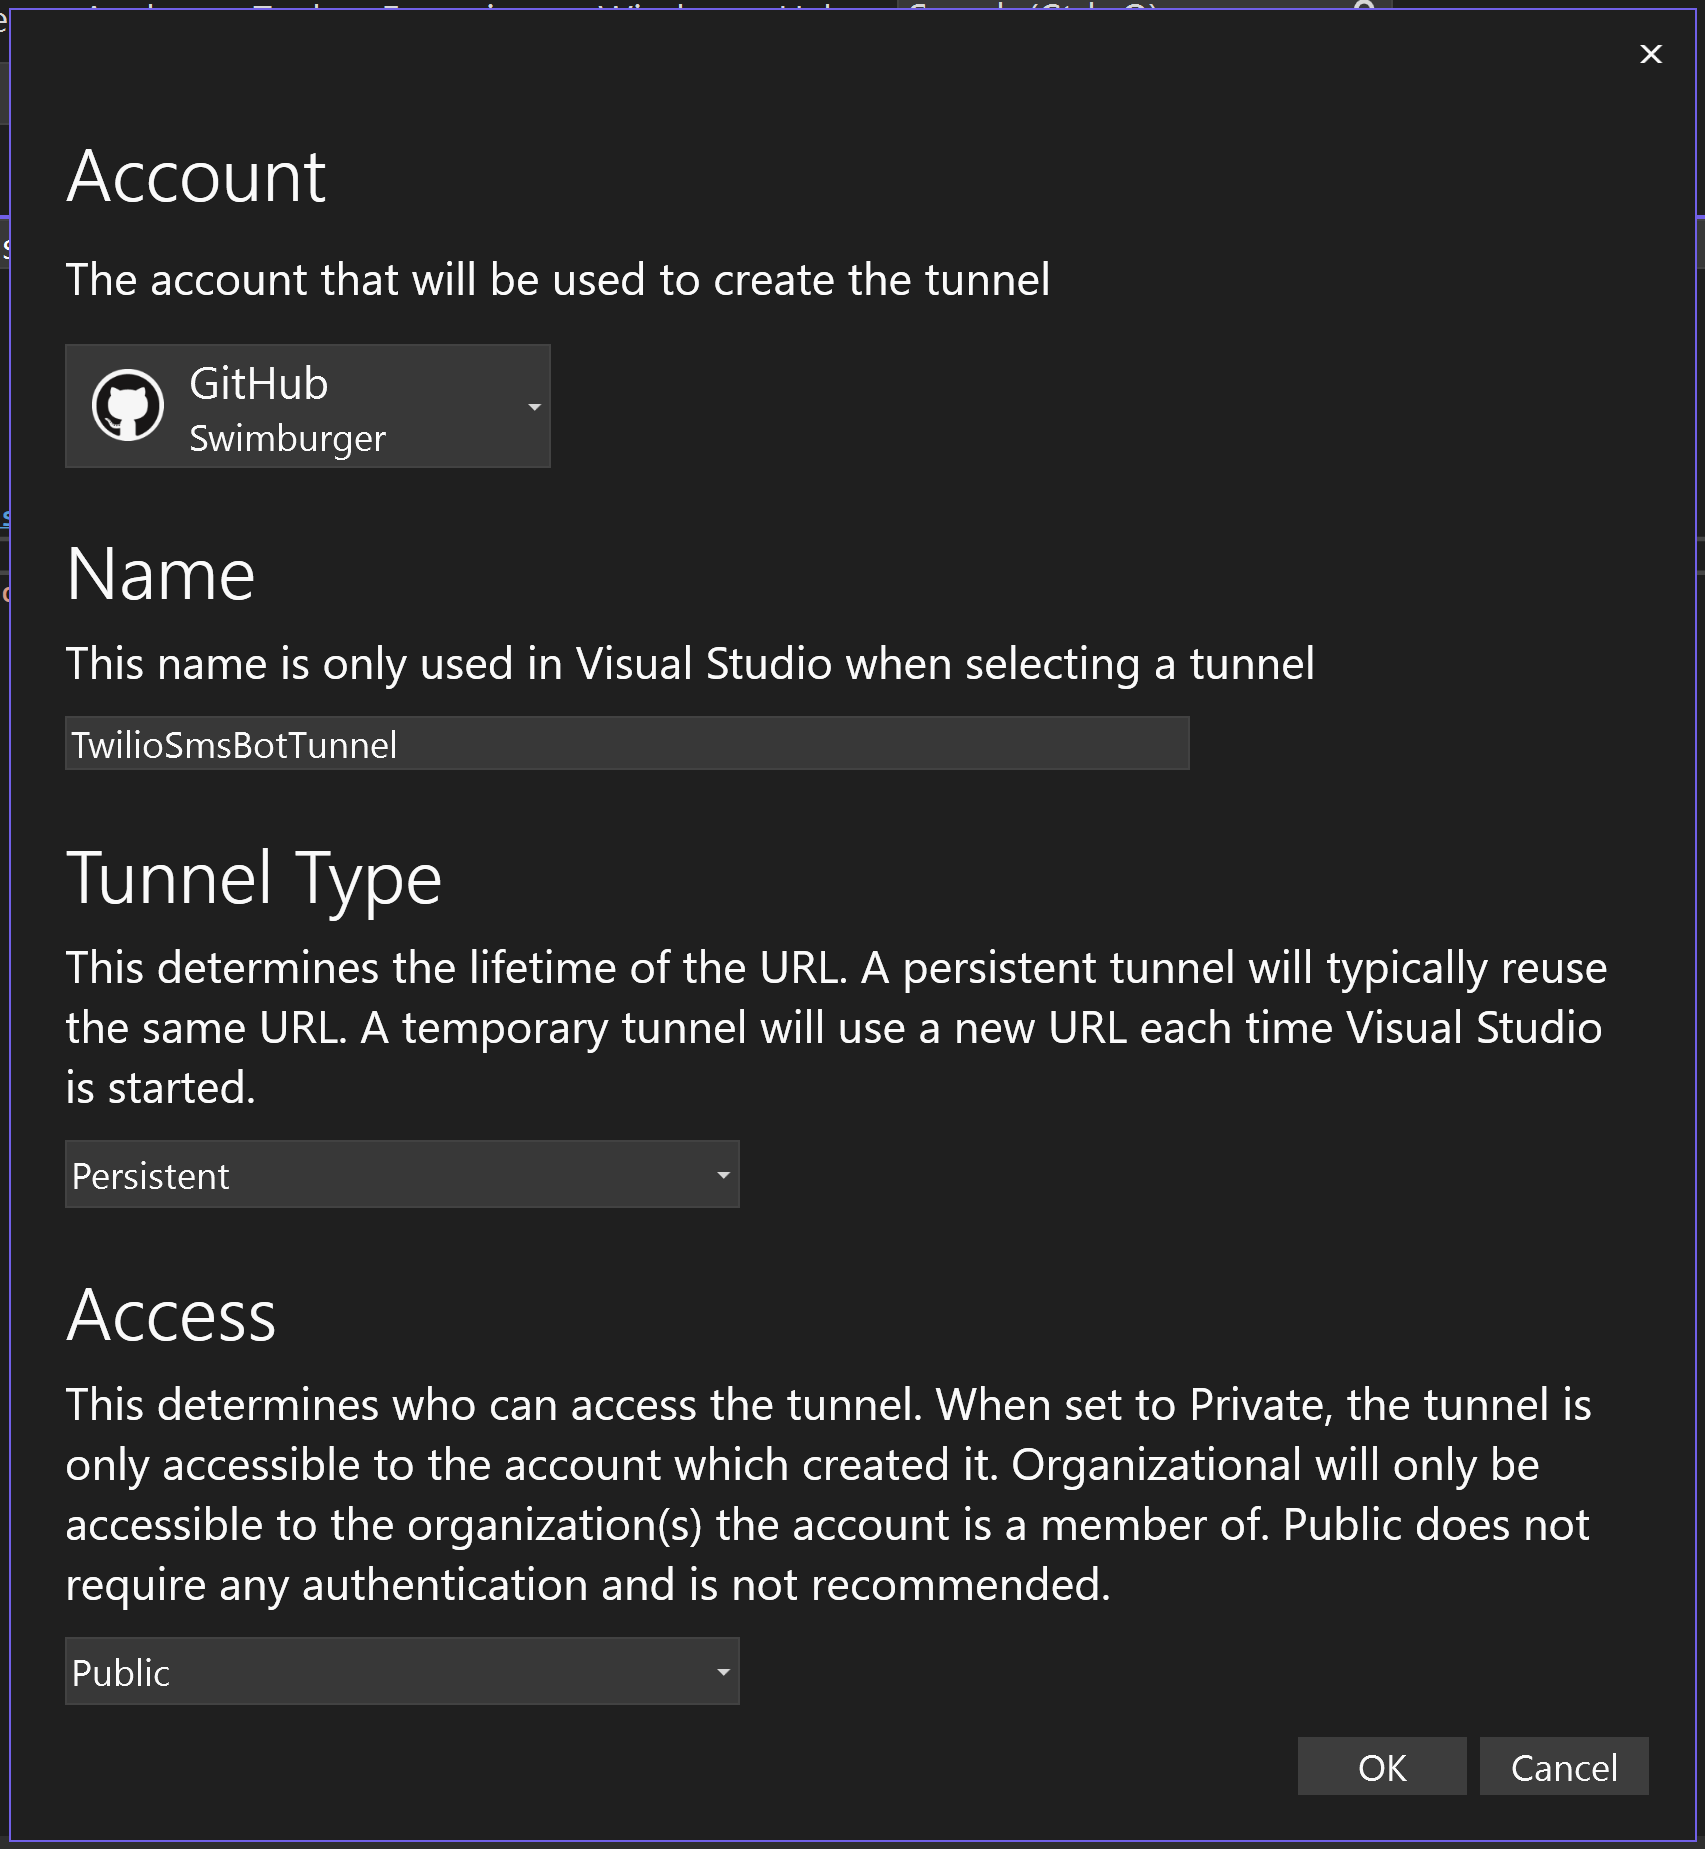
Just like the form above, select an Account, enter a Name for the tunnel, set the Tunnel Type to Persistent, and the Access to Public. Then click OK.
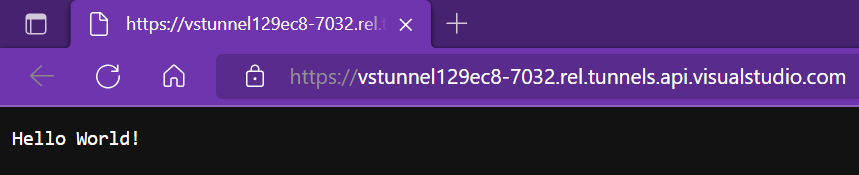
Just like before, Visual Studio will open your web browser and browse to your web application. However, this time it will browse to the public tunnel URL, which looks something like https://0pbvlk3m-7032.use.devtunnels.ms/.
Now you can open the same URL on any other device and send it to your friends and colleagues. As long as your project is running, they will be able to use the web application that is running locally on your machine.
Now that your application is publicly available, let's add some Twilio magic to it ☎️
Respond to SMS with ASP.NET Core
Buy a Twilio Phone Number
If you haven't done so already, you'll need to buy a Twilio phone number. To do that, log in to the Twilio Console, select Phone Numbers, and then click on the “Buy a number” button. Note that if you have a free account, you will be using your trial credit for this purchase.
On the “Buy a Number” page, select your country and check SMS in the “Capabilities” field. If you’d like to request a number that is local to your region, you can enter your area code in the “Number” field.
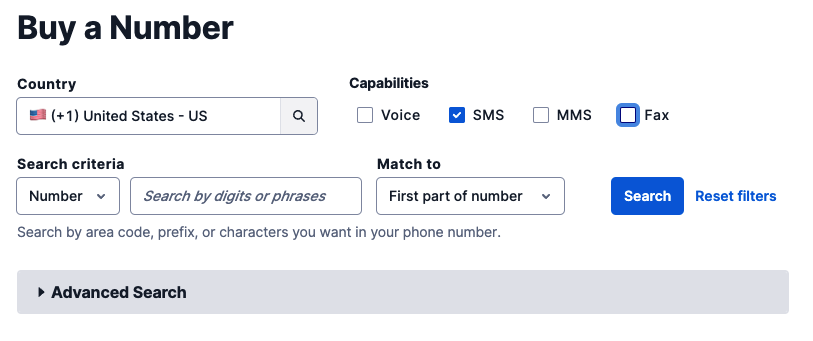
Click the “Search” button to see what numbers are available, and then click “Buy” for the number you like from the results. After you confirm your purchase, click the “Close” button.
Handle Twilio SMS webhook in ASP.NET Core
Since TwiML is XML, you can use any technique to produce the XML as a response to the Twilio webhook request. However, you can use the Twilio .NET SDK and the Twilio helper library for ASP.NET Core to make it easier.
First, make sure your application isn't running anymore. You can stop your app by pressing the red square icon in the Visual Studio top toolbar, or close the browser window.

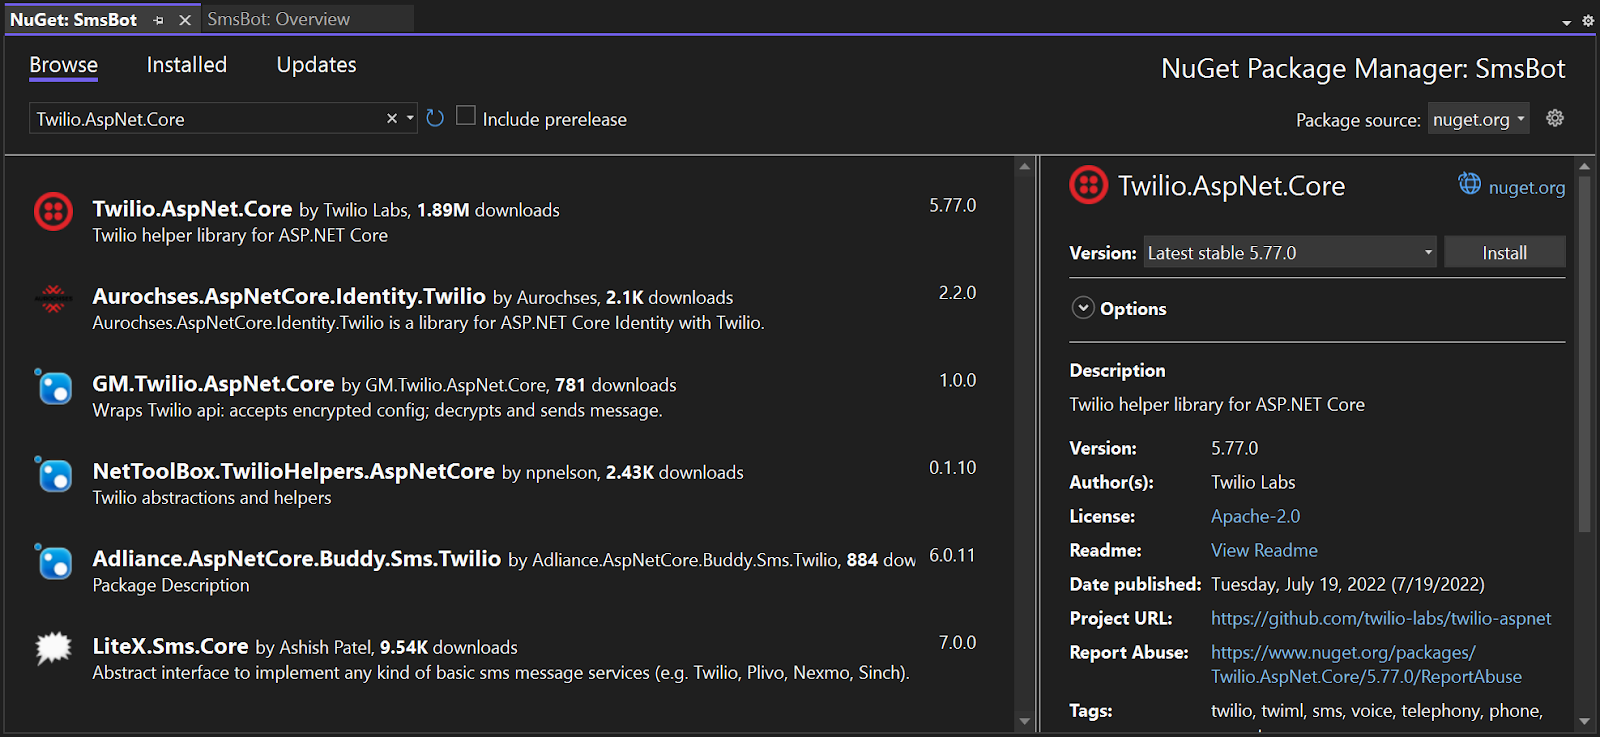
In Visual Studio, right-click on the Dependencies node of your project, and click "Manage NuGet Packages". This will open the NuGet Package Manager window in Visual Studio. Click on the Browse tab and search for "Twilio.AspNet.Core". Click on the Twilio.AspNet.Core package by Twilio Labs, and click the Install button to install the latest version.
Now, replace the code from Program.cs with the following code:
The "Hello World!" GET / endpoint has been replaced with the /message endpoint. The /message endpoint creates a MessagingResponse. messagingResponse.Message("Ahoy!") will create a Message TwiML verb to respond with "Ahoy!".
Lastly, the Results.Extensions.TwiML method will create a TwiMLResult object which takes care of serializing the object to XML and setting the correct content-type headers.
Start your project again. Visual Studio will open the browser again, but you'll see a HTTP 404 error which is fine, this is expected. Copy the URL somewhere as you'll need it in the next section.
Configure your SMS webhook
Now that your web application is running and publicly available through the tunnel, you can now configure the messaging webhook on your Twilio Phone Number.
Back in the Twilio Console, navigate to Phone Numbers > Manage > Active Numbers, or click this link to the Active Numbers page, then click on your Twilio Phone Number to navigate to the configuration page. Scroll down to the Messaging section and where it says "A MESSAGE COMES IN", pick the "Webhook" option in the first dropdown, paste your Visual Studio tunnel URL and add the /message path, and then pick the "HTTP POST" option from the next dropdown.
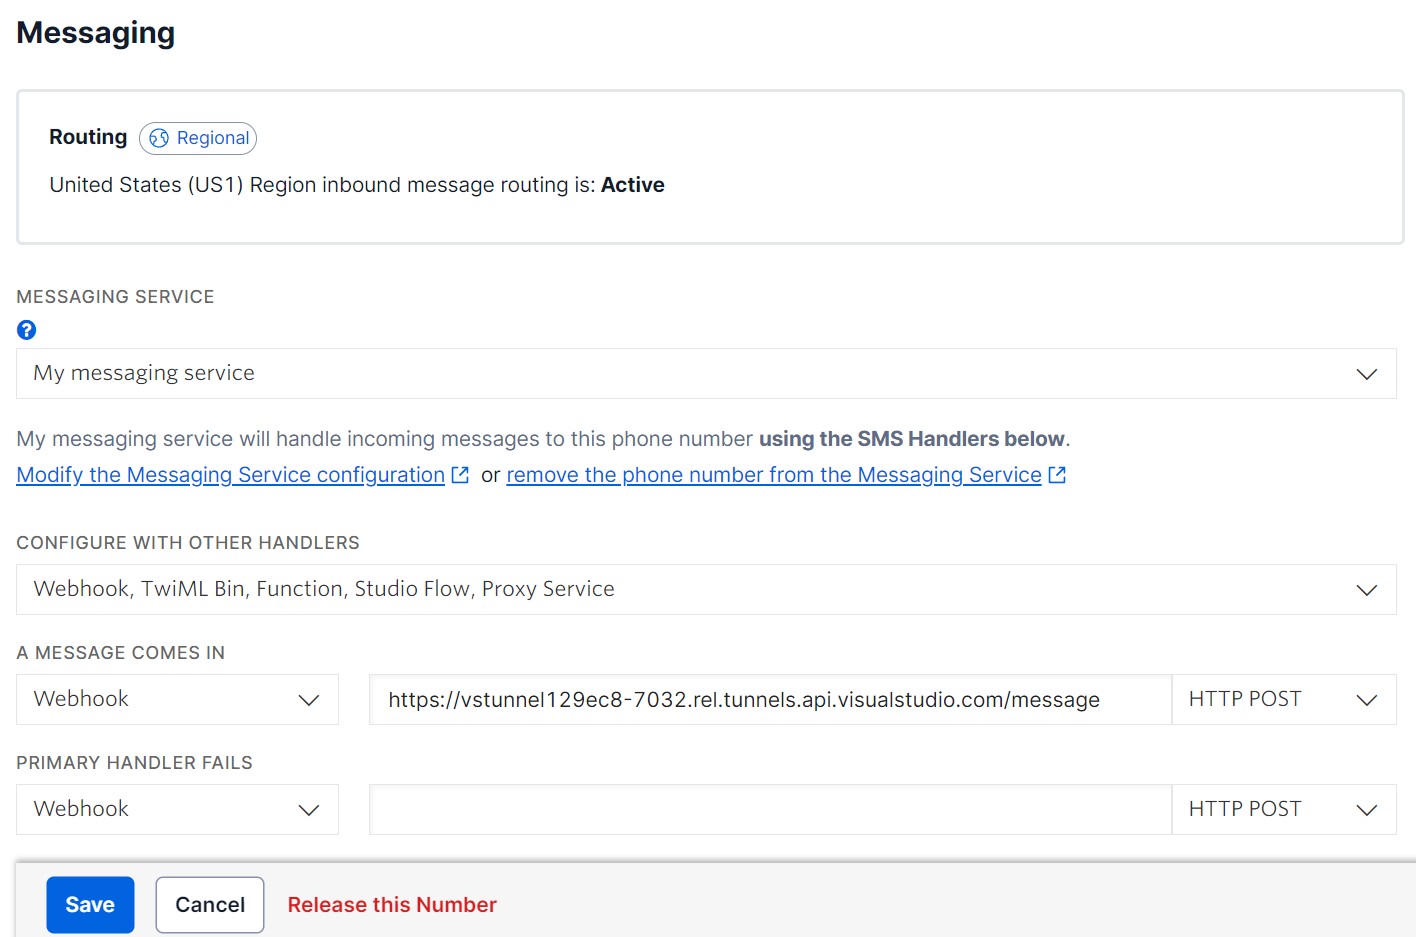
Click the Save button.
Test your SMS application
Now that everything has been set up, it's time to test out your SMS application. Pull out your personal phone, and send an SMS to your Twilio Phone Number. You should receive a response saying "Ahoy!".
One thing I always do to gain a better understanding is to put a breakpoint in the application and see when the breakpoint is hit. Feel free to put a breakpoint inside the /message endpoint, and play around with the application to see what you can do with Twilio Messaging.
Alternatively, you can test your messaging and voice applications using the Twilio Dev Phone.
Next steps
Congratulations on building this SMS application! Since your application is now public, that also means anyone on the internet can reach it which comes with its own risks. To mitigate these risks, you can validate that the incoming requests originated from Twilio and not some bad actor. In this tutorial, you manually updated the webhook URL in the Twilio console, but you can also do this programmatically. Check out this follow-up tutorial on how to automatically configure your Twilio webhooks using Visual Studio dev tunnels.
Want to learn what else you can do with Twilio? Here are some more tutorials for inspiration:
- How to send a vCard with MMS using C# and .NET
- How to build an Email Newsletter application using ASP.NET Core and SendGrid
- Find your U.S. Representatives and Congressional Districts with SMS and ASP.NET Core
- Send Emails with C#, Handlebars templating, and Dynamic Email Templates
- How to send SMS with C# .NET and Azure Functions using the Twilio Output Binding
Shout-out to Sayed I. Hashimi for answering my questions and taking my feedback.
Niels Swimberghe is a Belgian American software engineer and technical content creator at Twilio. Get in touch with Niels on Twitter @RealSwimburger and follow Niels’ personal blog on .NET, Azure, and web development at swimburger.net.
Related Resources
Twilio Docs
From APIs to SDKs to sample apps
API reference documentation, SDKs, helper libraries, quickstarts, and tutorials for your language and platform.
Resource Center
The latest ebooks, industry reports, and webinars
Learn from customer engagement experts to improve your own communication.
Ahoy
Twilio's developer community hub
Best practices, code samples, and inspiration to build communications and digital engagement experiences.