How to View Your Twilio Account Usage Using Laravel
Time to read: 7 minutes
March 02, 2023
Written by
Reviewed by
Twilio provides an API to retrieve actions made by your Twilio account and to filter them by both time and category. Using that API, in this tutorial, you’re going to learn how to build a small analytics dashboard for your Laravel application.
Let's begin!
Prerequisites
To get the most out of this tutorial, you're going to need the following things:
- PHP 8.1 or above, which meets Laravel's server requirements
- NPM (I’m using 8.19.3 at the moment)
- Composer installed globally
- A Twilio account (free or paid). If you are new to Twilio, click here to create a free account
- A SendGrid account (free or paid). If you are new to SendGrid, click here to create a free account
- A mobile phone number that can receive and send SMS
- An active email address
- Your favourite text editor or IDE. I recommend using PhpStorm; Visual Studio Code and SublimeText 3 are also excellent options
In addition, it'd be ideal if you have prior experience working with Laravel, Vue.js, and the command line.
Application overview
So how will the application work? There’s not much to it, actually. It will have one route that will follow the pattern below:
It will start off with /twilio/usage/, so that it's clear what information the route provides. It will also use two route parameters to help filter the information returned:
recordLimit: This limits the total number of usage records to be retrievedtimePeriod: This determines the time range to filter by
When requested, the route's handler will make a request for your Twilio usage records, filter them based on the value of the two route parameters, and render them in the dashboard.
The end result is a response that should look similar to the screenshot below.

Scaffold a new Laravel project
The first thing that you need to do is to scaffold a new Laravel application. Do that and change into the generated application directory by running the following commands.
Check that the application works
Now, start the application by running the following command.
Then, open it in your browser of choice where it should look similar to the screenshot below.
As the application’s working, press Ctrl + C to stop it.
Add the required environment variables
The next thing to do is to set two environment variables: Twilio Account SID and Auth Token. These are required for the application can make authenticated requests to Twilio’s Usage Record API.
To do that, at the bottom of .env, in the application’s top-level directory, paste the following configuration.
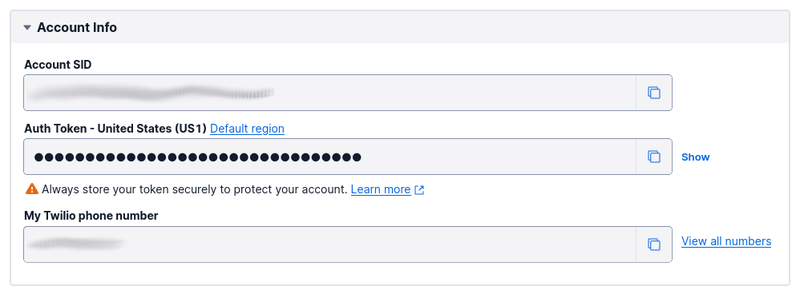
Then, from the Account Info section of Twilio Console's Dashboard, copy your Account SID and Auth Token. Paste the values into .env, in place of the placeholders for TWILIO_ACCOUNT_SID, and TWILIO_AUTH_TOKEN respectively.
Install the required dependencies
There are only two required PHP dependencies:
- Laravel-money: This package is an abstraction on MoneyPHP which simplifies formatting values in localised currency formats, e.g., R$10,00 and €10,00;
- Twilio's PHP Helper Library: This package simplifies interacting with Twilio's APIs in PHP
Everything else which the application needs comes standard in Laravel.
To install them, run the following command.
There are a few frontend dependencies, though. The key ones are Tailwind CSS, Vue.js, and Vite's Vue plugin. These will simplify the development of the application's frontend.
To install them, run the following commands.
Update Vite's configuration
The next thing to do is to update Vite's configuration to use the Vue.js plugin to build the Vue component into the application's app.js file.
To do that, update vite.config.js, located in the top-level directory of the project, to match the code below.
Create Tailwind's configuration file
Then, create a Tailwind CSS configuration file, by running the following command.
The file will be located in the root directory of the project and named tailwind.config.css. Update it to match the following configuration.
Update Laravel’s Service Container
The next thing to do is to register a Twilio Client object with Laravel’s Service Container; one initialised with your Twilio Account SID and Auth Token. The simplest way to do this is to create a custom ServiceProvider class, by running the following command.
A new file, named TwilioServiceProvider.php, is now available in app/Providers/. Update the body of the file's register() method and add the required use statements, to match the code below.
The register() method initialises a new Twilio Client object, using the values of twilio.auth_token and twilio.account_sid from Laravel’s global configuration and registers the Client object as a new service in Laravel’s Service Container.
To add twilio.auth_token and twilio.account_sid to Laravel’s global configuration, create a new file in the config directory named twilio.php. Then, paste the code below into the file.
The two variables will contain the values of the TWILIO_AUTH_TOKEN and TWILIO_ACCOUNT_SID environment variables, respectively.
And finally, you need to enable the new TwilioServiceProvider class. To do that, in config/app.php, add the following code to the end of the "Application Service Providers…" section of the providers element, which the file returns.
Create a custom controller
The next thing to do is to create a single action controller to handle requests to render the Twilio usage dashboard. Create the controller by running the following Artisan command.
The new controller will be created in app/Http/Controllers and named TwilioUsageController.php. Update it to match the code below.
The controller is initialised with a Twilio Client object. It uses that object in the __invoke() method to:
- Retrieve usage records for a given time period;
- Sort the retrieved records in ascending order of category;
- Filter out inactive categories using a custom FilterIterator named
UsageWithCountFilter; - Render a table with the filtered and sorted records
Twilio supports filtering records in several ways. For the purposes of a concise example, however, the code will only filter in three ways:
- last month: returns usage records for the prior month. This is implemented in
getLastMonthUsageRecords(); - all time: returns all usage records. This is implemented in
getAllUsageRecords(); - today: returns usage records for the current day. This is implemented in
getTodaysUsageRecords()
Create the usage record filter
The next thing to do is to create a class which extends FilterIterator. It's part of the SPL (Standard PHP Library) and filters out unwanted values from a traversable object, such as an array.
To build it, first, in the app directory, create a new directory named Iterators. Then, inside the Iterators directory, create a directory named Filters. Inside the Filters directory, create a file named UsageWithCountFilter.php. Finally, paste the code below into the new PHP file.
The accept() method returns true if the current record’s count property is not empty.
Create the controller's template file
The next thing to do is to create the controller’s Blade template. To do that, in the resources/views directory, create the following directory structure: twilio/account. Then, in views/twilio/account create a new file named usage.blade.php, and add the following code to the file.
The template has four sections:
- A header which provides the dashboard overview;
- A form (
timePeriodForm), rendered by a Vue.js Component, where the user can set the date range; - A table where the usage records are rendered, if available.
Usage records have a number of properties, but the table renders just three; these are:category: the usage categorycount: the number of usage events, such as the number of callsprice: the total price of the usage in the currency specified in theprice_unitproperty
- A small footer
Update the application's stylesheet
The next thing to do is to update the application's stylesheet to include most of the dashboard's required styles, by updating resources/css/app.css to match the following code.
While it's not initially recommended to do this, I prefer to reuse styles in this way, rather than replicating them throughout one or more templates.
Download the Twilio logo
Lastly, create a new directory in public, named images. Then, download the Twilio logo to public/images and name it twilio-logo.svg.
Create a custom Vue Component
In the resources directory, create a new directory named components. Then, in that new directory create a new file named TimePeriodForm.vue; create a Vue Component stub, if your editor or IDE supports it.
Then, update the file to match the following code.
In the template section, you can see that it renders a form with a select box. That select box:
- Contains an option element for each element of the
timePeriodsproperty; - Is bound to the
timePeriodproperty
When the component is initialised the initTimePeriod() function is called. This method retrieves the current URL and parses it to retrieve the record limit and usage type parameters. With these values, it sets the recordLimit and timePeriod properties respectively.
When the value of the select box changes the changeTimePeriod() function is called. This function redirects the user to the current URL but updates it for the specified usage type.
Enable the Vue Component
With the component created, you now need to enable it. To do that, update resources/js/app.js to match the following code.
Update the routing table
Now, there’s one final thing to do, which is adding a route to the application’s routing table for the dashboard endpoint. To do that, add the following to the end of routes/web.php.
It adds a GET-accessible route named usage to the routing table, which is handled by TwilioUsageController’s __invoke() method. The route’s path starts with /twilio/usage/ and has two route parameters:
recordLimit: This value limits the total number of records to be retrieved. Thanks to the regular expression ('[0-9]+') in the call towhere()it can only accept a numerical valuetimePeriod: This determines the time range to filter by. Thanks to the second parameter to the whereIn function, it only accepts three values:last_month,today, andall_time.
Test the application
With all of the code written, it’s time to test that it works. To do that, start it with the following command.
Then, in a separate terminal window or tab, run the following command.
Then, open https://localhost:8000/twilio/usage/20/last_month in your browser of choice; change the port if Laravel didn’t bind to port 8000. There, you should see that it renders similarly to the example below.
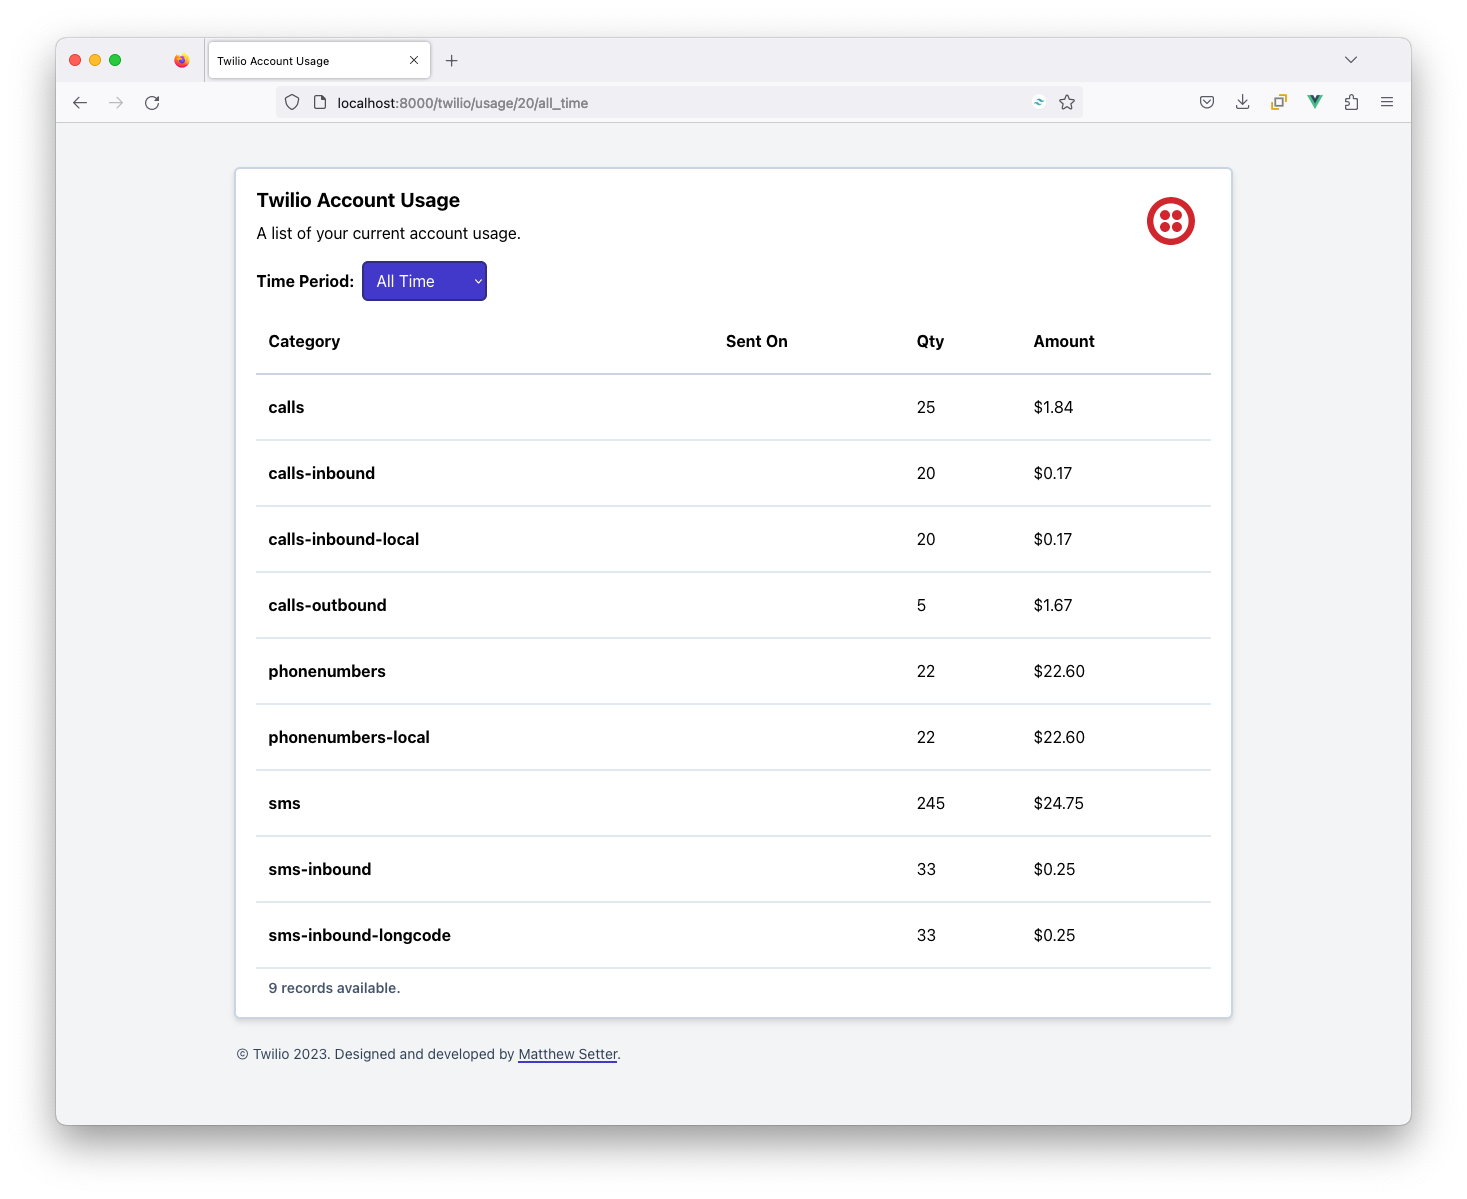
Now, click any of the options in the “Usage Type” select dropdown and see how the usage records change. Depending on your account usage, you may have a number of records appear for each usage type or very few to none.
That's how to view your Twilio account usage in Laravel apps
While there were a number of parts that had to be brought together for this application to work, Laravel and Twilio’s PHP Helper Library, more or less, make it trivial to retrieve your Twilio usage information and render it professionally, as this app does.
How would you improve the app? Share your thoughts by creating an issue in the GitHub repository.
Matthew Setter is a PHP and Go editor in the Twilio Voices team, and a PHP and Go developer. He’s also the author of Mezzio Essentials and Deploy With Docker Compose. You can find him at msetter@twilio.com. He's also on LinkedIn and GitHub.
Related Resources
Twilio Docs
From APIs to SDKs to sample apps
API reference documentation, SDKs, helper libraries, quickstarts, and tutorials for your language and platform.
Resource Center
The latest ebooks, industry reports, and webinars
Learn from customer engagement experts to improve your own communication.
Ahoy
Twilio's developer community hub
Best practices, code samples, and inspiration to build communications and digital engagement experiences.