How to Build an Amazon Price Tracking Chatbot with WhatsApp and Java Spring Boot
Time to read: 9 minutes
December 08, 2022
Written by
Reviewed by

With Christmas and Hanukkah around the corner comes the hassle of gift-giving. Raise your hand if you’re a last-minute shopper like me. Thanks to the e-commerce boom, I’m able to do my last-minute shopping all from the comfort of my own home.
However, with the prices fluctuating arbitrarily everyday, the priority becomes getting the best deal and saving money. If the hassle of visiting the same item day after day to get the best price is something you want to avoid… Don’t worry, I’ve got a GIFT OF CODE for you.
In this article, we will learn how to create a WhatsApp chatbot to track the prices of products throughout the festive month using Java Spring Boot and JSOUP.
Prerequisites
- Windows or Linux PC.
- Java 8.
- Maven.
- Basic knowledge about Spring Boot.
- Active Twilio account, if you don’t have one you can create one here.
- Ngrok, a useful tool that will be used to link the Spring Boot application that is currently running on your computer to a public URL that Twilio can connect to. Your machine is most likely hidden behind a network or firewall, making it inaccessible from the Internet directly, so this is essential for the chatbot's development version. You can download a version of ngrok for Windows, macOS, or Linux if you don't already have it installed.
- MongoDB Atlas account.
- A smartphone with WhatsApp enabled.
Understanding the workflows and basic components
The goal of this application is presented in these two diagram workflows:
Workflow 1 - Tracking the product
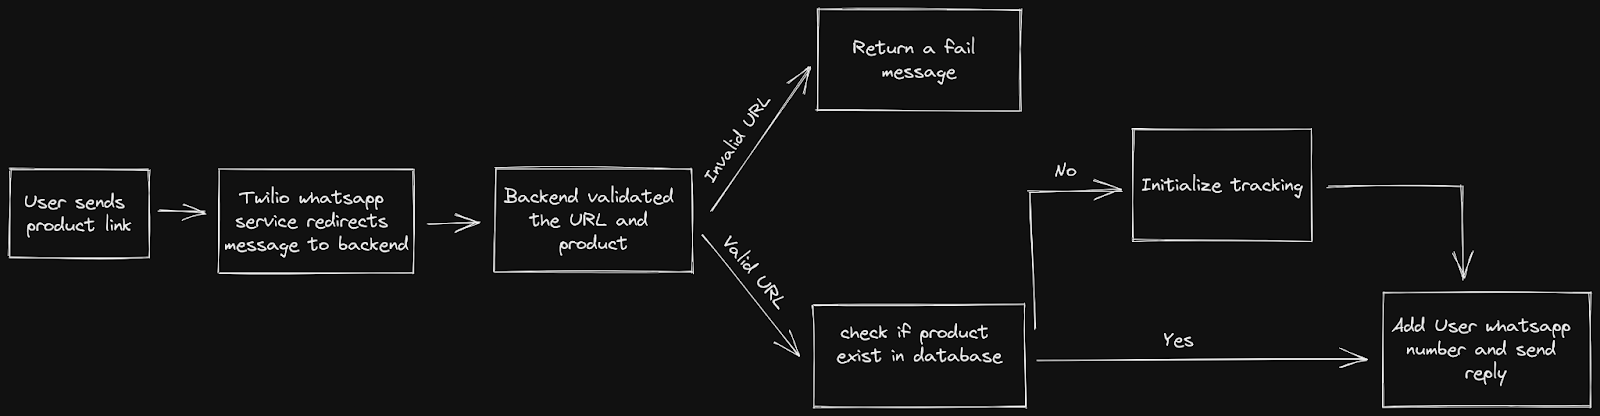
When the user sends an Amazon product link to the chatbot, the Twilio WhatsApp API handles the request.
The application first checks if the URL mentioned is already being tracked or not using MongoDB to store the products data. MongoDB will also store the mobile phone numbers of the user tracking the product in the form of an array. If the product doesn't exist within the database, we will scrape the appropriate data such as name and initial price.
For sending the message to our backend server we will utilize the Twilio WhatsApp Messaging Service which will send the user_from and message among other data.
Workflow 2 - Daily Scraping and user notifications

To scrape the data daily, we will use Spring Boot's scheduling annotations to fetch each product URL in individual threads.
Why MongoDB?
MongoDB is a NoSQL database that provides dynamic schema and is suitable for horizontal scaling. In our case, we don't have any JOIN queries to execute on the database. There is no strict need for ACID properties as well because we just have 1 table. In turn, this reduces the need for SQL DBMS.
We need to store a lot of products and phone numbers, so the need for scalable DBMS is high and NoSQL databases such as MongoDB will have horizontal scaling and will serve our needs.
Building the chatbot
This section would cover setting up the Twilio WhatsApp Sandbox and developing the chatbot service to handle all incoming messages.
Setting up the Twilio WhatsApp Sandbox
The WhatsApp Sandbox offered by Twilio makes it convenient to create and test your application. Once your application has been approved by WhatsApp, you can ask for production access for your Twilio phone number.
Connecting your phone to the sandbox is the next step. Choose Programmable Messaging from the Twilio Console. Click "Try it Out" and then "Try WhatsApp" You will see the unique join code along with the sandbox number associated with your account on the Twilio WhatsApp Sandbox dashboard.
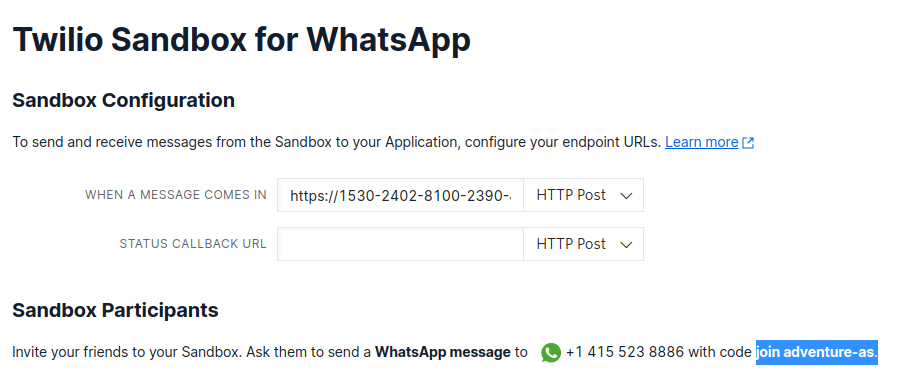
Send a WhatsApp message with the unique code provided to the number associated with your account to enable the WhatsApp Sandbox on your smartphone. After you send the message, you will receive a response letting you know that your cell number has been added to the sandbox and is now able to send and receive messages.
Spinning up the Spring Boot app
Spring Boot and Java provide fast runtime execution and multi-threading support for scraping, parsing, and notifying each product in individual threads.
Visit the Spring Boot initializer site. Change the artifact name to "restservice". Add "Spring Web", "Spring Data JPA”, and "Lombok" as the dependencies.
Select Maven as the build system, JAR for packaging and version 8 for JAVA.
Click on the Generate button at the bottom of the page to download the boilerplate project code as a compressed file.
Extract the compressed file downloaded in the previous step.
Open the project in your favorite IDE and wait a few minutes for the project files to be generated.
Locate the pom.xml file and add the following dependencies:
Save the file.
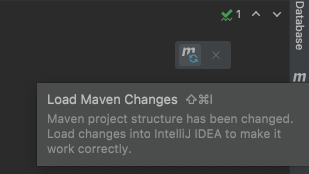
Look at the top-right corner of the IntelliJ IDEA and find the little icon with an "M" shape. Click it to load Maven changes.
As we encounter each dependent in the core logic, I will further explain how it is used.
Developing the core logic for the chatbot service
The chatbot service includes five main packages namely Models, Repository, Service, Controller and Scheduler. Each package or layer has its own functionality, let's explore each component separately.
Model Layer
Inside the src/main/java/com/example/restservice/ subfolder, create a package named "model" and a file named Product.java inside.
Write the following logic into the newly created Java file:
We used the mongo-Data dependency here to provide the @Document and @Id annotations. The @Document annotation helps set the collection name that will be used by the model. If the collection doesn’t exist, MongoDB will create it. The @Id annotation will specify the MongoDB document’s primary key _id.
Let's have a look at each property one by one now:
name- This property stores the product name as listed on the Amazon site.url- This property acts as a unique identifier for each product and is used to scrape data.prices- This property stores an array of prices for the last 365 days in order to compare with today's price.usersTracking- This property stores the phone numbers of users tracking the product.
Repository layer
All the operations on the database happen through the API implementations written in the repository package. It acts as a link between the model and the database and has all the methods for CRUD operations.
In the root application package src/main/java/com/example/restservice/, create a package named “repository” and a file named ProductRepository.java.
Write the following logic into the newly created Java file:
The ProductRepository extends the MongoRepository interface and has a method to find the item by URL. This method requires a parameter for the query to filter results. We specify this with the annotation @Query.
@Repository annotation is used to indicate that this interface is a repository.
Service Layer
The service layer handles the validation of the product URL sent by the user. This layer will also add the user’s WhatsApp number to the database for further tracking.
In the root application package src/main/java/com/example/restservice/, create a package named “service” and a file named ProductService.java.
Write the following logic into the newly created Java file:
The @Service annotation is used to indicate that this class is a service.
The TrackProduct method validates the URL and checks if it already exists in our database. The user phone number is directly added to the usersTracking array if the product exists. Otherwise, the product info is scraped, processed, and creates a new document.
For scraping, we will be using a library called JSOUP which will fetch the HTML content and create a DOM object for us to parse and retrieve the required information.
The trackAndSendReply method will call the trackProduct method and send a response to the user if the product is valid and tracked, otherwise it will send back an error if the product link is invalid.
Controller layer
In the root application package, create a package named “controller” and a file named ProductController.java.
Write the following logic into the newly created Java file:
The @RestController annotation marks this class as a Spring Boot Controller class that will handle REST HTTP requests.
The @RequestMapping("/track") annotation sets the base path to our API to /track.
The @PostMapping(consumes = {MediaType.APPLICATION_FORM_URLENCODED_VALUE}) annotation indicates that the annotated method will handle POST requests.
MediaType.APPLICATION_FORM_URLENCODED_VALUE indicates that the data expected in the POST request is form data. Twillio sends the form data to our application with the message body and sender details whenever a message is sent to our WhatsApp API.
Lombok @AllArgsConstructor generates a constructor with one parameter for each field in your class.
Scheduling Layer
This layer handles the daily tracking of products present in the database and if there is a price drop it notifies the users who are tracking that particular product.
In the root application package, create a package named “schedulingTasks” and a file named ProductScraperJob.java.
Write the following logic into the newly created Java file:
The @Component annotation denotes that the class acts as a scheduling component.
@Scheduled and CRON help us schedule the price update action at 12 A.M. everyday since Amazon usually updates the price at that time.
The scrapeProducts method fetches all products from the database and appoints its scraping and notification job to individual threads.
The ScraperThread first checks if the product price has dropped or not and notifies users of the price drop.
Application Layer
Finally, let’s modify the RestServiceApplication.java class under the src/main/java/com/example/restservice/ subfolder. Add annotations to enable MongoDB repositories and scheduling.
The logic for the file is as follows:
Configuration layer
Let’s configure our application to connect to MongoDB.
Create a MongoDB cluster using MongoDB Atlas, a cloud database service, which provides convenience in scalability and infrastructure management.
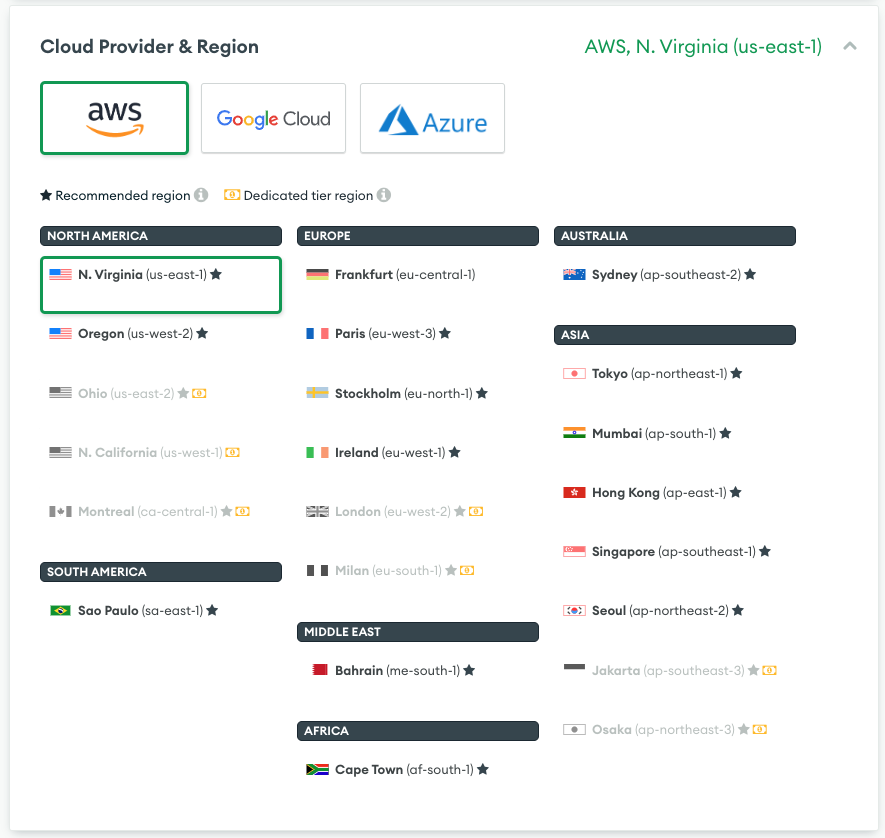
To create a cluster, log in to the MongoDB atlas account. If you do not already have an account, create one with a cluster at Free Shared level as shown below.
Use the automatically selected region for now. If you are targeting a user base in other regions or you already have a cloud service running on one of the cloud providers, you can choose those to get better performance.
Use the default configurations for the rest of the sections and click on Create Cluster.
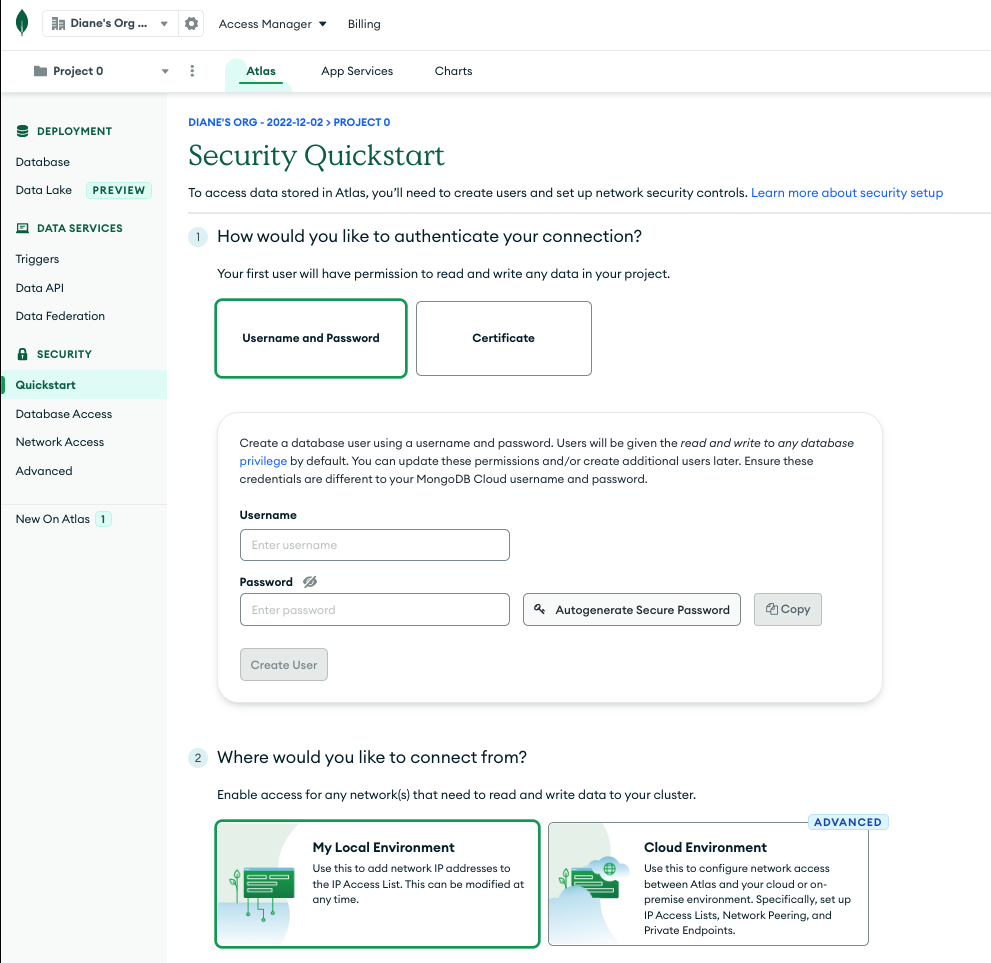
You will be redirected to the Security Quickstart page as shown below.
Create a username and password and save it to the clipboard. We will need it when we generate the final MongoDB URL.
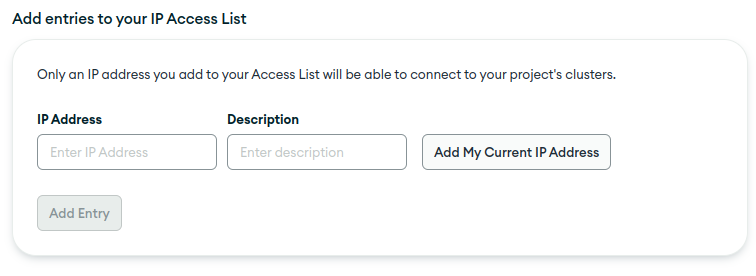
Add your current IP Address to the IP Access List to make the cluster available on your local system.
Then click on finish and close.
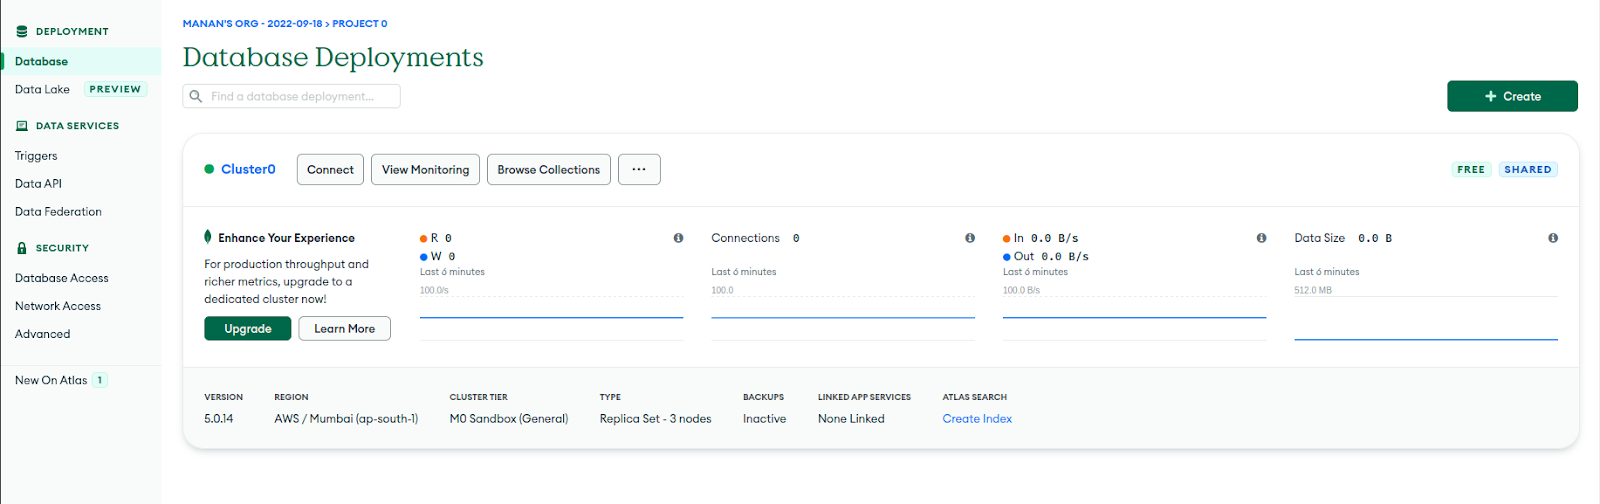
Navigate to Database under the Deployment section of the MongoDB dashboard. Find the newly created cluster and click on the Connect button.
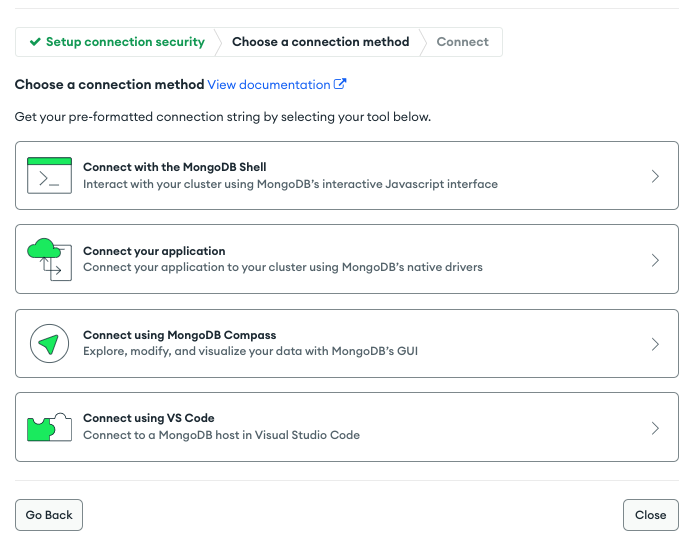
Once you have added the IP address as mentioned above you will be taken to the connection method step directly as shown below.
Click on Connect your application.
Select Java for the driver and Version 4.3 or later.
Copy the URL mentioned after connecting your application. Edit the <username> and <password> fields in the URL with the credentials copied earlier.
Use this URL in place of <Auth_URI> in the application.properties file, The <Auth_URI> is the URL that Spring Boot will use to connect to the MongoDB cluster.
We need to add the following lines to the application.properties file, which can be found under src/main/resources/.
Running the application
To run the application use the following command:
Ngrok setup
Installing Ngrok is necessary because we must expose our application endpoints so that Twilio may pass all incoming messages to our application.
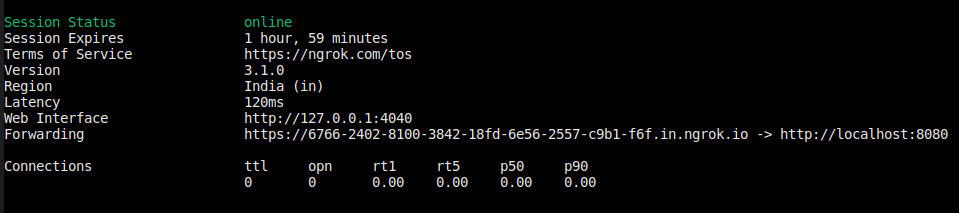
A local development environment is made accessible to the internet through Ngrok. This enables users of other applications and the internet to communicate with our application. Run the command listed below after installing Ngrok on your computer to make our local development environment available online.
The following output will be shown. Notice the URL mentioned in the forwarding part, copy this URL to the clipboard as it will be used in the next section.
Integrating the backend service to the Twilio service
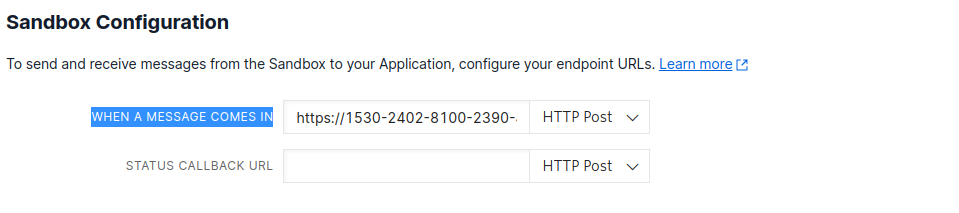
In the WhatsApp Sandbox Settings, update the WHEN A MESSAGE COMES IN text box with the Forwarding URL received from ngrok followed by /track webhook.
The URL should look something like https://dd89369c6ade.ngrok.io/track.
Testing the bot
You can find my complete implementation of the project in my GitHub repository.
If you haven't done so already, make sure your device has the WhatsApp Sandbox configured with the unique code found on the Twilio Console.
Now go to Amazon and copy the URL of a product that you would like to track. In this case, we are sending a URL for Oneplus Bluetooth Earphones to the WhatsApp bot. You will see the following message:
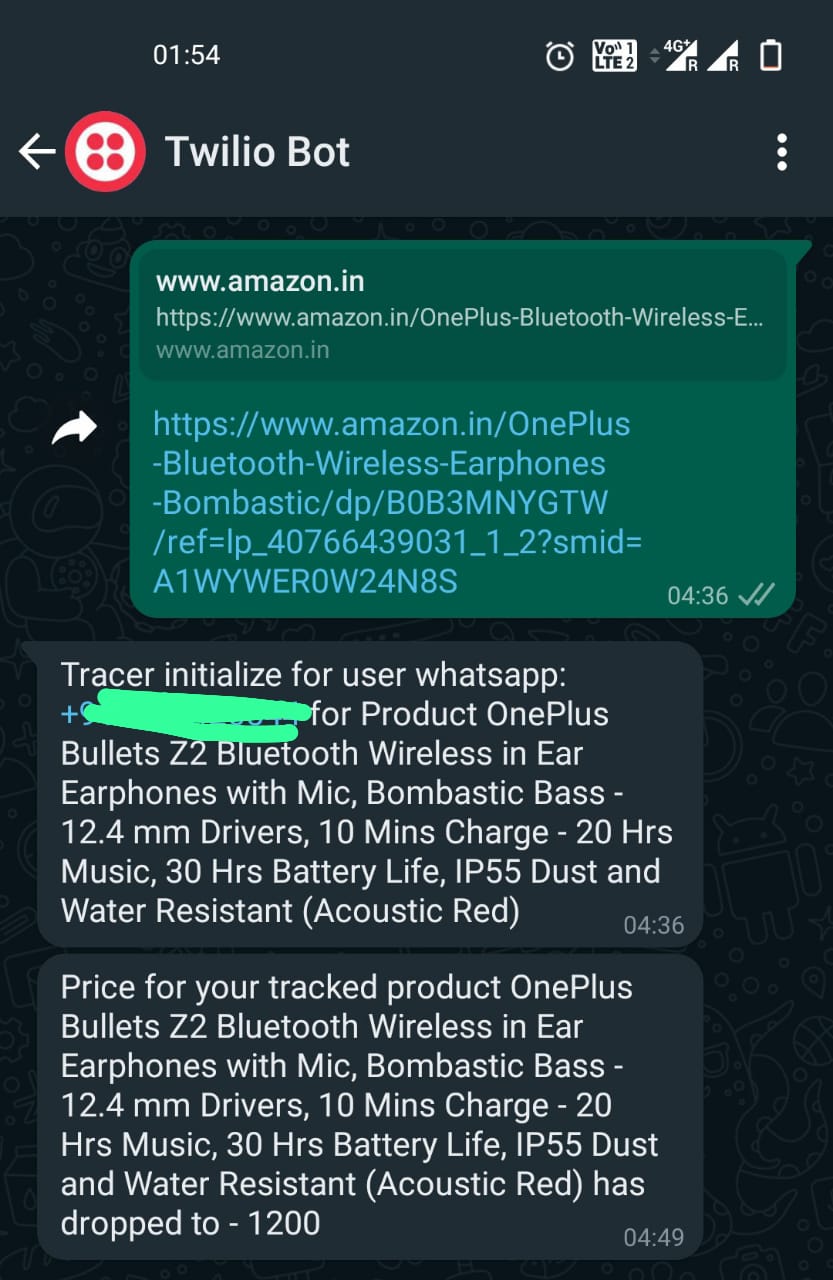
The response message will be something as follows:
The scripts running in the scheduling layer will detect when the price drops. If a user’s phone number was added to the database for this specific product link, they would receive a message as follows:
Since we are using the bot in developer mode, you will need to reconnect with the Twilio Sandbox every 3 days using the unique code. To get this bot into production you will need to link your twilio number with your WhatsApp business account.
What next for WhatsApp chatbots?
Through this article, you have learned to create a chatbot in Spring Boot and add features such as scheduling and web scraping. You also learned how to deploy the project using ngrok.
Here are some other project ideas for you to explore:
- Add an email notification service to the price tracking app using the Twilio Email service.
- Create a browser extension for the bot.
- Create your own chatbots to assist different businesses and websites. It has been statistically proven that people feel more at ease speaking with a chatbot than with a human.
Manan Jethwani is a senior at the Indian Institute of Information Technology Jabalpur. He’s a software professional who works to achieve software that empowers people. He has formerly interned with Goldman Sachs as a summer intern and is a Google Summer of Code select student. You can connect with him on Linkedin or reach out to him at mananjethwani02@gmail.com.

Related Resources
Twilio Docs
From APIs to SDKs to sample apps
API reference documentation, SDKs, helper libraries, quickstarts, and tutorials for your language and platform.
Resource Center
The latest ebooks, industry reports, and webinars
Learn from customer engagement experts to improve your own communication.
Ahoy
Twilio's developer community hub
Best practices, code samples, and inspiration to build communications and digital engagement experiences.