Build a ChatGPT-like SMS Chatbot with OpenAI and Python
Time to read:
January 11, 2023
Written by
Reviewed by
ChatGPT went viral recently. This conversational machine learning (ML) chatbot developed by OpenAI can answer questions, admit its mistakes, challenge incorrect premises, generate stories and poetry, and more. Read on to learn how to build a ChatGPT-like SMS chatbot using the OpenAI API and Twilio Programmable Messaging with Python.
Read this blog post if you'd like to learn how to build the same application but using Node.js.
ChatGPT and Python
GPT-3 (short for “Generative Pre-training Transformer 3”) is a natural language processing (NLP) model trained on human-generated text. Given some text input, it can generate its own human-like text based in a variety of languages and styles. Here, I ask it to "give me some bars about SendGrid."
You can test it out in the browser here.
The GPT-3 model uses a transformer architecture. This multi-layer neural network is good for processing sequential data, like text. Language-related tasks it can perform include translation, summarization, and question answering, as well as text generation comparable to human text generation.
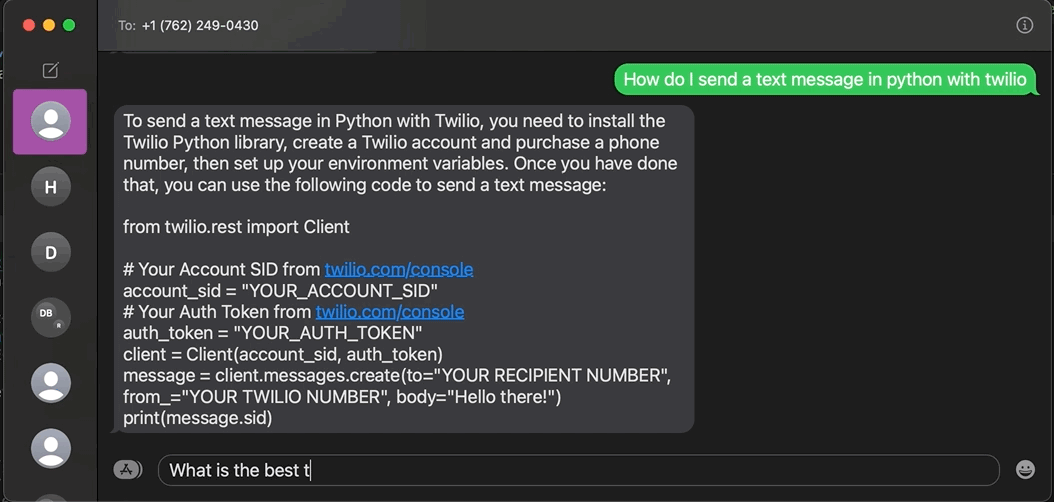
To make a ChatGPT-like application via SMS with Python, you must use the OpenAI API.
Prerequisites
- A Twilio account - sign up for a free one here
- A Twilio phone number with SMS capabilities - learn how to buy a Twilio Phone Number here
- OpenAI Account – make an OpenAI Account here
- Python installed - download Python here
- ngrok, a handy utility to connect the development version of our Python application running on your machine to a public URL that Twilio can access. This is needed for the development version of the application because your computer is likely behind a router or firewall, so it isn’t directly reachable on the Internet. You can also choose to automate ngrok as shown in this article.
Configuration
Since you will be installing some Python packages for this project, you will need to make a new project directory and a virtual environment.
If you're using a Unix or macOS system, open a terminal and enter the following commands:
If you're following this tutorial on Windows, enter the following commands in a command prompt window:
The last command uses pip, the Python package installer, to install the four packages that you are going to use in this project, which are:
- The OpenAI Python client library, to send requests to OpenAI's GPT-3 engine.
- The Twilio Python Helper library, to work with SMS messages.
- The Flask framework, to create the web application in Python.
- The python-dotenv package, to read a configuration file.
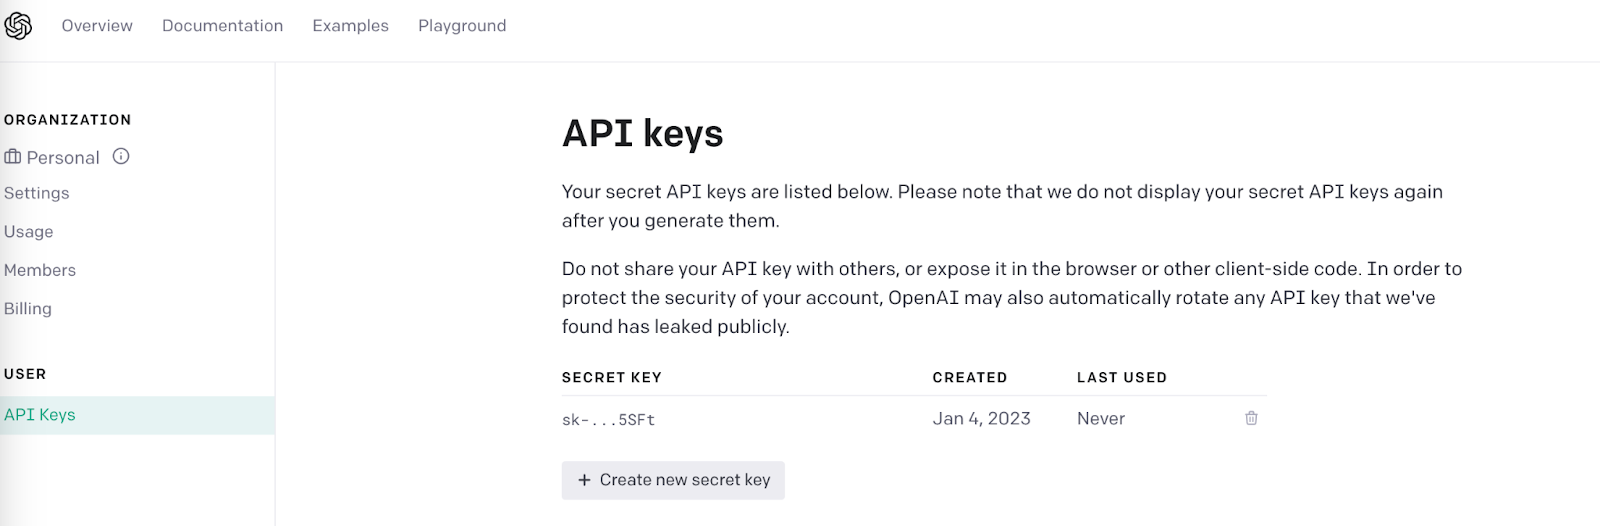
As mentioned above, this project needs an OpenAI API Key. After making an OpenAI account, you can get an OpenAI API Key here by clicking on + Create new secret key.
The Python application will need to have access to this key, so we are going to make a .env file where the API key can safely be stored. The application we create will be able to import this key as an environment variable soon.
Create a .env file in your project’s root directory and enter the following line of text, making sure to replace <OPENAI_API_KEY> with your actual key:
Make sure that the OPENAI_API_KEY is safe and that you don't expose your .env file in a public location such as GitHub.
Now, your Flask app will need to be visible from the web so Twilio can send requests to it. ngrok lets you do this. With ngrok installed, run ngrok http 5000 in a new terminal tab in the directory your code is in.
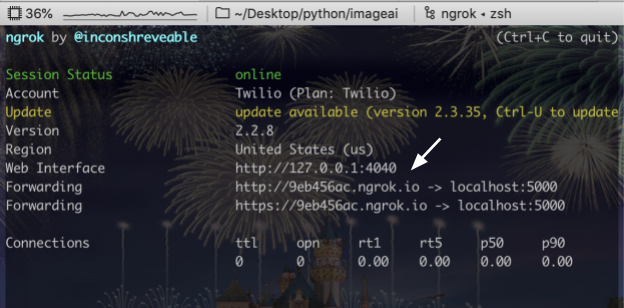
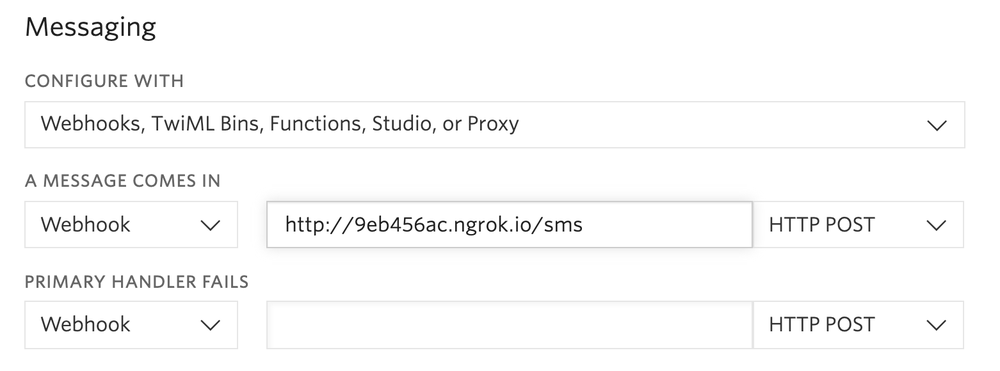
You should see the screen above. Grab that ngrok Forwarding URL to configure your Twilio number: select your Twilio number under Active Numbers in your Twilio console, scroll to the Messaging section, and then modify the phone number’s routing by pasting the ngrok URL in the textbox corresponding to when A Message Comes In as shown below:
Click Save and now your Twilio Phone Number is configured so that it maps to your web application server running locally on your computer. Let's build that application now.
Build your ChatGPT-like SMS Python App
Inside your chatgpt-sms-python directory, make a new file called app.py.
Copy and paste the following code into app.py to start off the ChatGPT-like SMS app. It imports the required modules, sets the OpenAI API key from the .env file, and creates a Flask app.
Directly beneath, add the following code:
Inside of the /sms webhook, this code creates a variable inbMsg from the inbound text message users will text in and prints it out. It then calls the openai.Completion.create method to use one of their language models to generate text based on inbMsg.
In order to specify our completion, you pass in some properties: model identifies the OpenAI language model used to generate an answer for the text which we assign to the prompt property. In this tutorial, you use the text-davinci-003 language model. It's the same language model used in the background by ChatGPT. The OpenAI docs list the other language models they offer for use.
Optional properties max_tokens and frequency_penalty specify the maximum completion length and the effort the model will make to not repeat itself. You can see more optional properties for completion here in the OpenAI documentation.
You can view the complete app on GitHub here.
Run the Python Flask app by running the following command
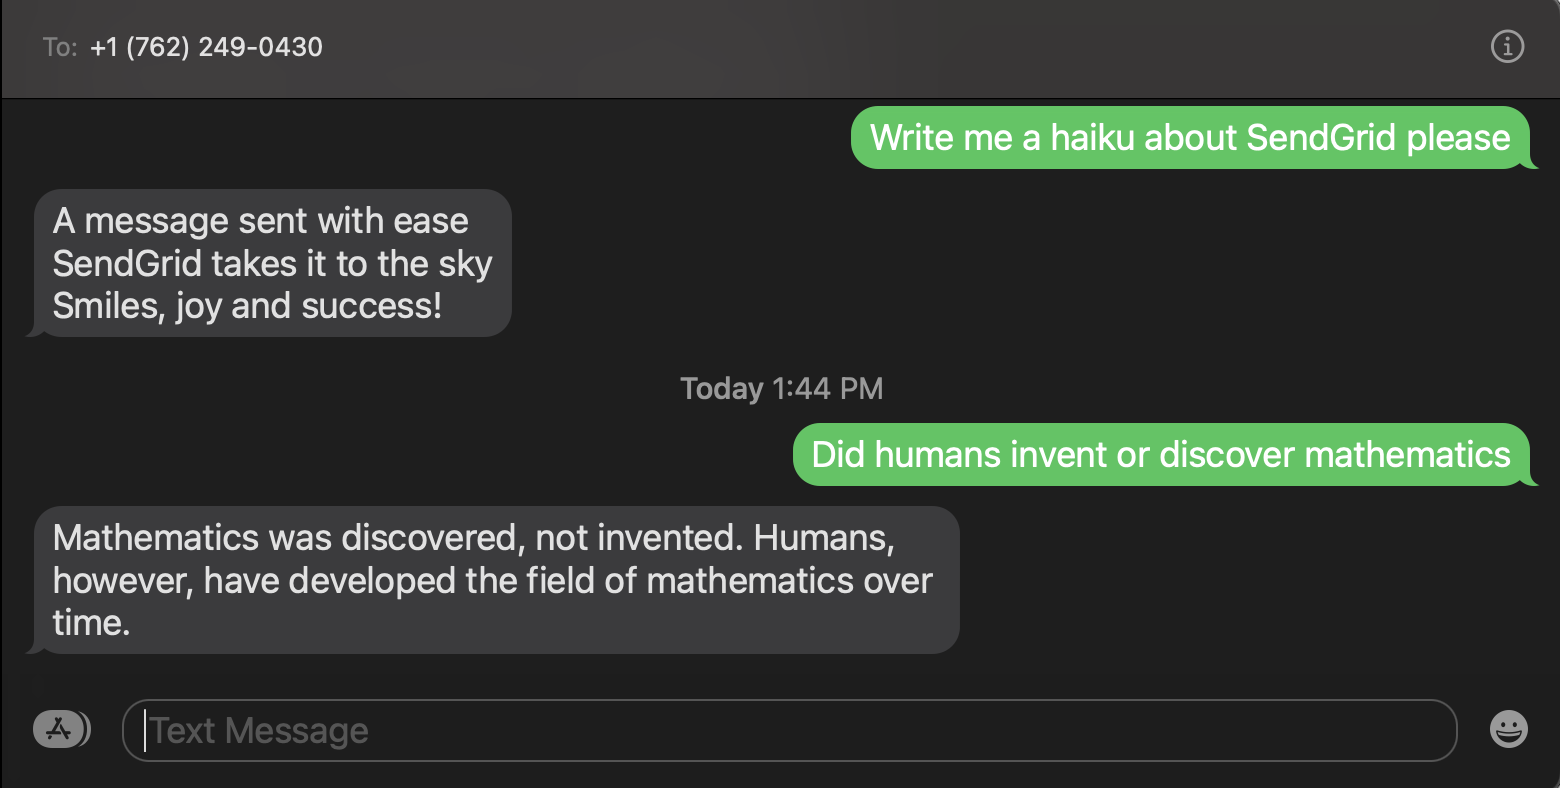
Now take out your phone and text your Twilio Phone Number a question or prompt so that OpenAI can answer it or generate text!
What's Next for Twilio and ChatGPT?
The development possibilities offered by ChatGPT and Twilio are endless! You can build an SMS chatbot with Python, call an AI friend, chat with an AI chef over WhatsApp, use the OpenAI API with Node.js and Twilio Serverless, and more. Let me know what you're working on with OpenAI or Python–I can't wait to see what you build.
- Twitter: @lizziepika
- GitHub: elizabethsiegle
- Email: lsiegle@twilio.com


Related Resources
Twilio Docs
From APIs to SDKs to sample apps
API reference documentation, SDKs, helper libraries, quickstarts, and tutorials for your language and platform.
Resource Center
The latest ebooks, industry reports, and webinars
Learn from customer engagement experts to improve your own communication.
Ahoy
Twilio's developer community hub
Best practices, code samples, and inspiration to build communications and digital engagement experiences.