Invite Collaborators to a Twilio Video Chat Using the Google Calendar API and JavaScript
Time to read:
August 16, 2021
Written by
Reviewed by

Have you ever attended an online video meeting that you were able to join via a link inside a calendar invitation? With the increase in people working and socializing from home, these kinds of calendar invitations have gotten a lot more popular in the last year.
In this tutorial, you will learn how to build an application that allows you to create Google Calendar events programmatically, with a link to a deployed Twilio Video app in their description. This will allow users to click the link and join the video call easily. You will get a chance to learn about the Google Calendar API, as well as build a JavaScript application with React and Express.
First, you'll get set up creating a new Google Cloud project. Then, you'll create a React + Express application to interact with the Google Calendar API. Finally, you'll deploy your Twilio Video application and attach a link to your calendar invite. Let's get started!
Prerequisites
- A free Twilio account. (If you register here, you'll receive $10 in Twilio credit when you upgrade to a paid account!)
- Twilio CLI installed on your machine.
- A Google Cloud account.
- Node.js v14+ and npm installed on your machine.
Set up a new project in the Google Cloud Console
The first step is to set up a new Google Cloud project. Log in to your Google Cloud account and navigate to the Google Cloud Console.
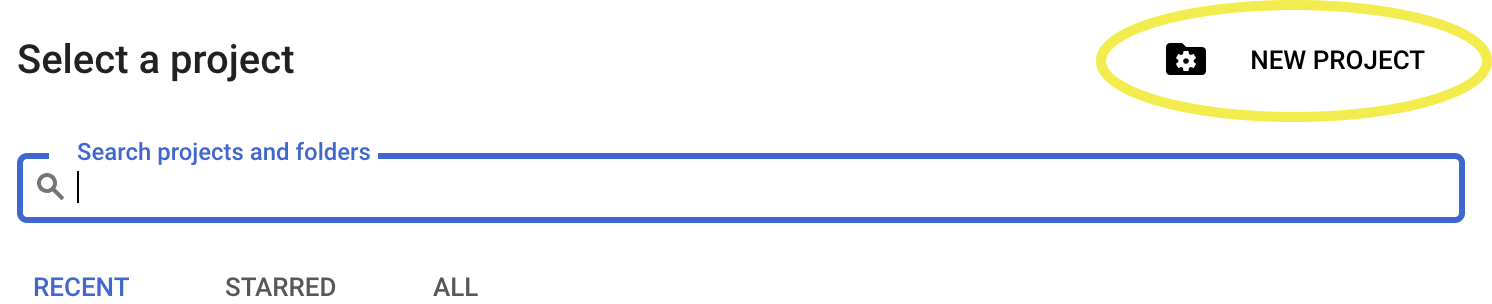
At the top of the screen, click on the downward facing arrow to show the project list:

The Select a Project screen will appear. On this screen, click the New Project button:
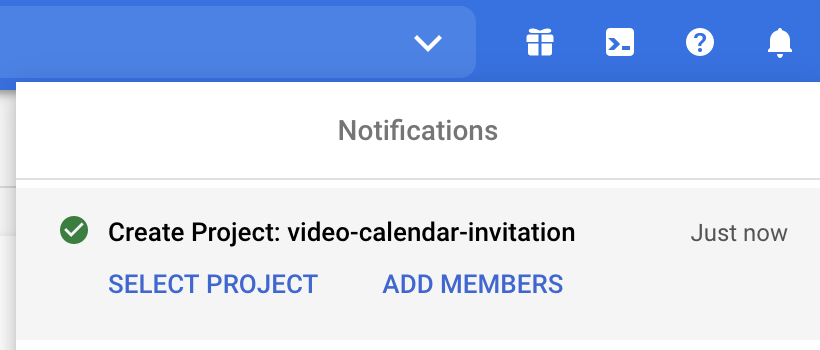
On the New Project screen, enter the project name "video-calendar-invitation" in the Project Name field. Then, click the Create button to create the project:

Once the project is created, a notification will appear. Click SELECT PROJECT in this notification to be taken to the project dashboard:
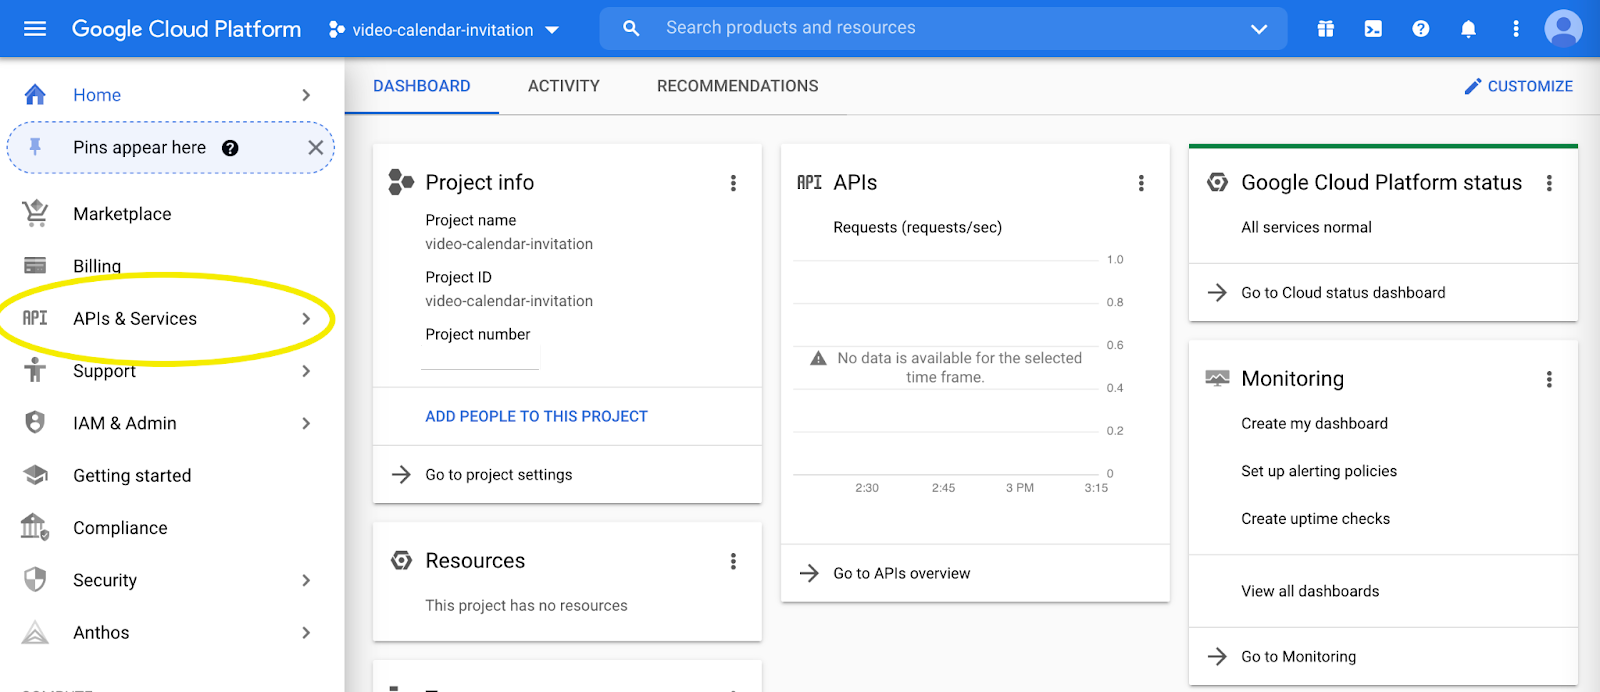
On the project dashboard, you can see all sorts of details about your new Google Cloud project.
The next steps are to enable the Calendar API in your project and set up an OAuth client to authorize requests. You will use these on the server side of your project to make requests to Google to create new calendar events.
Enable the Calendar API
To get started with the Calendar API, click on APIs & Services in the left-side menu:
Once inside the APIs & Services section, click ENABLE APIS AND SERVICES:

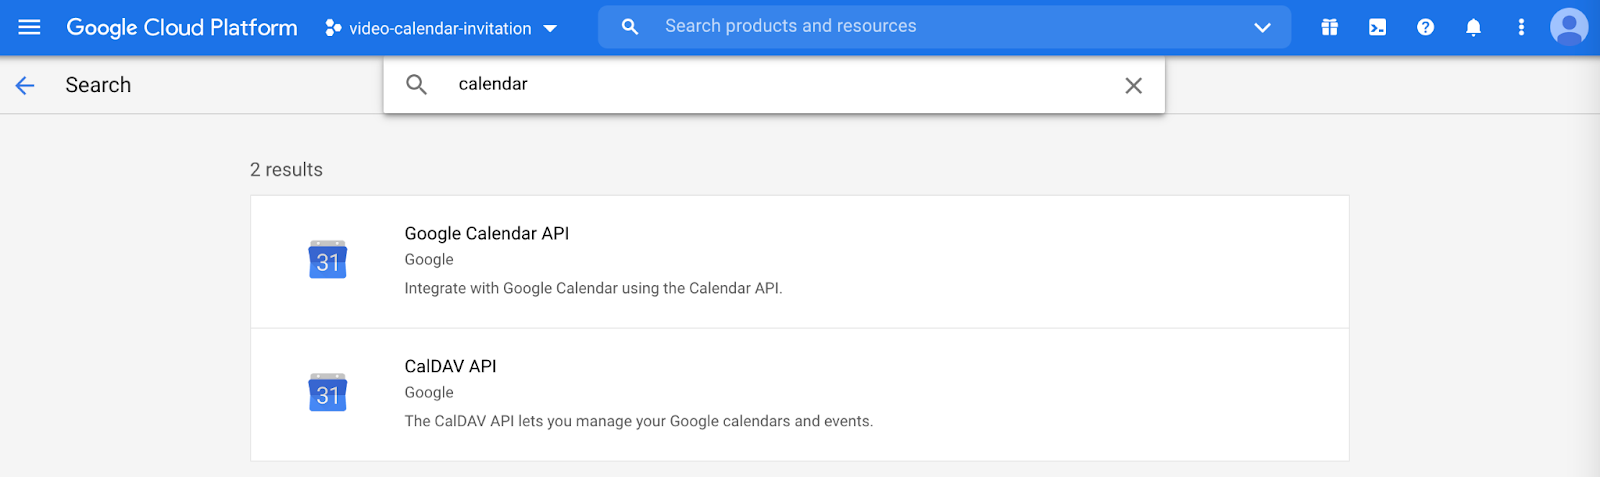
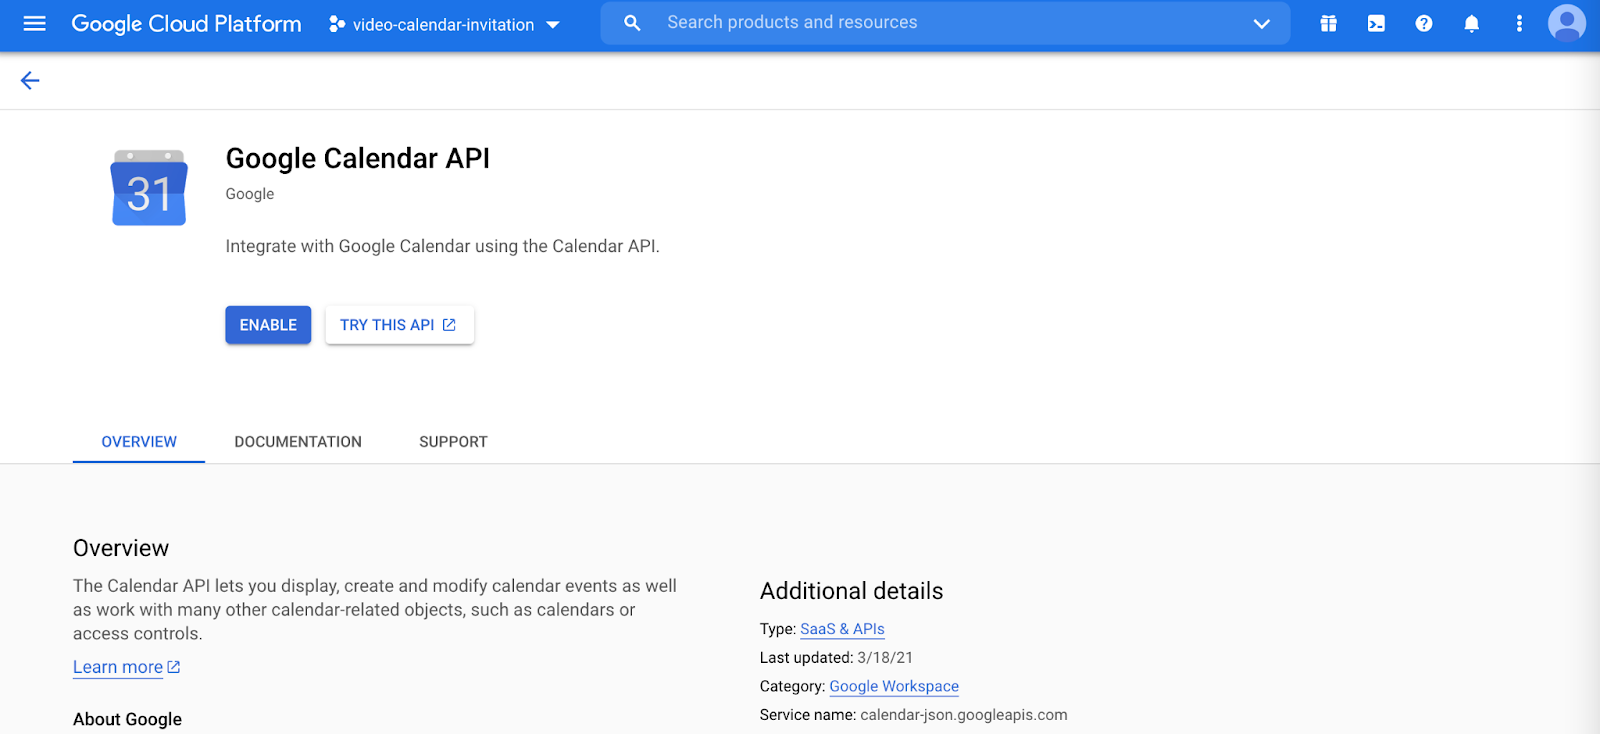
In the search bar, type in "Calendar" and find the Google Calendar API:
Then, on the Google Calendar API page, click the Enable button to enable this API for your project:
Create Google Calendar credentials
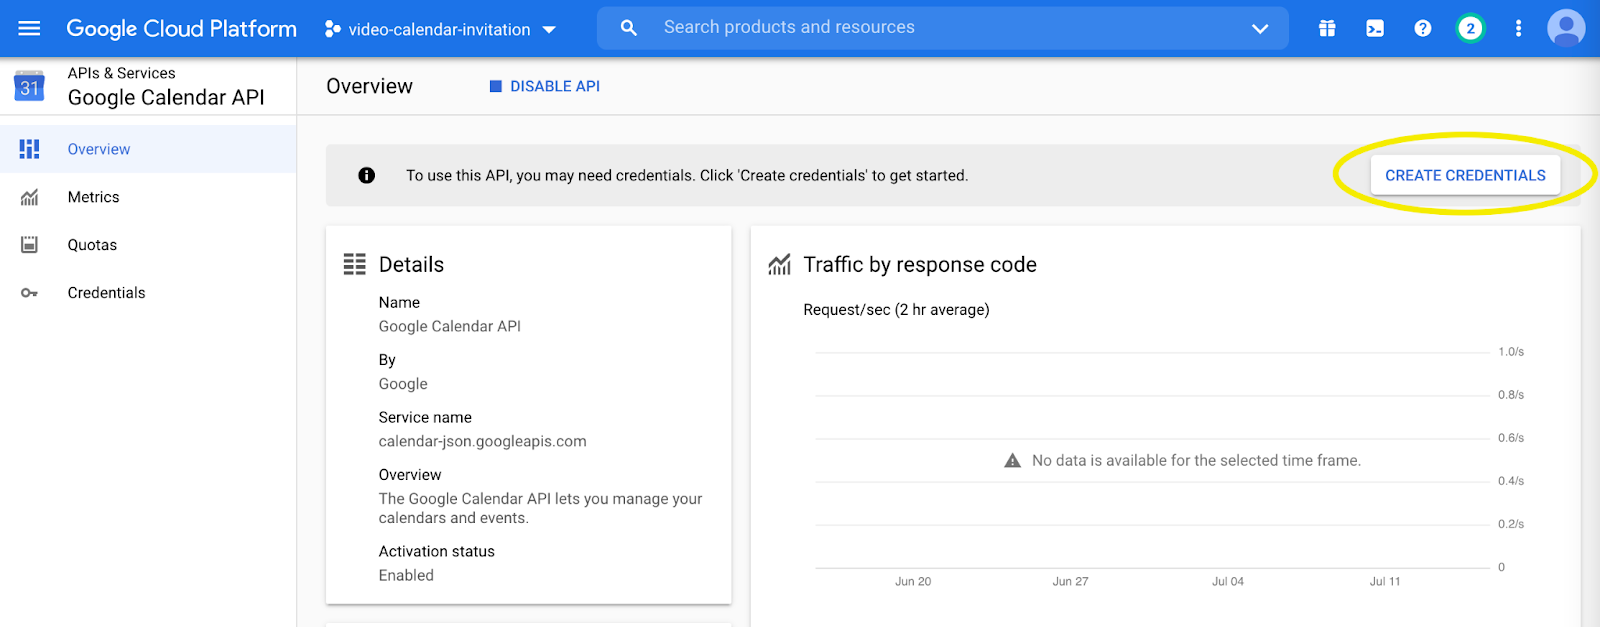
Now that you have enabled the Calendar API, it's time to create Google OAuth credentials that will allow your application to access users' Google Calendar data and create calendar events on their behalf. To learn more about how OAuth works with the Google APIs, you can take a look at the documentation here.
Click on the CREATE CREDENTIALS button in the top right corner:
In the form that comes up, select Google Calendar API from the select dropdown, then select the radio button for User data in the section below that:
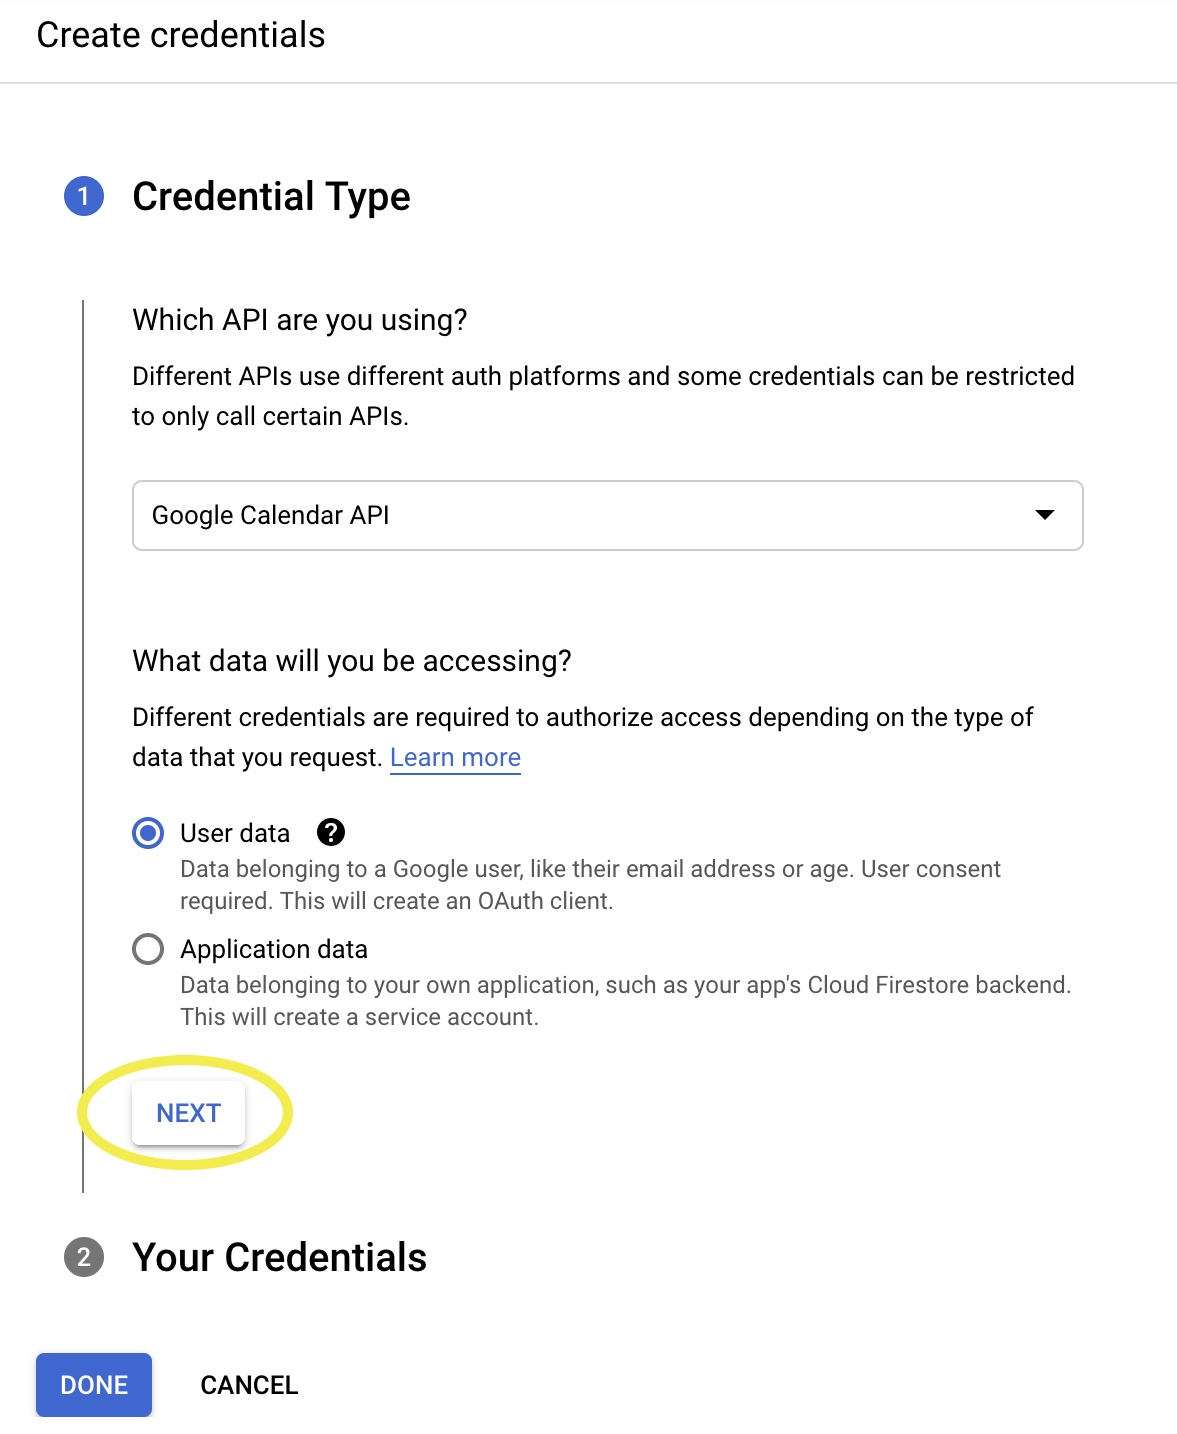
Then, click the Next button. You will be taken to the OAuth Consent Screen configuration. The OAuth consent screen is the part of your application that notifies the user about what kind of data your application is requesting and allows them to select which of their Google account data they grant permission for your application to access.
Access to the user's Google account is controlled by specifying one or more scopes. Scopes are a mechanism to limit and specify what kinds of account access your application will be granted. In this case, your application will need access to a user's Google calendar.
In addition to requesting the user's consent, the consent screen will also provide links where users can learn more about why your application is requesting this data. Once the user grants their permission, your application will be allowed to create calendar events on the user's behalf.
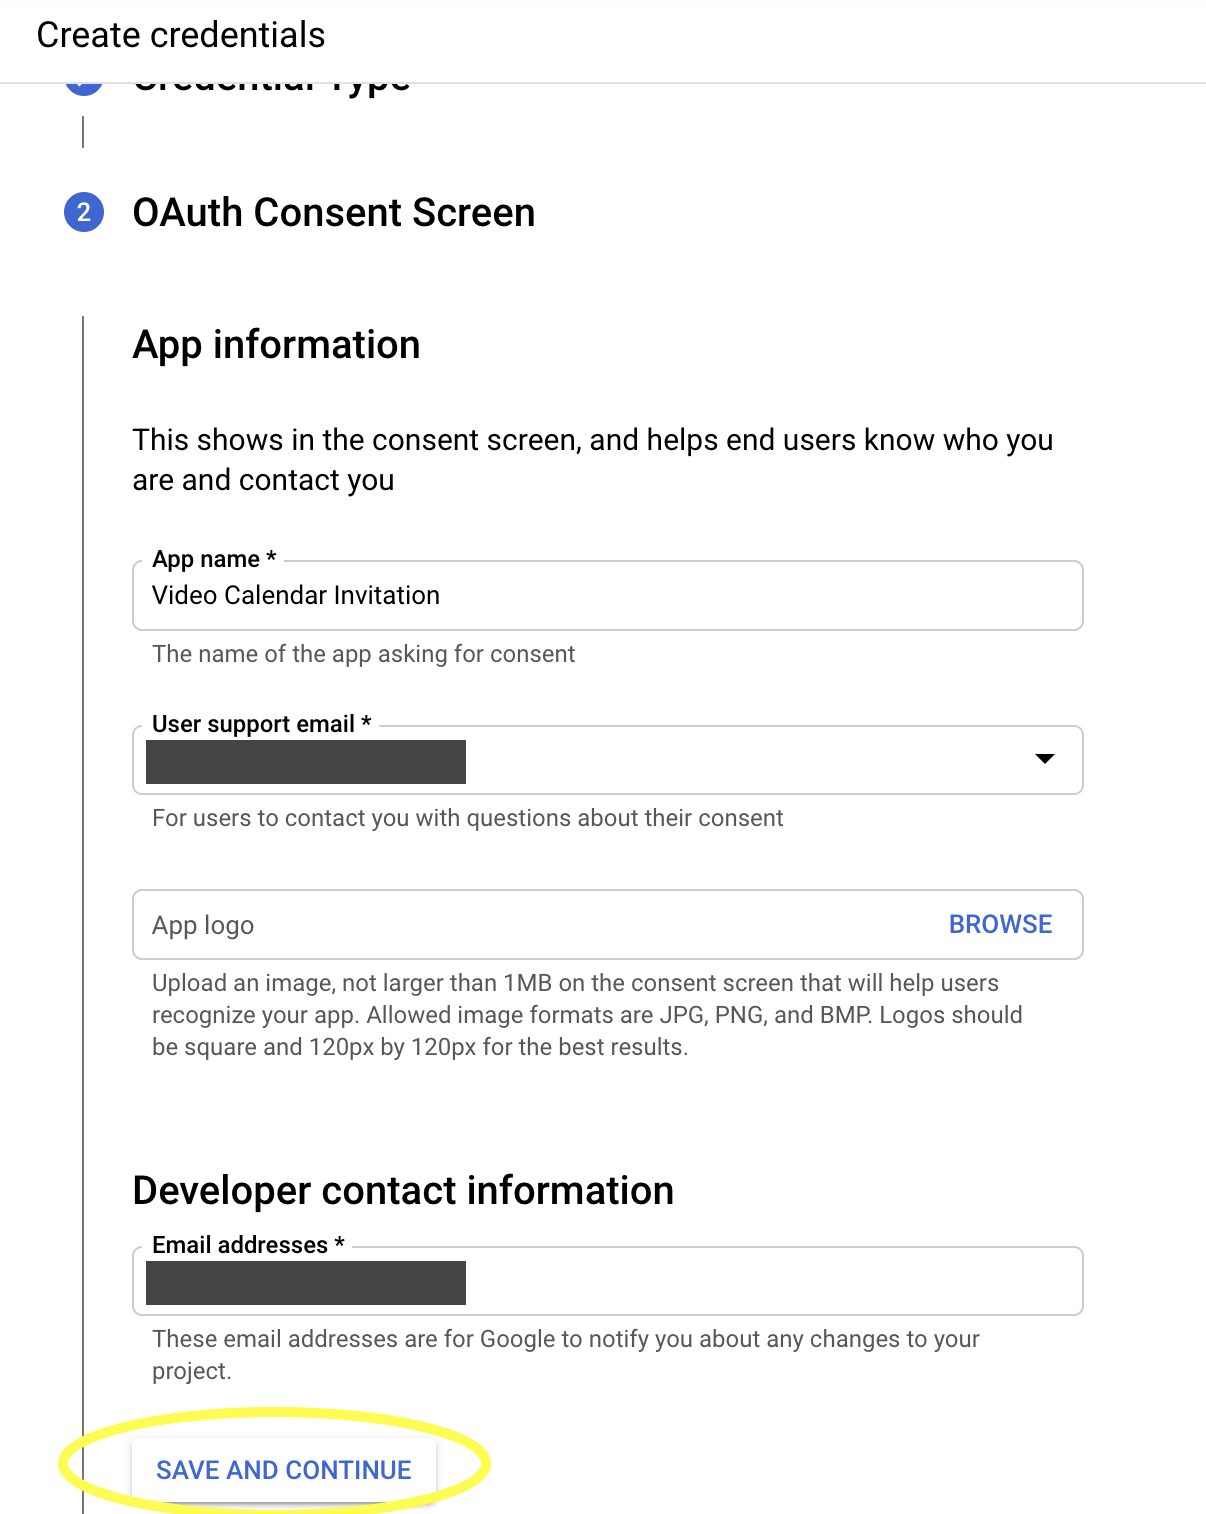
In the OAuth Consent Screen configuration form, enter the app name "Video Calendar Invitation" in the App name field, then enter your email address in the User support email and Developer contact information fields. When you are finished with this step, click the SAVE AND CONTINUE button.
Next, it's time to select OAuth scopes. Click the ADD OR REMOVE SCOPES button to show the scopes menu. In this menu, find and select ../auth/calendar, which is associated with the Google Calendar API:
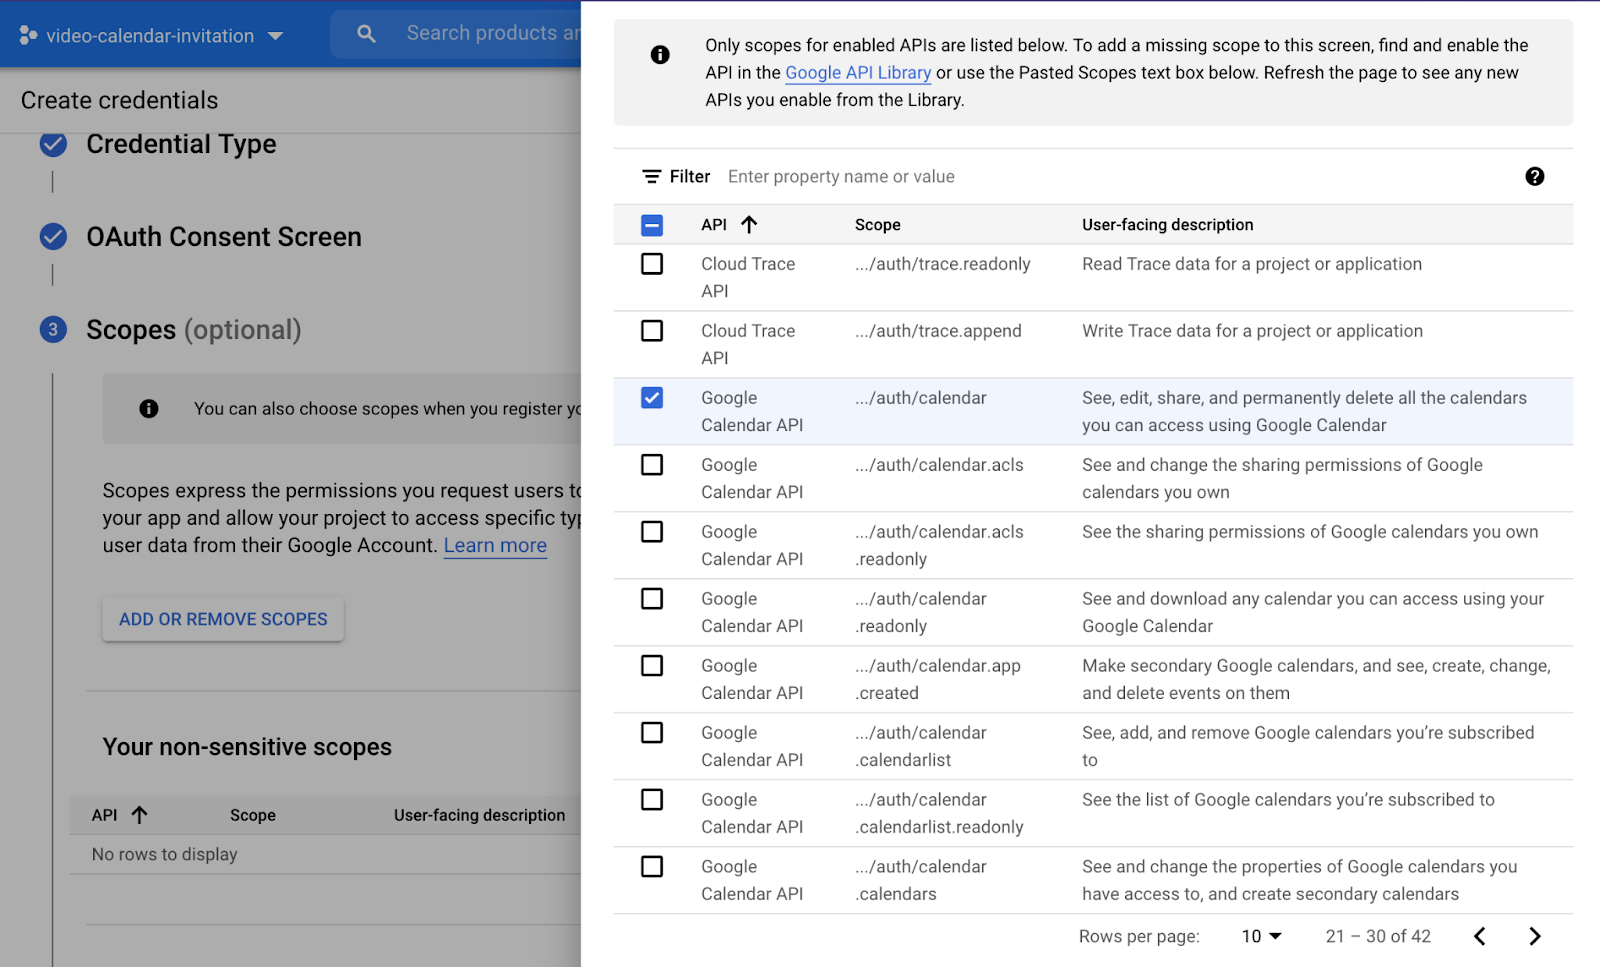
Then, click the Update button.
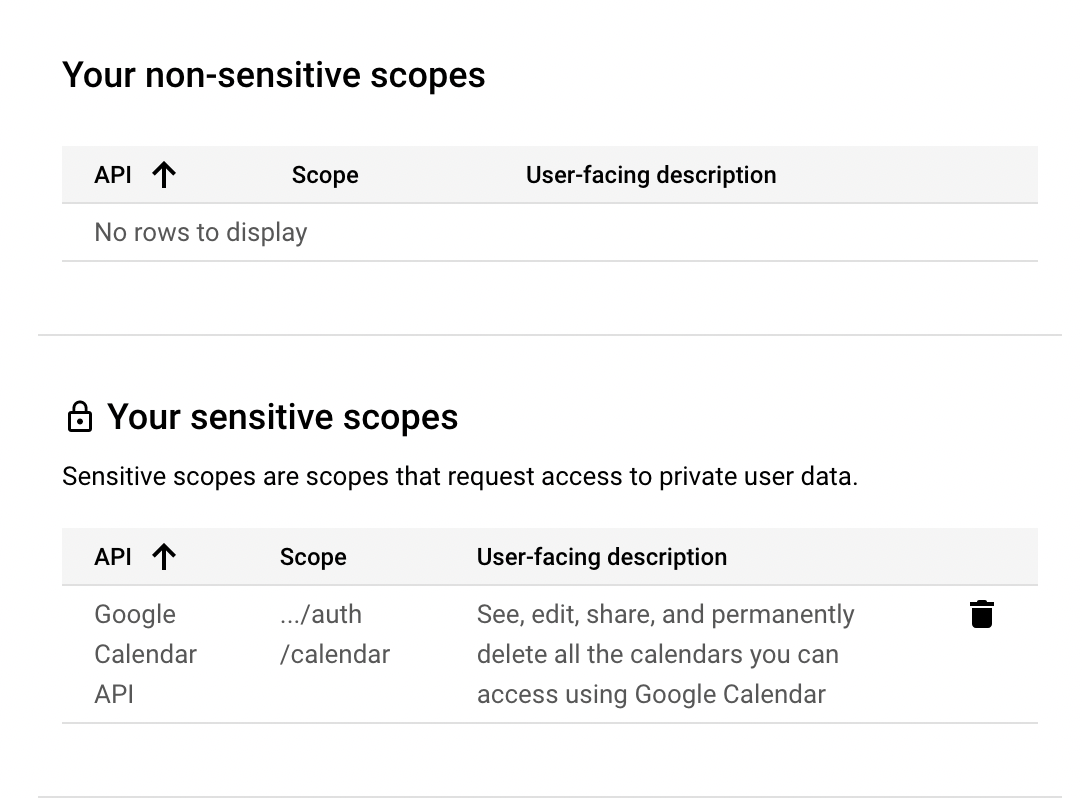
Once you have completed the steps above, the right-side menu will close, and you will see that your selected scopes have been updated:
Click the SAVE AND CONTINUE button.
The next part of the form, under the heading “OAuth Client ID”, will help you finish setting up your OAuth client. In the dropdown menu for Application type, select "Web application." (You can change the name of the OAuth client if you wish, but it is not required for this project.)
Next, enter the URL http://localhost:5000 under Authorized JavaScript Origins. This is where you will be running your server and making requests to the Google Calendar API to create calendar events.
Under Authorized Redirect URIs, enter http://localhost:5000/auth/callback. This is the URL that your browser will be redirected to after the user has given their consent to allow access to their data.
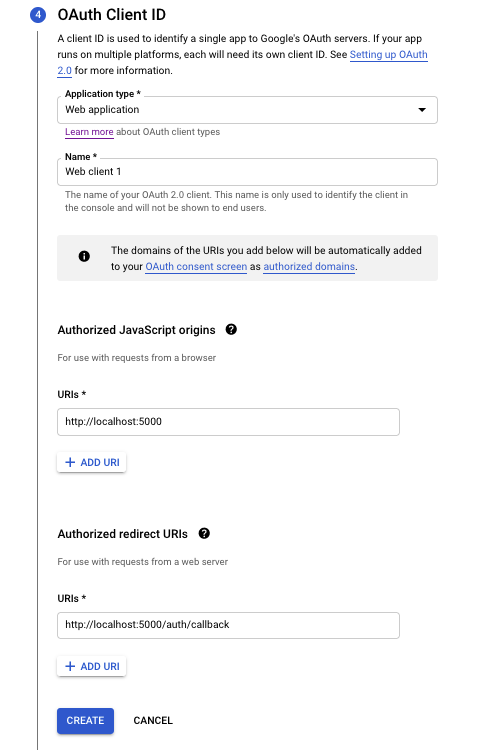
When you are finished entering in the URLs, click the CREATE button. Once creation is complete, you will see your new Google credentials. Take note of these and keep them in a safe place. You will need them for the next steps of this tutorial.
Once you have saved your credentials, you can click DONE.
Before you move on to the next steps, there is one more thing you need to do in the Google Cloud Console — add yourself as a test user for the application. Since your application is still in the "Testing" phase of publishing, only a limited number of users are able to access your app.
In the left-side menu, click on OAuth Consent Screen.
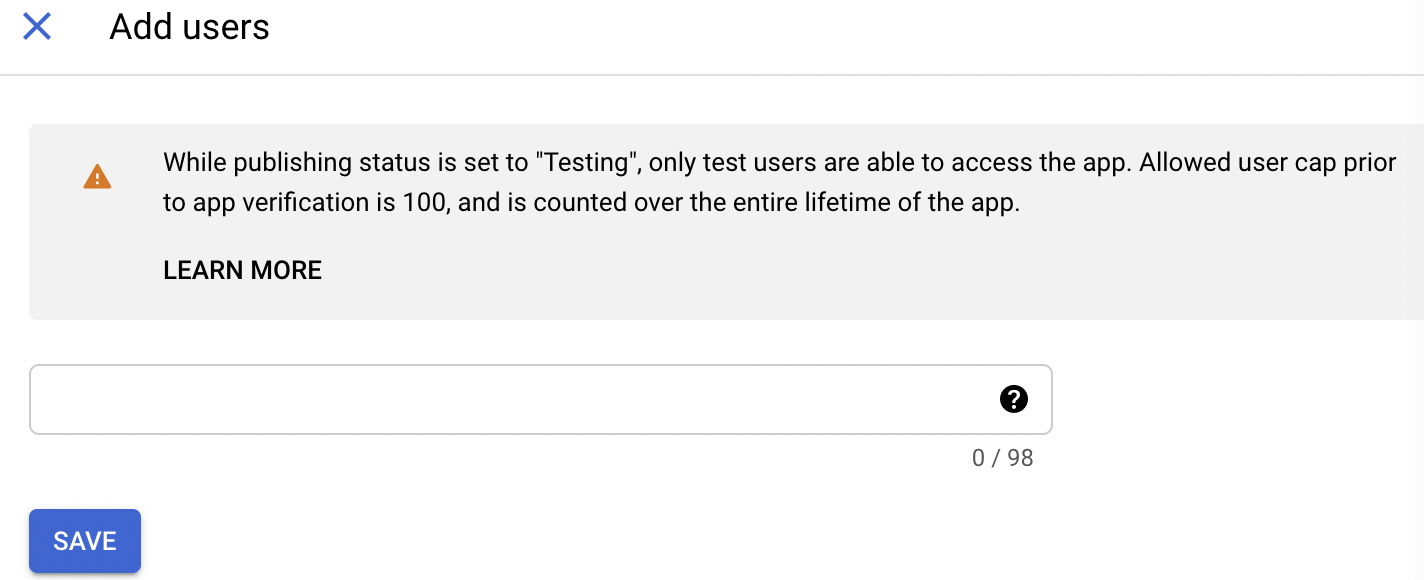
Scroll down to the Test users section, and click the ADD USERS button:
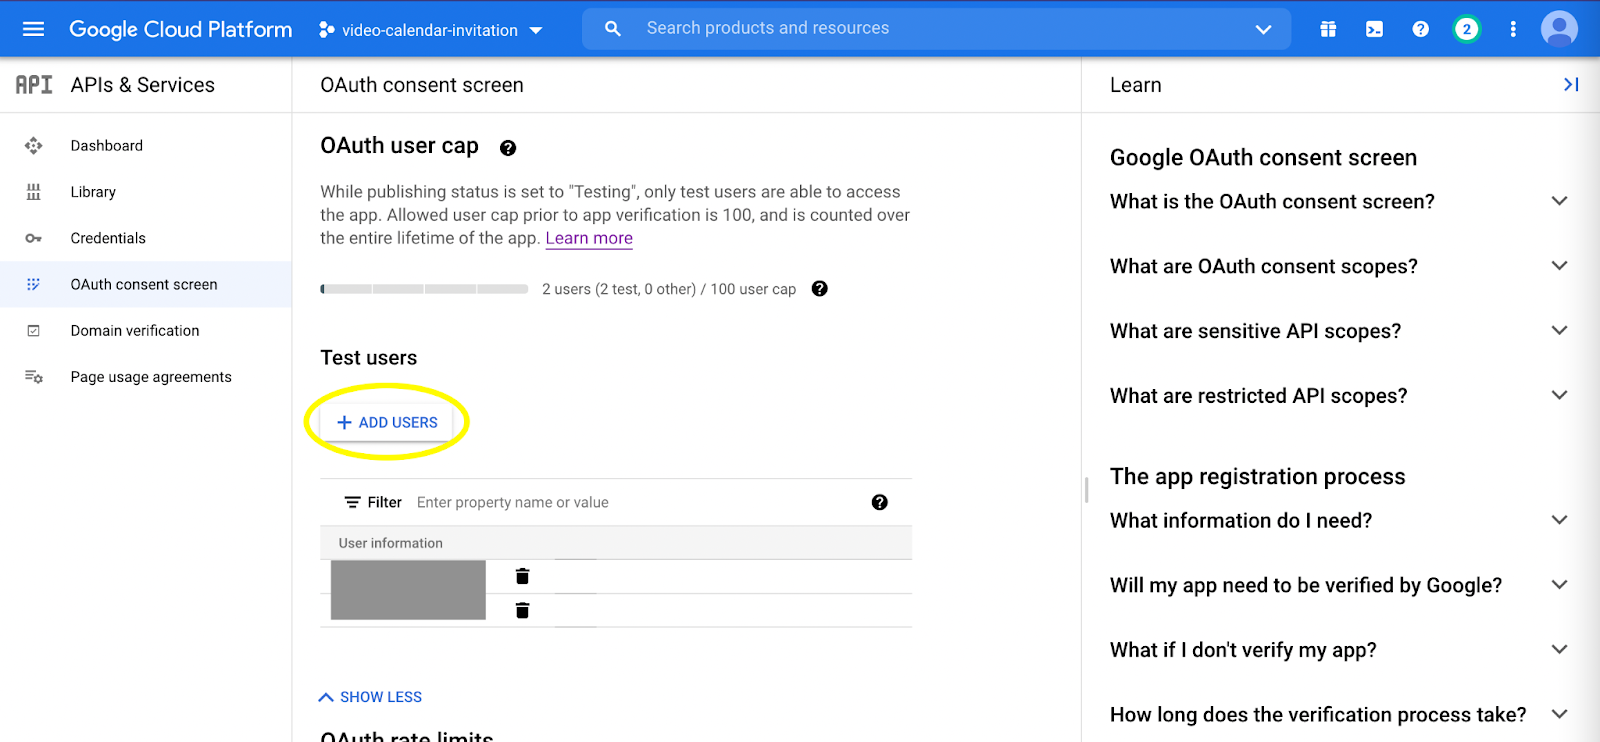
Enter your email address in the Add users input field that appears, and then click SAVE.
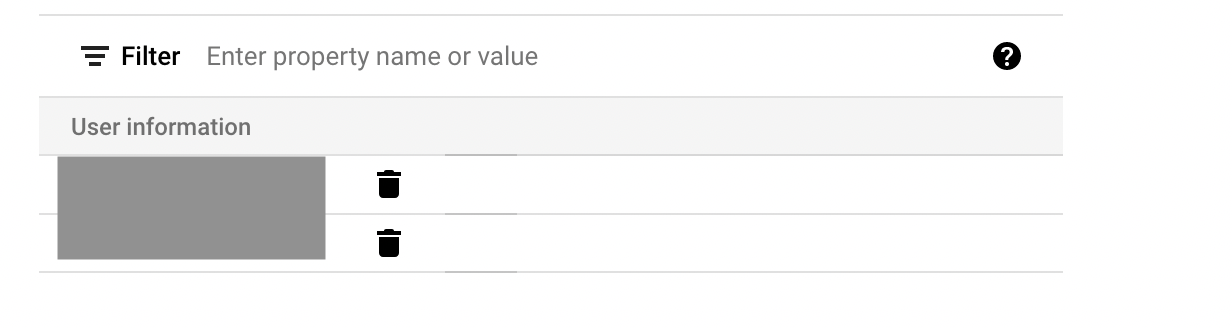
Once you have done this, your email address will appear in the User information section. (If you need to delete a user, you can do this by clicking the trash icon next to the user's email address.)
Now that you have enabled the Calendar API and created your OAuth credentials, it's time to start writing the JavaScript code for your application.
Create a React and Express project with Tailwind CSS
In your terminal window, create a new React project and change into the new directory by running the following commands:
For this project, you will need the following packages:
- Express, a Node.js web framework
- node-dev, to automatically restart the Node process when you modify a file
- dotenv, to load the environment variables from a .env file into your application
- cors, an Express middleware to handle CORS
- cookie-parser, to parse cookies
- googleapis, a Node.js library for using the Google APIs
- CRACO, to modify your React application from the default create-react-app setup
- Tailwind CSS, a useful CSS framework
- React Date Picker, a useful date/time selection package
Run the following command in your terminal to install the first batch of needed packages:
Set up Tailwind CSS
In this project, you'll be using Tailwind CSS to style your application. There are a few specific steps you'll need to follow to get this set up.
After you've created the React project and installed the other dependencies, run the following commands to install Tailwind CSS and its dependencies:
Open package.json in your code editor and update the start scripts to match the following code:
Next, create a new file called craco.config.js at the root of your project. Open that file in your code editor and add the following code:
Then, run the following command to generate a tailwind.config.js file:
Open tailwind.config.js in your code editor and replace the purge line with the highlighted line of code below:
Open the file src/index.css as well, and replace the code in that file with the following in order to import the Tailwind CSS styles:
Now you can run the following command to start your React application:
Once you have done this, a browser window will open up to http://localhost:3000/ to let you know that the application is running.
Create the Express server
Now it's time to set up the Express server that will handle requests to the Google Calendar API.
Create a new file at the root of your project called .env. This is where you will store your API credentials. Open this new file in your code editor, and add the following lines of code:
Replace these placeholder values with the values for the Google client ID and client secret that you got from the Google Cloud Console earlier. (If you didn't save them, you can always return to the Credentials page for the project and click on the OAuth client to view these values again.)
Next, add the .env file to the .gitignore file at the root of the project in order to keep these private credentials secure and out of version control:
Create a new file at the root of your project called server.js. Open this new file in your code editor.
Inside server.js, add the following lines of code to include the required modules for the project and start a new Express application that will run on port 5000:
Next, add the following lines of code to server.js, just below the code you added in the last step:
With this code, you set up a new instance of the Google OAuth2 client, using the environment variables you stored in the .env file. Then, you use the calendar scope you read about earlier to generate the auth URL that your server will use to request the user's consent to access their calendar data. The code above also sets up middleware to handle CORS and cookies with credentials.
The next step is to create two more endpoints: the auth endpoint that your client-side application will call to log in and request the user's consent, and the callback endpoint that will receive a code from Google.
When the user navigates to http://localhost:5000/auth, they will be redirected to the authUrl you created earlier. Google will then display the consent screen to the user, and if the user authorizes your application to request their calendar data, Google will send a unique code to http://localhost:5000/auth/callback. This code then gets exchanged for an access token, which will be saved in a cookie and used in requests to create new calendar events on the user's calendar.
Add the following code to server.js, just below the code you added in the previous step:
Great! Now that you've taken care of the auth parts, it's time to add the endpoint that will actually let you create calendar events. Just below your auth endpoints, add the following createEvent endpoint to server.js:
This endpoint gets the tokens from the cookie and passes it along to the Google Calendar API with the calendar event data entered by the user. If the event creation is successful, the Calendar API will return a link to the newly created calendar event.
Now that your server can make requests to the Calendar API, you just need to add the following lines of code at the bottom of server.js in order to run the server:
Great! Now in a new terminal window, start the server by running the following command:
Once the server is running, you'll see the following log statement in your terminal window:
Now you're ready to build out the React side of your application.
Set up the rest of the React application
Inside the src directory, create two new files: EventForm.js and EventConfirmation.js.
Build the EventForm component
Open EventForm.js in your code editor. EventForm will be the component where the user will enter the information for the calendar event they want to create. Add the following code to EventForm.js. This code will create the component and set up the state variables needed:
Inside the return statement, add the following code to set up a form for the user to enter the calendar event details:
This form will allow a user to enter the email addresses (separated with commas) of the people who should receive the calendar invitation, the summary (title) of the event, and the start and end datetimes for the event. These values will be saved in the component's state. To select the date and time, this project uses the React Date Picker component, which will display a calendar component when the start or end input fields are in focus.
You may have noticed that the code above refers to a few handler functions that do not yet exist. Let's add them now. Just above the return statement in this component, add the following two handler functions to handle when the user changes the input values and when the user submits the form by clicking the Create Video Calendar Event button:
The handleSetAttendees function will create an array of email addresses from the comma-separated list the user enters into the Email Addresses field.
The handleSubmit function will take the data from the form and send it as a request body to the createEvent endpoint you wrote earlier on the server side of the application. Once the new calendar event is created, the link returned will be saved in eventData, and the eventCreated value will be set to true.
Add the following logic to EventForm.js, inside the return statement but above the component's main <div>:
When eventCreated is set to true, the application will show the EventConfirmation component. Otherwise, it will show the EventForm component.
Now that you have the EventForm component complete, it's time to work on the EventConfirmation component.
Build the EventConfirmation component
Open EventConfirmation.js in your code editor. This is the component that will appear once a user has submitted their request to create a new calendar event. Whether it is a success or an error, this component will handle both cases as well as provide a way for the user to go back and create another calendar event.
Add the following code to EventConfirmation.js:
This small component shows the link to the calendar event and a success message if it was created successfully, or it shows an error message if event creation failed for some reason.
Bring everything together in App.js
Open the file src/App.js in your code editor. Replace the code in that file with the following code to finish setting up the basic structure for your application:
In this component, the top left corner shows your application's name, and the top right corner displays a Login link. Clicking this link will prompt the user to log in with Google if they are not already logged in, as well as grant their consent for their calendar data to be accessed. Once the user logs in, a cookie will be saved in the user's browser that contains that user's access token. Any calendar events created while a user is logged in to their Google account will show that user as the event's creator.
Now you have a fully designed layout for your application. There are just a few more steps to complete before you can create calendar invitations with video chat links.
Deploy a Twilio Video app
Now that you have the Google Calendar side of the application pretty much set up, it's time to set up and deploy a Twilio Video app whose link you'll be able to attach to the calendar invitation. We already have a pre-built, open-source application that this tutorial will use, but you can also build your own video application if you like.
Open a new terminal window and navigate to where you would like the Twilio Video React application to live. Then, clone the application and change into its directory by running the following commands in your terminal:
Install the application's dependencies by running the following command:
If you're not already logged in to your Twilio account via the Twilio CLI, log in now by running the following command and entering your Twilio Account SID and Auth Token:
Install the Twilio RTC plugin next by running the following command:
Now you're ready to deploy the application! Run the following command in your terminal window:
When the deployment is complete, you will see a web app URL similar to the one below in your terminal window:
Copy the URL. Then, inside server.js, add a line break (<br/>) to the description field of the eventDetails in the createEvent endpoint. After this line break, add the URL for the video application. When you are finished, it should look something like this:
At this point, you now have:
- An Express server running on port 5000
- A React application running on port 3000
- A Video app deployed to Twilio
Now that everything is set up, it's time to test out creating a calendar event with a video chat link!
Test your application by creating a calendar event
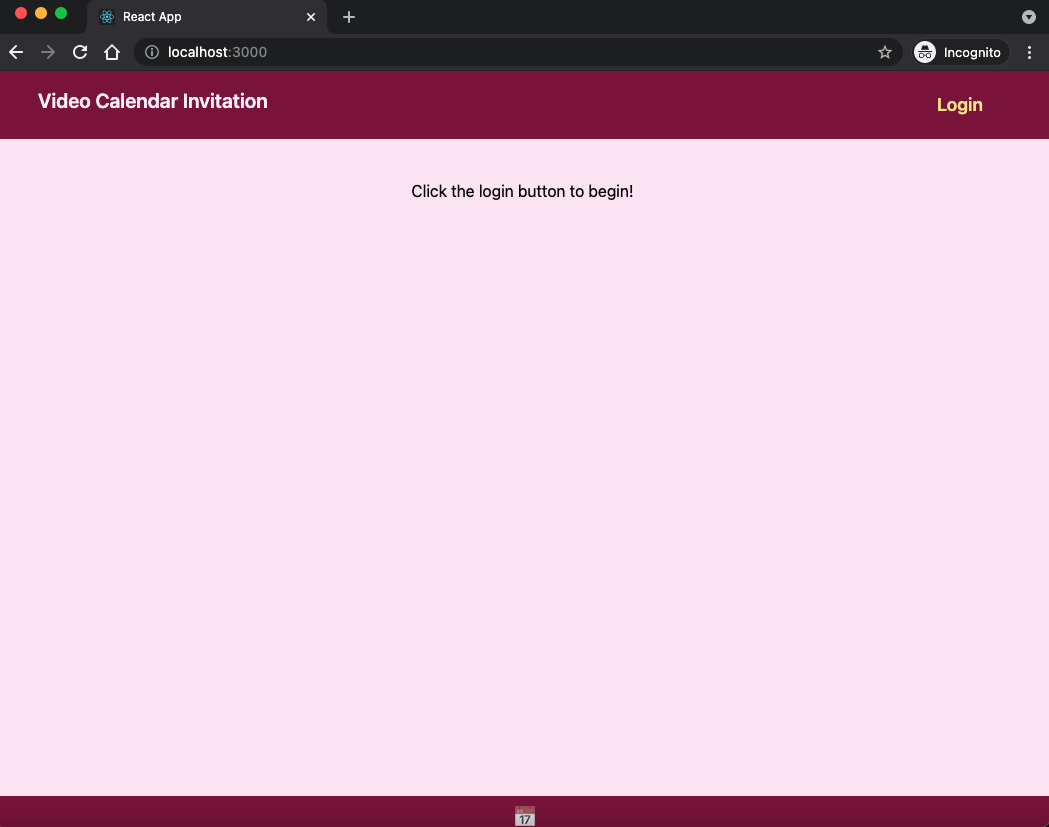
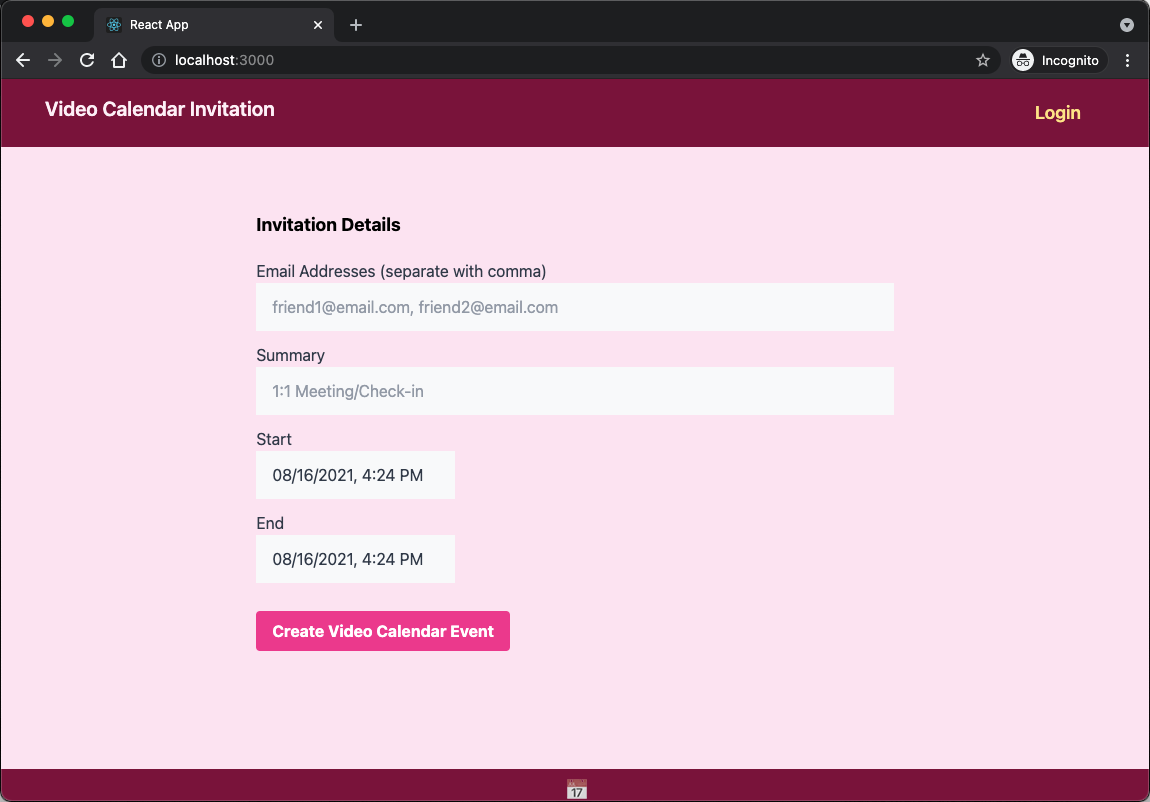
Navigate to http://localhost:3000/ in your browser. You will see a view like the image below:
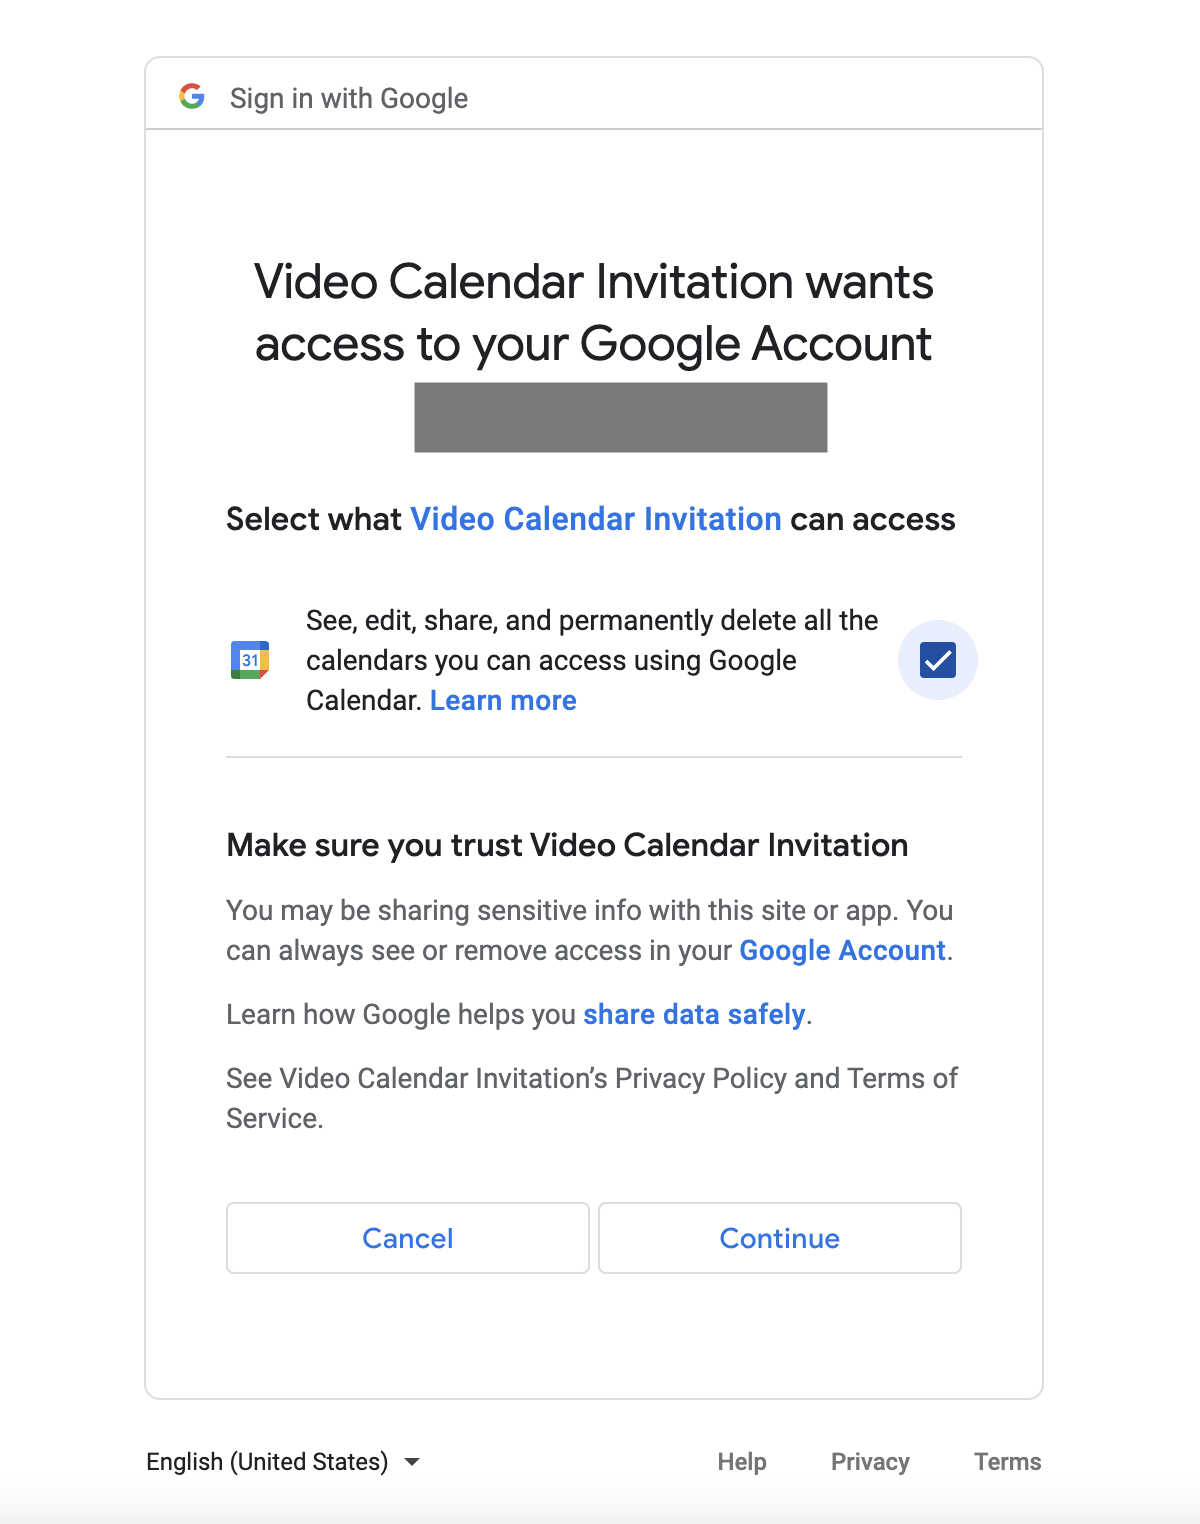
Click on the Login link in the top right corner of the page. You will be prompted to log in with your Google account (if you are not already logged in), or select which account you would like to use.
Once you have done this, you will be prompted for consent to share your calendar data with this application. Check the checkbox, then click the Continue button.
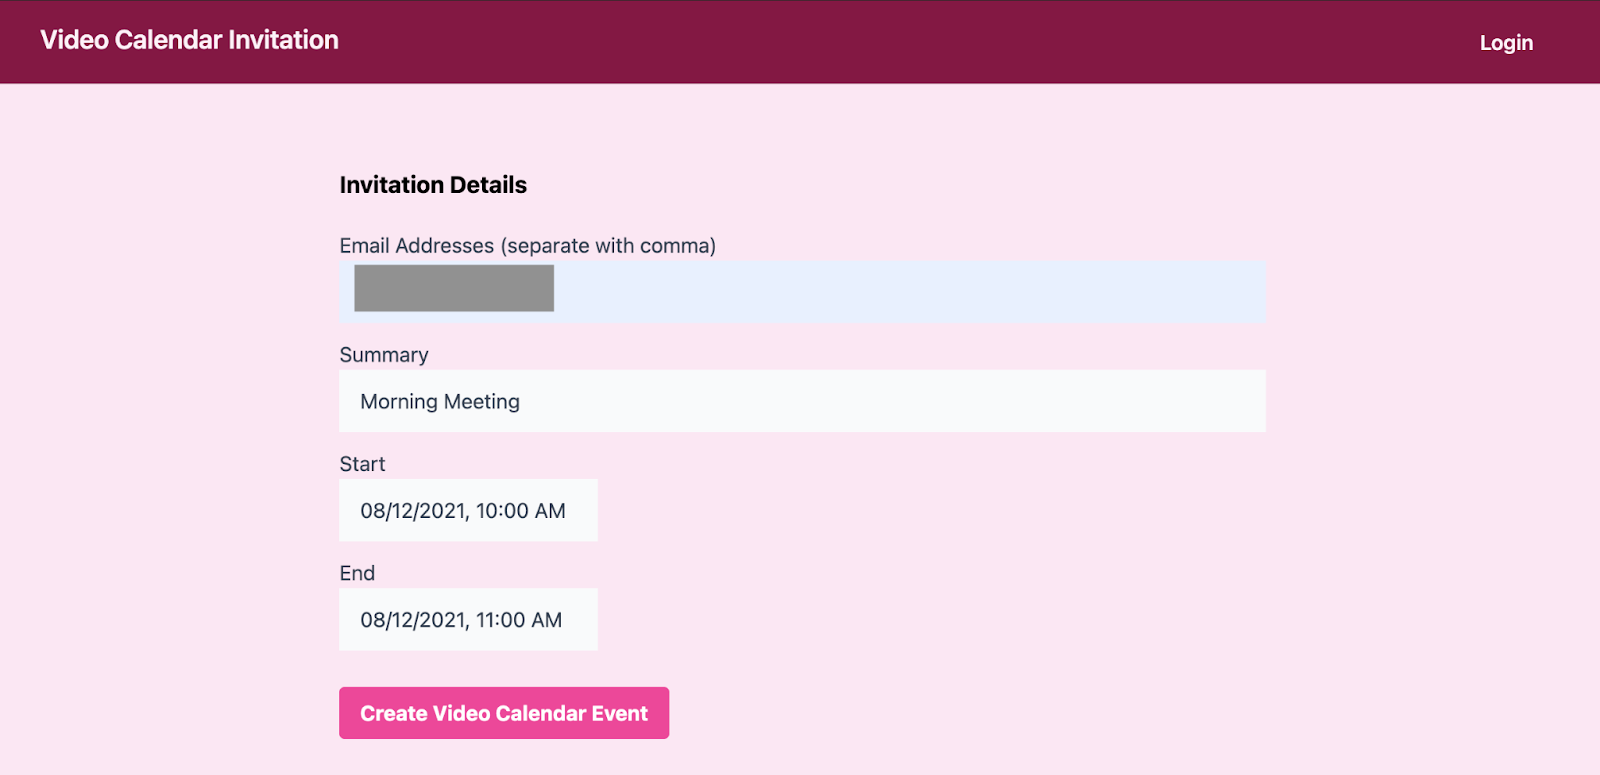
You will be redirected back to the React application you created, and there you will see the calendar event creation form:
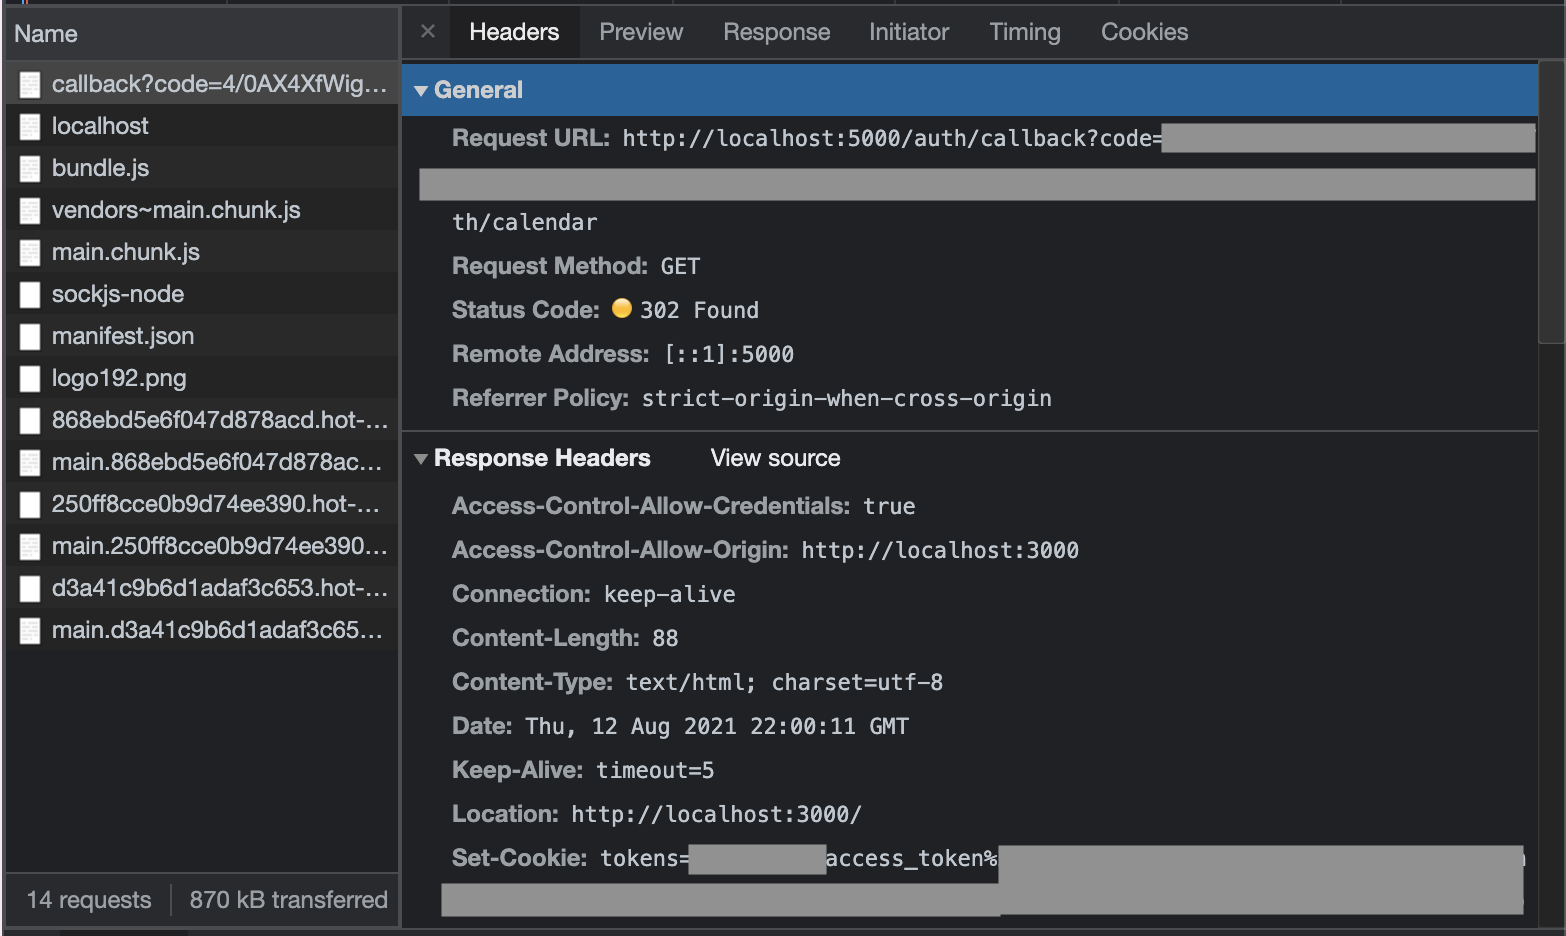
If you examine the callback request in the Network panel of your developer tools, you will be able to see the code returned from Google, as well as the tokens stored on the cookie.
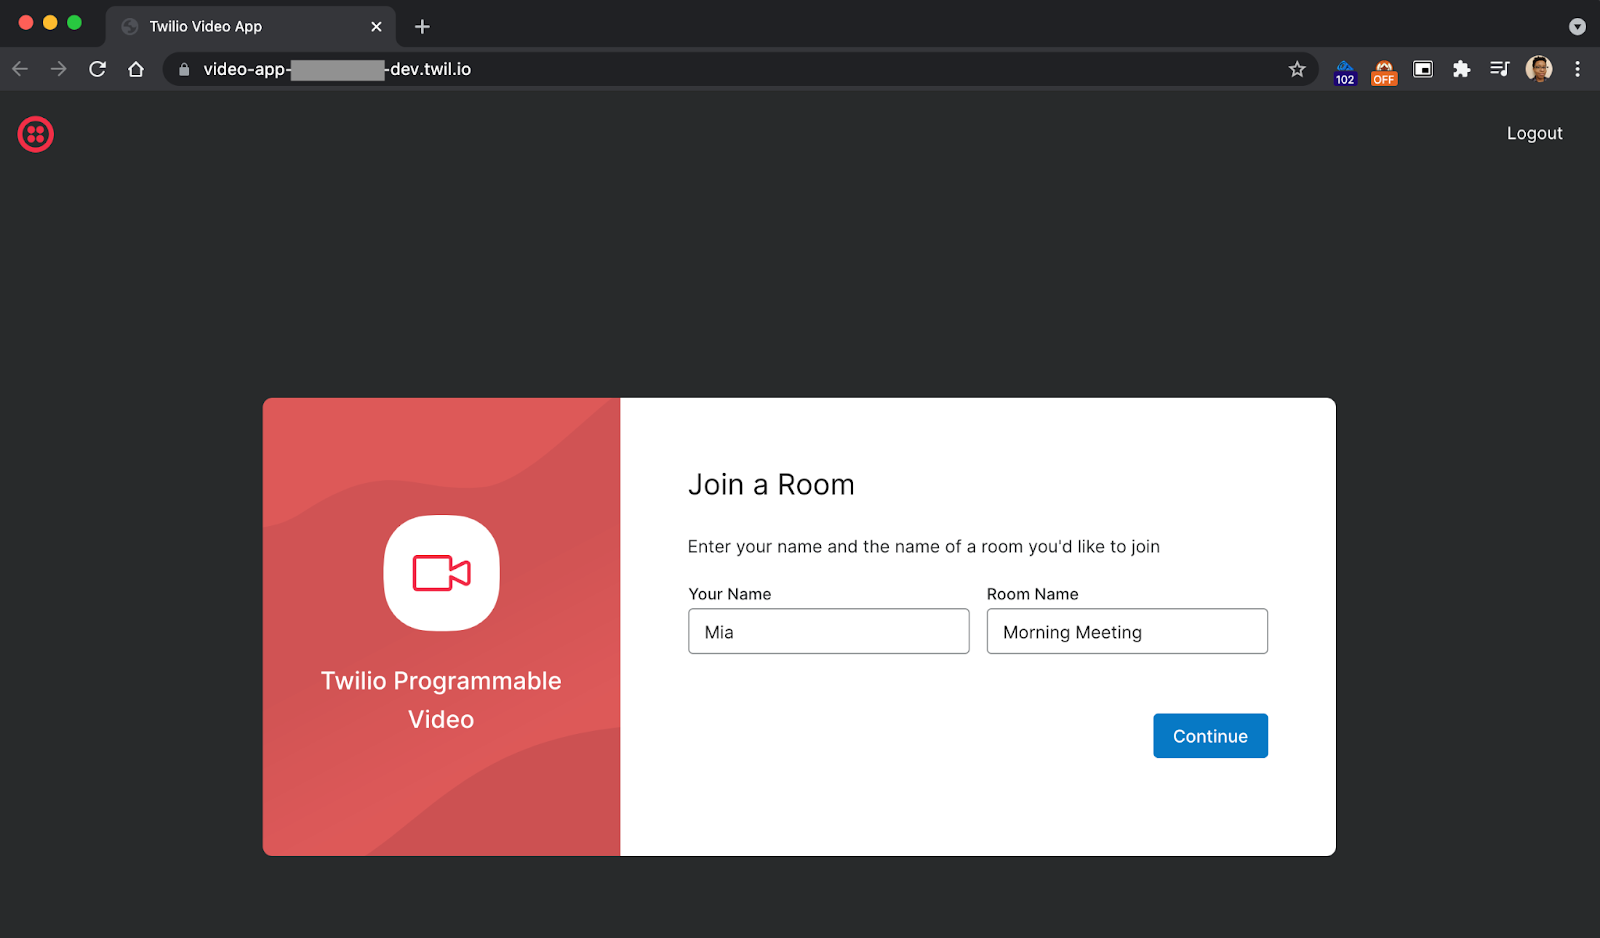
In the calendar event creation form, enter your email address in the email address field, write a short summary that will provide a title for the event as well as a video room name, and select some start and end times for your test event. In the image below, I have named my event "Morning Meeting", but you can name yours whatever you wish.
Once you have entered your event details, click the Create Video Calendar Event button to submit your request. You will see the Event Confirmation screen next, containing a link to your newly created event!

Click on this link in order to be taken to your Google Calendar. There, you will see the event you created!
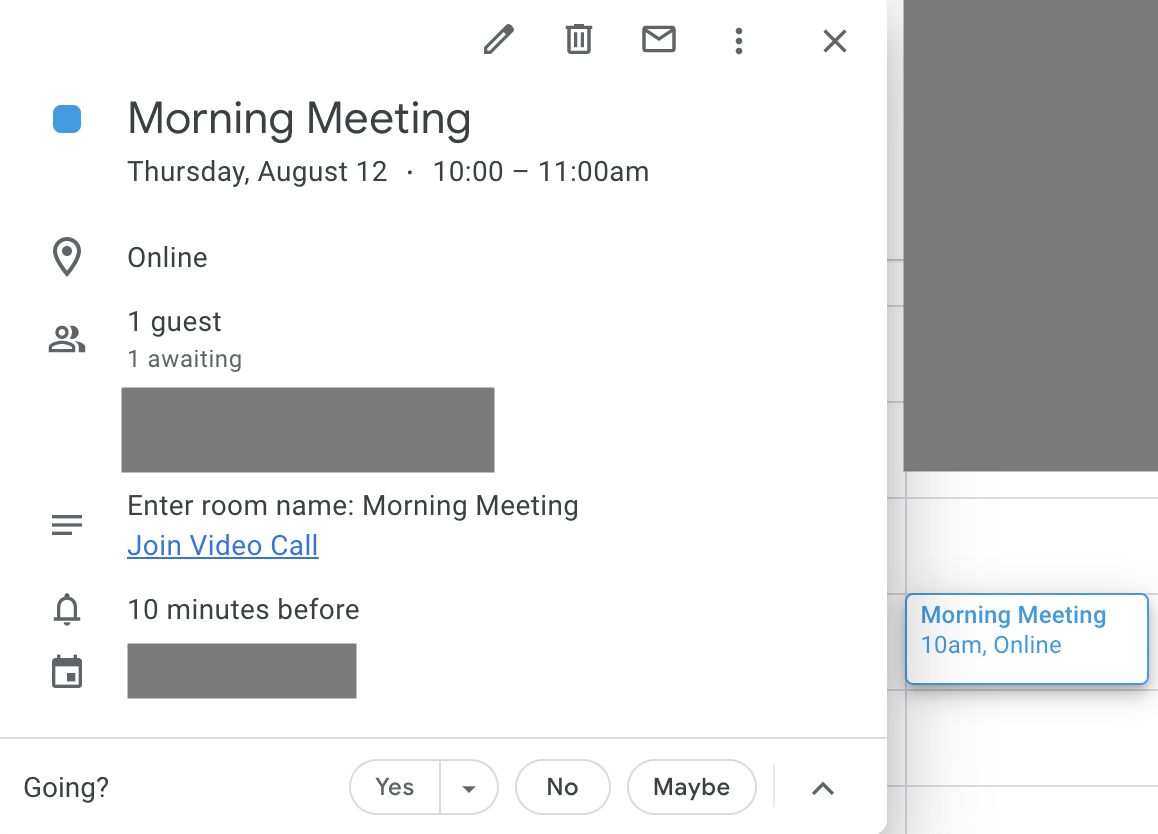
Exciting, right? If you look at the description field, you will see the Join Video Call link. Clicking this link will take you to the deployed Twilio Video application, and you will be able to start video chatting! Enter your name and the room name from the calendar invitation into the Twilio Video sign in form. Now you can chat with anyone else who has joined this room via the calendar invitation.
What's next for your video chat calendar invitations?
This application is just a demo of what you could do with Twilio Video and the Google Calendar API. There are so many directions you could take this from here. Perhaps you are interested in building out your own version of a Twilio Video application with JavaScript. Or maybe you want to learn how to add virtual backgrounds to your video chat? There are so many exciting things you can create. I can't wait to see what you build!
Mia Adjei is a Software Developer on the Developer Voices team. They love to help developers build out new project ideas and discover aha moments. Mia can be reached at madjei [at] twilio.com.


Related Resources
Twilio Docs
From APIs to SDKs to sample apps
API reference documentation, SDKs, helper libraries, quickstarts, and tutorials for your language and platform.
Resource Center
The latest ebooks, industry reports, and webinars
Learn from customer engagement experts to improve your own communication.
Ahoy
Twilio's developer community hub
Best practices, code samples, and inspiration to build communications and digital engagement experiences.