Add Twilio Programmable Chat to a Java Struts 2 Web App

March 26, 2018
Written by
Onwuka Gideon
Contributor
Opinions expressed by Twilio contributors are their own

bridge_struts

The need for real-time chat can’t be overemphasized. Real-time communication with your users increases customer satisfaction, and as a result, makes your business more credible.

In this article, I’ll walk you through setting up a Java Struts 2 application. Then we’ll add real-time chat to the application by leveraging Twilio Programmable Chat.

By the end of this tutorial, you’ll have built an application similar to this:

Java Struts 2 Adding Twilio Chat

Software Requirements

The following are used in this post:

  • Java SDK– Download and install the  Java SDK from Oracle’s site, if you don’t have it already. (I’m using version 9.0.1)
  • Eclipse IDE – Download and install Eclipse from their website. (I’m using Oxygen.1a Release (4.7.1a))
  • JavaScript (jQuery)
  • Maven (The most recent version of Eclipse includes Maven already)

Step 1: Set up Twilio Programmable Chat

First, we need to set up Twilio Chat Service and API keys from our Twilio account dashboard. Before all of that though, you’ll need a Twilio Account. (You can sign up for a free trial here).

Create a Chat Service

Chat Services are where all the Channels, Messages, Users and other resources within a Chat deployment live. Services are entirely siloed, and while you can have many Services in an Account, Services do not overlap or interact in any way.

To create a new Chat Service, log in to your Twilio account, or sign up for a free account if you don’t have one already.

Once logged in, note your ACCOUNT SID because we’ll need it later.

Twilio Account Credentials

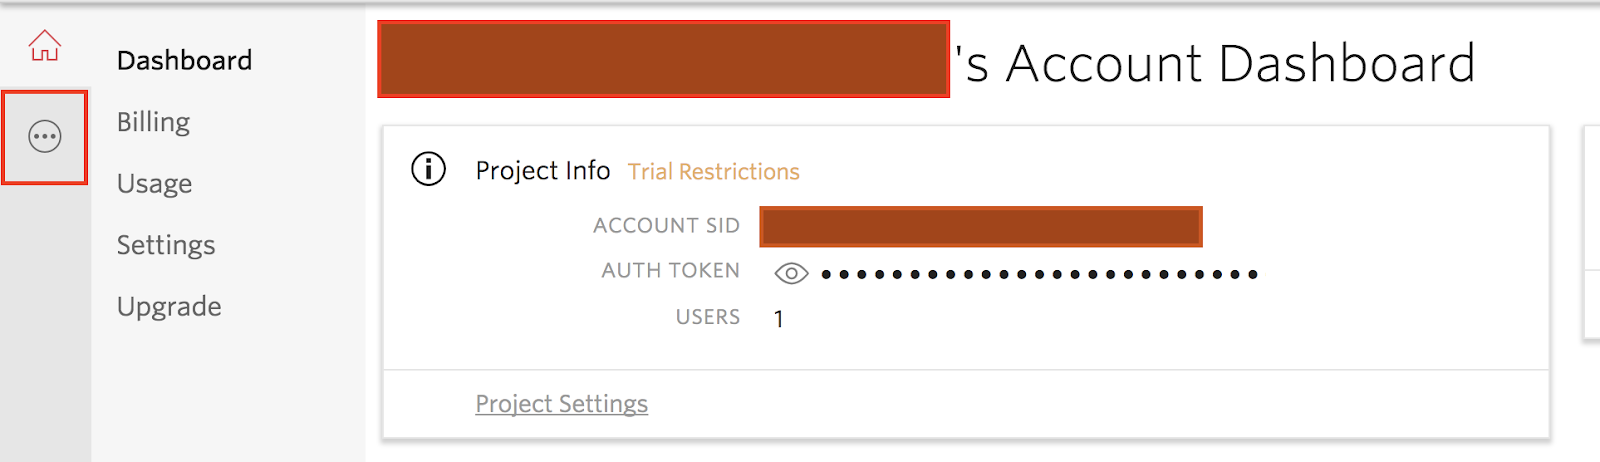
Click on the Console link on the left hand side of the page (marked with a red box in the image above).

Twilio Chat Console

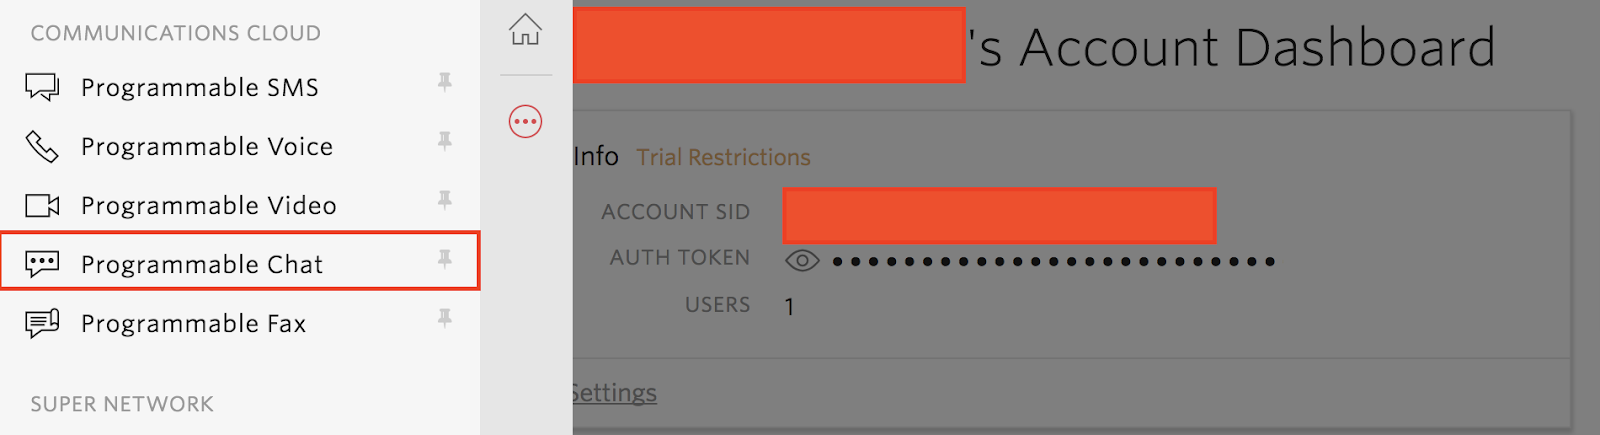
Next, click on Programmable Chat. On the next window that appears, click on the  icon to create a new Chat Service. Add a “Friendly Name” (eg: chatx-service) and click on Create to create the chat service.

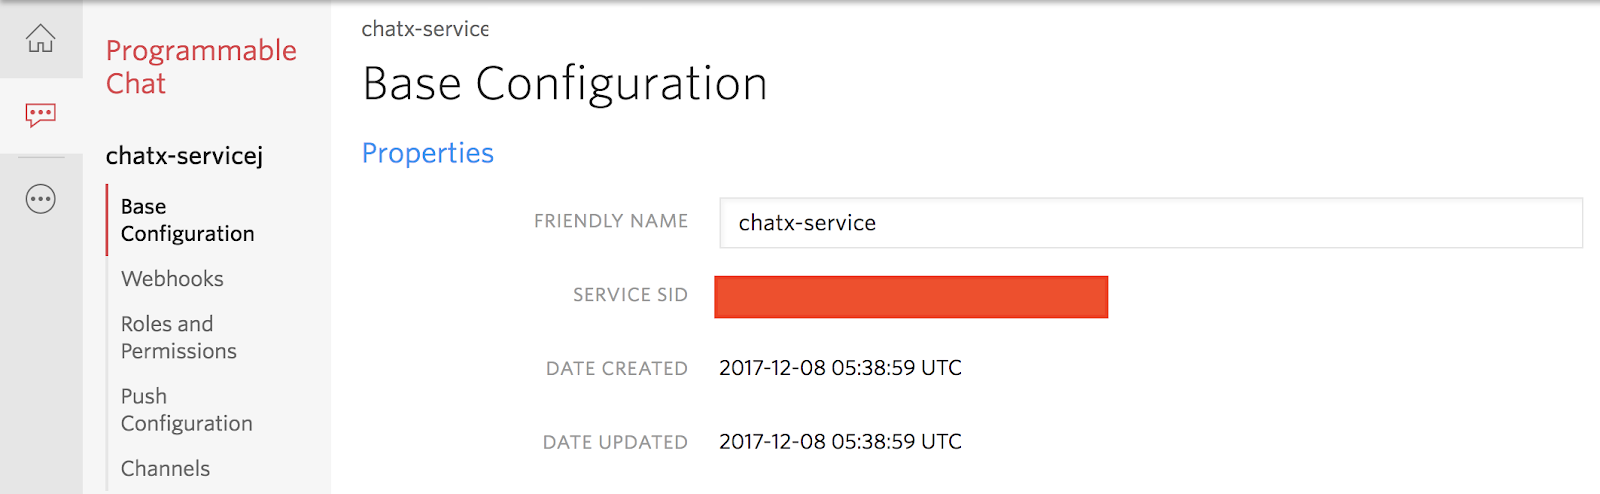
Once the service is created, note your SERVICE SID:

Programmable Chat Service SID

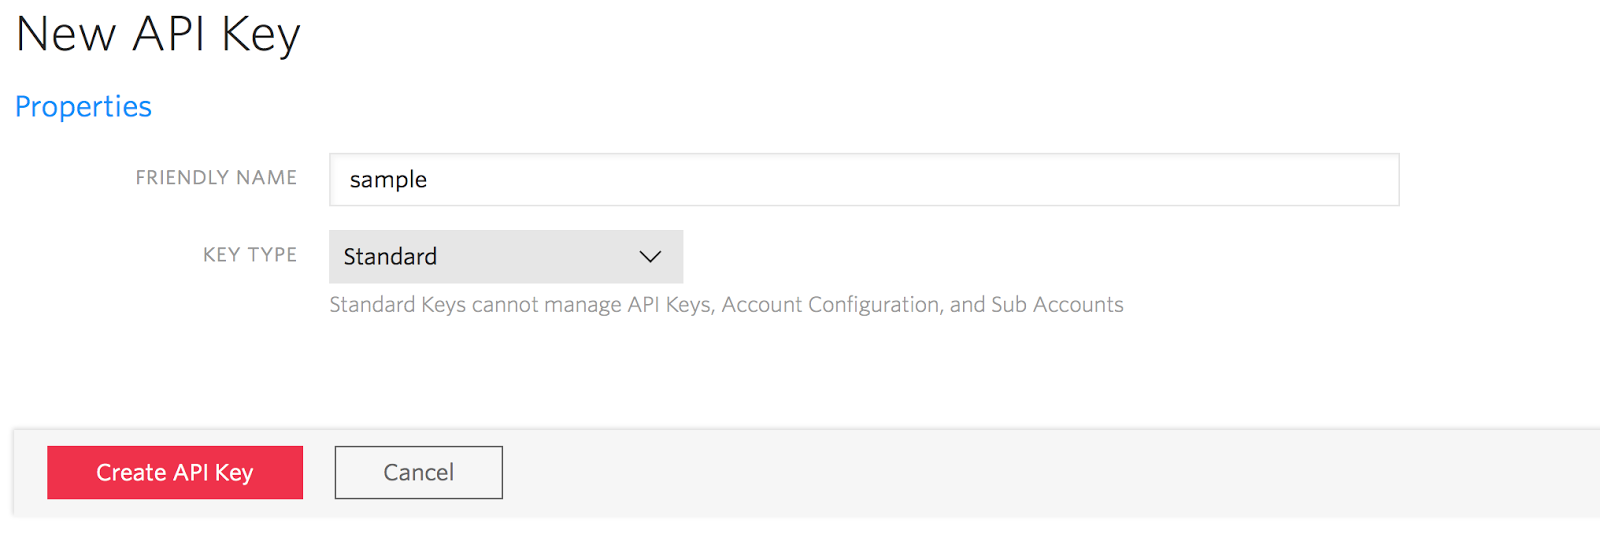
Next, let’s create an API Key for our service. Go back one page to the Chat Services page. Then click on Tools:

Programmable Chat Dashboard

Once the page is loaded, click on API Keys and then click on the sign to create a new API key:

Twilio Programmable Chat API Key

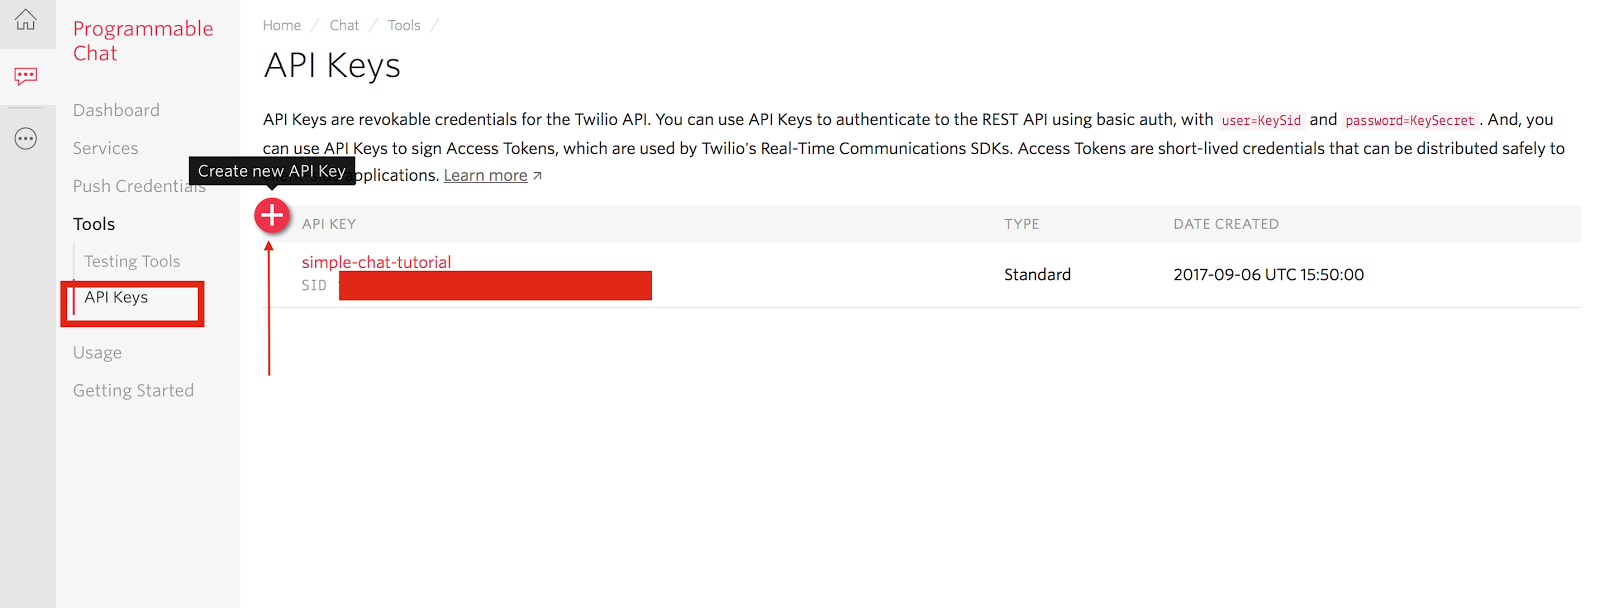
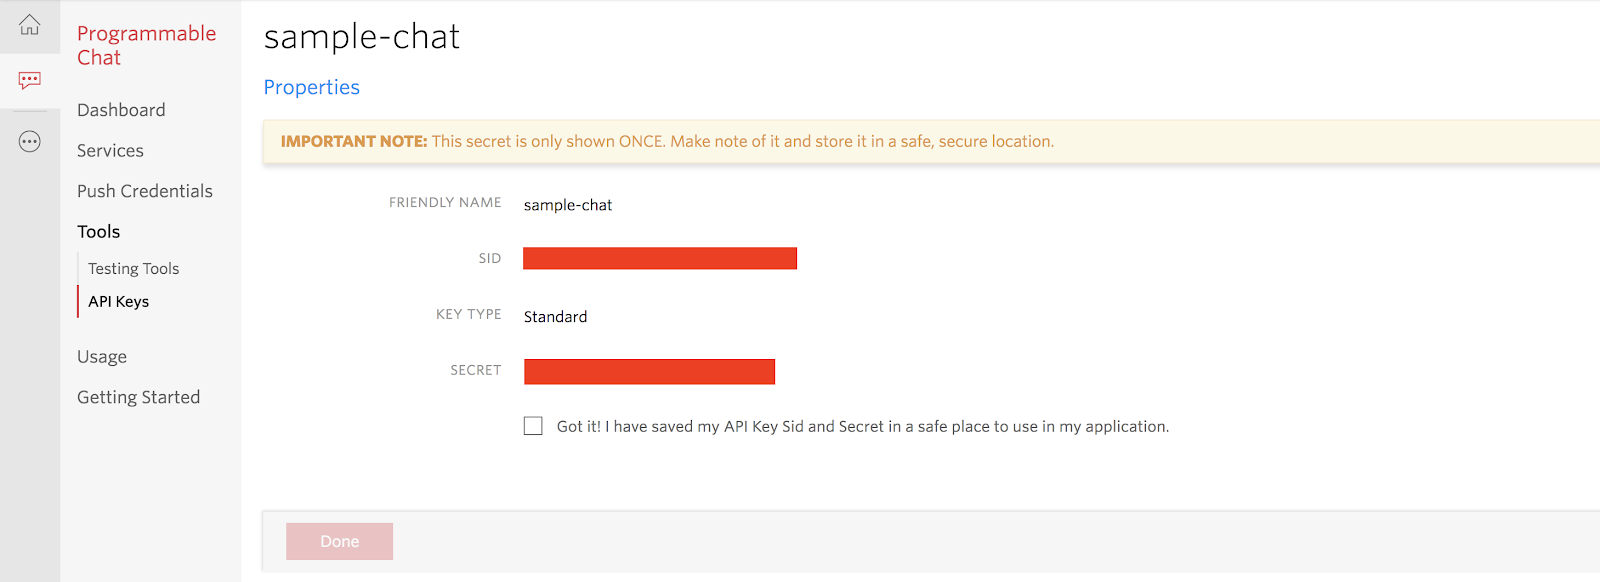
On this page, input a friendly name and then click the Create API Key button.

Create a new API Key for Twilio

We are done here! Note your API SID and SECRET so we can move on.

Sample Chat application

Step 2: Set up a Struts 2 application in Eclipse

Struts 2 is an MVC Web framework for developing enterprise Java web applications. It enables rapid development of Web applications and handles most of the plumbing required in large Web applications. A Struts 2 application is an ordinary Java Web application with a set of additional libraries.

Create a new project

To create a new project, open your Eclipse IDE then go to File >> New >> Others from the menu. You should get a prompt just like in the image below:

Struts 2 App in Eclipse

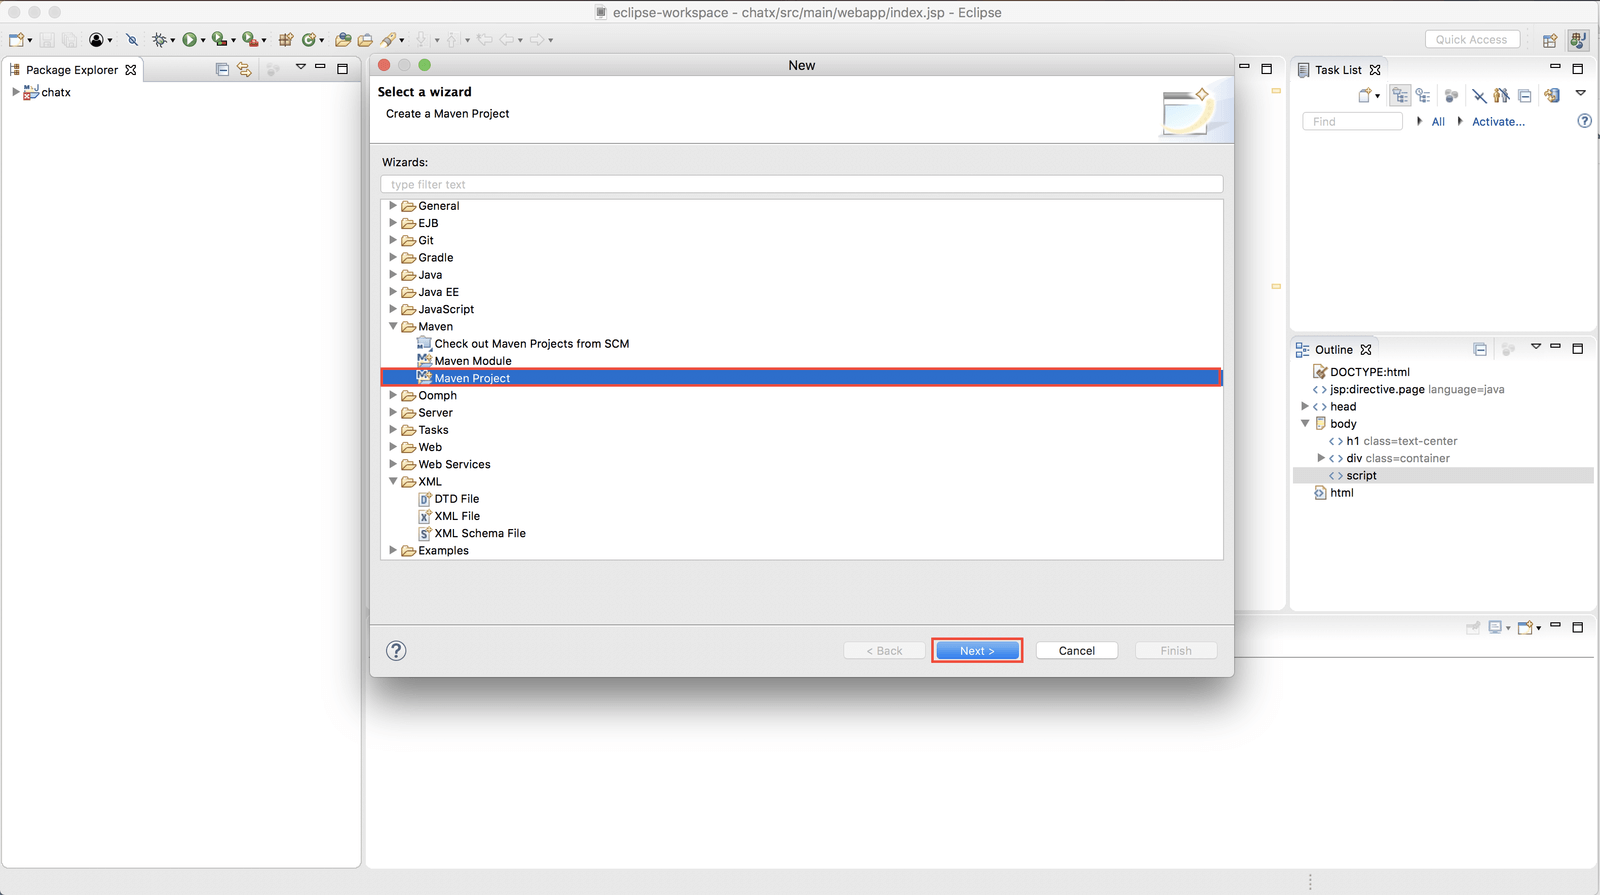
Now, Select Maven >> Maven Project then click on Next.

You should now have another window:

Maven Project setup

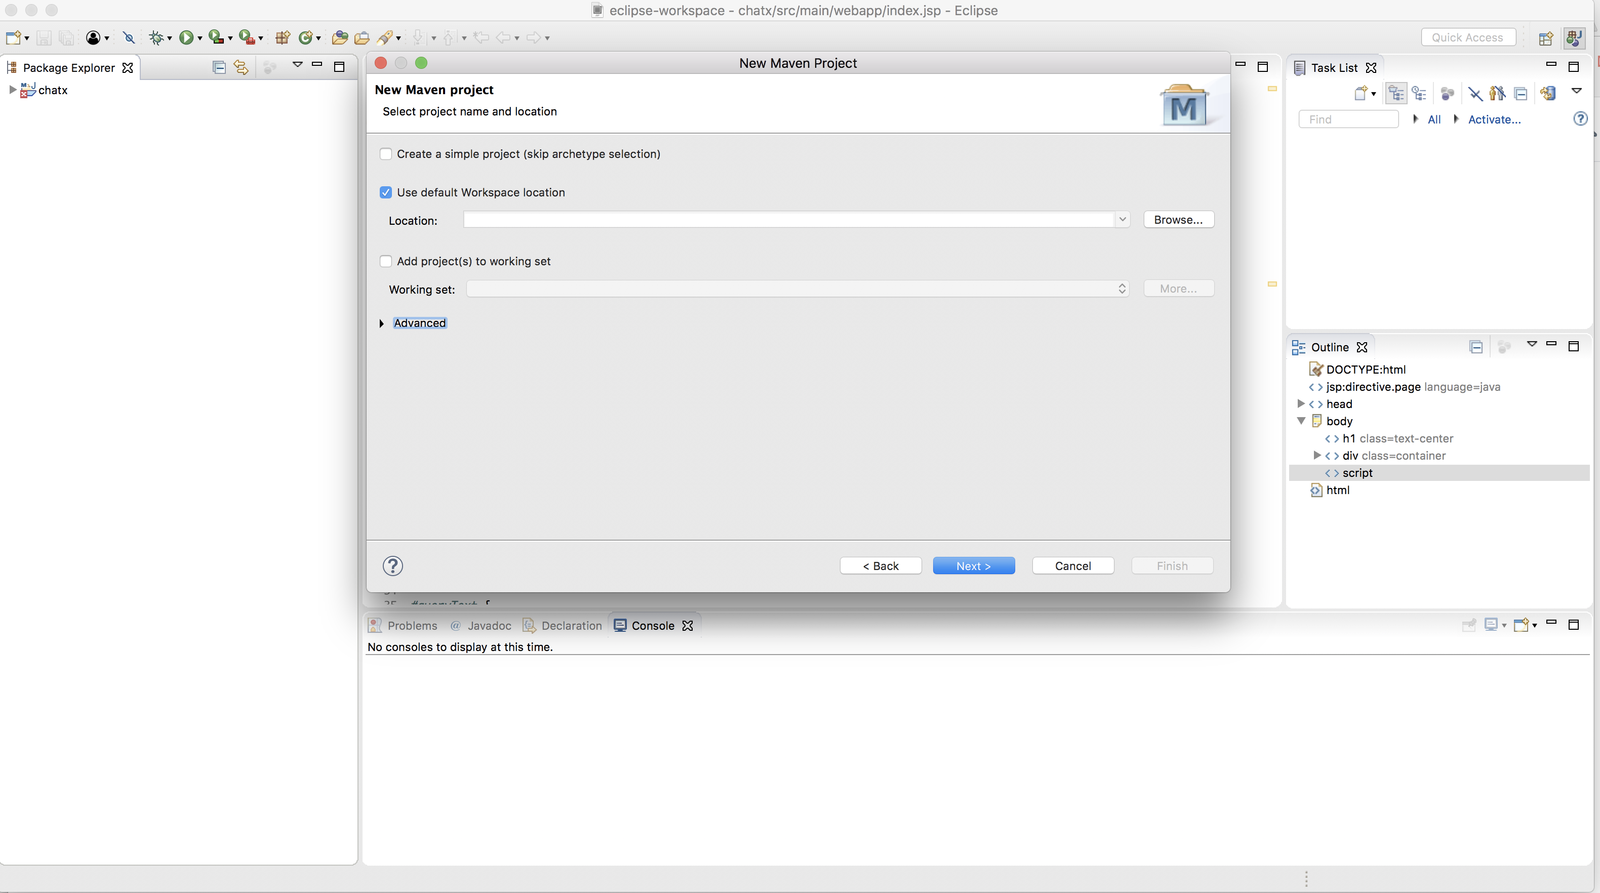
Now, select your project location; this is where your project’s files will be stored. Then click on Next to proceed. In my case, I used the default location by just clicking Next.

Project location

On the next window, select org.apache.maven.achetypes maven-achetype-webapp 1.0 then click on Next.

You will get a new window. On this window, put in the GroupId and ArtifactId then click on Finish.

light bulb
groupId will identify your project uniquely across all projects, so we need to enforce a naming schema. It has to follow the package name rules, which means that it has to be at least a domain name that you control, and you can create as many subgroups as you want. Look at More information about package names. eg. org.apache.maven, org.apache.commons
light bulb
artifactId is the name of the jar without version. If you created it then you can choose whatever name you want using lowercase letters and no strange symbols. If it’s a third party jar then you have to take the name of the jar as it’s distributed. eg. chatApp

Once done, a new project will be created for you:

Eclipse package explorer for new chatApp

Add Maven and Struts 2

Since we’ll use Maven to run the application, we need to add the jetty-maven-plugin to pom.xml. Add the following code to pom.xml:

<build>
    ... 
    <plugins>
        <plugin>
            <groupId>org.eclipse.jetty</groupId>
            <artifactId>jetty-maven-plugin</artifactId>
            <version>9.4.7.v20170914</version>
            <configuration>
                <webApp>
                    <contextPath>/${build.finalName}</contextPath>
                </webApp>
                <stopKey>CTRL+C</stopKey>
                <stopPort>8999</stopPort>
                <scanIntervalSeconds>10</scanIntervalSeconds>
                <scanTargets>
                    <scanTarget>src/main/webapp/WEB-INF/web.xml</scanTarget>
                </scanTargets>
            </configuration>
        </plugin>
    </plugins>
   ...
</build>

Now, from your Eclipse IDE, right click on the project name. Then go to Run As >> Maven build.

Configuring the Java app in Eclipse

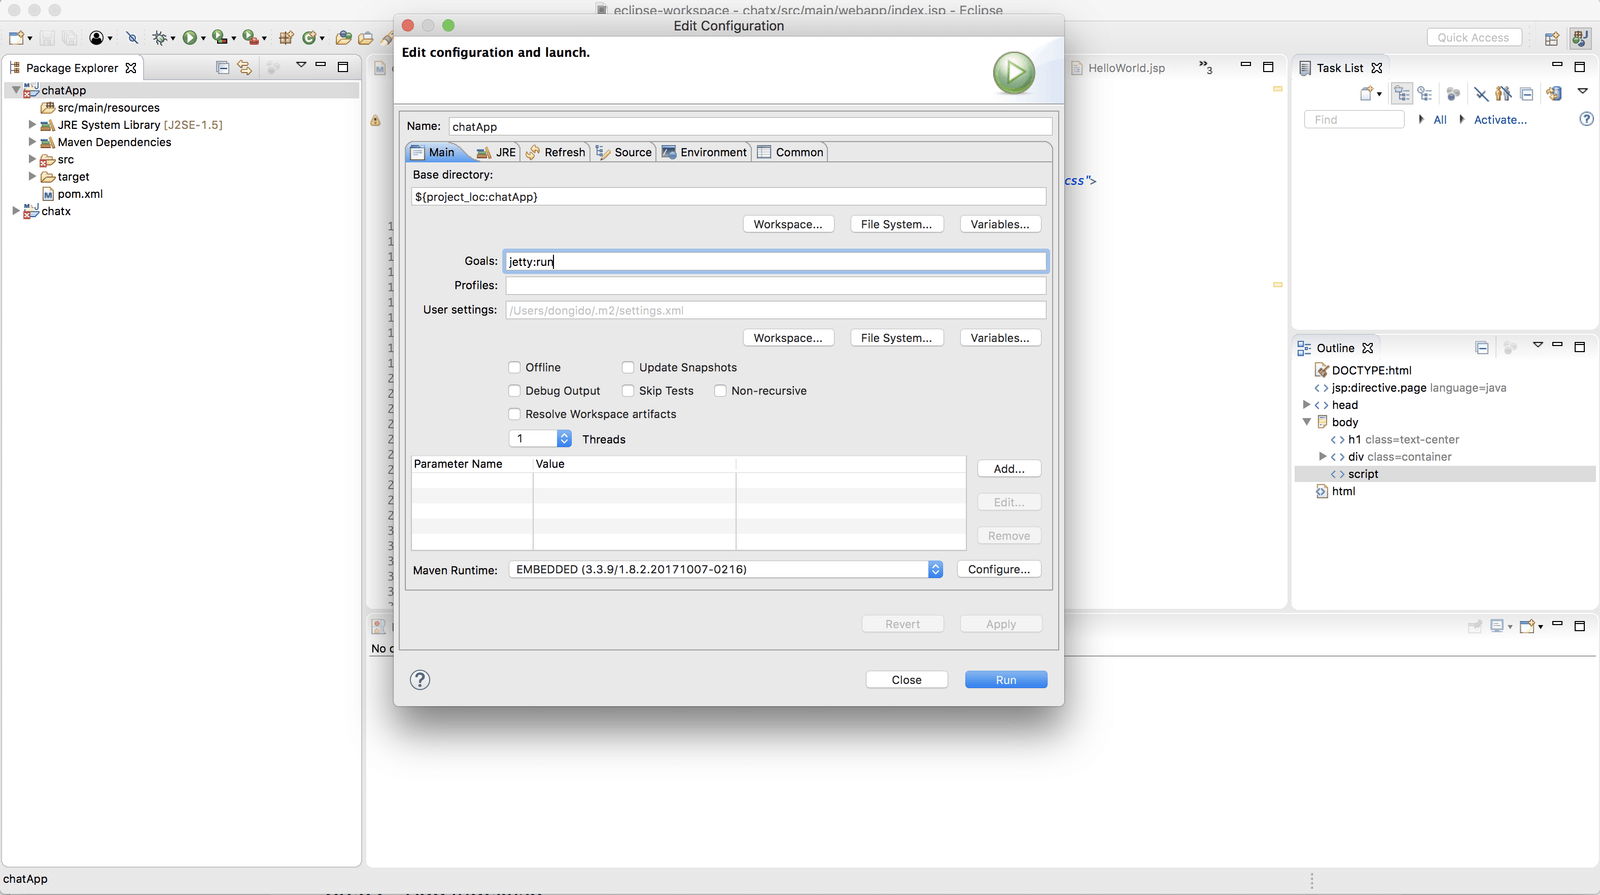
Next, input “jetty:run” in the goals field, click Apply, and then click on Run.

Visit http://localhost:8080/chatApp from your browser:

  • Note that chatApp is the folder name of your project. If you have used a different name, you should change the URL accordingly.

"Hello World!" in a Chat app
Next, we’ll add Struts 2 to the classpath of our app.  In pom.xml add the following to the dependencies node:
<dependency>
    <groupId>org.apache.struts</groupId>
    <artifactId>struts2-core</artifactId>
    <version>2.5.14</version>
</dependency>

Struts 2 libraries jar files will be downloaded and added to the project when you save.

Next, let’s add a Struts 2 plugin that will enable us to work with JSON. Add the following to the pom.xml dependencies node.

<dependency>
       <groupId>org.apache.struts</groupId>
       <artifactId>struts2-json-plugin</artifactId>
       <version>2.5.14</version>
</dependency>


Step 3: Add Java libraries

In order to build our app quickly, we’re going to take advantage of libraries from Apache, Twilio, and Struts.

Add logging

To see what’s happening under the hood like when errors occur or any other processes taking place, let’s add a logging dependency to our application.

Add the following dependencies to the pom.xml dependency node:

<!-- Note: updated to 2.16.0 after log4j security exploit found in Dec 2021 -->
<dependency>
    <groupId>org.apache.logging.log4j</groupId>
    <artifactId>log4j-core</artifactId>
    <version>2.16.0</version>
</dependency>

<dependency>
    <groupId>org.apache.logging.log4j</groupId>
    <artifactId>log4j-api</artifactId>
    <version>2.16.0</version>
</dependency>

Next, create a new file called log4j2.xml in src/main/resources and add the following code:

<?xml version="1.0" encoding="UTF-8"?>
<Configuration>
    <Appenders>
        <Console name="STDOUT" target="SYSTEM_OUT">
            <PatternLayout pattern="%d %-5p [%t] %C{2} (%F:%L) - %m%n"/>
        </Console>
    </Appenders>
    <Loggers>
        <Logger name="com.opensymphony.xwork2" level="debug"/>
        <Logger name="org.apache.struts2" level="debug"/>
        <Root level="warn">
            <AppenderRef ref="STDOUT"/>
        </Root>
    </Loggers>
</Configuration>


Add Twilio’s Java library

Twilio has a Java library that helps in interacting with its Chat API. To download and add the library to our application, update the pom.xml dependency node with the following:

<dependency>
    <groupId>com.twilio.sdk</groupId>
    <artifactId>twilio</artifactId>
    <version>7.14.4</version>
</dependency>


Add Struts 2 servlet filter

A filter is typically used to perform a particular piece of functionality either before or after the primary functionality of a web application is performed. Struts provides FilterDispatcher, a servlet filter class that initializes the Struts framework and handles all requests.

For the Struts 2 framework to work with our web application, we need to add its servlet filter class and a filter mapping.

Add the following to the web-app node in src/main/webapp/WEB-INF/web.xml:

<web-app>
...
<filter>
    <filter-name>struts2</filter-name>
    <filter-class>org.apache.struts2.dispatcher.filter.StrutsPrepareAndExecuteFilter</filter-class>
</filter>

<filter-mapping>
    <filter-name>struts2</filter-name>
    <url-pattern>/*</url-pattern>
</filter-mapping>
...
<web-app>


  • If you got an error after adding above, you need to restart your eclipse by clicking on File >> Restart from the eclipse menu.

Create struts.xml

struts.xml isn’t a library, but you can think of this as the router for our application. Struts 2 can use either an XML configuration file or annotations (or both) to specify the relationship between a URL, a Java class, and a view page (such as index.jsp). For our basic Struts 2 application, we’ll use a minimal XML configuration.

Create a new file called  struts.xml in src/main/resources:

<?xml version="1.0" encoding="UTF-8"?>
<!DOCTYPE struts PUBLIC
    "-//Apache Software Foundation//DTD Struts Configuration 2.5//EN"
    "http://struts.apache.org/dtds/struts-2.5.dtd">

<struts>

    <constant name="struts.devMode" value="true" />
  
    <package name="default" namespace="/" extends="json-default">
     <default-action-ref name="index"/> 
     
        <action name="index">
            <result>/index.jsp</result>
        </action>
    </package>

</struts>


Step 4: Craft the chat front end

Now that you have your backend built out, it’s time to work on the front end. We’ll write the user interface, generate authentication tokens, initialize Twilio Programmable Chat, and send and receive messages.

Build the Programmable Chat interface

Next, we’ll create a simple interface for our chat application. Open src/main/webapp/index.jsp and add the following markup to it:

<!DOCTYPE html>
<head>
  <title>Welcome To Struts 2 chat!</title>
  <meta charset="utf-8">
  <meta name="viewport" content="width=device-width, initial-scale=1">
  <link rel="stylesheet" href="https://maxcdn.bootstrapcdn.com/bootstrap/3.3.7/css/bootstrap.min.css">
  <link rel="stylesheet" href="assets/custom.css">
  <script src="https://ajax.googleapis.com/ajax/libs/jquery/3.2.0/jquery.min.js"></script>
  <script src="https://maxcdn.bootstrapcdn.com/bootstrap/3.3.7/js/bootstrap.min.js"></script>
  <script src="https://media.twiliocdn.com/sdk/js/chat/v1.2/twilio-chat.min.js"></script>
  <script src="assets/custom.js"></script>
</head>
<body>
   <h1 class="text-center">Welcome To Struts 2 chat!</h1>
   
    <div class="container" style="border: 2px solid gray;">
            <!--msgbox-->
      	<div id="msgItems" class="container-fluid"> </div>
              
            <!-- querybox-->
            <div class="row text-center" id="queryText">
                  
               <div class="hideForm">
                    <div class="row">
                        <div class="col-xs-9">
                             <input type="text" class="form-control" placeholder="Type your Message Here" id="message">
                        </div>
                        <div class="col-xs-3">
                            <button type="button" class="btn btn-primary" id="submitMessage">Send Message</button>
                        </div>
                    </div>
               </div>
               
               <div class="initiateChat">
                   <div class="row"> <h4>Setting up chat, Please wait...</h4> </div>
               </div>
               
               <div id="chatName">
                     <form class="form-inline">
                        <div class="form-group">
                             <input type="text" class="form-control" id="userName" placeholder="your username">
                        </div>
                             <button type="button" class="btn btn-primary" id="startChatting">Start Chatting!</button>
                    </form>
               </div>
                    
           </div>       
    </div>
</body>
</html>

In the markup above, we have included Bootstrap and used it to design a simple chat interface. We also include jQuery and Twilio’s Javascript SDK, both of which we’ll need later.

Create a new file as src/main/webapp/assets/custom.css and add the following css styles to it:

body {
  padding-top: 50px;
}

#queryText {
  position : relative;
  bottom : 4%;
  padding: 0.3%;
  background : grey;
  min-width : 200px;
}

#queryText  input {
  width : 100%;
}


#queryText form div {
  margin-left: auto;
  margin-right: auto;
}

#queryText {
  border : 0px solid black;
  padding: 10px;
}

#chat-item {
  border-bottom : 1px solid grey;
}

#msgItems div img {
  background : blue;
  display : inline;
}

#msgItems {
   height: 400px;
   overflow: scroll;
}
.hideForm, .initiateChat {
  display: none;
}
.input-large {
 padding: 5px 150px;
}

Finally, create src/main/webapp/assets/custom.js and add the following code to it:

$(function() {
	
	var chatChannel = ""; // we will assign this to the channel payload later...

	$("#startChatting").click(function() {
	    	   
	    if( $("#userName").val() ) { // if user provides a username
	        	
	    		 $("#chatName").hide();
	        	 $(".initiateChat").show();
	    	}
	});
     // Other code coming below soon…
});

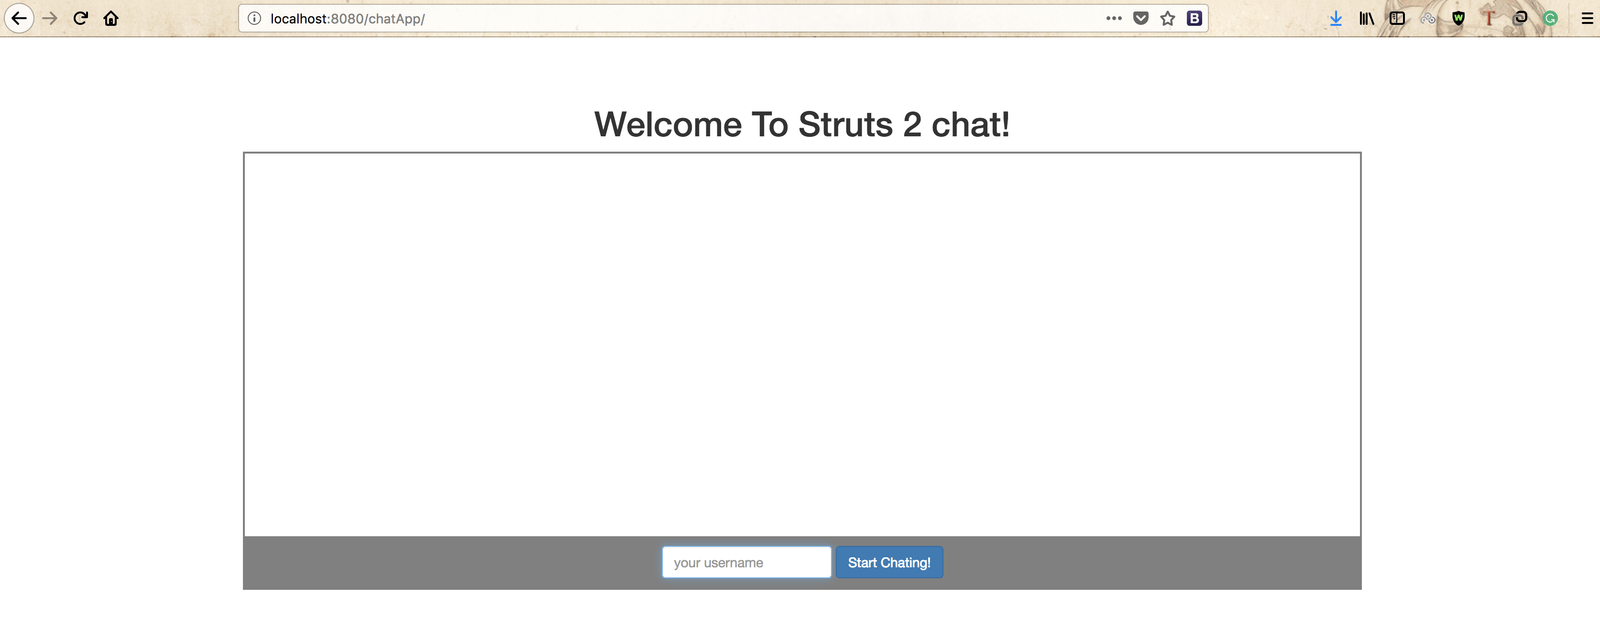
Now restart the server, and visit the webpage again: https://localhost:8080/chatApp/. If all has gone well, you should see something like this:

Java Struts 2 Chat

Generate access tokens

For users to start exchanging messages, Twilio needs to identify them and make sure they have the right to do so. We’ll need to give these users an access token that tells Twilio who they are and what they can do. We’ll create an endpoint on our server for providing access tokens.

Add a helper class

Create a new folder called java in src/main. Then create a new file called CreateToken.java in the src/main/java folder and add the following code to it:

package com.tchatapp.chats.twilio;

import com.twilio.jwt.accesstoken.AccessToken;
import com.twilio.jwt.accesstoken.ChatGrant;

public class CreateToken {

	  public static String token(String identity) {
	    String twilioAccountSid = "AC***********************";
	    String twilioApiKey = "SK**************************";
	    String twilioApiSecret = "**************************";

	    String serviceSid = "IS****************************";
	    String appName = "chatX";
	    String endpointId = appName + ":" + identity + ":";

	    ChatGrant grant = new ChatGrant();
	    grant.setEndpointId(endpointId);
	    grant.setServiceSid(serviceSid);

	    AccessToken token = new AccessToken.Builder(twilioAccountSid, twilioApiKey, twilioApiSecret)
	        .identity(identity).grant(grant).build();
	    
	    return token.toJwt();
	  }

}

Update twilioAccountSid, twilioApiKey, twilioApiSecret and serviceSid with the Twilio API keys you wrote down earlier.

  • Note that the com.tchatapp.chats.twilio package does not exist by default. You should resolve this to a package by clicking on the light bulb symbol that appears on the left hand side of that line in Eclipse.

Add an action class

We need a route users can visit to get an access token. Create a new Java class file called TokenGenerator.java in src/main/java/ folder then add the following code to it:

package com.tchatapp.chats.action;

import com.opensymphony.xwork2.ActionSupport;
import com.tchatapp.chats.twilio.CreateToken;

public class TokenGenerator extends ActionSupport{

	private String token = "", identity;
	
	public String execute() {
	    
		this.token = CreateToken.token( this.getIdentity() );
		
		return SUCCESS;
	}

    public String getToken() {
    	   return this.token;
    }
    
    public String getIdentity() {
  	  return this.identity;
    }
  
   public void setIdentity(String identity) {
  	 this.identity = identity;
   }
}

Don’t forget to resolve this to a package, too.

Now, add the following to src/main/resources/struts.xml:

...
<action name="token" class="com.tchatapp.chats.action.TokenGenerator" method="execute">
      <result type="json"/>
</action>
...

We now have a route available: http://localhost:8080/chatApp/token. When this URL is visited, the execute method in TokenGenerator.java will be invoked.

When someone accesses this route, we expect them to pass along their identity, or username, in a POST request, which is then used to generate an access token for them.

To keep things simple, we are using only a username to uniquely identify each user using our app, and we expect the username to be unique. However in our app there is no enforcement mechanism to make sure the username is unique. In real life, you should have authentication in place to make sure all users are unique.

Integrate Twilio Programmable Chat

Now that we can generate an access token, lets initialize the Chat SDK on the client so we can start sending and receiving messages.

Channels are where the action takes place. Lets create a “general” channel so users can chat there.

Add the below code to src/main/webapp/assets/custom.js:

   // get existing channel or create new channel
	function getExistingChannelOrCreateNew(chatClient) {
	    return chatClient
	        .getPublicChannelDescriptors()
	        .then(function(paginator) {
	           if (paginator.items.length > 0) {
	        	       return paginator.items[0];
	            }
	            else {
	            	
	               chatClient
	                .createChannel({
	                   uniqueName: "general",
	                   friendlyName: "General Chat Channel"
	               })
	               .then(function(newChannel) {
	                   console.log("Created general channel:");
	                   console.log(newChannel);
	                   return newChannel;
	               });
	            }
	        })
	        .then( function(channel) {
	        	    return channel;
	        })
	        .catch(error => console.log("error getting channel", error) || error);
	}

Note that it should be added inside:

   $(function() {
       …
            
   });

In the function above, we first checked if the “general” channel has been created. If it already exists we’ll return it; otherwise we’ll create it.

Next, let’s write a function that will initialize the chat. Update ‘src/main/webapp/assets/custom.js’ with the code below:

	// initialize the chat
	function initializeChat(token) {
		
	   Twilio.Chat.Client.create( token )
	   .then( function(client) {
		   getExistingChannelOrCreateNew(client)
		   .then( function(channel) {
	              return channel.getChannel();
		   })
		   .then( function(channel) {
			   return channel.join(); //join the channel
		   })
		   .then( function(channel){
			   chatChannel = channel;
			   // alert("I am done setting up your chat dude!");
			   $(".hideForm").show();
			   $(".initiateChat").hide();
		   });
	   });
	}

We have Twilio.Chat.Client.create( token ) available to us from the Twilio JavaScript SDK we included in index.jsp. Twilio.Chat.Client.create( token ) will initialize the chat service using the token we generated.

Next, let’s add another function to fetch the access token. Once it has been retrieved, we’ll initialize the Chat Service by calling the initializeChat(token) function.

Add the below function to src/main/webapp/assets/custom.js:

	// fetch access token
	function fetchAccessToken(username) {
	    $.post('token', {identity: username, device: 'browser'})
	      .done(function(response) {
	        console.log('Successfully finished fetch of the Access Token.');
	         // Initialize the chat SDK
	         initializeChat(response.token);
	        
	      })
	      .fail(function(error) {
	        console.log('Failed to fetch the Access Token with error: ' + error);
	      });
	}

Now let’s initialize Twilio Chat SDK. Update src/main/webapp/assets/custom.js with the following line of code:

$("#startChatting").click(function() {
               
    if( $("#userName").val() ) { // if user provides username
        ...
        const username = $("#userName").val()  
        fetchAccessToken(username);  
        ...
    }
});

When a user clicks on the start chatting button, We’ll call the fetchAccessToken() with the username as a parameter(In this function, we have the initializeChat() which initializes the chat using the generated token).

If you have followed correctly, your custom.js file should look exactly like this:

$(function() {
	
	var chatChannel = "";    // we will assign this to the channel payload later...

	$("#startChatting").click(function() {
	    	   
	    if( $("#userName").val() ) { // if user provides username
                       const username = $("#userName").val()
	            fetchAccessToken(username);
	            $("#chatName").hide();
	        	$(".initiateChat").show();
	    }
	});
	
	// get existing channel or create new channel
	function getExistingChannelOrCreateNew(chatClient) {
	    return chatClient
	        .getPublicChannelDescriptors()
	        .then(function(paginator) {
	           if (paginator.items.length > 0) {
	        	       return paginator.items[0];
	            }
	            else {
	            	
	               chatClient
	                .createChannel({
	                   uniqueName: "general",
	                   friendlyName: "General Chat Channel"
	               })
	               .then(function(newChannel) {
	                   console.log("Created general channel:");
	                   console.log(newChannel);
	                   return newChannel;
	               });
	            }
	        })
	        .then( function(channel) {
	        	    return channel;
	        })
	        .catch(error => console.log("error getting channel", error) || error);
	}

	// initialize the chat
	function initializeChat(token) {
		
	   Twilio.Chat.Client.create( token )
	   .then( function(client) {
		   getExistingChannelOrCreateNew(client)
		   .then( function(channel) {
	              return channel.getChannel();
		   })
		   .then( function(channel) {
			   return channel.join(); //join the channel
		   })
		   .then( function(channel){
			   chatChannel = channel;
			   $(".hideForm").show();
			   $(".initiateChat").hide();
		   });
	   });
	}

	// fetch access token
	function fetchAccessToken(username) {
	    $.post('token', {identity: username})
	      .done(function(response) {
	        console.log('Successfully finished fetch of the Access Token.');
	         // Initialize the chat SDK
	         initializeChat(response.token);
	        
	      })
	      .fail(function(error) {
	        console.log('Failed to fetch the Access Token with error: ' + error);
	      });
	}
});


Send and display messages

Now that you have Twilio Programmable Chat ready to go, you’re finally able to glue everything together! Let’s continue on and see how to send messages and display them in the interface.

When a user submits a message, we’ll send the message to Twilio so that they can broadcast it to other users on the channel.

Add the following code to src/main/webapp/assets/custom.js:


// sending message
$("#submitMessage").click( function() {
   var message = $("#message").val();
   chatChannel.sendMessage(message); // send to Twilio Server
   $("#message").val("");
});

When there are new messages, we will append messages to the HTML div with the id “msgItems“. Update src/main/webapp/assets/custom.js with the code below:

// listen for messages and append to HTML DOM as we receive them
function appendMessage(data) {
   $("#msgItems").append(
	 `<div id="chat-item" class="row">
	      <div class="cols-xs-4">	
	         <p>
                 <b> ${data.author} </b>
                    <img src="http://placehold.it/30X30" class="img-circle img-responsive">
	              ${data.body}
	          </p>   
	      </div>
	 </div>`
   );
}

We can call this new function in initializeChat() by adding the following code after the channel is joined:

  ...
    chatChannel.on("messageAdded", function(message) {
                // append message...
                appendMessage(message.state);
    });
   ...

The function should look like the below after updating it:

	// initialize the chat
	function initializeChat(token) {
		
	   Twilio.Chat.Client.create( token )
	   .then( function(client) {
		   getExistingChannelOrCreateNew(client)
		   .then( function(channel) {
	              return channel.getChannel();
		   })
		   .then( function(channel) {
			   return channel.join(); //join the channel
		   })
		   .then( function(channel){
			   
			   chatChannel.on("messageAdded", function(message) {
			         // append message...
		                    appendMessage(message.state);
		               });

			   $(".hideForm").show();
			   $(".initiateChat").hide();
		   });
	   });
	}


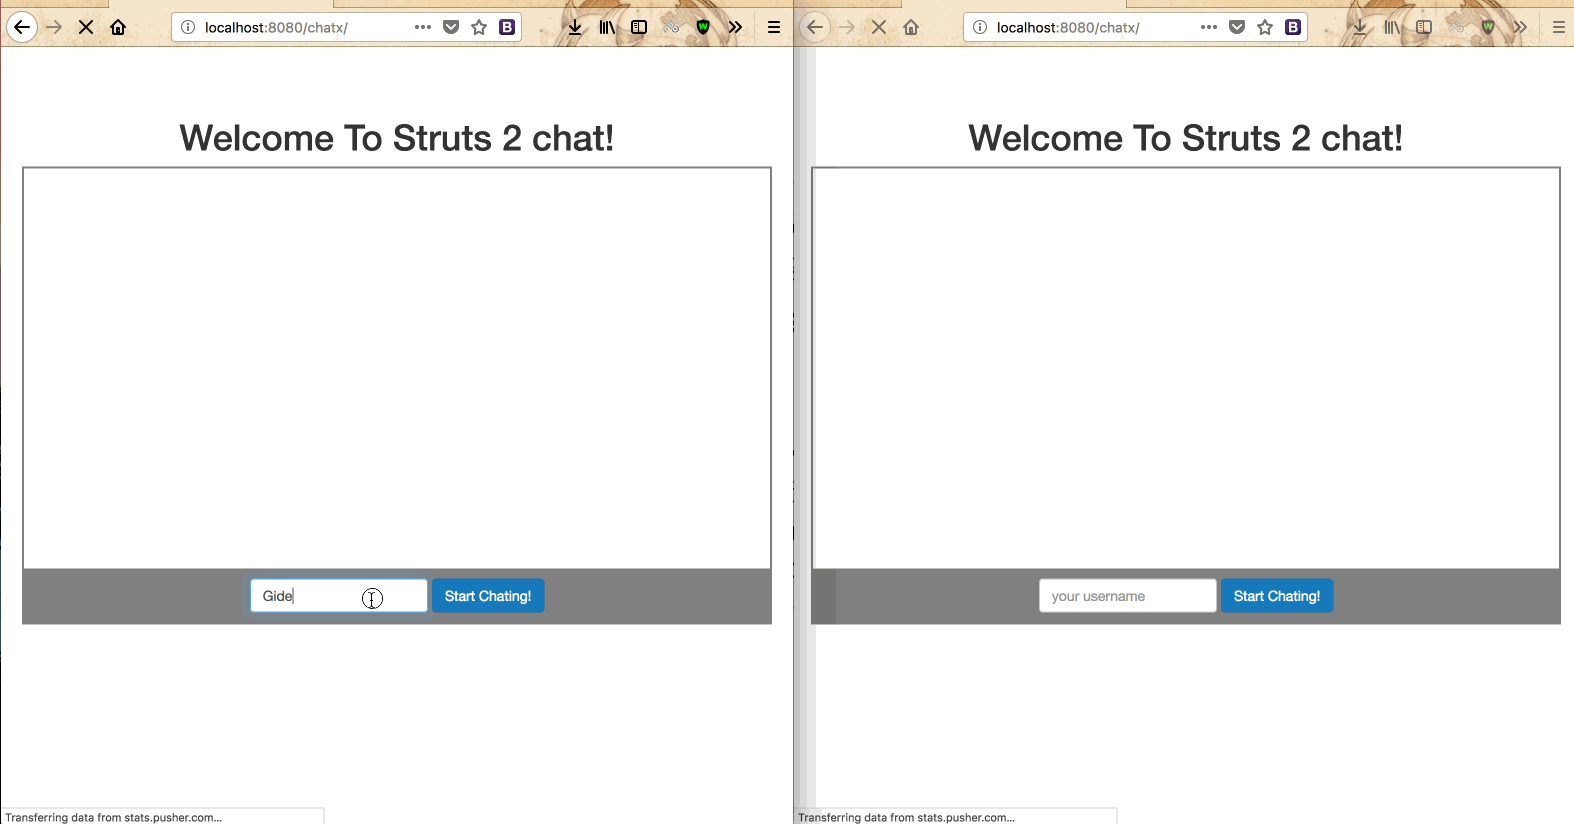
Step 5: Test our finished Struts 2 chat app

Load up the application in different browser tabs, or share with your friends and start communicating.

Testing Twilio Programmable Chat in Struts 2

Conclusion: Adding Programmable Chat to a Java Struts 2 Application

Twilio’s Programmable Chat API is really simple to use and makes life easy when it comes to adding real-time communication to web applications. We have learned the basics of adding Twilio Programmable Chat to a Java Struts 2 application, but there are so many other things you could add. The source code for this app can be found on Github.

If you have any questions or observations, feel free to reach me on twitter at @gideon_onwuka. I’ll be more than happy to respond to you.