How to Send SMTP Emails in Node.js With SendGrid
Time to read:
March 11, 2022
Written by
Reviewed by
When it comes to email services in application development, a hosted email API – such as Twilio SendGrid – is the way to go as it offers ways to customize the setup to your needs. However, you may want to send emails through SMTP (Simple Mail Transfer Protocol) if it is already on your existing platform and since it is an email standard that's used universally. Luckily, Twilio SendGrid offers an SMTP Relay service without having to set up your own server. You’ll also still have access to in-depth metrics, analytics tracking, increased deliverability rates and even more SendGrid features through the X-SMTPAPI header.
In this tutorial, you’ll learn how to send out emails through Twilio SendGrid’s SMTP Relay in Node.js.
Prerequisites
- Node.js installation
- A free Twilio SendGrid account. Sign up here to send up to 100 emails per day completely free of charge
- An email address to test out this project
- Visual Studio Code or your preferred IDE
Configure SendGrid
To get started, you’ll need to do two things with SendGrid: Verify your Sender Identity, and generate your API key.
Verify your Sender Identity
SendGrid customers are required to verify their Sender Identity to ensure that they own the email address that they’ll be using. A Sender Identity represents your 'From' email address—the address your recipients see as the sender of your emails.
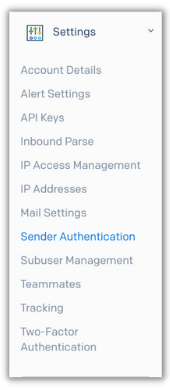
Log on to SendGrid and head over to the settings tab on the left-hand side. Click on the dropdown and click on Sender Authentication.
Within the Sender Identity section click on the Verify a Single Sender button and fill out the form that pops up with your information.
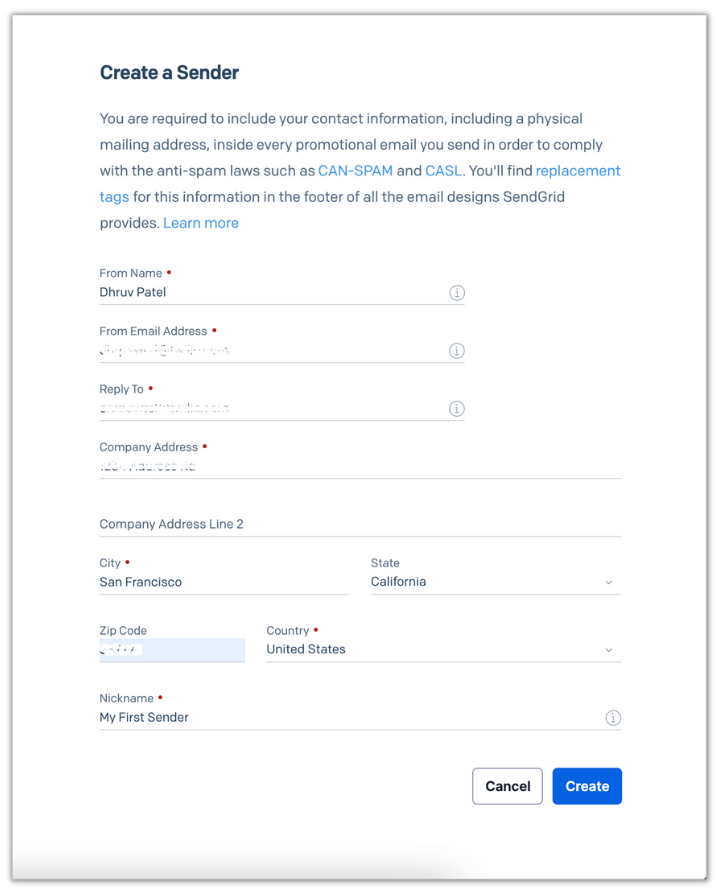
Once the form is filled, click on the blue Create button and you’ll receive an email in your inbox to verify your email address. Open that email and click on Verify Single Sender which will redirect you back to SendGrid to let you know that your email is ready to be used.
Generate your API key
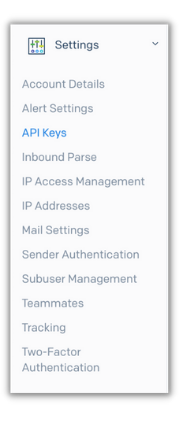
On your SendGrid dashboard, head to the API Keys section by heading to the settings tab on the left-hand side and clicking API Keys.
Click the blue “Create API Key” button on the top right and a form will appear.
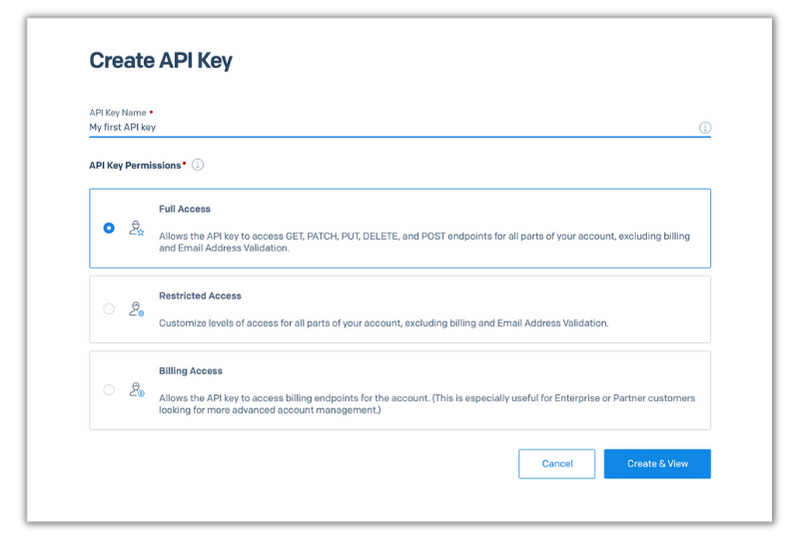
Choose whatever name you’d like for your API key and click the blue Create & View button. Copy your API key and store it in a safe place.
Build your Node.js Application
Now that you have verified your email address and have gotten your API key with SendGrid, let's start building out the application.
In your terminal or command prompt, navigate to your preferred directory and enter the following commands to create your project:
This command will create your project file and scaffold out your Node project by creating a package.json file that will contain your project's metadata and package dependencies.
Next, you’ll need to install two dependencies: dotenv and Nodemailer. dotenv will be used to store environment variables and Nodemailer – the most popular Node.js email package – will be used to send emails through SMTP. Enter the following command in your terminal to install these dependencies:
To store your SendGrid API key, create a file in the same directory named .env and place the following in it, while replacing the XXXXXX placeholders with your actual API key:
Now create a file called index.js in the same directory and add the following code to it:
This code will initialize nodemailer and import environment variables from the .env file. It will then create a transporter with a given server host, port number, and authentication data.
SendGrid’s server host for SMTP relay is smtp.sendgrid.net and the recommended port to use is 587.
For the authentication data, you will need to provide a username and password. For connecting with SendGrids SMTP server, the username will be “apikey” and the password will be your actual API key. SendGrid will use the given API key to connect with your SendGrid account where you’ll be able to track and view sent emails.
Add the following code below the transporter:
This last code chunk uses the transporter to send out an email with a given message configuration. It will then log the result of the email being sent.
X-SMTPAPI header
You can also pass in headers to the ”header” property to the message configuration. SendGrid’s SMTP service also allows you to pass SendGrid a JSON string with as many SMTP objects as you want through a header named X-SMTPAPI. Through this header, you can integrate SendGrid features – such as filters, scheduled sends, substitution tags and more – to your SMTP emails. For more information on this, check out Building an X-SMTPAPI Header on the SendGrid docs and SendGrid’s Node.js SMTPAPI helper library.
Send an email through SMTP
Before running the code don’t forget to change the SENDER_EMAIL and RECIPIENT_EMAIL placeholders with their respective email addresses.
Lastly, save the file, head back to your terminal and run the following command:
You should see your console log that the email has been sent with the SMTP response code being 250. This means that the email has been successfully sent and delivered to the recipient.
Check the inbox of the recipient’s email and you’ll see the email that you sent through your code.
Next Steps
Nice! You’ve just successfully sent an email through SMTP using Node.js. Using SendGrid’s SMTP relay makes it easy for you to switch your existing SMTP server to SendGrid’s server without losing out on SendGrid functionality.
Going forward, you can even enable dedicated IP pools, suppression groups, and scheduled sends all through the X-SMTPAPI header with SendGrid. Happy building!
Dhruv Patel is a Developer on Twilio’s Developer Voices team. You can find Dhruv working in a coffee shop with a glass of cold brew or he can either be reached at dhrpatel [at] twilio.com or LinkedIn.
Related Posts

Related Resources
Twilio Docs
From APIs to SDKs to sample apps
API reference documentation, SDKs, helper libraries, quickstarts, and tutorials for your language and platform.
Resource Center
The latest ebooks, industry reports, and webinars
Learn from customer engagement experts to improve your own communication.
Ahoy
Twilio's developer community hub
Best practices, code samples, and inspiration to build communications and digital engagement experiences.