How to Build a PDF Analyzing Bot with Haystack AI, Python, and WhatsApp
Time to read:
April 02, 2024
Written by
Reviewed by
PDF files are a way to share voluminous textual information with anyone, but at times the knowledge you seek is at a point in the PDF which you cannot keep searching for. In cases like this the ability to chat with the PDF comes in handy.
In this post, you will learn how to build a PDF question-answering chatbot in python using Twilio Programmable Message API for WhatsApp and the Haystack Large Language Model (LLM) .
Prerequisites
To follow along the tutorial you need to set the following:
- A Twilio Account. If you haven’t yet, sign up for a free Twilio trial .
- Python version 3. Can be downloaded here. This tutorial uses Python version 3.11.
- An IDE. Visual Studio Code is recommended, but you can follow along with your preferred one.
- The ngrok CLI , exposes your local development environment over the internet.
- A smartphone with WhatsApp installed to test your chatbot.
- A basic understanding of FastAPI .
Building the chatbot functions
Set up the Development Environment
To set up a development environment, open the command line and run the following commands:
These commands create a new directory named askpdf_whatsapp and navigate into it. Then a Python virtual environment name venv is created and activated.
Next, create a file named requirements.txt that would contain the list of the required packages and add the following code to it.
Here is a breakdown of all the packages in the file:
- twilio : A Twilio Python Helper Library. Used to access Twilio API functionalities.
- fastapi : A package for the FastAPI, a modern, fast (high-performance) web framework for building APIs with Python 3.7+.
- uvicorn : An ASGI web server implementation for Python. Used together with the FastAPI package.
- python-multipart : A streaming multipart parser for Python. The FastAPI package uses it to accept multipart form data like files.
- pymupdf : A Python library for the manipulation of PDF. It is used in this tutorial to read pdf files.
- Farm-haystack[inference]: An open-source Large Language Model framework in Python. The tutorial uses version 1.24
- python-decouple : A library used to organize settings and separate settings from code. It can be used to read values from .ini and .env files which is how it is used in this tutorial.
Run the following command in the terminal to install the packages.
Read PDF to Text
Create a file named utils.py and add the following code that extracts the text from the PDF.
The extract_text function takes the URL of the PDF and a path of the output folder as the parameters.
The breakdown of the function:
- The
requestslibrary is used to make an HTTP call to the PDF URL and the content is written to a temporary file,temp_file.write(), - The
fitz.open(pdf_filename)opens the PDF file and returns a content that can be enumerated over [enumerate(doc)]. The text is then extracted page-by-page usingpage.get_text()into the output folder with a naming of style 0_ouptut.txt.
Next create the main.py file to expose an API endpoint and use the extract_text() function.
Here is the breakdown of the code parts:
- The code file imports
FastAPIandRequestfrom the FastAPI package andextract_textfunction from the utils.py file. - An endpoint
/receiveaccepts the incoming request and uses therequest.form()to retrieve the request body that is sent. Media data received from the Twilio WhatsApp API is named in styleMediaUrl{n}. And since you are expecting one media, you can pick the first one withMediaUrl0. Check out more information about the data received from the Twilio WhatsApp API here . - If the key
MediaUrl0is available, it is passed into theextract_textfunction and the output file pathdoc_file_pathis passed into it. This will create a local directory with the name docs_files.
Build the function to answer questions
To build the Question and Answer function, you will make use of a predefined pipeline provided by the Haystack LLM, the ExtractiveQAPipeline , whose task is to find the answers to a question by selecting a segment of text.
First step is to build the pipeline. Add the following code to the utils.py file:
The build_pipeline function takes the file_path which is the directory that contains the text files of each page of the PDF file in the format {index}_output.txt (0_output.txt, 1_output.txt). The function also accepts the name of the file to save the model to.
Here is a breakdown of the code parts:
- The
TextIndexingPipelineis created using an in-memory storageInMemoryDocumentStorewhere all the text files are passed into. - The
BM25Retrieverretrieves the data from the document store. The retriever combs the DocumentStore and returns only the documents it thinks are relevant to the query. - Next, the
readeris set up using a premade modeldeepset/roberta-base-squad2. The reader is responsible for accepting the documents that theretrieverreturns and selecting a text span that provides an answer to the query. - Finally, the
pipelineis then built and saved to amodel_fileusingpickle. The pipeline accepts the reader and retriever and uses them for each question.
Dumping the model into a pickle file allows its usage anytime it is needed without building the pipeline again.
To make use of the pipeline to answer the question, create a function as shown below in the utils.py file.
- The function takes in the name of the pipeline
model_fileand the question, and tries to check if the file exists. If it does not, that means a PDF has not been uploaded. - Next, the pipeline is loaded using the
pickle.load()method and thepipeline.runmethod from the Haystack framework is used to accept the question and set some parameters for the Retriever and the Reader. Check out more on the parameters here . - The
predictionsvariable that is returned contains a list of other values that do not need to be shown as a result; the next code lines filter the answer from the list and return a dictionary (answer_dict) with key-value pair ofanswerandcontext.
Finally, use the two functions in the API endpoint in the main.py file.
Update the main.py file with the following code:
The /receive endpoint now does the following:
Retrieves the form data using
request.form()and extracts fields with the keys ofMediaUrl0as a file andBodyas a body (a naming synonymous to Twilio WhatsApp API Message structure).If the
MediaUrl0key exists and the corresponding value,pdf_urlis not empty, the functionsextract_textandbuild_pipelineare called. Then a message is returned to ask the questions.If it is the
bodythat has some value, thepredict_answerfunction is called and the answer is returned to you.
Integrate the Twilio Programmable Message API for WhatsApp
If you are on a free trial, you have to join the WhatApp Sandbox. It is an environment set up for prototyping.
Do not use the WhatsApp Sandbox for production. For production, you can either get a Twilio phone number approved to be used with WhatsApp or you can get your WhatsApp number to be approved for use on Twilio.
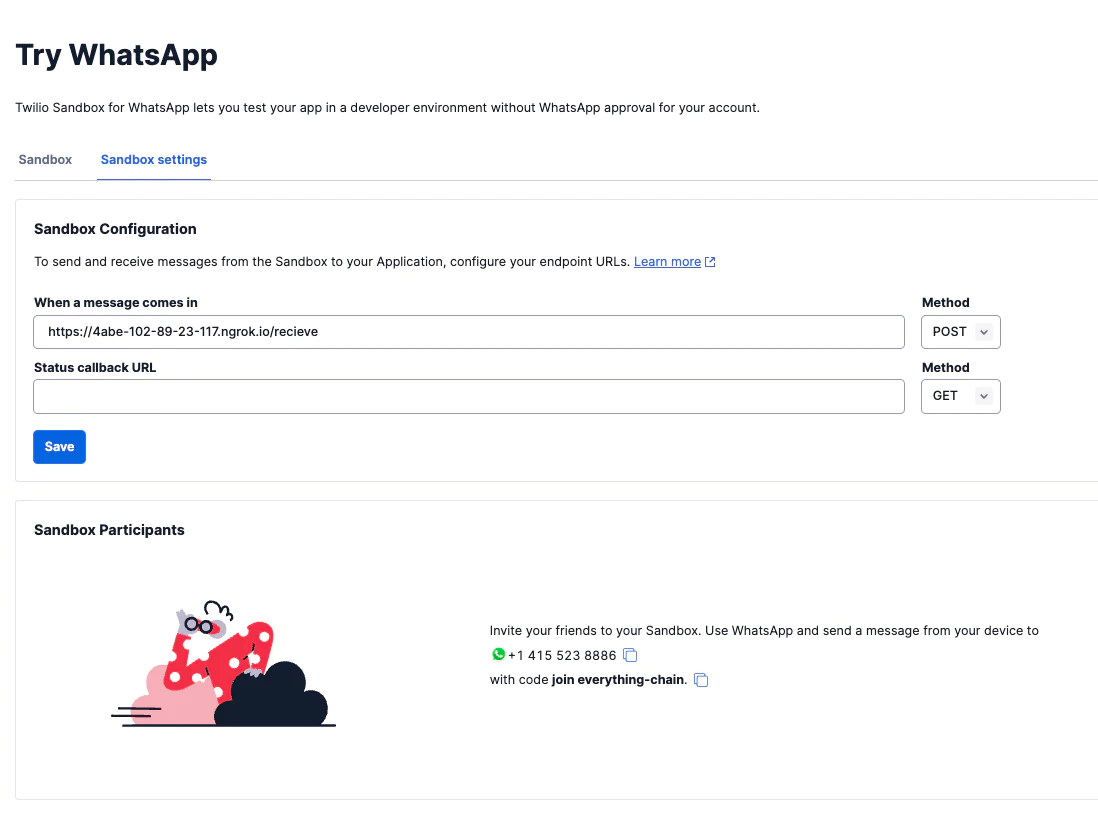
To set up the WhatsApp Sandbox, login to the Twilio Console. Navigate to Explore Products > Messaging > Try it out > Try WhatsApp.
Scan the QR code or send the "join" message shown on the screen to your Twilio WhatsApp Sandbox number. The sandbox expires after three (3) days after which you have to join the sandbox again by scanning the QR code or send the message again.

Next click on the Accounts > API Keys & Tokens section from the dashboard header.

Copy the credentials ACCOUNT_SID and AUTH_TOKEN.
Create a .env file to contain the credentials and the you WhatsApp Sandbox number.
Update the .env file as follows:
Do not store your credentials inside the code files. Always manage with environment files or secret files.
Add code functionality to send WhatsApp Message
Add the function to send a WhatsApp Message to the utils.py:
A Client object is built from the credentials that were saved in the .env file and used to call the messages.create method that accepts the recipient phonenumber to and the message to be sent body_text.
Then, update the main.py file to send a WhatsApp message after every event.
- For the
/receiveendpoint to follow the Twilio webhook convention, it will now return a response of type TwiML (Twilio Markup Language) which is achieved using theresp = MessagingResponse(). - The sender's WhatsApp number is extracted from the request using the
Fromkey and split to include only the number without any other text. - The responses are then passed into the
send_messagefunction alongside the sender’s WhatsApp numberwhatsappNumber.
Test the application
Run the following commands to activate the virtual environment and start the app:
To receive messages that are sent to the Twilio WhatsApp Number, you will expose the local endpoints over the internet using the ngrok tool and update the webhook on the Twilio dashboard.
Create an account on ngrok and select your operating system type then run the installation command.
This is the command for a macOS:
After installation, run the ngrok command to add the authtoken to the ngrok config.

Open another terminal to start ngrok with this command:
The ngrok terminal returns a URL that can be used to set up a webhook on Twilio. e.g. https://be59-102-89-42-55.ngrok-free.app. But the full URL for the endpoint is https://be59-102-89-42-55.ngrok-free.app/receive
To set up the webhook, go to the Twilio console Explore Products > Messaging > Try it out > Try WhatsApp > Sandbox Settings. Insert the full URL endpoint https://be59-102-89-42-55.ngrok-free.app/receive into the field with the label When a message comes in option and select the POST method.
This setup sends every message that is sent to the Twilio WhatsApp number to the `/receive` endpoint.
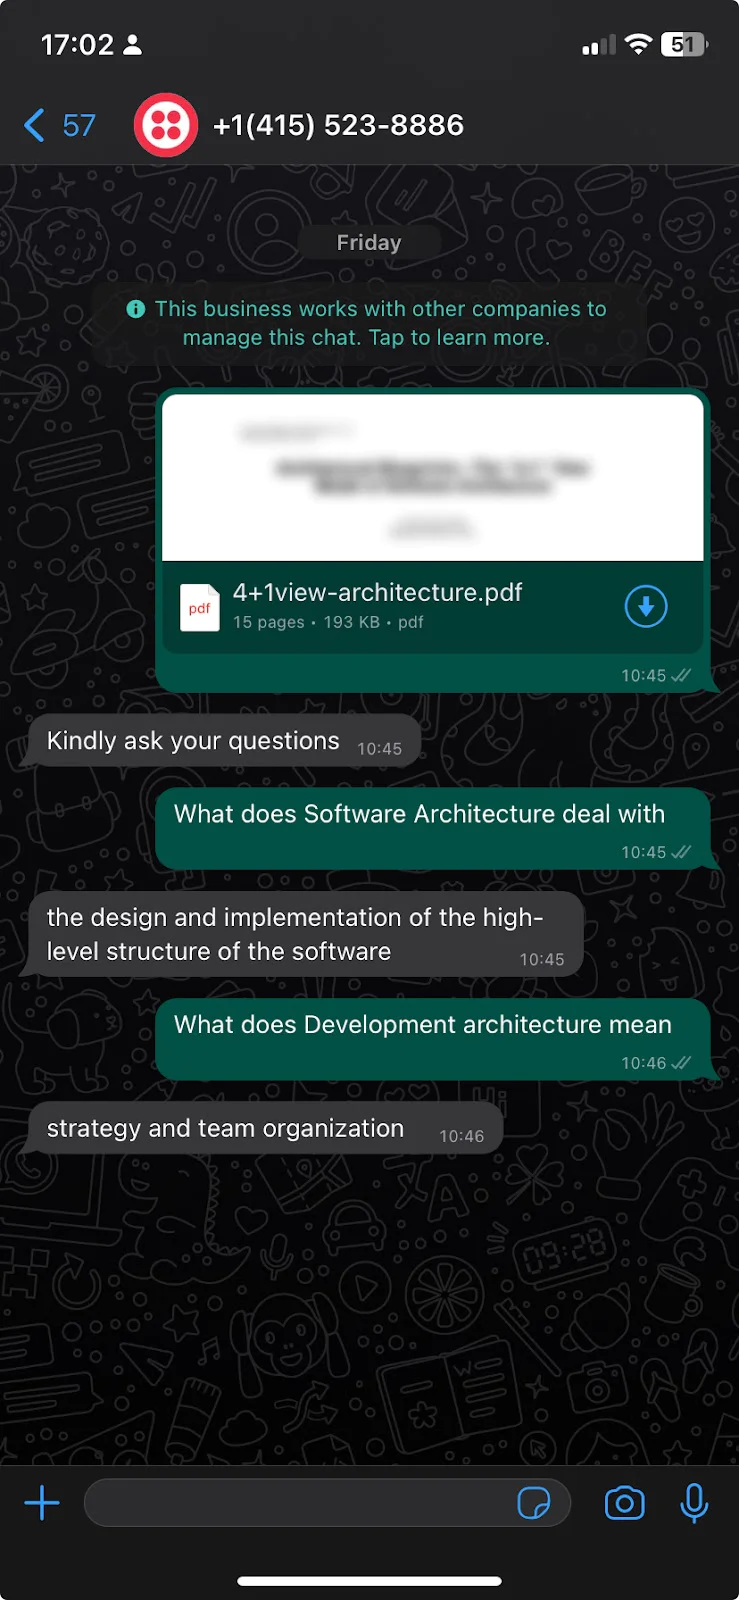
Finally, open the chat you set up when you joined the Twilio Sandbox, upload a PDF file and ask your questions about the PDF file.
What's next for LLM chatbots?
In this tutorial, you have gone through a step-by-step procedure to build a WhatsApp chatbot that can extract and provide answers to questions using knowledge from a PDF. The process covered setting up the development environment, extracting text from the PDF, using a ready made pipeline for question-answering, and integrating it with the Twilio Messaging API for WhatsApp.
Check out this guide on how to use AI with Twilio, or how to interact with the chatbot through audio .
You can also explore how to build a question answering bot with LangChain instead of Haystack.
Similoluwa is a Software Engineer that enjoys tinkering with technologies. When he is not coding he spends his time reading.

Related Resources
Twilio Docs
From APIs to SDKs to sample apps
API reference documentation, SDKs, helper libraries, quickstarts, and tutorials for your language and platform.
Resource Center
The latest ebooks, industry reports, and webinars
Learn from customer engagement experts to improve your own communication.
Ahoy
Twilio's developer community hub
Best practices, code samples, and inspiration to build communications and digital engagement experiences.