Building a Real-time SMS Voting App Part 1: Node.js & CouchDB
Time to read: 7 minutes
September 18, 2012
Written by

This is the first in a multi-part series of blog posts on building a real-time SMS and voice voting application using Node.js. In part one, we will create the Node.js application, set-up the CouchDB database and connect everything to Twilio so that we can process votes via SMS.

A few months ago, I was attending Startup Weekend GOV in Seattle where Twilio was a sponsor. I was there to support the event and help out teams that needed assistance with marketing validation, prototyping and pitching. I love helping out with Startup Weekend events, but sometimes I get a little antsy and wish I was working on something of my own. During this event, I happened to have some downtime so I decided to scratch my itch and start working on Votr, a SMS voting application built on Node.js.
Although I have been building web applications since 1999 and have used Java, PHP, Python and Ruby, this was my first experience using technologies like Node.js and CouchDB. In all past projects, I had used a RDBMS like MySQL, typically with an language-specific ORM. Having transitioned fairly painlessly between these technologies, I was shocked at how clueless I felt writing a Node.js app and working with a NoSQL database like CouchDB.
I thought it might be useful for other people who are making a similar transition to write about my experience coding Votr, the pitfalls I ran into and a few solutions that I discovered. In this first post I’ll simply walk through the basics of getting started: creating an app, setting-up the database and processing votes over SMS.
Create a Node App
First, you’ll need to have Node.js and NPM installed. For the remainder of this blog post, I’ll be rocking the terminal on Mac OS X, but these steps should be easy to follow on Windows or Linux. Here’s how you install Express and create an app:
At this point, you should have a starter node application. Let’s go ahead and deploy this to the cloud.
1) Sign-up for a Nodejitsu account
For the purpose of this tutorial I’m going to use Nodejitsu to deploy our Node app.

You’ll be asked to enter a subdomain for your application and the version of Node.js to use. The defaults should work fine, so feel free to hit enter. Once your deployment has finished, check to see that it’s running:
Set-up CouchDB
Setting-up a local CouchDB is easy, but for the purposes of this tutorial I’m going to show you how to use Cloudant’s hosted CouchDB. I evaluated a few different hosted solutions and experienced the fewest issues with Cloudant. I really came to love their web interface for CouchDB.
Before we dive in it, you might be wondering how CouchDB (and NoSQL in general) is different than something like MySQL. While that’s outside of the scope of this tutorial, below is a table that compares some of the core concepts from MySQL to CouchDB:
| RDBMS | NoSQL |
| Database | CouchDB server |
| Table | Database |
| Row | Document |
| Column | things get tricky… |
1) Sign-up for a Cloudant account


4) Populate the document with some test data
Unlike a SQL database, there is no concept of a schema. I don’t have to define in advance what kind of attributes by documents are going to have. If you are starting twitch uncontrollably, don’t worry. There are other ways to enforce data integrity in a NoSQL database like validation functions, but a schema isn’t one of them.
In our app, our event documents will be structured like this:
- Name: the name of the event where voting is taking place
- Short Name: a URL-friendly version of this
- State: the state of voting (on, off, etc)
- Vote Options:an array of options for voting, where each option look like
- Id: number to use for voting
- Name: the name to display
- Votes: the number of votes cast for this option
- Numbers: an array of phone numbers that have voted for this option
Let’s go ahead and load a dummy event document into our database so we can get on with building our app.

5) Create a view to query events
Once our app is up and running, we’ll need to be able to query events. In the world of CouchDB, you use views to query documents. For anyone who has worked with Oracle databases, this will sound familiar. In Oracle, a view is simply a predefined SQL query that behaves like a read-only table. In CouchDB, a view is a map function that processes all of the documents in your database and created a hash of key/value pairs. These functions are stored inside of special documents called Design Documents. In our app, we’ll want to be able to query events based on their phone number and their short name. Let’s go ahead and create a design document and paste in the content of the Gist below.
Process Incoming Votes
Ok, now that we’re done with the appetizers, let’s get to the main course: writing our Node.js app. The express command gave us a nice scaffold to use, so let’s start implementing the specifics.
1) Create utils.js
Let’s create a utility module to store some useful functions:
https://github.com/crabasa/votr-part1/blob/master/utils.js
2) Edit package.json and add some dependencies
While we defined a few functions of our own above, but there’s nothing cool about reinventing the wheel. We’re going to make use of two NPM modules (cradle and twiliosig) so let’s go ahead and add those dependencies to our package manifest file.
https://github.com/crabasa/votr-part1/blob/master/package.json
3) Create config.js and edit the values for your CloudDB
In order to configure the app to point at your CouchDB instance on Cloundant, you’ll need to provide the following four values:
- config.couchdb.url: ‘https://your-username.cloudant.com’
- config.couchdb.port: 443
- config.couchdb.username: ‘your username’
- config.couchdb.password: ‘your password’
https://github.com/crabasa/votr-part1/blob/master/config-sample.js
4) Create events.js
This module is going to encapsulate access to our events database on CouchDB and provide some nice and simple methods for the rest of our app. This way, if we change our mind about CouchDB and decide to use a different datastore, we’ll just have one file to edit. Let’s define three methods:
- findBy – looks up an event based on a key
- hasVoted – checks to see if a person has already voted for a specific event
- saveVote – saves a person’s vote
https://github.com/crabasa/votr-part1/blob/master/events.js
5) Edit routes/index.js
Let’s create a function called voteSMS to handle the incoming requests from Twilio. Each time Twilio receives an SMS, this function will be called.
https://github.com/crabasa/votr-part1/blob/master/routes/index.js
6) Edit app.js
Add a route to our Express application to accept POST requests for the path “/vote/sms” and wire it to the voteSMS function we just created.
https://github.com/crabasa/votr-part1/blob/master/app.js
7) Create views/forbidden.hjs
In the event that someone figures out the SMS Request URL of your voting application (because, I don’t know, it’s posted both here and on Github!) they might be tempted to try to generate phony requests and hijack the voting. Thankfully, this application checks X-Twilio-Signature and displays the following video to would-be intruders.
Wire Incoming SMS Messages to Our App
Ok, we’re almost done! The last thing we need to do is set-up a phone number to process incoming votes over SMS.
1) Sign-up for a Twilio account


3) Go back to the Node.js app and edit config.js
If you click on “Dashboard”, you’ll see your Account SID and Auth Token. The Auth Token is initially hidden, but just click on the key to reveal it.
Please copy these values into config.js.
4) Deploy to Nodejitsu

When you enter your number, please make sure it’s in E.164 format (e.g. +12026189023).
Let’s Vote!
At this point you can pull out your phone and start testing your voting app. Here’s a simple script I use:
- Send a valid vote: text “1” (no quotes) to the voting number
- Send an out of range vote: text “7”
- Send an invalid vote: text “A”
- Try to vote twice: text “1”
Below you’ll see the results of these text messages in Nodejitsu logs for your app:

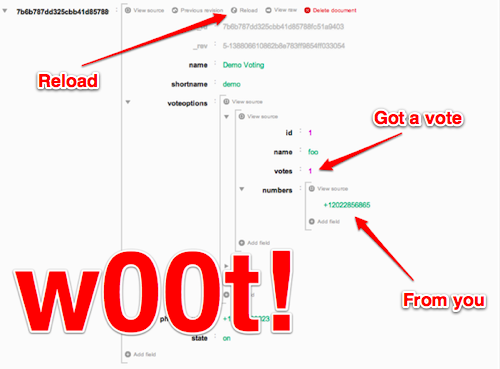
Let’s double check our DB on Cloudant to verify the vote came in:
That concludes part one of building a real-time SMS voting application using Node.js. All of the source code for this application can be found on Github: https://github.com/crabasa/votr-part1.
You may be wondering where the “real-time” part was. In part two, we’ll build a visualization for this voting application using Highcharts JS and animate this visualization in real-time using Socket.io.
Related Resources
Twilio Docs
From APIs to SDKs to sample apps
API reference documentation, SDKs, helper libraries, quickstarts, and tutorials for your language and platform.
Resource Center
The latest ebooks, industry reports, and webinars
Learn from customer engagement experts to improve your own communication.
Ahoy
Twilio's developer community hub
Best practices, code samples, and inspiration to build communications and digital engagement experiences.