Building Screen Pops With Twilio Client and FullContact API
Time to read: 9 minutes
October 30, 2013
Written by


Screen Pops are a way of displaying contextual information to an agent about any incoming call so that they can provide more relevant support to the caller. They are one of the most powerful features of a software-powered voice communication system. They let your agent learn about the customer they are servicing as soon as the phone rings, look up an anonymous caller so that they can prioritize the importance of their call, or simply forward the call to the most relevant representative before the caller even has to ask. In this tutorial we are going to build a layer on top of our Twilio Client Quickstart for Node.jsthat automatically looks up the name and photo of any incoming caller using the FullContact API. FullContact is a powerful tool that allows you to get additional data about a user based on only a single piece of information such as phone number, e-mail address, or name.
We will be using standard components like jQuery, jQuery UI and Socket.io to make our application more interactive along with Node.js (http://nodejs.org/) for our backend logic, Twilio Client for communications and FullContact to lookup information about our caller.
Steps To Building Screen Pops With Twilio Client and FullContact API
- Allow the user to enter their name
- Create a new Twilio Client instance that can make incoming/outgoing calls
- On every incoming call, send a lookup request to FullContact
- Show data to user and allow them to accept/deny the call
Part One: Configuring Our Node.js Application
As with most Node.js applications, we have a few basic setup steps to follow. The first thing we need to do is create a package.json file to handle our dependencies:
We are using the twilio module to make it easier to generate Capability tokens for our Client instance and to generate the TwiML that we use to Dial our Client application. We use express as our web application framework along with ejs as our template library. socket.io makes it easy for us to handle realtime communication between our client and server. And last but not least, fullcontact-api is a wrapper module to make it easy for us to interact with FullContact and look up our callers.
Once you have created that file head on over to your command-line and run npm install to install all of our necessary packages. Then we can dive into some sweet code!
Part Two: Create Our Index View
Let’s go ahead and create a views folder in our application root. In this folder we can create a file called index.ejs, which is the view for our root path (/):
All we are doing on our index page is setting up a very simple form that allows the user to input their name the first time they use the application. We’ll get into what is happening behind the scenes later, but for now all we need is that form.
Part Three: Create Our Client View
In our views folder, create a client.ejs file. We’re going to split this up into two parts to look at the HTML and JavaScript separately:
This HTML code is taken mostly from our Client Quickstart tutorial. To recap what we are doing here, we include our twilio.js library that makes it possible for us to do Voice calling in our browser. We also include some twilio CSS to make our page pretty and red. For interactivity, we include socket.io, JQuery, and JQuery UI. Socket.io makes it easy to have realtime communications between our Node.js backend and our frontend client. JQuery and JQuery UI allow us to make the page more dynamic for the user.
We use this page to display a form to the user that allows them to enter a number for an outgoing call. They are presented with Call and Hangup buttons to handle the call itself as well as a log div to display messages about the status of Twilio Client. The last thing is an empty
that we will fill later and use as our confirmation dialog with the caller’s data.
Now in the <script type="mce-text/javascript">// tag in our <head> block we can add the following JavaScript code:
First things first, we need to initialize our Socket.io connection so that we can communicate with our backend app via Websockets. We then set up our click events for the Call and Hangup buttons, which begin and end our call respectively.
Next we set up our Twilio Device object and set up an event handler for our ‘ready’ event which notifies the user that Twilio Client is ready to make calls.
Our next piece of code handles incoming calls. We set up a handler for
, and pop up a dialog every time we are receiving a call. This handler also fires off a socket.io event to our backend which looks up the caller’s details and displays them to the user, who can either Accept or Reject the call. We also set up a handler for the foundPerson socket.io event, which receives the FullContact data that has been fetched on the backend and displays it to the user for evaluating whether or not they would like to accept the call.
Now we set up disconnect and connect event handlers – at this point we just use these to display a notice to the user of what is currently happening with Twilio Client.
Last but not least we set up a basic error handler to display errors to the user.
Part Four: Writing Our Node.js Server Code
At this point we have all of our views completed and we have begun to set up our Node.js app by creating our package.json file. Now all that is left is to write our server code to handle the application logic. Start off by creating a new file called app.js and adding the following code to it:
This is standard configuration code. We are including our necessary modules and creating the objects that our application will be using. You will notice that the fullcontact constructor accepts an API Key, which we will define later. Next we add our root route, which renders the index.ejs view from above or redirects the user to /client if they have already visited the app.
Now we need to set up the route that lives at /client – this is what handles the Twilio Client part of our application.
The first thing we do here is generate a Capability token. This token is what allows the client-side JavaScript library authenticate itself with the Twilio Client servers. If this is the first time the user has visited our page, we save their name in the clientName session variable. We then set our app to accept incoming calls dialed to that clientName and make outgoing calls using the TwiML application that we configure below. Lastly, we render our client.ejs template that we created above. One unusual thing you might notice is that our /client route accepts POST or GET requests – this is because the first time a user visits, they are submitting their name via a form but on future visits we do a basic GET redirect.
Now that our two primary routes are configured, we can set up socket.io:
Socket.io makes WebSockets simple and event-driven. In this example we only have one event we listen for, called incoming – this is the event that is fired by an incoming call to our Twilio Client instance. We use it to look up the incoming caller using the FullContact API and return the caller’s details to our front-end via the foundPerson event so that it can be displayed to our user and they can decide to Accept or Reject the call.
The last piece of our application code is the /incoming route:
This route generates a very basic TwiML response that does a to our Client based on a name transmitted in the clientName POST parameter. We will point our incoming phone number for each agent to this route.
Now that our application’s core code is complete, all that is left is for us to define some environment variables, set up our Twilio phone number and test it out.
Part Five: Configure and Run Our App
In order to fetch data about the incoming callers, we will be using the Full Contact API. Head over to FullContact’s Pricing Page and sign up for a free developer account. Once you have an account, go to your Developer Dashboard and grab the Full Contact API Key. We will store this in our environment variables using the following command in our Terminal (replace yourkey with the key from your dashboard):
export FULLCONTACT_API_KEY=yourkey
Then we will store our Twilio API credentials (found in your Twilio Account Dashboard) as environment variables as well:
export TWILIO_ACCOUNT_SID=AXXXXXXXXXXXXXXXXXXXXXXXXXXXXXXXXXexport TWILIO_AUTH_TOKEN=YYYYYYYYYYYYYYYYYYYYYYYYYYYYYYYY
There are two variables left. One is our TwiML App SID, and the other is our outgoing Phone Number. My recommendation would be to purchase a new phone number for each dedicated agent using your application so that they can receive calls.
First, let’s head to our Account Dashboard.
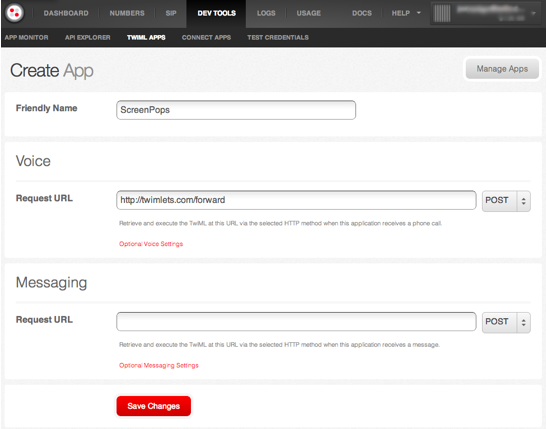
Click the Dev Tools tab, and then the TwiML Apps sub link. Go to Create TwiML App and create a new application with the following Voice Request URL and using the GET method by default.
This is a little bit magical, but really all we are doing is making use of the Forward Twimlet, which will generate TwiML containing the verb directed to any phone number passed in as the number parameter. Your TwiML app should look like the following image
Once you Save Changes, you will be given a new TwiML App. If you click through to its settings screen, you can see the App SID. Take this string and save it to your environment variables:
export TWILIO_APP_SID=APXXXXXXXXXXXXXXXXXXXXXXXXXXXXXXXX
The last step is to buy a phone number and set it up to dial one of your agents. Simply pick and choose the number that you like, purchase it via your Account Dashboard or the API, and set the Voice Request URL as http://YOURSERVER.com/incoming?clientName=yourName
In my case this would be http://jonmarkgo.com/incoming?clientName=Jon where Jon is the name I enter when I first visit the application – this name is stored in my cookies so that I do not have to enter it every time.
Now save this number in your environment variables to be used as your outgoing phone number:
export TWILIO_PHONE_NUMBER=+18881234567
That’s all we have to do. Just head back into your terminal, run node app and watch the magic happen!
You can find the full source for this tutorial on Github here.
If you have any questions or comments please tweet @jonmarkgo or e-mail jonmarkgo@twilio.com!
// ]]>


Related Resources
Twilio Docs
From APIs to SDKs to sample apps
API reference documentation, SDKs, helper libraries, quickstarts, and tutorials for your language and platform.
Resource Center
The latest ebooks, industry reports, and webinars
Learn from customer engagement experts to improve your own communication.
Ahoy
Twilio's developer community hub
Best practices, code samples, and inspiration to build communications and digital engagement experiences.