Votr Part 5: AngularJS and CRUD Using RESTful APIs
Time to read: 6 minutes
December 17, 2013
Written by
")
This is the fifth and final part in a series of blog posts about building a real-time SMS and voice voting application using Node.js and TwiML. I began working on this application during some downtime at a Startup Weekend event back in the summer of 2012. It was both an excuse to learn Node and build a reusable app for something that my team is often asked to provide at events (SMS voting). Let’s take a moment and recap where we’ve been.
In part one, we created the Node application and captured incoming votes over SMS and stored them in a CouchDB. I chose to use Express as the web framework and Cloudant and my CouchDB provider.
In part two, we created a real-time visualization of the voting using Socket.io and Highcharts. As votes came in a bar chart depicting the current state of the vote would update in realtime. For my purposes (live SMS voting at events) this was my MVP product. But at larger events I ran into some nasty scaling issues.
In part three, we tweaked our app to scale to thousands of votes per second and millions of total votes. This was accomplished by being smarter about how we stored our documents and leveraging CouchDB’s map/reduce capabilities.
In part four we began adding an web front-end for admins using AngularJS. We added AngularJS to our project and implemented a login and logout flow. We walked through the process of using CouchDB’s cookie-based authentication scheme to bootstrap a simple log-in process for our app.
The last thing for us to do to complete this admin portion of the application is to use AngularJS to create a simple CRUD interface for the events in our CouchDB. We will focus on the AngularJS code and templates that we’re going to write to edit our event documents and finish with a brief run-through of the server-side code.
Listing Event Documents
If you go back and look at the configuration for our app in votr.js you’ll see that the root path (/) is associated with the event-list.html template and the EventListCtrl controller. Remember, this is the root path relative to where we mounted AngularJS. In our case we mounted our app at /admin. When the controller is instantiated, it issues a query to the EventService. The EventService is just like the SessionService; it’s a thin wrapper around a $resource object that points to the /api/events/:id endpoint on our Node app.
Running this query with no parameters will return all of the events in the database, which will then be sent to the template for rendering.
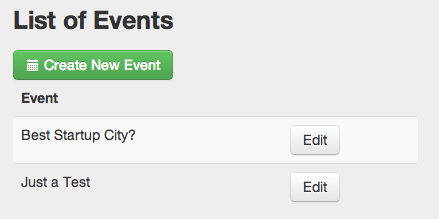
Below is the HTML code for the template and it’s fairly simple. We use the ngRepeat directive to iterate over the collection of events.
List of Events
| Event | |
|---|---|
| {{event.name}} |
You might notice that I’m using Bootstrap to handle the styling and UX touches. You can certainly use your UX framework of choice, but I appreciated having access to a clean set of styles, icons and easy to use modal capabilities.
Creating a New Event
On the list page, the user has the option of creating a new event. When they click “Create New Event”, the method editEvent is called passing in the parameter “new”:
You can see that if the event parameter is “new” we set a “newEvent” flag to true and attach an empty event object to our $scope. You’ll also notice we attach an array called opts to our scope, we’ll discuss that in a second.
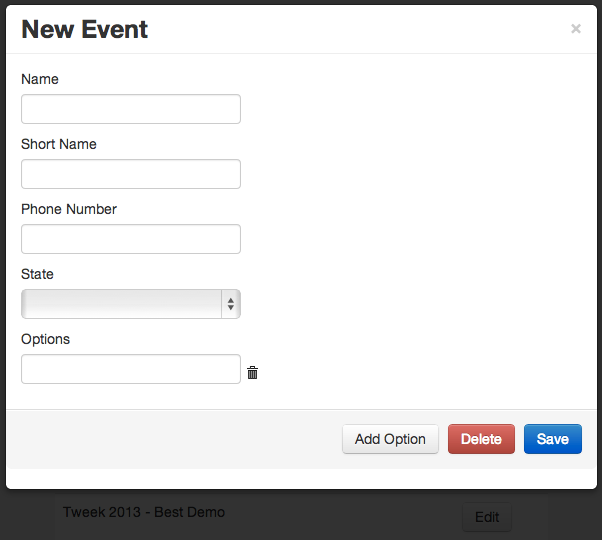
This template, while being fairly concise, offers quite a bit in the way of functionality. The user can:
- Enter data for a new event document
- Edit an existing event document
- Add an unlimited number of voting options
- Remove voting options
- Delete the event
- Save the event
In the case of create a new event document, the ngModel directive will bind the form fields to the associated attributes of the empty event object we created. When a user clicks “Add Option”, we simply add a new object (with an incremented id) to the vote options array:
When the user clicks the trash can icon next to an option, we remove that object from the array and then reset the id values for all of the vote options.
When a user clicks the Save button the EventService is used to persist the event to the backend and the new event is then added to our in-memory list of events.
When a user clicks “Edit” for an event on the list page, the editEvent is called passing in the event object itself. Remember, all of the events have been pulled down from the database and are sitting in memory. There’s no need to make another call to the database to fetch the data for the selected event.
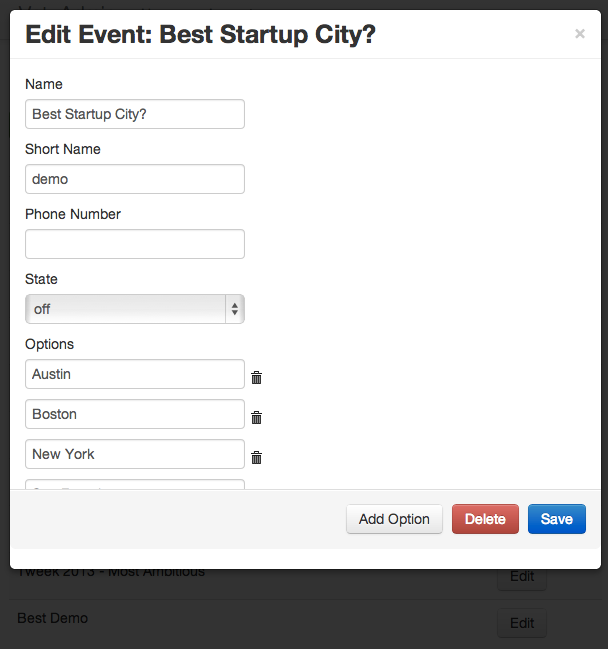
When the user decided to save this event, the following code is executed:
We loop through all of the event objects in memory and invoke save on the one we’ve just edited. Since the $scope.events collection was fetched from the backend using ngResource, each item in the collection contains the logic necessary to persist itself back to the backend.
Deleting an Event
Deleting an event is relatively straightforward. Much like the save() method, we loop through our in-memory collection of events looking for the one we’d like to delete and invoke the $delete method. In addition to an id our service expect a document revision to be passed along.
Once our event has been deleted we remove it from our in-memory collection.
Creating an Events API
Throughout this blog post we have assumed a simple RESTful API for event documents. Going back to our Node application, let’s quickly walk through our simple API:
Getting a List of Events
In app.js, let’s wire up the route /api/events to the getEventList function in the routes module:
Remember, when we logged-in to the application we also logged-in to CouchDB. During the authentication step, CouchDB gave us a cookie to use for future requests to the database. We now pass this cookie value to the list method of the event module. If an error is returned we just chalk this up to an auth issue and return an HTTP 401 error.
The list method gets a handle to the DB (using the cookie) and executes the event/list view.
Getting an Event
Now let’s wire up the route for fetching a specific event:
In the event that an error occurs while trying to retrieve the specified document we simply return a 404 error to the client.
Deleting an event is similarly simple. Notice that we’re wiring up the HTTP delete method.
Saving an Event
And finally, we need to be able to save an event.
If an error occurs, return a 500 error to the client.
If we are creating a new event document, we need to generate a document id for it that matches the pattern “event:{shortname}”.
And That’s All She Wrote
Feel free to play around with a live demo of this app, hosted on Nodejitsu:
http://twilio-votr-part5.nodejitsu.com (thenchathavertyoundishos / fPFEFIHIWjKsATJADG4qWfsI)
I have had a ton of fun working on this app and walking you all through the process of making. I started working on Votr back in July 2012, which blows my mind. Along the way I taught myself:
- Node.js
- Express and Mustache templating
- CouchDB and map/reduce functions
- Socket.io
- Highcharts
- AngularJS
I hope you enjoyed the series. All the code has been posted to Github.
Happy hacking! Make sure you check out our other guides and tutorials on the Twilio docs.


Related Resources
Twilio Docs
From APIs to SDKs to sample apps
API reference documentation, SDKs, helper libraries, quickstarts, and tutorials for your language and platform.
Resource Center
The latest ebooks, industry reports, and webinars
Learn from customer engagement experts to improve your own communication.
Ahoy
Twilio's developer community hub
Best practices, code samples, and inspiration to build communications and digital engagement experiences.