How to Customize Phone Call Workflows with Twilio Studio and TaskRouter
Time to read: 6 minutes
June 20, 2018
Written by

With Twilio Studio and TaskRouter you can quickly customized call flows. This post will walk you through the steps to receive calls on your Twilio phone number and have the callers put into a call queue. The callers will listen to music while the application arranges an agent to take their call. Agents will use their web browser, on their computer, to manage their status: offline and available to accept calls.
When a caller is added into the queue, TaskRouter creates a reservation and then asks an agent if they will accept the call. The agent has the option to Accept and be connected with the caller, or to Reject the call. If the call is rejected, TaskRouter will ask the next available agent.
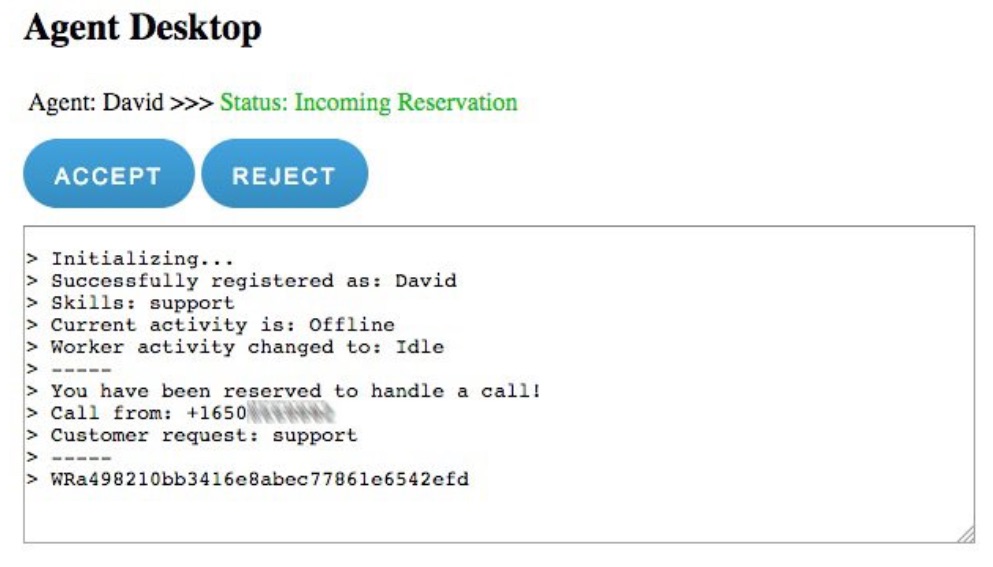
When the agent accepts the call, TaskRouter will contact the agent based on the agent’s TaskRouter configuration. For example TaskRouter maybe configured to dial the person’s mobile phone number or contact the agent using Twilio Client, which is built into the sample application. Twilio Client allows an agent talk to callers using their computer with a microphone and headphones (or built in microphone and the computer’s speakers).
Implementation overview:
- Create and configure a TaskRouter workspace.
- Use Studio to create an IVR to welcome the caller and let them know an agent will be with them shortly.
- Deploy an agent application to the website provider, Heroku. The application allows agents to manage their available status, and optionally, to talk to the callers.
Create and Configure the Application
Start by creating a TaskRouter Workspace that will contain the required components: TaskQueues, Workflows, and Workers. In the Twilio Console, go to the TaskRouter dashboard:
https://www.twilio.com/console/taskrouter/dashboard
Set the Properties Workspace Name to, Seagull.
Click Save.
On the left menu, click Settings.
Note, Workspace SID, for example: WS40e4826e3a7b33b140b3c4d63b853e44. Add the SID into a text file for later reference.
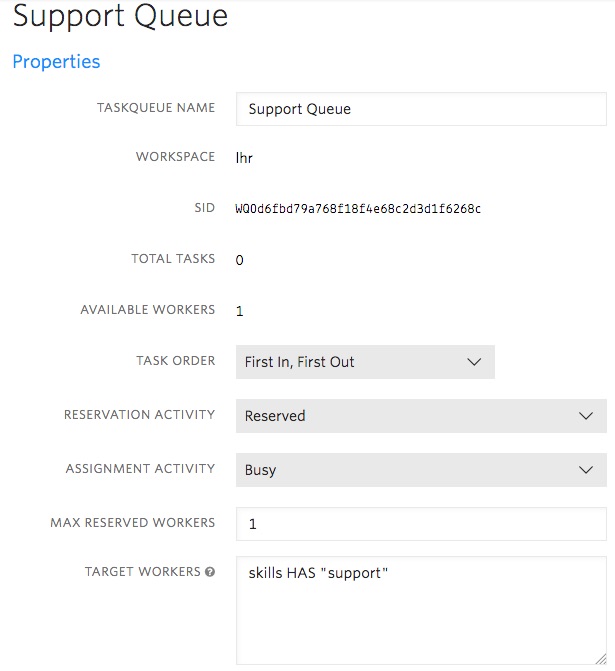
Create a Caller TaskQueue
A TaskQueue holds callers waiting to be connected to an agent. A TaskQueue has a name, for example support, and is configured with Worker attributes, such as support. If a caller wants to talk with a support agent (Worker), they are put into the support queue.
In Overview, click Create new TaskQueue.
Set:
- Properties TaskQueue Name to, support.
- Max Reserved Workers: 1
- Target Workers: skills HAS “support”
Click Save.
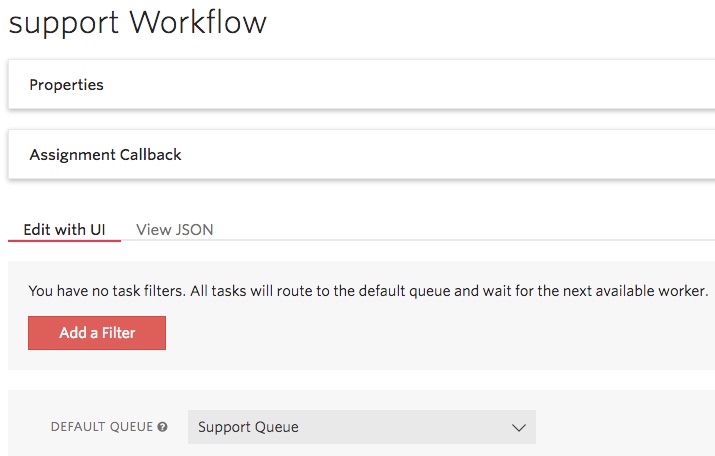
Create a Workflow
A WorkFlow manages task reservations. A WorkFlow has a name, for example support, and is configured with task attributes such as (selected_product=="support"), and has a queue assigned; in this example, the support TaskQueue. When the TaskRouter Workspace is given a task with the attribute, selected_product=="support", TaskRouter checks the assigned queue, support, to get the required Worker attributes. Then TaskRouter makes a reservation and asks the available agent to Accept the call. Then follow these steps to proceed with the Workflow configuration:
- On the left menu, click Workflow.
- Click Create new Workflow.
- Set the Properties, Friendly Name to, support.
- Set the Assignment Callback, Task Reservation Timeout to, 10. This gives an agent 10 seconds to accept a call reservation.
- Click Save.
- Note, at the bottom the default TaskQueue is support: “Default TaskQueue: support.”
- On the left menu, click Workflow.
- Add the support workflow SID, example:
WW999952bd6c48b9159592ea2c291b7e42, into your SID text file, as it’s used when configuring your Studio IVR.
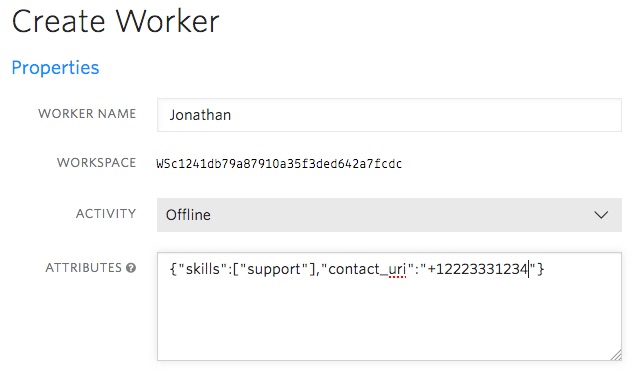
Create a Worker
Workers are agents. They have a name, attributes to match at least one TaskQueue ("skills":["support"]), which they are subscribed to, and their status. The status can be set in Console or managed by the agent in the agent web application.
- Create a Worker. In the left menu, click Workers.
- Click Create new Worker.
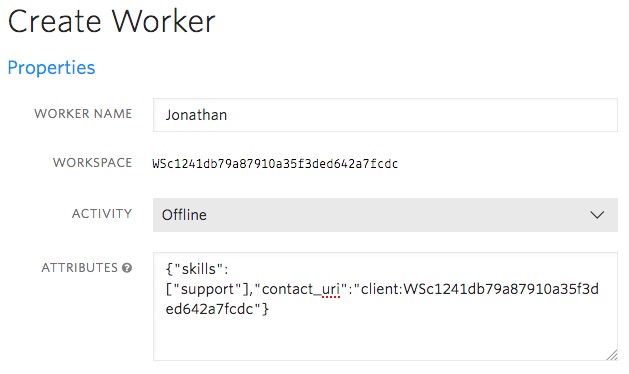
- Set the Properties Worker Name to, Jonathan.
- Set the Attributes to,
{"skills":["support"],"contact_uri":"+12223331234"}. Replace12223331234, with your phone number. - Click Save.
Note, at the bottom is the message, “Subscribed TaskQueues: support.”
The above uses a phone number. An option is to use the Twilio Client built into the agent application. To use the Client instead of a phone number, do the following:
On the left menu, click Workers. Note, Worker: Jonathan, has SID, example: WSc1241db79a87910a35f3ded642a7fcdc.
Click Jonathan. Set Attributes to use Jonathan’s SID as the Twilio Client id. Example: {"skills":["support"],"contact_uri":"client:WSc1241db79a87910a35f3ded642a7fcdc"}
The contact_uri is used to connect Jonathan to callers.
Configure an Agent Worker Activity
To use the sample agent application, add a WrapUp Worker activity. This activity happens after an agent finishes their call. For example, the agent may need to make call notes before becoming available again.
- On the left menu, click Activities.
- Click the icon, Create new Activity.
- Set the Properties Activity Name to, WrapUp.
- Click Save.
- On the left menu, click Activities.
The new activity is list with the other activities:
Create an IVR Studio Flow to Manage Incoming Calls
Create a Support IVR that says a message and the puts the caller into the TaskRouter support TaskQueue.
Go to the Twilio Console Studio tool: https://www.twilio.com/console/studio
Create a new flow, Friendly name: Enqueue Caller.
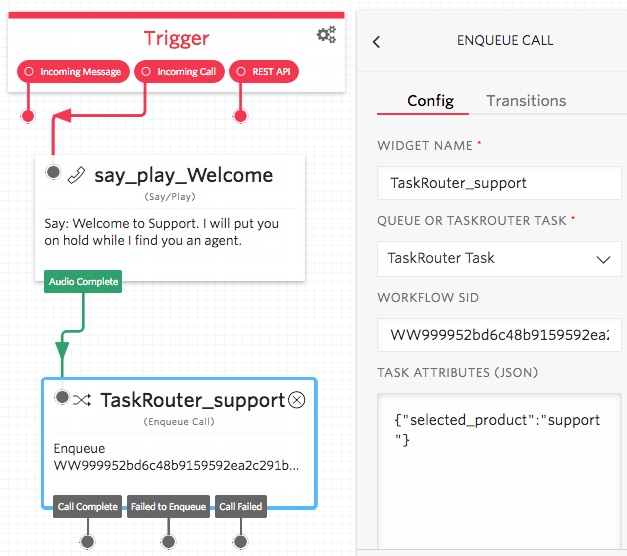
Drag a Say/Play widget onto the flow panel, under the Trigger. Connect the Trigger’s Incoming Call link to the Say/Play widget. Set the widget name to: say_play_Welcome. Set the Text to Say to, Welcome to Support. I will put you on hold while I find you an agent.
Drag an Enqueue Call widget onto the flow panel.
Set the widget name to: enqueue_to_Support. Set Workflow SID to your support workflow SID, which begins with the letters, “WW”. Set Queue or Taskrouter Task to: TaskRouter Task. Set the Task Attributes (JSON) to: {"selected_product" : "support"}.
Your Studio flow will look like this flow:
Buy and Configure a Twilio Phone Number to Call the Support IVR
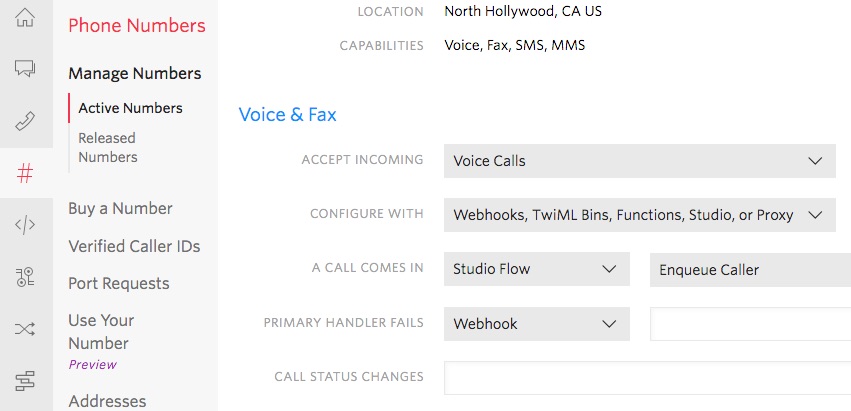
In the Console, buy a phone number then go to your Twilio phone number’s configuration page. Set Voice & Fax, A Call Comes In, to: Studio Flow : Enqueue Caller (see screen print below). Click Save.
Test
Use a phone to call your IVR Twilio phone number. You will hear the welcome message and then be put into the TaskRouter support TaskQueue where you will hear music playing. If you hear music, the test is a success and you can hang up.
Implement the Agent Web Application
For this part, you will need an Heroku account. Once you have an account and are logged into the Heroku dashboard, go to my GitHub application repository:
https://github.com/tigerfarm/owlcc
Note, as an alternative, in the repository’s README.md file, I have included the steps to run the application from your localhost.
To deploy to Heroku, scroll down the GitHub README.md file, and click, Deploy to Heroku, or just click it here:

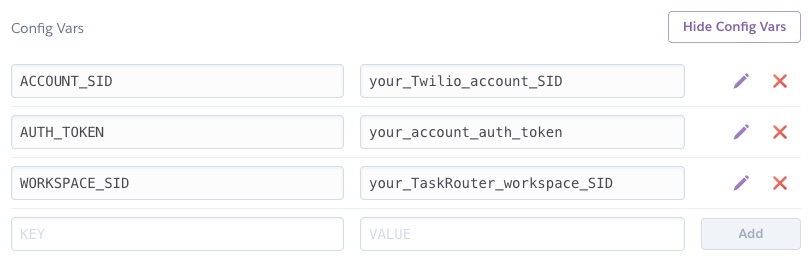
You will be prompted for an app name. The name needs to be unique. Enter, your name cc, example: davidcc. Click Deploy app. Once the application is deployed, click Manage app. Set Heroku project environment variables by clicking Settings. Click Reveal Config Vars. Click Add, and add each of the following key value pairs:
ACCOUNT_SID: your_Twilio_account_SIDAUTH_TOKEN: your_account_auth_tokenWORKSPACE_SID: your_TaskRouter_workspace_SID
Test the Application
Use your web browser to go to your Heroku’s URL, example:
https://davidcc.herokuapp.com
The Owl Call Center home web page is displayed.
- Click Agent list. Your Worker agent and their status is displayed.
- Click the agent’s name. The agent’s call center desktop is displayed.
- Click Go Available, and the message,
Worker activity changed to: Idle, is displayed. - Click Go Offline, and the message,
Worker activity changed to: Offline, is displayed. - Click Go Offline. Have your agent status as offline before starting the next test.
Testing our Application
Use a phone to call your Twilio phone number. The Studio IVR will answer and put you on hold. While listening to music, go to your agent browser. Click Go Available. If you are using the Twilio Client option, you will be prompted to allow access to your microphone. Click Allow. You, as the agent, are now connected to the caller. If you are using a phone number for the agent, that phone number will receive a phone call.
You, as the agent, are now connect to the caller, who is from the support queue.
Check the voice call logs:
https://www.twilio.com/console/voice/logs/calls
What’s Next?
You have a Twilio phone number and an IVR which accepts calls that are handed off to TaskRouter. TaskRouter queues the calls and arranges an agent for each call. Your agents have an application to manage their availability status and take calls using their computer, headphones and mic. In other words, you have a simple call center-style application.
Next, ramp up. In your TaskRouter Workspace use the Twilio Console to add more workers, and add another queue to manage, say, sales calls. Build out your IVR with Studio, use MP3 sound files and add options for each of your queues. Read up on more TaskRouter features and add where required, such as timeout and escalation logic. If, after a specified amount of time, no agent is available on one queue, fall over to another queue.
If you have HTML and graphic skills, brand your Owl Call Center application to use your own company’s name, logo, and colors. Since you have followed this blog, your website uses Heroku or you’re running it on your localhost computer. You can upgrade your Heroku account or deploy your application to your company website.
Get others involved in testing. When your setup is better than your current system, move your application into production, advertise your new company Twilio phone number and receive customer calls. Good luck!


Related Resources
Twilio Docs
From APIs to SDKs to sample apps
API reference documentation, SDKs, helper libraries, quickstarts, and tutorials for your language and platform.
Resource Center
The latest ebooks, industry reports, and webinars
Learn from customer engagement experts to improve your own communication.
Ahoy
Twilio's developer community hub
Best practices, code samples, and inspiration to build communications and digital engagement experiences.