How to Create an Engaging Scavenger Hunt with Twilio
Time to read: 7 minutes
July 01, 2022
Written by
Reviewed by

As kids are finishing up school and the days are becoming warmer, consider getting everyone active by sending them on a scavenger hunt around the neighborhood. To make the day more exciting, utilize some Twilio magic by having the participants use their phones to complete puzzles to determine the winner of the scavenger hunt.
This tutorial is intended to present an idea that can be appended to the end of the scavenger hunt game, sort of like an alternate reality game (ARG) that utilizes both the real world and technology.
The flow of the game goes as follows:
- The user will text the Twilio number to retrieve the URL to play a minigame.
- The user will play a click-based game that will trigger an SMS to be sent to the host of the scavenger hunt, likely yourself, signifying that someone has completed the scavenger hunt.
In this article, you will learn how to implement a game workflow in the Java Spring Boot Controller and build a mini clicker game that sends an SMS with Twilio.
Tutorial requirements
- Refer to this Twilio article to set up a Java Spring Boot application that can be hosted on the web.
- Java Development Kit (JDK) version 11.
- Some knowledge of JavaScript.
- Two SMS enabled phones to test the project.
- ngrok, also known as a handy utility to connect the development version of the Java application running on your system to a public URL that Twilio can connect to. This game will be hosted on ngrok.
Add the Thymeleaf and Twilio dependencies
Navigate to the pom.xml file to add the following dependencies between the <dependencies></dependencies> tags:
The Spring Boot Starter Thymeleaf is required to build web applications that serve HTML. This is essential for creating the web-based clicker game.
This dependency allows the Twilio Java Helper Library to be used and executed in this Maven project. This is essential for the controller class that will be created later on to handle the TwiML messages of this SMS project.
Save the file.
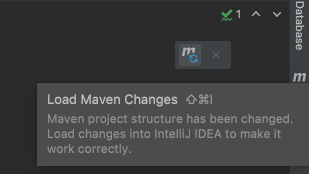
Look at the top-right corner of the IntelliJ IDEA and find the little icon with an "M" shape. Click it to load Maven changes.
Customize the web controller
After you’ve set up your application, navigate back to the WebController.java file that was created during the setup prerequisites, and replace the contents with the following code:
Remember that the package in the first line will vary depending on the name of your Java project. The project is named "scavengerhunt" in this tutorial.
The WebController has a helloGame() method that returns a string referencing the path name for the HTML template page that will be rendered.
Build the click-based minigame with Twilio SMS
There are multiple parts to this project. The webpage portion of the project is the click-based minigame that will trigger an SMS to be sent to the host of the scavenger hunt, likely yourself, signifying that the player has completed the scavenger hunt.
Create the HTML page
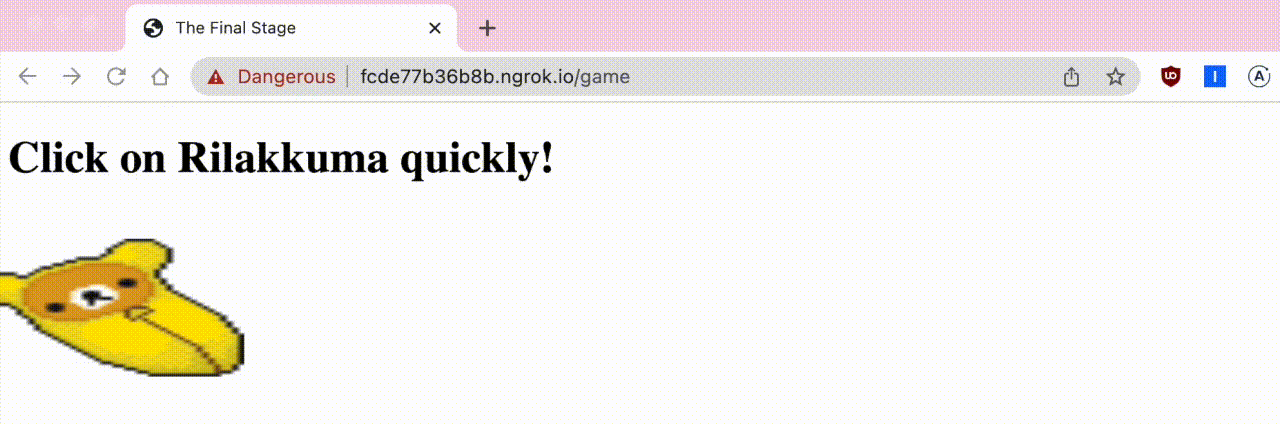
The objective of this clicker game is to make a POST request whenever the user clicks on a moving picture. Once the image is clicked, an SMS is sent to the game host to inform them that someone has reached the end of the scavenger hunt. At the same time, an alert is made to let the player know that the host was informed.
Go ahead and place a picture that you would like to see in the minigame in the src/main/resources/static subfolder. The /static subfolder is a location for all static assets to be used and referenced throughout this project.
Find the src/main/resources/templates subfolder and create a new file named game.html. This file will be rendered from the helloGame() method in the web controller.
Copy and paste the following code to the game.html file:
The image is given an id so that it can be retrieved from the Document Object Model (DOM). In the example for this article, a pixelated image of Rilakkuma inside a banana is used, so the variable and id names will be related to the banana. This banana image is retrieved from the document in the JavaScript portion so that an onclick event function can be attached to the image.
The following logic is defined inside the function:
- Once the image is clicked on, an alert shows up to the player to let them know the host has been alerted.
- A fetch request is made to the
/sendSMSroute.
Here's an example of the expected HTML page at the end of the article:

Add some animation to the minigame
This will be a fun section for those who enjoy using CSS and JavaScript to make their websites interactive. This clicker game will offer some challenging elements with the help of CSS to make the image move across the screen. This is intended to be a little challenge, just for fun.
Copy and paste the following code in between the <head></head> tags in the game.html file:
The banana image is altered with the CSS id selector. With the help of @keyframes, a bounce animation is created for the image to bounce across the screen. Clicking the image is the small challenge within the minigame on the webpage.
Feel free to alter the CSS as you wish or add more properties and functions to make it more fun.
Configure the environment variables
It is best practice to protect your Twilio account credentials by setting environment variables.
You can find your account credentials on the Twilio Console.
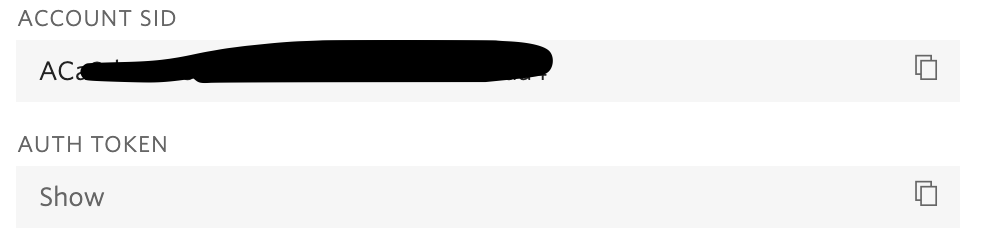
Refer to this article to set up and hide variables in the IntelliJ IDEA environment.
Not only is it mandatory to set the Twilio credentials as environment variables, it is also suggested that you store both your Twilio phone number and personal phone number as environmental variables. This would be helpful in the case that the code is shared on a public repository so that the phone numbers are not exposed.
Go ahead and follow the same instructions to store YOUR_PHONE_NUMBER and TWILIO_PHONE in the IntelliJ IDEA environment. The Twilio phone number and personal number must be stored in E.164 format such as "+19140201400".
Build the REST controller
Recall that the Twilio number will send a text twice within the scope of this project.
- When the player texts the phone number to retrieve the game link.
- When the player wins the game and triggers an SMS to be sent on their behalf.
A few HTTP requests are necessary for the flow of this clicker game. The REST controller file is essential for serving data and REST endpoints.
Share the game link
Create a file named GameRestController.java within the same subfolder and paste the following code:
Remember that the package in the first line will vary depending on the name of your Java project.
The @RestController annotation marks the request handler required to build and provide the RESTful web service during runtime.
Begin by defining the first route the player hits. This /sms route uses the environment variables set in the previous section to make a connection to the Twilio services. In addition, the system retrieves the phone numbers that were set in the IDE as well.
Another String variable named "gameSite" is created to store the custom URL for the minigame link.
One of the paid features of ngrok is that it allows creating custom domains instead of the "XXXXXXXX" placeholder as seen in the code. Thus, it is important to change this URL so that it applies to your case.
For the purposes of this article, a randomly generated URL will be sufficient as you are the only one who needs to know the URL path to the /game page. When you are ready to share this live, it would be convenient to have a static URL hardcoded so that it's ready to be texted whenever this program is run.
Send an SMS in Spring Boot
Now the magical part – writing the code that sends the SMS to you, the game host, once the image is clicked.
Copy and paste the following code inside the GameRestController class so that it is aligned with the other @PostMapping route:
Similarly, a connection to the Twilio services is made, in addition to retrieving YOUR_PHONE_NUMBER since Twilio will be sending an SMS to your personal device.
We create a new message instance of the Message resource as provided by the Twilio REST API in order to send an SMS to your personal phone number from your Twilio phone number. The SMS will inform the host that a winner has been identified, along with a success message after firing the SMS.
Play the clicker game
It's time to test out the game flow! Here is the GitHub repository in case you need to check the code.
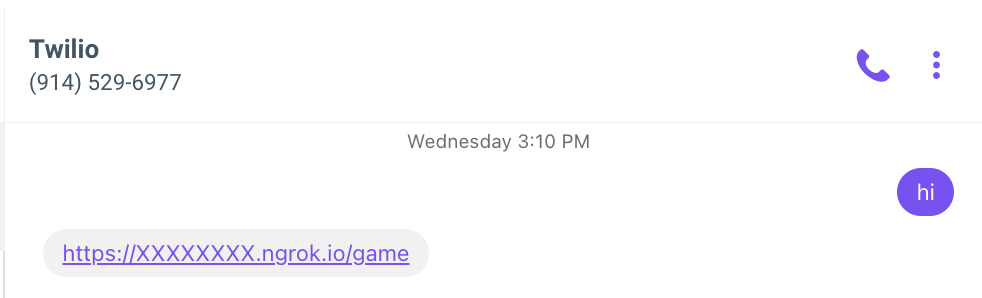
You are encouraged to test the game out on two different SMS enabled devices. Go ahead and use the second phone whose number is not an environment variable, and text a message such as "hi" to the Twilio number to receive the game link.
The following gif shows the demonstration of the gameplay for the given URL:
Check your personal device for the last SMS as seen here:
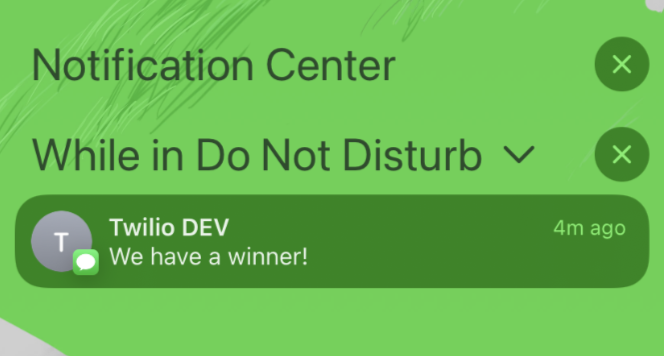
Nice! The group scavenger hunt can end and the winner can be awarded a prize.
What's next for building Java minigames?
Congratulations on building a clicker game that utilizes the real world as a platform as well as technology!
As you can see, there are plenty of ways you can be creative and introduce some Twilio magic to your physical, real-world activities.
While you send groups of friends and family onto their own scavenger hunt challenges, why not spend the time challenging yourself to expand on this project? Look into how you can build a more creative game flow for an ARG or make more minigames.
Explore some other neat Java Spring Boot projects.
- Make a cat clicker game with Java.
- Send a mysterious phone call with Twilio Voice and Java.
- Create a button that sends a WhatsApp message using Java.
Let me know what games you're building by reaching out to me over email.
Diane Phan is a software developer on the Developer Voices team. She loves to help beginner programmers get started on creative projects that involve fun pop culture references. She can be reached at dphan [at] twilio.com or LinkedIn.

Related Resources
Twilio Docs
From APIs to SDKs to sample apps
API reference documentation, SDKs, helper libraries, quickstarts, and tutorials for your language and platform.
Resource Center
The latest ebooks, industry reports, and webinars
Learn from customer engagement experts to improve your own communication.
Ahoy
Twilio's developer community hub
Best practices, code samples, and inspiration to build communications and digital engagement experiences.