Add Two-Factor Authentication To Your Website with Google Authenticator and Twilio SMS
Time to read: 9 minutes
April 10, 2013
Written by

Why Two-Factor Authentication?
Back in the day, it used to be that enforcing a strong password policy was sufficient to prevent unauthorized access into your user’s accounts. (Ah, those were the days, when kids were polite and respected their elders). However, as the security landscape continues to evolve, it is becoming clear that a strong password policy is not enough any more. Today, an attacker can discover your user’s password in a variety of ways: they might find your user’s password on a stolen or lost computer, they might find their password on another site where your user used the same password, or your user’s computer might be infected with a virus that is capturing their keystrokes.
In an ideal world, we would all be authenticating ourselves using tamper-proof hardware that implements a public-key cryptographic system. In the meantime, a simple and effective way of improving the way your users authenticate themselves is a method known as “Two-Factor Authentication“, “Two-Factor Auth”, or just “TFA”. Two-Factor Authentication is a method where your users are required to log in with two “factors”: a password, and a code from a device that they carry on their person. That device used to be a special-purpose device, but these days that device can just as well be a mobile phone.
A great pattern that we are seeing for implementing two-factor authentication is to use the TOTP (Time-based One-time Password Algorithm) standard for the second authentication step. What is so cool about TOTP is that it is flexible enough to allow your users to generate their authentication tokens directly on their smart phones using a TOTP app like Google Authenticator or have their tokens sent to their mobile phone via SMS.
This means that you only need to implement and test one additional authentication scheme, but get the benefits of having two different ways that your users can get tokens.
The best way to see how this is done is to look at some code. Let’s do that now.
Here are the topics that I’ll be covering:
- An Example of Application
I will start with a very basic Python application that implements password authentication and build from there. - Understanding TOTP
Before I show you how to add TOTP to that example application, I’ll explain how TOTP works. - Adding Two-Factor Authentication
Now that we know more about how TOTP works, I’ll show you how to add it to the example application that we started with. - Adding Google Authenticator
Here I will show you how to enable your users to authenticate via the Google Authenticator. - Adding Twilio
Here I will show you how to enable your users to authenticate using a code that is delivered to their phone via SMS. - Try It Out Yourself
Finally, I give you a working example of a site that can use both the Google Authenticator and SMS to do two-factor authentication.
- An Example of Application
An Example of An Application
Below is the code for a very basic website that only uses a username and password for authentication. We will start with this code, and then add two-factor authentication to it.
If you don’t want to read over everything, you can just focus on the “main_page()” function, here:
If you’re new to Python or Flask, here is what’s going on in the code:
In the code below, the first line is a Python function decorator which tells Flask to register this function as the handler for GET and POST requests for ‘/’ (the main page)
This if statement below is true if the request was a “GET” request, meaning, no data was sent to us to process. In that case, we just send HTML to the user.
If we get to this point, then we know that we were sent a “POST” request, hopefully with a username and password. We check to see if the user or password are invalid. If the user or password are not valid, then we display an error saying so. Otherwise, we log the user in.
The rest of the code in this example deals with including additional libraries, setting up the application, defining the User class and handling other website functionality.
You can see the full source on GitHub here: https://github.com/jpf/Twilio-TFA/tree/no-tfa
Understanding TOTP
Before we get started with adding two-factor authentication to this example application, let’s take a quick detour and to learn more about how TOTP works.
As you’ll find on Wikipedia, TOTP “is an extension of the HMAC-based One Time Password algorithm HOTP to support a time based moving factor.”
Based on that involved explanation, you might be surprised to find that generating a one time token with TOTP is not actually very complicated. Here is how you generate a 6 digit TOTP code:
- Compute the 20 byte HMAC of a “shared secret” and a timecode using HMAC-SHA1.
- Deterministically select an offset inside of that 20 byte HMAC.
- Starting at the offset, select a 4 byte range from the 20 byte HMAC.
- Turn the 4 byte range into an integer.
- Divide that integer by 1,000,000 (or “10**6”, the “6” is the number of digits in the TOTP code)
- The remainder of that division is the 6 digit code – the TOTP code
If that isn’t making sense, try taking a look at RFC 6238 and this simple implementation of TOTP in Python below. If needed, you can cut and paste this code into a script and run it from your command line:
Adding Two-Factor Authentication
Now that you have a better understanding of how TOTP works, let’s see how we would add it to the example web application that we started with. The first place that we’ll be touching in our example above is the “main_page()” function, here’s what it looks like when it is modified to support logging in with two-factor authentication:
This should all look very familiar, it’s all the same code as before, with some modifications at the end.
Let’s go over these modifications in a little more detail.
Here is the code that we started out with. No big changes here.
Here is where we add our modifications. We start by checking to see if the user has one enabled two-factor authentication on their account via an app or SMS.
If either two-factor authentication method is enabled, the “totp_enabled” variable will be True.
If TOTP is enabled, we record the fact that the user’s password has been validated into the session state, and redirect the user’s browser to “/verify-tfa”.
Otherwise, if the user doesn’t have any form of two-factor authentication enabled, then we just log them in as before.
In the case where the user has two-factor authentication enabled, they will be redirected to a page to enter in their two-factor authentication token. Here is what the code behind that page looks like:
And here’s what that code does. Again, this is a Python method decorator that registers this method to handle “GET” and “POST” requests to the “/verify-tfa” path.
This loads in the user information from the session state that we saved before.
If the request was a “GET” request, then we send the user an SMS with their token (if they have that configured) and then render the page prompting the user to enter their token.
This code does some sanity checking on the session data. We should never actually get into a state where this code will run, it’s here Just In Case.
If we got to this point, we know that we got a POST request. We check to see if the user submitted a token, and if that token is valid for the user. If the token is valid, log the user in and send them to their user page!
Otherwise, if the token wasn’t valid, ask the user to enter their token again.
Adding Google Authenticator
Now that we have code to add TOTP authentication to the login process, let’s take a look at how we’ll get our users to enable TOTP authentication on their account.
Keep in mind that you don’t have to use Google Authenticator for this to work. TOTP is an IETF standard and has many different client implementations.
I’m using Google Authenticator in this example because it seems to be the most widely used TOTP client at this time. Let’s get started.
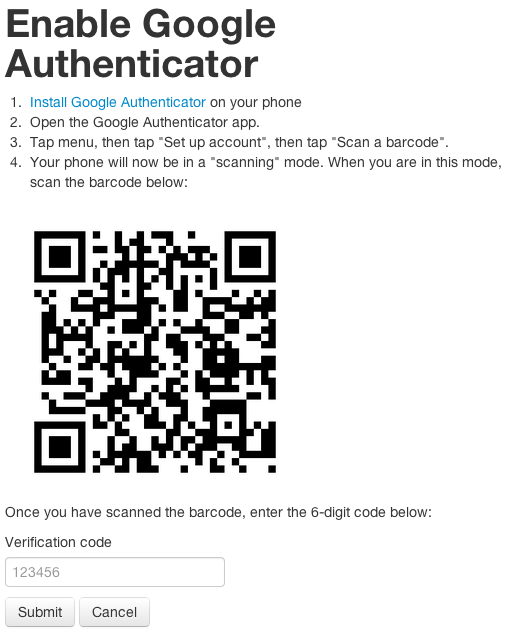
Here is the basic overview of how this part works:
- The user visits a page to add Google Authenticator to their account.
- The page contains a QR code that the user scans with Google Authenticator.
- After scanning the QR code, the user will enter the 6 digit token that Google Authenticator displays
This is what the page will look like:
And here is the code that handles takes the 6 digit token and adds it to the user’s account.
By this point, you should be familiar with the first part of this function.
Starting at line 7, we check to see if the token that the user entered is valid, this is an important step that makes sure that the user set up Google Authenticator correctly.
Once we know that the token is valid, we update a flag on the user’s account and save the update. The details of how this data is persisted will differ from application to application, so we don’t cover those details in this tutorial.
If there was an error with the token, notify the user and ask them to try again.
Finally, I wanted to show you how I generate the QR code. I’m generating my own QR code to avoid sending the shared secret to another service and reduce the risk of leaking the shared secret in a plaintext string.
Each account in Google Authenticator has an account name, so in this section we create a globally unique name for our user and then have our totp object make us an image with the QR code that will contain that account name and the TOTP shared secret for that account.
The object that the “.qrcode()” method can only write the image to a file. So here, we create a “StringIO”, a file-like object in memory, to write to. We write the image to that object and then send the contents over the wire.
As I noted earlier, I’m glossing over several things here. I’m not showing you how I persist the user objects and I’m not showing you the HTML that gets sent to the user. If you’re wondering what those look like, take a look at the full source over here: https://github.com/jpf/Twilio-TFA
Adding Twilio
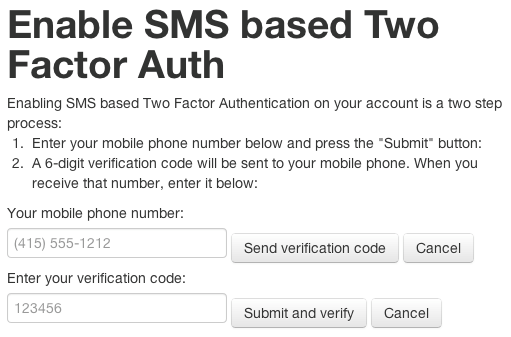
Once we’ve added support for Google Authenticator, it’s just a small additional step to give our users the ability to receive TOTP tokens on their phones via SMS. The procedure for adding SMS based two-factor authentication is very similar to adding support for Google Authenticator. The main difference is that instead of having our users scan a QR code, we have them enter in their mobile phone number.
Here is what this page looks like:
And here is the code that powers the page above.
In this code, we check to see if we got a phone number in the “POST” request.
If so, we take the phone number and send an SMS with the TOTP code to that phone number. We store the results of the SMS sending method in an option called “sms_sent”, if the SMS sending method returns “False” then the HTML template will display an error to the user saying that the phone number was invalid.
Assuming that previous section of code worked, the user should have recieved an SMS with their TOTP code and then entered that code into the page. In this part of the code, we check to see if we were give a token and see if that token is valid. If the token is valid, we enable two-factor authentication for this account and save that setting. As I said in the section on adding Google Authenticator, the details of how to persist the user settings will be unique to your situation, so I don’t cover that here. If there was an error validating the token, then we notify the user of that error via a flag that will be checked by our HTML template.
Summary
In this article, we showed you an example of a simple web application written in Python/Flask. We showed you how to add two-factor authentication to that application, Finally, we showed you how you would enable your users to use Google Authenticator or SMS to authenticate to that modified application.
What I didn’t cover is the HTML that I used in this example or how I saved the user data.
To really understand what is going on, I suggest that you try out the example I have running online and then look at the code.
Try it out yourself
If you want to see what this all looks like, here is a copy of the code running online for you to try out: http://twilio-tfa.herokuapp.com
All of the source code for this example is also available on GitHub: https://github.com/jpf/Twilio-TFA
Thanks for reading.
Please let me know if you have any additional questions, feedback or patches.
Related Resources
Twilio Docs
From APIs to SDKs to sample apps
API reference documentation, SDKs, helper libraries, quickstarts, and tutorials for your language and platform.
Resource Center
The latest ebooks, industry reports, and webinars
Learn from customer engagement experts to improve your own communication.
Ahoy
Twilio's developer community hub
Best practices, code samples, and inspiration to build communications and digital engagement experiences.