Add users & messages to new Twilio Conversation with Google Cloud Functions and C#
Time to read:
December 07, 2022
Written by
Reviewed by

With Twilio Conversations, you can autocreate new Conversations when your Twilio Phone Number receives an incoming message. When the Conversation is autocreated, a webhook can respond to the onConversationAdded event that the creation triggers.
In this post, you’ll learn how to enable Conversation autocreation and write a Google Cloud Function in C# that adds a chat participant and sends a message automatically to newly-created Conversations with the Twilio .NET SDK.
Prerequisites
Before you begin this tutorial, you will need the following:
- A Twilio account – sign up for a free Twilio account using this link and get trial credit to try out Twilio products.
- A Twilio Phone Number
- A verified personal phone number
- Twilio CLI installed
- .NET 6 (earlier and newer versions should work with slight adjustments)
- ngrok
- Prior knowledge of the Twilio Conversations API
- Basic understanding of HTTP-triggered Google Cloud Functions
You can view the finished project’s source code on GitHub.
Twilio Conversations API core concepts
While this tutorial assumes some prior knowledge of the Conversations API, here is a brief refresher of the core concepts you should understand. Feel free to skip to the next section if you’re already familiar with them.
Twilio Conversations API
The Twilio Conversations API allows you to build scalable, multichannel conversations. Users can participate in a Conversation using any supported channel, such as SMS, chat, Facebook Messenger, Google's Business Messages, and WhatsApp.
Conversation
A Conversation is a virtual space that Participants use to communicate across channels. Participants send text and/or media Messages that get delivered to all other Participants. Each Conversation has a unique ID, known as its Conversation SID.
Participant
A Participant is an entity that reads and sends messages within a Conversation. Participants may join through any supported channel type. Chat participants are backed by a User entity and identified by a unique identity string.
Conversation and Messaging Services
A Conversation Service is a container for all Conversations-related resources, such as Conversations and Participants. To support non-chat channels such as SMS and WhatsApp, a Messaging Service needs to be attached to the Conversation Service.
Conversation autocreation overview
When Conversation autocreation is enabled, incoming Programmable Messaging webhooks are ignored, and if the sender is not a part of any Conversation, a new Conversation will be created.
Autocreation triggers an onConversationAdd pre-event hook; this webhook allows you to accept or reject the auto-creation. However, you will use the onConversationAdded post-event hook, which fires after the Conversation has been created and sends Conversation data such as the Conversation SID.
Now that you understand the necessary Conversations API concepts and how autocreation works, it’s time to begin!
Enable Conversations autocreation in the Twilio Console
To enable Conversation autocreation when your Twilio number receives a message, you need to do two things in the Console.
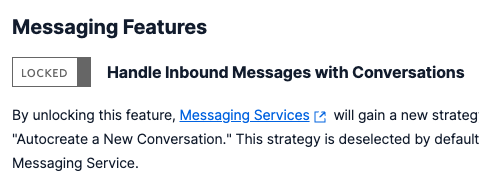
First, you must unlock the Handle Inbound Messages with Conversations Messaging feature from within the Conversations settings. This gives the Messaging Service a new Autocreate a Conversation option for handling incoming messages.
Second, you have to select the new option from the Messaging Service’s settings. Selecting the option will autocreate Conversations that create onConversationAdded events.
Unlock the Handle Inbound Messages with Conversations feature
First, navigate to the Conversations Overview page. In the left-hand sidebar, expand the Manage section and click Defaults to navigate to the configuration defaults page.
Under the Messaging Features section, unlock the feature by clicking the toggle next to Handle Inbound Messages with Conversations:
Click Save at the bottom of the page to save the updated settings.
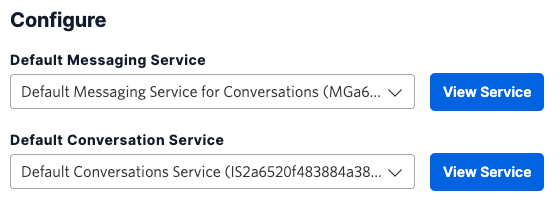
Note that there is a default Conversation Service named Default Conversations Service and a default Messaging Service named Default Messaging Service for Conversations. These are initially selected and are shown in the Default Messaging Integration Settings section:
Allow Messaging Services to autocreate Conversations
Navigate to the Messaging Services page and click Default Messaging Service for Conversations.
To use the Messaging Service, you first need to add a Sender to it. Under Add Senders to Service, click Add Senders and follow the prompts to add your Twilio number to the sender pool.
Next, click Integration in the left-handle sidebar to navigate to the Integration page. Under Incoming Messages, select Autocreate a Conversation.
Finally, click Save at the bottom of the page.
Create the Google Cloud Function locally
Now that you’ve enabled Conversation autocreation in the Console, you can begin writing the Google Cloud Function that handles the onConversationAdded webhook. Recall that this function will be responsible for adding a new Participant and sending a message to the newly-created Conversation.
First, create a new directory for the Function and cd into it:
You’ll generate the Function boilerplate using the HTTP function template provided by Google Cloud. Run the following command to install the template package:
Next, create a Function from the template with dotnet new:
Once the command exits, you should see a ConversationsAutocreate.csproj file and a Function.cs file.
You can ensure that everything is working properly by starting the server:
Then, make a request to the Function:
You should get a 200 status code and a response like “Hello, Functions Framework” back.
Implement the Function
First, you’ll need to install the Twilio .NET SDK to interact with the Twilio API. If your Function is still running, terminate the process, then run the following command:
Open your text editor of choice, and at the beginning of Function.cs, bring in the required libraries:
Next, remove all the boilerplate code within the Function’s HandleAsync method and replace it with the following:
First, the Function ensures that it has received a POST request and returns a 405 status code if it hasn’t. For inbound messages, Twilio sends a POST request with a Content-Type of application/x-www-form-urlencoded.
Next, it retrieves the EventType key from the request form, which is the webhook type that Twilio is triggering. The Function returns early if it isn’t an onConversationAdded webhook.
Then, the Function gets the environment variable values for your Twilio account SID and auth token and retrieves the ConversationSid key from the request form. The value of the ConversationSid key is the conversation SID of the newly-created Conversation (i.e., the Conversation created in response to an incoming message).
Lastly, the Twilio client is initialized with your account credentials, and a chat participant is added by creating a new ParticipantResource followed by sending a chat message by creating a new MessageResource. Be sure to specify the identity of the chat participant you want to add.
Hook up the webhook in the Console
With the Function implemented, you can now run it locally and specify the webhook URL in the Console.
First, specify your Twilio account SID and auth token as environment variables:
Next, start the Function with dotnet run:
In a separate terminal window, start ngrok and copy the public Forwarding URL that it logs:
Next, navigate to the Conversations Services page and click Default Conversations Service. In the left-hand sidebar, click Webhooks.
Under Webhook URLs, enter the ngrok URL in the Post-Event URL field and ensure that HTTP POST is selected for Method.
Under Post-webhooks, select onConversationAdded and click Save at the bottom of the page.
Test the finished project
To test the project, you can send a message to your Twilio number and check for the created Conversation with the Twilio CLI and ensure that you receive the automatically-added Message.
First, send a message to your Twilio number from your verified personal phone number. Then, run the following command to list your Conversations:
You should see one Conversation listed. Copy the Conversation SID and run the following command with the SID:
You should see two Participants listed: one whose Message Binding’s address is the number you sent the test message from, and another representing the chat participant whose Message Binding is null. Additionally, you should ensure that you received the Message created in the Function.
Viewing Conversations in the Console
You can also view all Conversations in the Twilio Console. First, navigate to the Conversations Overview page. In the left-hand sidebar, expand the Manage section and click Services. Select the Default Conversations Service and click Conversations in the left-hand sidebar.
You should see a list of Conversation SIDs. To view a Conversation’s properties, Messages, and Participants, click a Conversation SID.
Next steps
Now that your Function works locally, consider deploying it and checking out the resources below:
Conclusion
Congrats! You’ve finished the project. I hope you found this post helpful and were able to learn more about the Conversations API.
Zach is a software engineer based in Washington State. He works with JavaScript and React and enjoys writing about code on his blog. You can get in touch with him on LinkedIn, Twitter, or at me[at]zachsnoek.com.

Related Resources
Twilio Docs
From APIs to SDKs to sample apps
API reference documentation, SDKs, helper libraries, quickstarts, and tutorials for your language and platform.
Resource Center
The latest ebooks, industry reports, and webinars
Learn from customer engagement experts to improve your own communication.
Ahoy
Twilio's developer community hub
Best practices, code samples, and inspiration to build communications and digital engagement experiences.