An easier way to write TwiML templates in Rails and Sinatra
Time to read:
November 05, 2014
Written by
This post is part of Twilio’s archive and may contain outdated information. We’re always building something new, so be sure to check out our latest posts for the most up-to-date insights.

We recently had a discussion between some members of the Developer Evangelism team about how best to write TwiML within a Ruby application. There are a few methods available to a developer right now: handwrite the XML (ugh!), use the builder gem or take advantage of the twilio-ruby gem’s Twilio::TwiML::Response object.
Writing XML by hand can get messy very quickly. Building up a Twilio::TwiML::Response gets unwieldy within controller actions and violates the separation of concerns between controller and view. The builder gem is probably the best bet in a non-trivial application, but it also requires you to repeat yourself between templates as every TwiML response starts with a <Response> tag.
What if we could write just the code that generates the TwiML we need? And save it to a .twiml file, much like an .erb or .haml file, so that what we’re dealing with is obvious to every developer on the project?
Light bulb
At this point, I started to get excited about the idea. I found myself with a few hours spare and decided to tackle this problem by coding up what I think could be the best of both builder’s approach and Twilio::TwiML::Response’s handling of the repetition.
twiml_template is a gem that connects the Twilio::TwiML::Response object to the templating systems that Rails and Sinatra use. It does away with any boilerplate that any of the existing methods require, but still uses the Ruby standard builder template to create the XML for your TwiML response.
How do you use it?
Let’s code up a simple application to demonstrate how to use it! We are going to create ourselves a simple Rails application using TwiML to respond to an incoming call. First we’ll implement our TwiML using the Twilio::TwiML::Response class from the twilio-ruby gem. Then we’ll update that to use the builder gem and finally implement the simplest option, twiml_template. So, make sure you have your Twilio account details to hand and Ruby and Rails installed and let’s get started. Head to the command line and enter:
A nice easy start. We generate a new Rails application for ourselves and cd to the application directory. Open the code up in your favourite text editor, navigate to the Gemfile and add the following line to the bottom:
Back on the command line we need to get the twilio-ruby gem into our bundle, so we need to run:
again. Wait for the gems to install. Now we’ll want to generate ourselves a controller, on the command line type:
This is going to generate us a controller that will respond to Twilio’s requests for TwiML. Straight away we can remove the generated view as we won’t be needing that.
We also need to update the route that has been generated. Open the config/routes.rb file and change the line:
to
This sets up our route and defaults the format to XML, since that is what we need to respond with to Twilio.
Now, open up the TwilioController. We are going to add a simple TwiML response to our controller action so that we can test this is all working over the phone. We also need to skip verifying the authenticity token so that Twilio can make POST requests to this action. Replace the contents of the file with the following code:
Ok, we’re ready to spin this up and test it. Start your rails server from the command line:
We’ll also need to expose our application to the outside world so that Twilio can access it. As ever, Kevin’s post on how to do this with ngrok is an invaluable source on how to do this. If you’ve got ngrok installed and ready, launch it now.
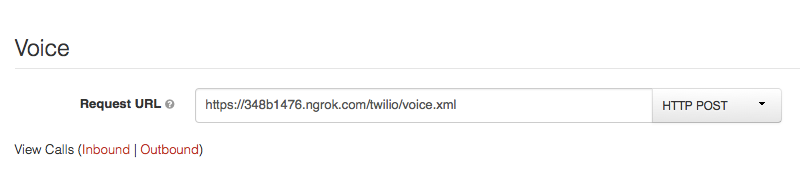
Grab your ngrok URL and head to your Twilio account. You’ll need to use an existing number you own, or buy a new one, and update the voice request URL to http://YOUR_NGROK_URL/twilio/voice.xml.
Save the updates to your number and give it a call. You should hear Twilio say “Hello World!” and then hang up. Good news! That works, but as I said earlier, that Twilio::TwiML::Response object is a bit unwieldy. Let’s replace that with builder.
Same app, different builder
For this, we need to create a view file. This is good as it is going to separate the different concerns of the controller and the view. Create a file called voice.xml.builder in the app/views/twilio folder. Now we can build up our TwiML with the builder. The view should look like this:
Much neater. Now open up the TwilioController again and remove everything from within the voice action. The controller should end up looking like:
Let’s test again. Nothing on the Twilio side of things needs to change, just call your Twilio number again. Did you hear “Hello World!” again? Good, let’s improve this one more time.
Upgrading to twiml_template
First we need to add the twiml_template gem to our Gemfile. Open up the Gemfile again, and at the bottom add:
On the command line, run:
and we’re ready to tidy up our view even more. We need to update our route that we had generated, so return to the config/routes.rb file and change the default format to :twiml.
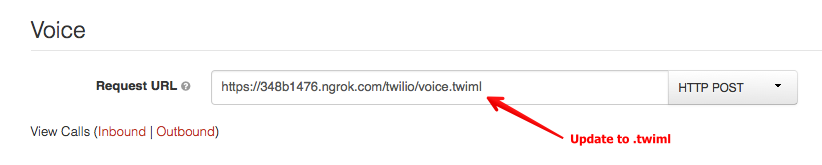
Make sure you update the URL in your Twilio account too. You need to replace the .xml extension with .twiml.
Finally, we need to update our view. Rename the file voice.xml.builder to voice.twiml and open it up for editing. Now comes the fun part: removing boilerplate. You can remove all the lines except for our Say verb, and change response to twiml. It should look like this:
Clear and simple. Let’s call our number up one more time to see if it still works. If you hear “Hello World!” one more time then you can relax knowing you never have to write boilerplate for TwiML ever again.
Less repetition, clearer code
I wanted to create a tool that made it easier for Ruby developers to generate TwiML within our applications. Including the twiml_template gem cleans up our templates and removes repetition.
The example above was simple, but for every extra endpoint you write TwiML for that’s one less time you have to instantiate a Twilio::TwiML::Response or write out the xml.instruct! command. All you need to do is write the TwiML you want to see in your application and let the template handle the rest.
If you want to get more of a feel for using twiml_template you can run and play with some simple Rails and Sinatra examples in the twiml_template_example repository. Or you can check out the source of twiml_template on GitHub');">[crayon-5b6d1e25801f0498904087-i/] on GitHub.
I’m really interested to know if this does make things simpler for rendering TwiML within your Ruby applications. Please install the gem, try it in your next Twilio project and let me know what you think. You can catch me on Twitter on @philnash or on email at philnash@twilio.com. Happy TwiML writing!


Related Resources
Twilio Docs
From APIs to SDKs to sample apps
API reference documentation, SDKs, helper libraries, quickstarts, and tutorials for your language and platform.
Resource Center
The latest ebooks, industry reports, and webinars
Learn from customer engagement experts to improve your own communication.
Ahoy
Twilio's developer community hub
Best practices, code samples, and inspiration to build communications and digital engagement experiences.