Build a ChatGPT SMS bot with Azure OpenAI Service and ASP.NET Core

May 15, 2023
Written by
Reviewed by

Build a ChatGPT SMS bot with Azure OpenAI Service and ASP.NET Core

ChatGPT is a state-of-the-art natural language processing tool by OpenAI that can help you create a chatbot that can provide accurate and helpful responses to user queries.

With its extensive knowledge base and advanced language processing capabilities, ChatGPT can assist you in developing a chatbot that delivers a seamless and engaging user experience. It's worth noting that this introduction was generated using ChatGPT itself, with some minor editing, showcasing the power and versatility of this language model.

OpenAI has opened up an API for ChatGPT, but in addition to that, Microsoft Azure has been working with OpenAI to offer its own version of OpenAI's models through Azure, adding on the security, integration, and management features you expect from the Azure cloud platform.

The interesting thing about Azure OpenAI Service, is that the same models are used by OpenAI, but they are deployed inside your Azure subscription. This means they are completely isolated from OpenAI and from other Azure OpenAI Services so you don't have to worry about accidentally sharing data with others.

While Azure has released the Azure OpenAI Service as "Generally Available", you’ll still need to fill out this form and be approved by Microsoft to get access to the service. (C'mon Microsoft, any service where you have to be manually approved is not GA, but I digress.)

In this tutorial, you'll learn how to create an Azure OpenAI Service and consume the API using the OpenAI .NET client library to create a chatbot inside the console.

In this tutorial, you'll learn how to

  • integrate Twilio SMS with ASP.NET Core,
  • create an Azure OpenAI instance and model deployment,
  • and call the chat completions API using the Azure OpenAI client library to create the chatbot.

Let's get started!

Prerequisites

Here’s what you will need to follow along:

You can find the source code for this tutorial on GitHub. Use it if you run into any issues, or submit an issue if you run into problems.

Create and set up a Twilio SMS project

Open a shell, use the .NET CLI to create an empty web project named AzChatGptSms, and change into the project directory, using these commands:

dotnet new web -n AzChatGptSms
cd AzChatGptSms

The Twilio .NET SDK lets you communicate with Twilio's APIs without having to manually write the HTTP code. Add the Twilio .NET SDK using the following command:

dotnet add package Twilio

The Twilio helper library for ASP.NET Core helps you integrate Twilio into ASP.NET Core. Add the helper library for ASP.NET Core using the following command:

dotnet add package Twilio.AspNet.Core

Open the project in your preferred .NET IDE and update the Program.cs file to match the following code:


using Twilio.AspNet.Core;
using AzChatGptSms;

var builder = WebApplication.CreateBuilder(args);

builder.Services.AddDistributedMemoryCache();

builder.Services.AddSession(options =>
{
    options.Cookie.HttpOnly = true;
    options.Cookie.IsEssential = true;
    options.Cookie.SecurePolicy = CookieSecurePolicy.Always;
});

builder.Services.AddTwilioClient();

var app = builder.Build();

app.UseSession();

app.MapMessageEndpoint();

app.Run();

Here's an overview of the changes:

  • The application configures server sessions to store the session data in memory. These sessions will be used to store the chat messages.
  • The Twilio API client is registered as a service in the ASP.NET Core Dependency Injection (DI) container. Now the ITwilioRestClient and TwilioRestClient can be injected into constructors and methods supported by DI.

MapMessageEndpoint is an extension method that doesn't exist yet. Create a new file within your project directory named MessageEndpoint.cs and add the following code to it:

using Twilio.Clients;
using Twilio.Rest.Api.V2010.Account;

namespace AzChatGptSms;

public static class MessageEndpoint
{
    public static IEndpointRouteBuilder MapMessageEndpoint(this IEndpointRouteBuilder builder)
    {
        builder.MapPost("/message", OnMessage);
        return builder;
    }

    private static async Task<IResult> OnMessage(
        HttpContext context,
        ITwilioRestClient twilioClient,
        CancellationToken cancellationToken
    )
    {
        var request = context.Request;

        var form = await request.ReadFormAsync(cancellationToken);
        var receivedFrom = form["From"].ToString();
        var sentTo = form["To"].ToString();
        var body = form["Body"].ToString().Trim();

        await MessageResource.CreateAsync(
            to: receivedFrom,
            from: sentTo,
            body: $"You said: {body}",
            client: twilioClient
        );

        return Results.Ok();
    }
}

The MessageEndpoint.MapMessageEndpoint extension method maps the /message endpoint for HTTP POST requests to the OnMessage method.

Later, you will configure Twilio's message webhook to send HTTP POST requests to the /message endpoint. Twilio will send data about the incoming message as a form.

 The OnMessage method reads the form data from the request and extracts data from the form. The From parameter is the phone number that sent the message. The To parameter is the phone number that received the message, which will be your Twilio phone number. The Body parameter is the content of the message itself. The MessageResource.CreateAsync method sends a message back to the sender, repeating what the sender said.

Alternatively, you can use TwiML to respond to the incoming message. This is simpler and sufficient for most use cases, however, this application will require sending multiple messages in correct order, which you'll need to call the Twilio API for.

You'll need to configure the Twilio Account SID and Auth Token before you can communicate with the Twilio API using the Twilio REST client. Since the Auth Token is a secret that you should not share, you should avoid hard-coding it such as putting it in your appsettings.json file — or any other way that it could end up in your source control history. Instead, use the Secrets Manager aka user-secrets, environment variables, or a vault service.

Run the following commands to initialize user-secrets:

dotnet user-secrets init

Then, grab the Account SID and Auth Token from the Account Info panel of the Twilio Console and configure them using the following command, replacing [YOUR_ACCOUNT_SID] with your Account SID and [YOUR_AUTH_TOKEN] with your Auth Token:

dotnet user-secrets set Twilio:Client:AccountSid [YOUR_ACCOUNT_SID]
dotnet user-secrets set Twilio:Client:AuthToken [YOUR_AUTH_TOKEN]

Now, run your application using the following command:

dotnet run

In the application's output, you'll see a line similar to Now listening on: http://localhost:5209. Copy the HTTP URL and port, as you'll need it shortly.

You can also create a Twilio API key to authenticate to Twilio's APIs instead of an Auth Token. API keys are easier to manage, and you can create one for each application as needed.

Configure the message webhook on your Twilio phone number

Next, you'll need to configure the message webhook on your Twilio phone number. Before you can do that, you'll need to make your locally running application accessible to the internet. You can quickly do this using ngrok which creates a secure tunnel to the internet for you.

Leave your .NET application running, and run the following command in a separate shell, after replacing [YOUR_LOCALHOST_URL] with the URL and port which you copied previously:

ngrok http [YOUR_LOCALHOST_URL]

ngrok printed the Forwarding URL to the output, which you'll need to publicly access your local application. Copy it, as you'll need it in just a moment.

If you're using an HTTPS localhost URL, you'll first need a ngrok account, and authenticate the ngrok CLI.

Now, go back to the Twilio Console in your browser, and use the left navigation to navigate to Phone Numbers > Manage > Active Numbers. Then, click the Twilio phone number you want to test with. On the phone number configuration page, locate "A MESSAGE COMES IN" in the Messaging section. Underneath that, set the first dropdown to Webhook. Set the value of the text box next to the dropdown to the ngrok Forwarding URL which you just copied, and add /message at the end of the URL. Then click Save.

Now, text something to your Twilio phone number. You should receive an SMS back saying something like "You said: [whatever you said]".

Great job! You have an application that can receive SMS and send back SMS.

Your webhook endpoint has to be publicly accessible, so Twilio can send HTTP requests to them, but this means others can also send HTTP requests to your endpoint. You should add Twilio's request validation to your application to validate that the HTTP requests originated from Twilio, and not a malicious actor.

Create an Azure OpenAI instance

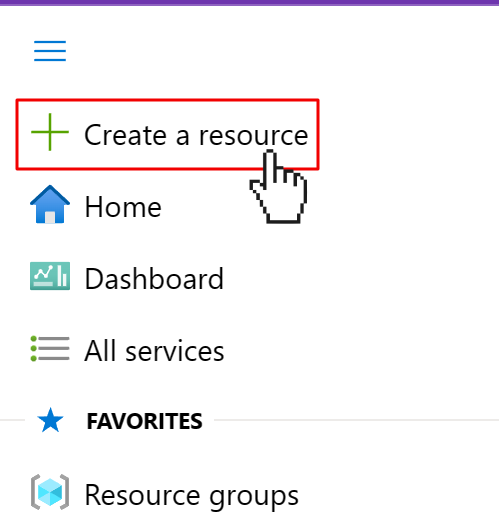
To create an Azure OpenAI Service, open a browser and navigate to the Azure Portal. Open the navigation on the left and click on Create a resource.

User clicks on the "Create a resource" link in the Azure Portal navigation

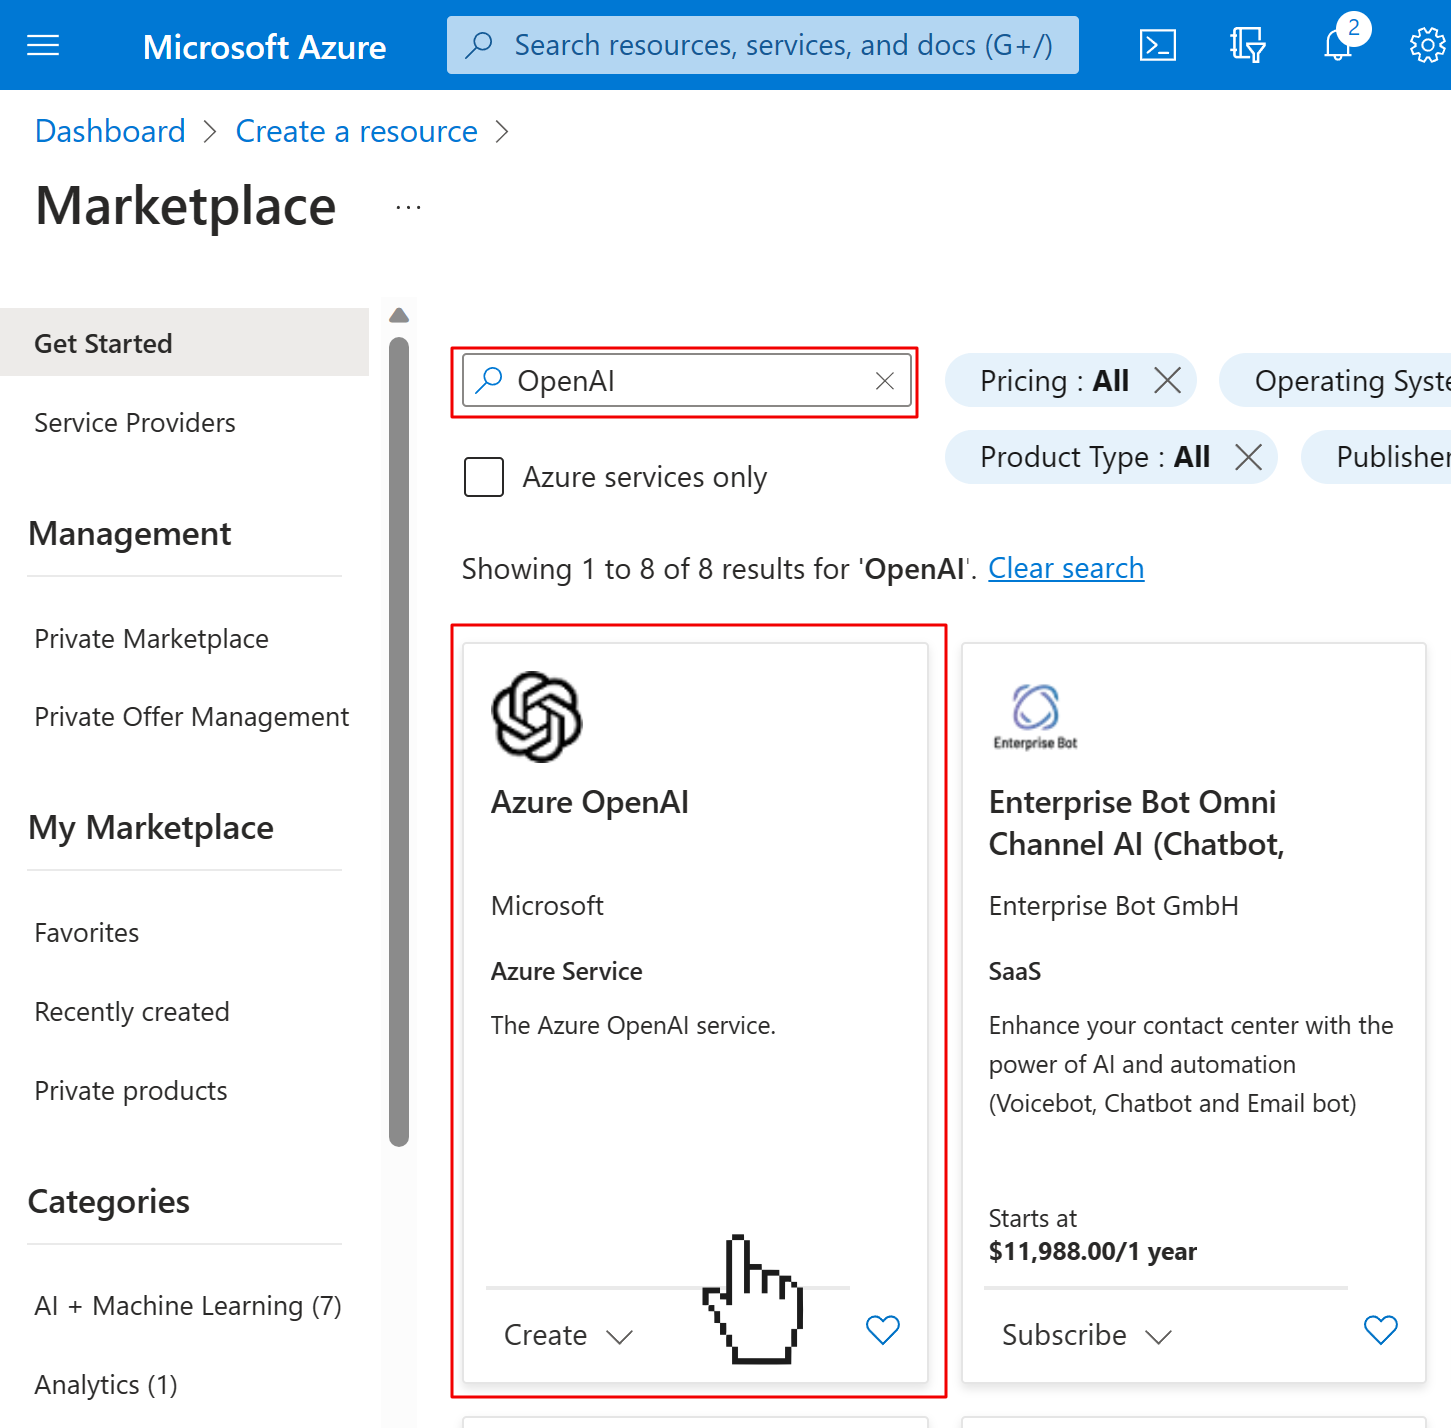
This will open the Azure Marketplace. Use the search box to search for "OpenAI" and click on the Azure OpenAI product.

User searching for OpenAI in the Azure Marketplace and clicking on the Azure OpenAI product card.

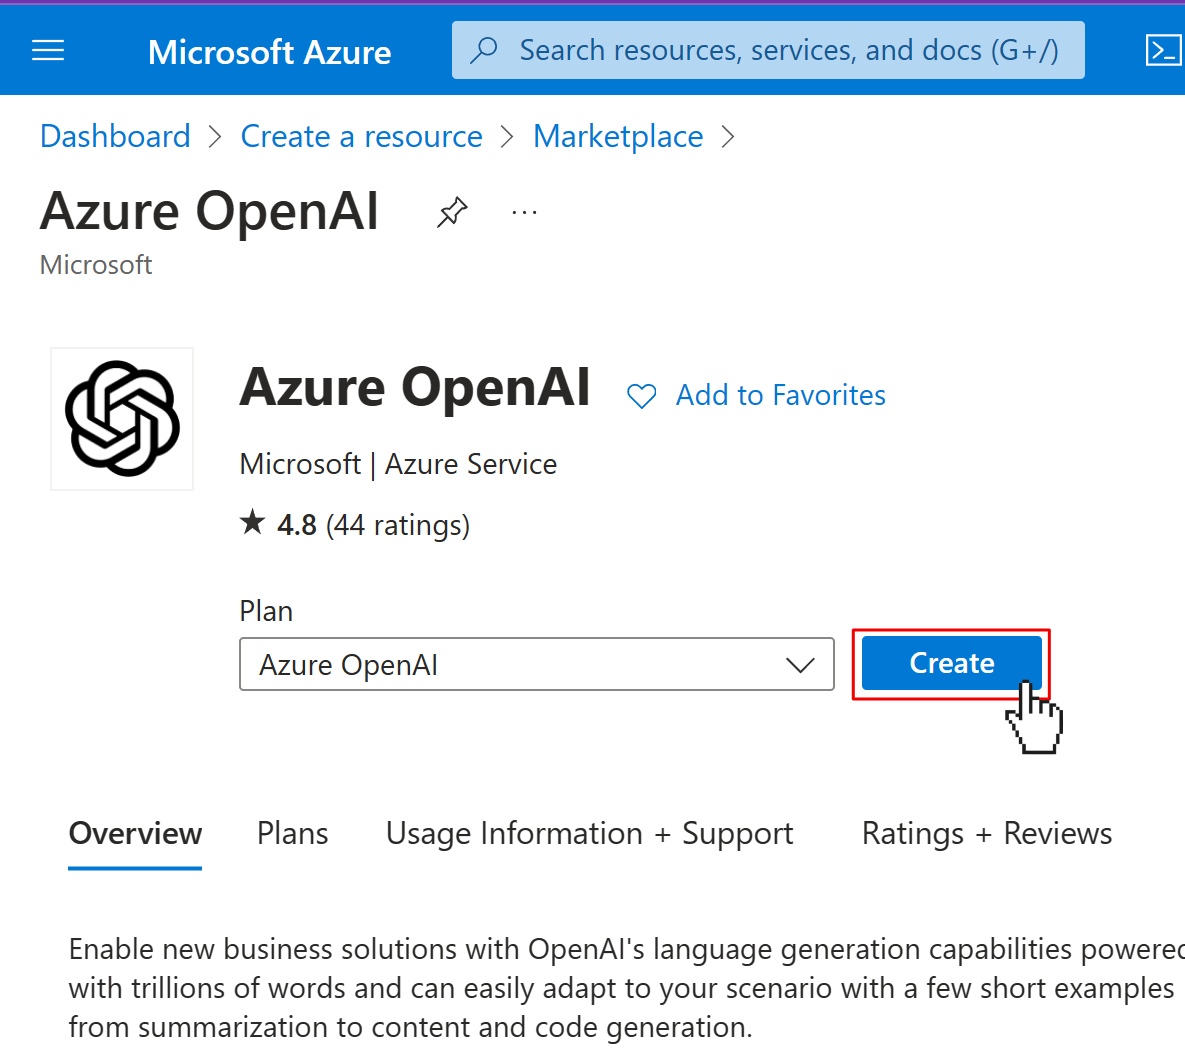
On the product page for Azure OpenAI, click on the Create button.

Azure OpenAI product page where user click on the Create button.

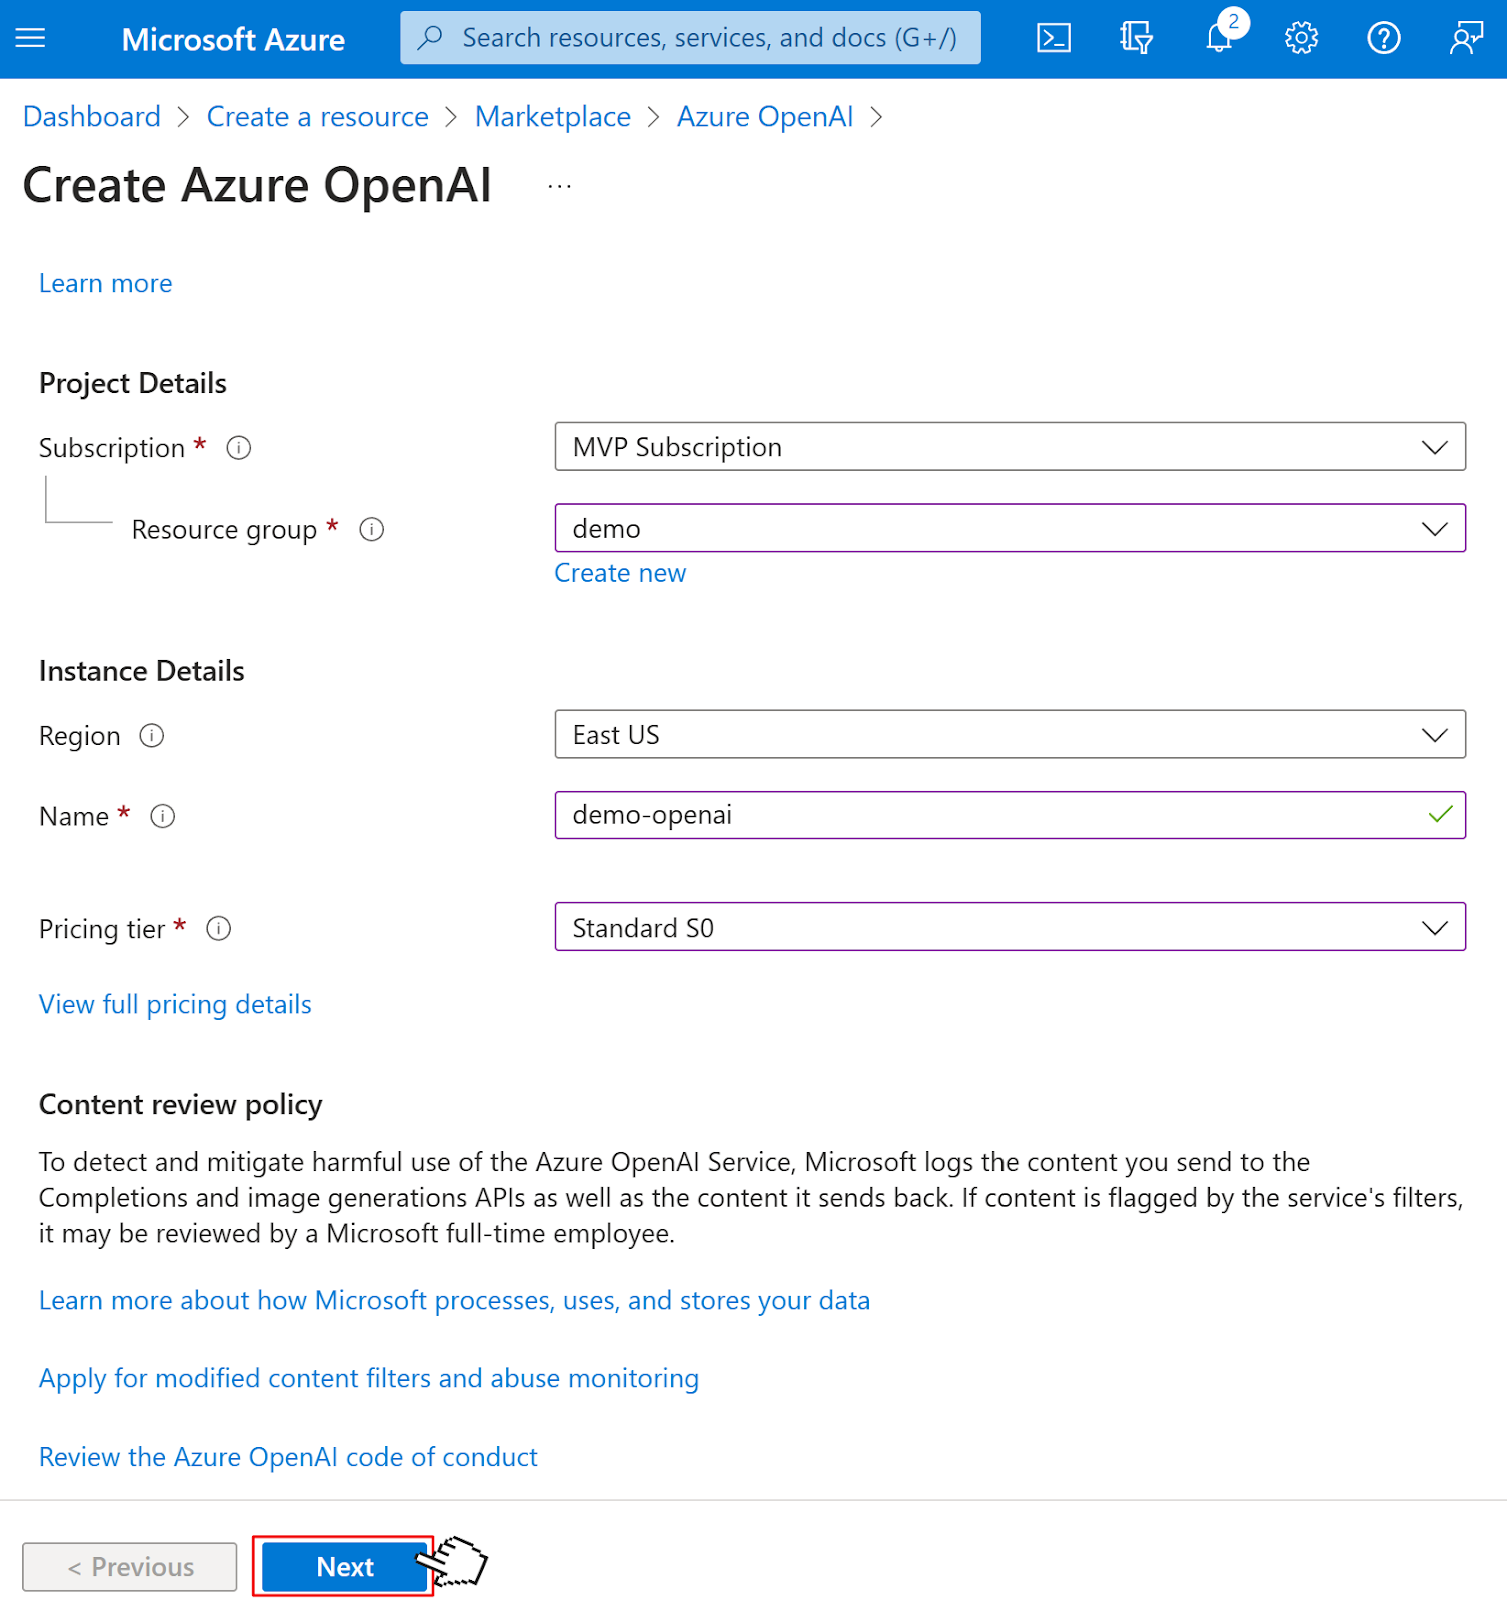
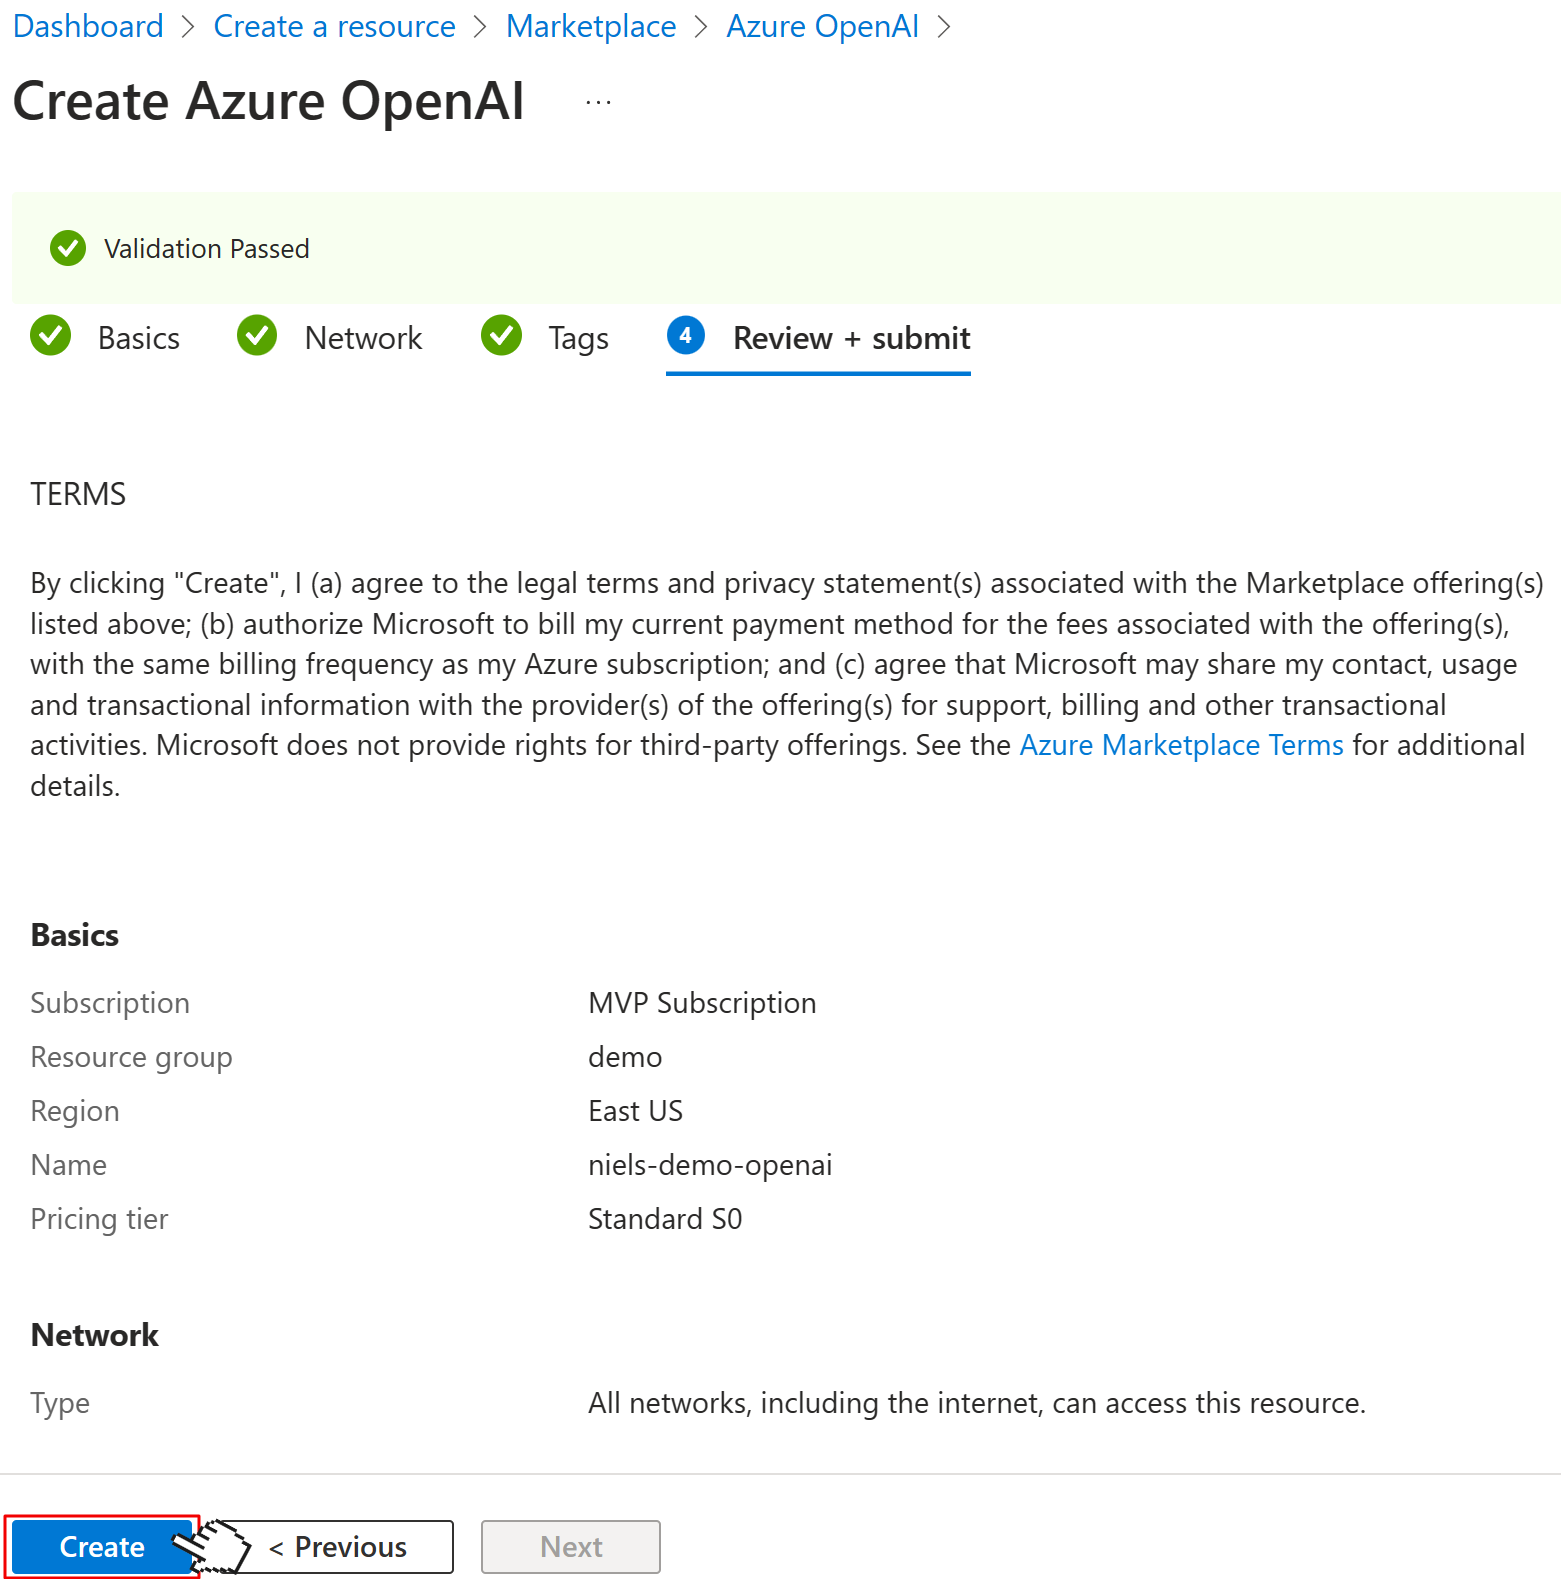
Select the resource group you want to use, or create a new one, give your OpenAI instance a globally unique name, and select any pricing tier (there's only one at the time of writing this). Then click Next.

Create Azure OpenAI dialog, asking for the subscription, resource group, region, name, and pricing tier. User filled out the form and is clicking on the Next button.

Leave the defaults on the Network and Tags page. Click Next until you reach the Review + submit page. Here you'll see an overview of what you're about to create. Click the Create button.

Create Azure OpenAI Review + submit dialog, showing an overview of the resource to be created. User clicks on Create button.

Now, Azure will provision your Azure OpenAI instance, which will take some time. It took about 10 minutes for me, so go make some coffee, or even better, some delicious tea. 😉

Azure deployment screen showing the Azure OpenAI service has been deployed. User clicks on "Go to resource" button.

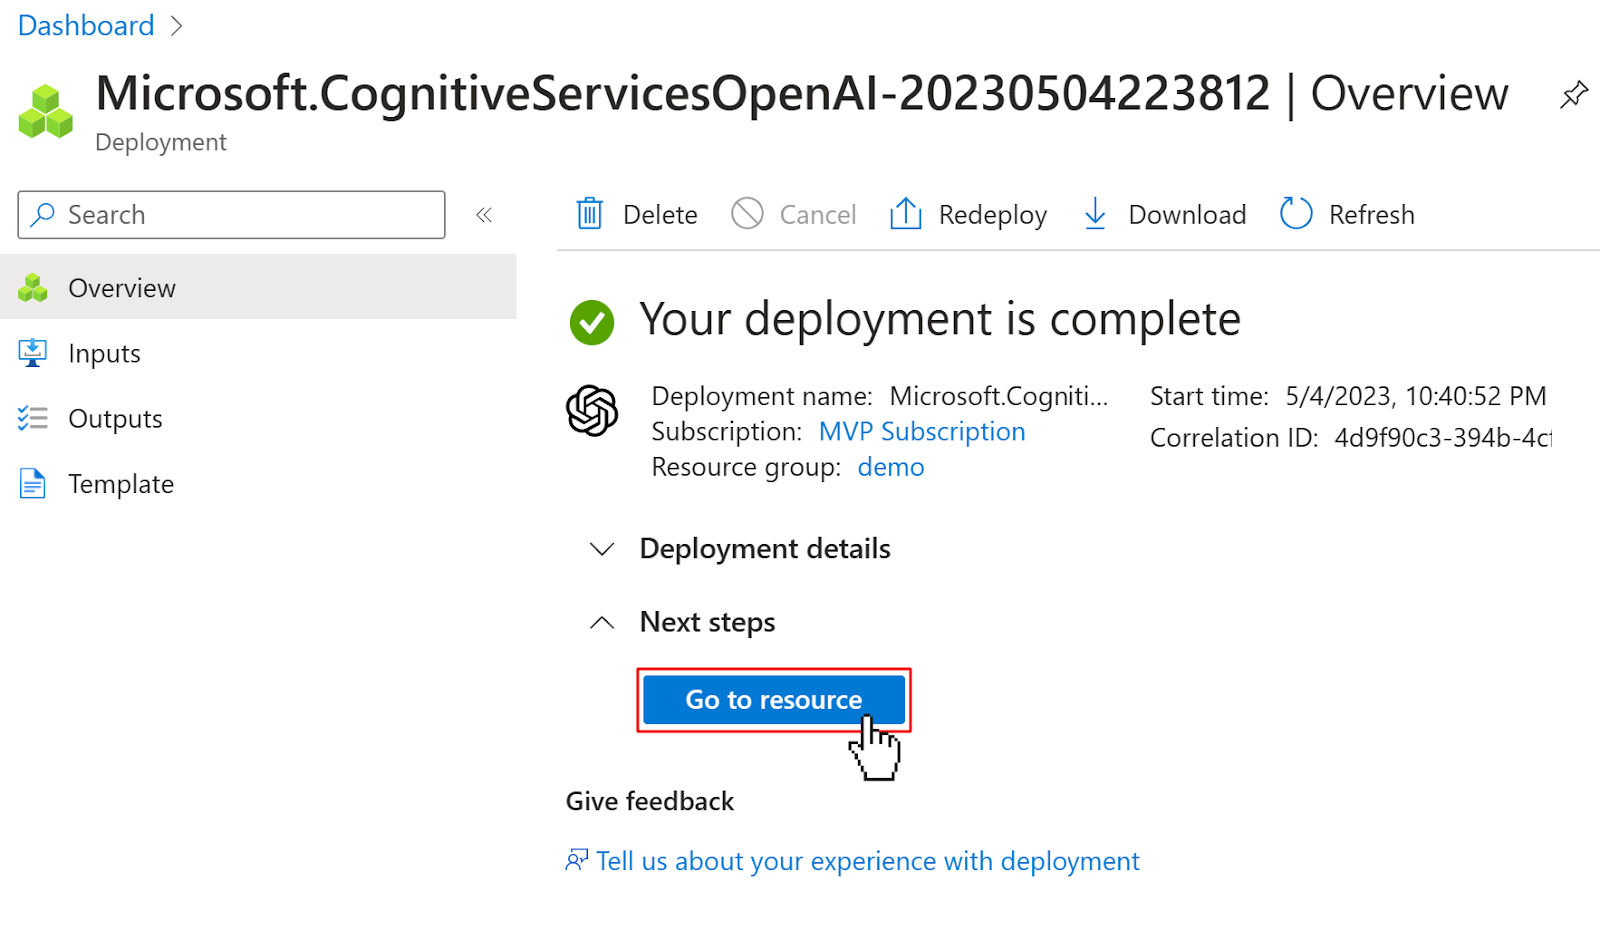
Once Azure says, "Your deployment is complete", click on the Go to resource button. Then in your OpenAI instance, click on the Model deployments tab in the left navigation, and then click the Create button up top.

User navigates to the Model deployments tab using the left side navigation of the Azure OpenAI service. User then clicks Create button which opens the Create Model deployment modal. User fills out the form as described below, and clicks the Save button.

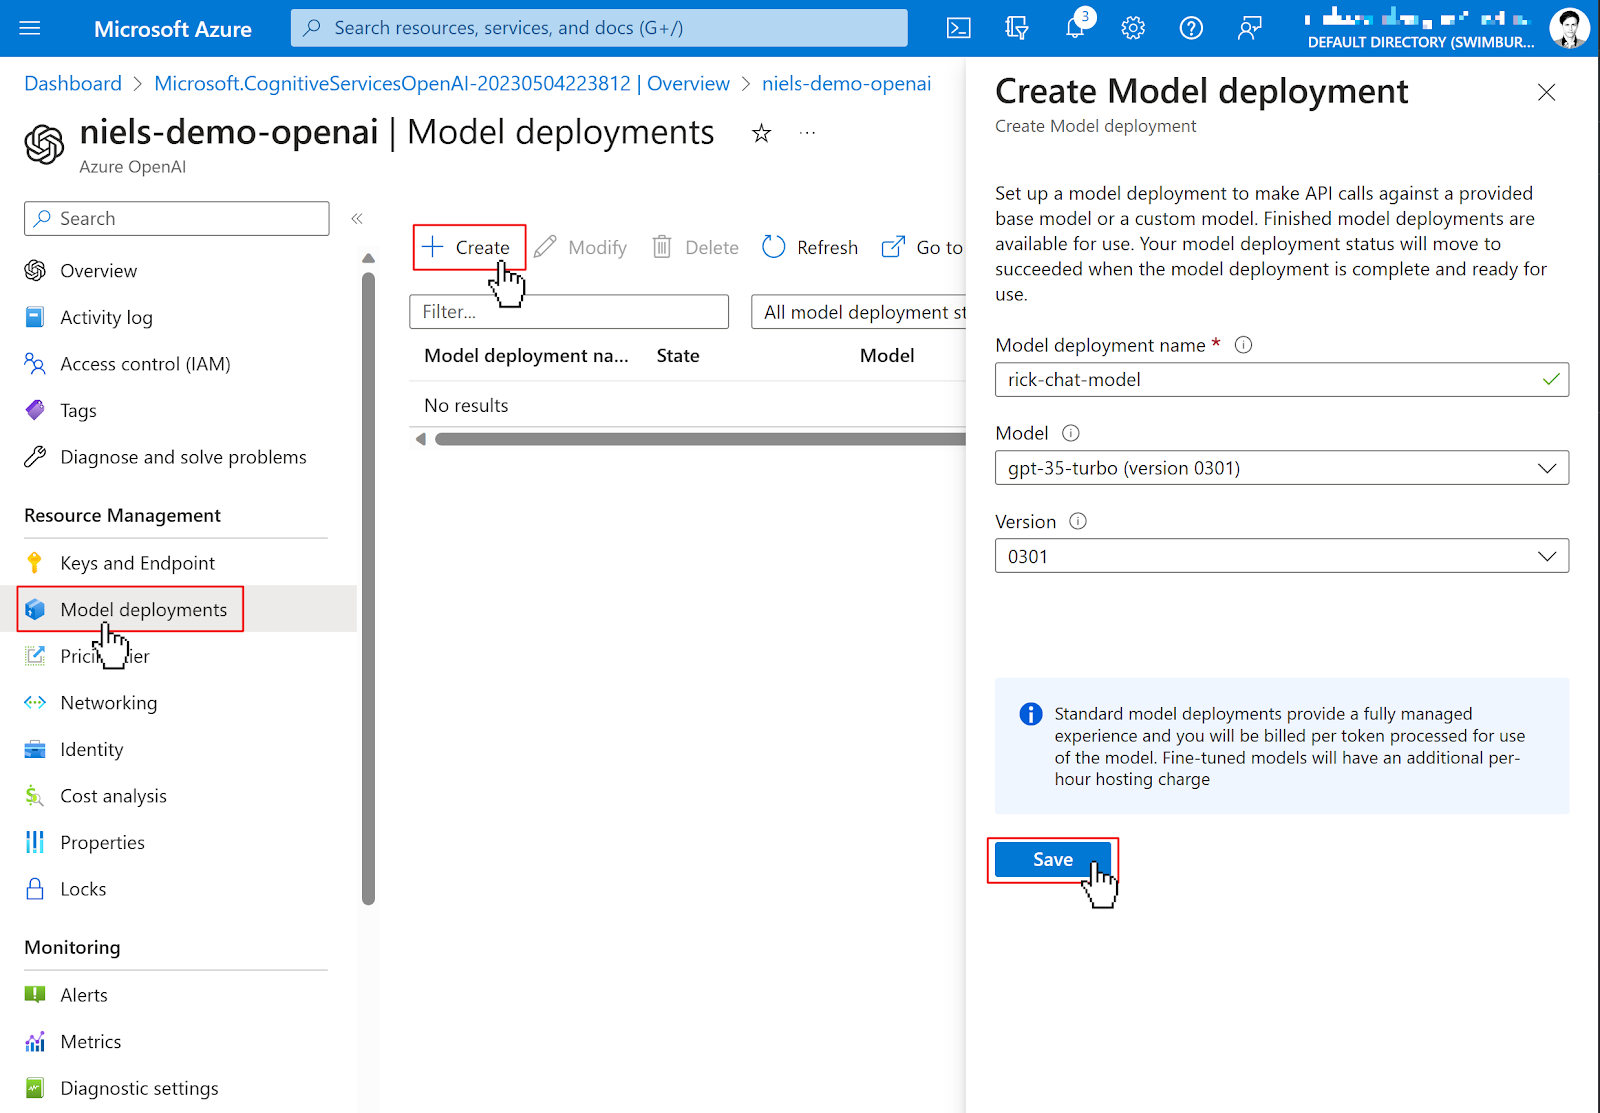
Give your model any name, select gpt-35-turbo (version 0301) as the Model, select 0301 as the name, and click Save.

Gpt-35-turbo is the model that OpenAI trained specifically for ChatGPT, however, ChatGPT also offers a newer model GPT-4 which is not yet available in Azure OpenAI.

You can't customize your model inside the Azure portal itself, but there's a link that says "Go to Azure OpenAI Studio" which takes you to the Cognitive Services portal where you can use the playground to experiment with the different models, and you can customize the model by providing extra training data. Keep in mind, this is just the start of this new service, and there's a lot more to come ;)

Remember the name of your Model deployment, as you'll need this later in your .NET application.

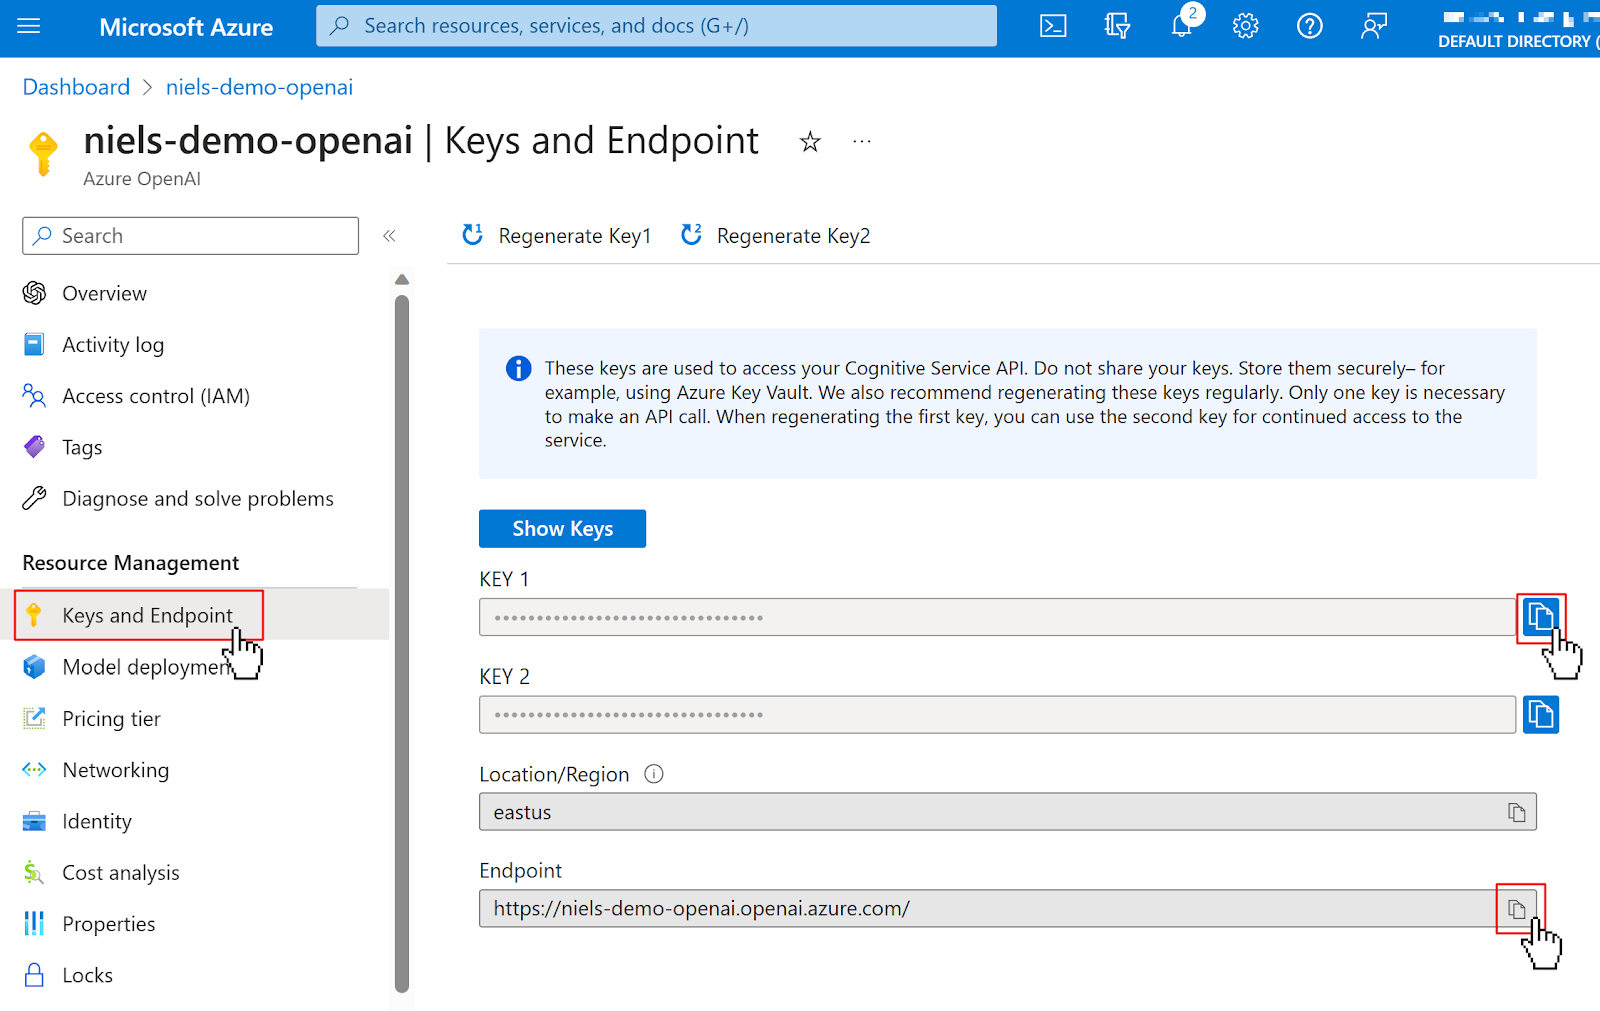
Now, click on the Keys and Endpoint tab in the left navigation and copy the KEY 1 and Endpoint somewhere safe. You'll need these two for your .NET application as well.

User navigates to Keys and Endpoint tab using the left navigation for Azure OpenAI service. Then user copies KEY 1 and Endpoint field.

Communicate with Azure OpenAI

Azure provides their own client library or SDK to communicate with the Azure OpenAI service. To use the library, add the Azure OpenAI NuGet package using the .NET CLI:

dotnet add package Azure.AI.OpenAI --prerelease

The SDK is only available as a prerelease at the moment, as it's still in beta. If a normal release is available, feel free to drop the prerelease-argument.

To add the OpenAI client to ASP.NET Core's DI container, you'll also need to add the Microsoft.Extensions.Azure NuGet package:

dotnet add package Microsoft.Extensions.Azure

Add the following namespaces to the top of the Program.cs file:

using Azure;
using Microsoft.Extensions.Azure;

And add the OpenAI client to the DI container by adding the highlighted lines to Program.cs:


builder.Services.AddTwilioClient();

builder.Services.AddAzureClients(clientBuilder =>
{
    clientBuilder.AddOpenAIClient(
        new Uri(builder.Configuration["Azure:OpenAI:Endpoint"]),
        new AzureKeyCredential(builder.Configuration["Azure:OpenAI:ApiKey"])
    );
});

var app = builder.Build();

Next, configure all the Azure OpenAI configuration as user-secrets, replacing [YOUR_AZURE_OPENAI_ENDPOINT] with the ENDPOINT URL, [YOUR_AZURE_OPENAI_APIKEY] with the KEY 1, and [YOUR_MODEL_DEPLOYMENT] with the name of the Model Deployment you took note of earlier.

dotnet user-secrets set Azure:OpenAI:Endpoint [YOUR_AZURE_OPENAI_ENDPOINT]
dotnet user-secrets set Azure:OpenAI:ApiKey [YOUR_AZURE_OPENAI_APIKEY]
dotnet user-secrets set Azure:OpenAI:ModelName [YOUR_MODEL_DEPLOYMENT]

Next, update MessageEndpoint.cs with the following code:


using System.Security.Cryptography;
using System.Text;
using Azure.AI.OpenAI;
using Twilio.Clients;
using Twilio.Rest.Api.V2010.Account;

namespace AzChatGptSms;

public static class MessageEndpoint
{
    public static IEndpointRouteBuilder MapMessageEndpoint(this IEndpointRouteBuilder builder)
    {
        builder.MapPost("/message", OnMessage);
        return builder;
    }

    private static async Task<IResult> OnMessage(
        HttpContext context,
        OpenAIClient openAiClient,
        ITwilioRestClient twilioClient,
        IConfiguration configuration,
        CancellationToken cancellationToken
    )
    {
        var request = context.Request;

        var form = await request.ReadFormAsync(cancellationToken).ConfigureAwait(false);
        var receivedFrom = form["From"].ToString();
        var sentTo = form["To"].ToString();
        var body = form["Body"].ToString().Trim();

        // ChatGPT doesn't need the phone number, just any string that uniquely identifies the user,
        // hence I'm hashing the phone number to not pass in PII unnecessarily
        var userId = Convert.ToHexString(SHA256.HashData(Encoding.UTF8.GetBytes(receivedFrom)));

        var chatCompletionOptions = new ChatCompletionsOptions
        {
            User = userId,
            Messages = {new ChatMessage(ChatRole.User, body)}
        };

        var chatCompletionsResponse = await openAiClient.GetChatCompletionsAsync(
            configuration["Azure:OpenAI:ModelName"],
            chatCompletionOptions,
            cancellationToken
        );

        var chatResponse = chatCompletionsResponse.Value.Choices[0].Message.Content;

        await MessageResource.CreateAsync(
            to: receivedFrom,
            from: sentTo,
            body: chatResponse,
            client: twilioClient
        );

        return Results.Ok();
    }
}

The OpenAIClient is injected into the openAiClient parameter of the OnMessage method.

User is one of the optional parameters you can pass to the ChatGPT API. While it is optional, it helps ChatGPT monitor and detect abuse, so I recommend passing it in. The only data you have access to that uniquely identifies the current use is their phone number. Since a phone number is Personally Identifiable Information (PII), I decided not to hand that to OpenAI, but instead to hash it first using the SHA256 hashing algorithm.

Next, the endpoint will pass the SMS body to the chat completions API and retrieve the response. The response is then sent back to the sender using Twilio.

The chat completions API has a lot more options than used in this tutorial. I recommend reading up on the chat API reference to customize your chatbot to your needs.

Run your application again using the following command:

dotnet run

Then, ask your chatbot anything by texting a question to your Twilio phone number.

It is possible that the response from ChatGPT is too large and will cause an error or deliverability issues. You'll fix this issue soon, but for now, try asking something simpler.

I asked the chatbot for a joke about dogs, and it delivered a great joke, however, when I asked it for a follow-up joke about cats, without explicitly mentioning a joke, it just gave me information about cats.

SMS conversation with ChatGPT. Person asks ChatGPT to tell a joke about dogs. ChatGPT responds with a joke about dogs. Person asks for one about cats, but ChatGPT doesn"t retain the context of the previous question and responds with cat facts instead of a joke.

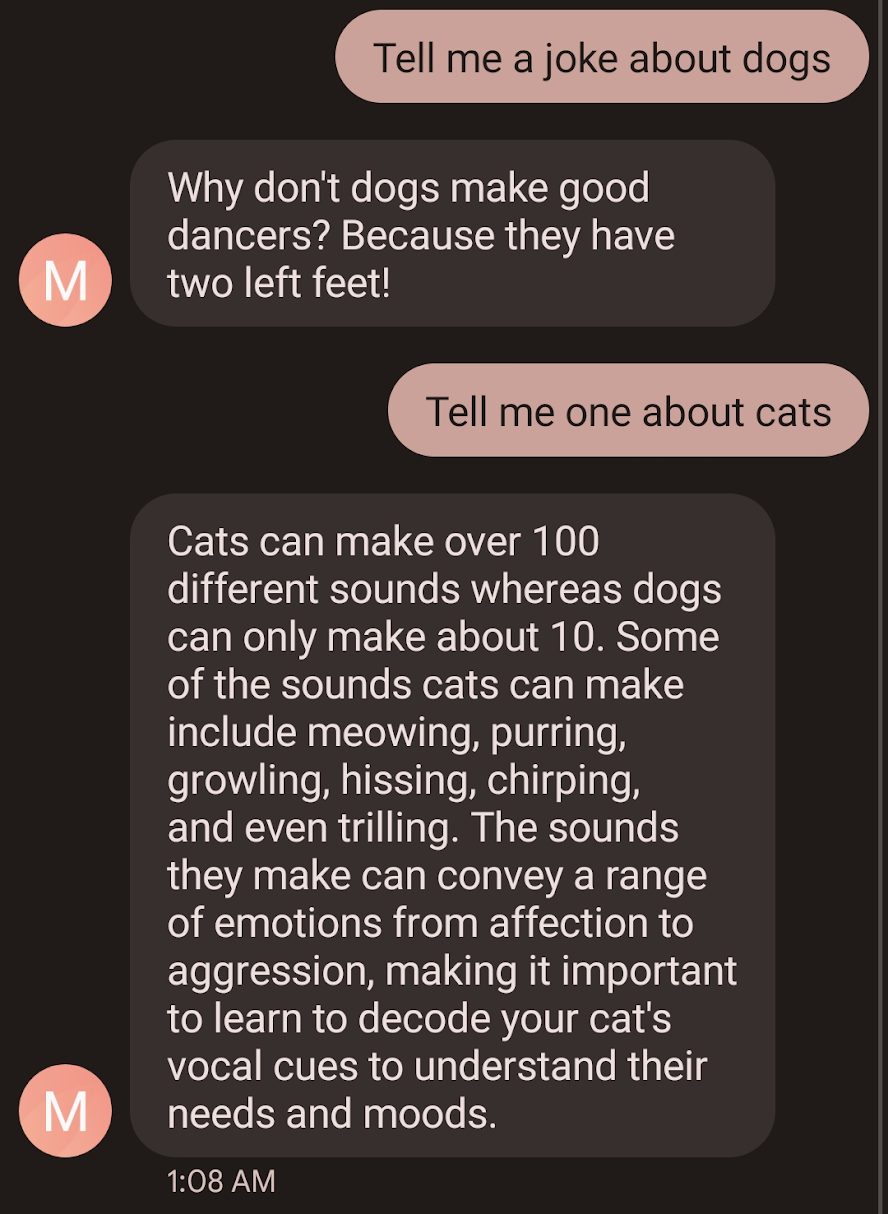
This is because the chat completions API does not maintain the context of the previous messages by default. Let's fix that.

Persist chat history as context

Since the chat completions API doesn't persist the history of the chat, it is not able to use the history as context to generate new responses. To solve this problem, you have to persist the history in your application, and pass the entire chat history to the chat completions API, for every new query.

In this tutorial, you'll store the history of the chat in ASP.NET Core's server session. Update the MessageEndpoint.cs like this:


using System.Security.Cryptography;
using System.Text;
using System.Text.Json;
using Azure.AI.OpenAI;
using Twilio.Clients;
using Twilio.Rest.Api.V2010.Account;

namespace AzChatGptSms;

public static class MessageEndpoint
{
    private const string PreviousMessagesKey = "PreviousMessages";

    public static IEndpointRouteBuilder MapMessageEndpoint(this IEndpointRouteBuilder builder)
    {
        builder.MapPost("/message", OnMessage);
        return builder;
    }

    private static async Task<IResult> OnMessage(
        HttpContext context,
        OpenAIClient openAiClient,
        ITwilioRestClient twilioClient,
        IConfiguration configuration,
        CancellationToken cancellationToken
    )
    {
        var request = context.Request;
        var session = context.Session;
        await session.LoadAsync(cancellationToken).ConfigureAwait(false);

        var form = await request.ReadFormAsync(cancellationToken).ConfigureAwait(false);
        var receivedFrom = form["From"].ToString();
        var sentTo = form["To"].ToString();
        var body = form["Body"].ToString().Trim();

        // ChatGPT doesn't need the phone number, just any string that uniquely identifies the user,
        // hence I'm hashing the phone number to not pass in PII unnecessarily
        var userId = Convert.ToHexString(SHA256.HashData(Encoding.UTF8.GetBytes(receivedFrom)));

        var messages = GetPreviousMessages(session);
        messages.Add(new ChatMessage(ChatRole.User, body));

        var chatCompletionOptions = new ChatCompletionsOptions
        {
            User = userId
        };
        foreach(var message in messages)
            chatCompletionOptions.Messages.Add(message);
        
        var chatCompletionsResponse = await openAiClient.GetChatCompletionsAsync(
            configuration["Azure:OpenAI:ModelName"],
            chatCompletionOptions,
            cancellationToken
        );

        var chatResponse = chatCompletionsResponse.Value.Choices[0].Message.Content;

        messages.Add(new ChatMessage(ChatRole.Assistant, chatResponse));
        SetPreviousMessages(session, messages);

        await MessageResource.CreateAsync(
            to: receivedFrom,
            from: sentTo,
            body: chatResponse,
            client: twilioClient
        );

        return Results.Ok();
    }
    
    // Note: This method manually deserializes the chat history because
    // the ChatMessage class doesn't correctly deserialize
    private static List<ChatMessage> GetPreviousMessages(ISession session)
    {
        var jsonBytes = session.Get(PreviousMessagesKey);

        if (jsonBytes == null)
        {
            return new List<ChatMessage>();
        }

        var messages = new List<ChatMessage>();
        var json = JsonSerializer.Deserialize<JsonDocument>(jsonBytes);
        foreach (var messageJsonObject in json.RootElement.EnumerateArray())
        {
            var role = messageJsonObject.GetProperty("Role").GetProperty("Label").GetString();
            var content = messageJsonObject.GetProperty("Content").GetString();
            var chatMessage = new ChatMessage(new ChatRole(role), content);
            messages.Add(chatMessage);
        }

        return messages;
    }

    private static void SetPreviousMessages(ISession session, List<ChatMessage> messages)
    {
        var serializedJson = JsonSerializer.SerializeToUtf8Bytes(messages);
        session.Set(PreviousMessagesKey, serializedJson);
    }

    private static void RemovePreviousMessages(ISession session)
        => session.Remove(PreviousMessagesKey);
}

Now the endpoint loads any previous chat messages from the session, and then adds the new SMS body. The whole conversation is passed to the chat completions API and the response is also added to the conversation, which is then persisted back into session.

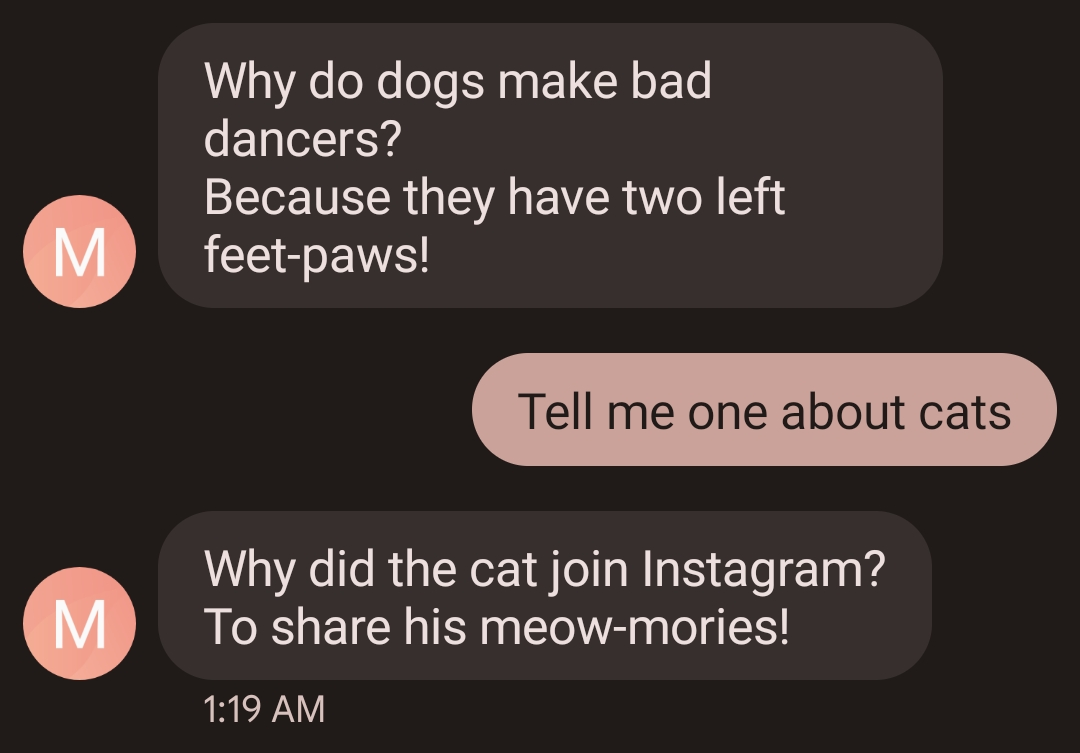
Stop and start your application to try it out. Now, when I asked for a follow-up joke about cats, it knew I wanted a joke and not facts about cats.

SMS conversation with ChatGPT. Person asks ChatGPT to tell a joke about dogs. ChatGPT responds with a joke about dogs. Person asks for one about cats. ChatGPT tells a joke about cats.

Server sessions will automatically be removed over time, and the cookie that associates the server session with the client will also expire at some point. If a cookie does not have a set expiration date, it'll remove the cookie after 4 hours. If you want the cookie to stay around for longer, you can set the expiration date, however, Twilio may still remove it before the given expiration date.

Check out this document on how Twilio treats your cookies.

Now that the chatbot has the context of the entire chat history, it is much more useful. However, users may still want to start from a fresh slate. Update the start of the OnMessage method in the MessageEndpoint.cs file:


private static async Task<IResult> OnMessage(
    HttpContext context,
    IOpenAIService openAiService,
    ITwilioRestClient twilioClient,
    CancellationToken cancellationToken
)
{
    var request = context.Request;
    var session = context.Session;
    await session.LoadAsync(cancellationToken).ConfigureAwait(false);

    var form = await request.ReadFormAsync(cancellationToken);
    var receivedFrom = form["From"].ToString();
    var sentTo = form["To"].ToString();
    var body = form["Body"].ToString().Trim();

    // handle reset
    if (body.Equals("reset", StringComparison.OrdinalIgnoreCase))
    {
        RemovePreviousMessages(session);
        await MessageResource.CreateAsync(
            to: receivedFrom,
            from: sentTo,
            body: "Your conversation is now reset.",
            client: twilioClient
        ).ConfigureAwait(false);
        return Results.Ok();
    }

    // ChatGPT doesn't need the phone number, just any string that uniquely identifies the user,
    // hence I'm hashing the phone number to not pass in PII unnecessarily
    var userId = Convert.ToHexString(SHA256.HashData(Encoding.UTF8.GetBytes(receivedFrom)));

Now users can text "reset" and the chat history will be reset.

Maximize message delivery

You can only send messages using Twilio SMS that are shorter or equal to 1600 characters, but sometimes the chat completions response will exceed that limit. If so, you'd receive an error that would look something like this:

Unhandled exception. Twilio.Exceptions.ApiException: The concatenated message body exceeds the 1600 character limit.
   at Twilio.Clients.TwilioRestClient.ProcessResponse(Response response)
   at Twilio.Clients.TwilioRestClient.Request(Request request)
   at Twilio.Rest.Api.V2010.Account.MessageResource.Create(CreateMessageOptions options, ITwilioRestClient client)
   at Twilio.Rest.Api.V2010.Account.MessageResource.Create(PhoneNumber to, String pathAccountSid, PhoneNumber from, String messagingServiceSid, String body, List`1 mediaUrl, Uri statusCallback, String applicationSid, Nullable`1 maxPrice, Nullable`1 provideFeedback, Nullable`1 attempt, Nullable`1 validityPeriod, Nullable`1 forceDelivery, ContentRetentionEnum contentRetention, AddressRetentionEnum addressRetention, Nullable`1 smartEncoded, List`1 persistentAction, Nullable`1 shortenUrls, ScheduleTypeEnum scheduleType, Nullable`1 sendAt, Nullable`1 sendAsMms, String contentSid, String contentVariables, ITwilioRestClient client)

While Twilio will accept messages shorter than or equal to 1600 characters, Twilio recommends keeping your messages below or equal to 320 characters to maximize deliverability of your messages.

To ensure your application does this, update the OnMessage method again:


private static async Task<IResult> OnMessage(
    HttpContext context,
    OpenAIClient openAiClient,
    ITwilioRestClient twilioClient,
    IConfiguration configuration,
    CancellationToken cancellationToken
)
{
    var request = context.Request;
    var session = context.Session;
    await session.LoadAsync(cancellationToken).ConfigureAwait(false);

    var form = await request.ReadFormAsync(cancellationToken).ConfigureAwait(false);
    var receivedFrom = form["From"].ToString();
    var sentTo = form["To"].ToString();
    var body = form["Body"].ToString().Trim();

    // handle reset
    if (body.Equals("reset", StringComparison.OrdinalIgnoreCase))
    {
        RemovePreviousMessages(session);
        await MessageResource.CreateAsync(
            to: receivedFrom,
            from: sentTo,
            body: "Your conversation is now reset.",
            client: twilioClient
        ).ConfigureAwait(false);
        return Results.Ok();
    }

    // ChatGPT doesn't need the phone number, just any string that uniquely identifies the user,
    // hence I'm hashing the phone number to not pass in PII unnecessarily
    var userId = Convert.ToHexString(SHA256.HashData(Encoding.UTF8.GetBytes(receivedFrom)));

    var messages = GetPreviousMessages(session);
    messages.Add(new ChatMessage(ChatRole.User, body));

    var chatCompletionOptions = new ChatCompletionsOptions
    {
        User = userId
    };
    foreach(var message in messages)
        chatCompletionOptions.Messages.Add(message);
    
    var chatCompletionsResponse = await openAiClient.GetChatCompletionsAsync(
        configuration["Azure:OpenAI:ModelName"],
        chatCompletionOptions,
        cancellationToken
    );

    var chatResponse = chatCompletionsResponse.Value.Choices[0].Message.Content;

    messages.Add(new ChatMessage(ChatRole.Assistant, chatResponse));
    SetPreviousMessages(session, messages);

    // 320 is the recommended message length for maximum deliverability,
    // but you can change this to your preference. The max for a Twilio message is 1600 characters.
    // https://support.twilio.com/hc/en-us/articles/360033806753-Maximum-Message-Length-with-Twilio-Programmable-Messaging
    var responseMessages = SplitTextIntoMessages(chatResponse, maxLength: 320);

    // Twilio webhook expects a response within 10 seconds.
    // we don't need to wait for the SendResponse task to complete, so don't await
    _ = SendResponse(twilioClient, to: receivedFrom, from: sentTo, responseMessages);

    return Results.Ok();
}

Then add these two static functions to the MessageEndpoint class:

/// <summary>
/// Splits the text into multiple strings by splitting it by its paragraphs
/// and adding them back together until the max length is reached.
/// Warning: This assumes each paragraph does not exceed the maxLength already, which may not be the case.
/// </summary>
/// <param name="text"></param>
/// <param name="maxLength"></param>
/// <returns>Returns a list of messages, each not exceeding the maxLength</returns>
private static List<string> SplitTextIntoMessages(string text, int maxLength)
{
    List<string> messages = new();
    var paragraphs = text.Split("\n\n");

    StringBuilder messageBuilder = new();
    for (int paragraphIndex = 0; paragraphIndex < paragraphs.Length - 1; paragraphIndex++)
    {
        string currentParagraph = paragraphs[paragraphIndex];
        string nextParagraph = paragraphs[paragraphIndex + 1];
        messageBuilder.Append(currentParagraph);

        // + 2 for "\n\n"
        if (messageBuilder.Length + nextParagraph.Length > maxLength + 2)
        {
            messages.Add(messageBuilder.ToString());
            messageBuilder.Clear();
        }
        else
        {
            messageBuilder.Append("\n\n");
        }
    }

    messageBuilder.Append(paragraphs.Last());
    messages.Add(messageBuilder.ToString());

    return messages;
}

private static async Task SendResponse(
    ITwilioRestClient twilioClient,
    string to,
    string from,
    List<string> responseMessages
)
{
    foreach (var responseMessage in responseMessages)
    {
        await MessageResource.CreateAsync(
            to: to,
            from: from,
            body: responseMessage,
            client: twilioClient
        )
        .ConfigureAwait(false);
        // Twilio cannot guarantee order of the messages as it is up to the carrier to deliver the SMS's.
        // by adding a 1s delay between each message, the messages are deliver in the correct order in most cases.
        // alternatively, you could query the status of each message until it is delivered, then send the next.
        await Task.Delay(1000);
    }
}

The SplitTextIntoMessages method will split the text into paragraphs and add the paragraphs while not exceeding the recommended 320-character limit. The method returns a list of strings, each containing 1 or more paragraphs. If a paragraph is larger than 320 characters, the individual string will exceed the 320-character limit. So it doesn't guarantee each string will be less than 320 characters, but in most cases it will be.

The SendResponse method iterates over the list of strings and sends them out one by one with a one-second delay between each. Twilio cannot guarantee that the messages will arrive in the same order as they are created. However, by putting a one-second delay between each message the order is preserved most of the time. Alternatively, you could poll the message status and wait to send the next message until the current message is delivered.

Restart your application and try asking the bot a question that will have a long response. Here's a video that shows how the bot answers the question "How do I become a .NET developer?".


The video shows how the bot responds with multiple messages, with a delay between each message, but the messages are in the correct order.

Next steps

Fantastic job! You’ve integrated Azure OpenAI's APIs with Twilio SMS to create an SMS based ChatGPT bot.

You can further improve this solution by storing the conversation history in a database instead of a server session. If you do that, you can respond to the webhook immediately, and then asynchronously without awaiting the task, do all the work including calling the chat completions API, which can take a while.

Want to experiment more with OpenAI's APIs? Here's a tutorial on how to generate AI art with DALL·E 2 by texting a Twilio phone number, and a tutorial to create a ChatGPT bot that impersonates Rick from Rick & Morty for the console.

We can't wait to see what you build. Let us know!

Niels Swimberghe is a Belgian American software engineer and technical content creator at Twilio. Get in touch with Niels on Twitter @RealSwimburger and follow Niels’ personal blog on .NET, Azure, and web development at swimburger.net.