How To: Build a 🎅 Bot with Twilio Studio
Time to read:
December 19, 2017
Written by
This post is part of Twilio’s archive and may contain outdated information. We’re always building something new, so be sure to check out our latest posts for the most up-to-date insights.

Welcome to our mini-series on getting started with SMS chatbots!
In this series, you’ll learn some of the basics of building a bot while working in a friendly, no code required, visual builder called Twilio Studio.
Before we dive in, I think it’s useful to know who you’re learning from. My name is Donnie and I am NOT a Software Engineer. I don’t have a computer science degree, and I work in marketing here at Twilio. Why me then? Because this how-to is for anyone who wants to build a bot—no matter your programming experience. Because Twilio Studio is the fastest, easiest way to build amazing experiences using text messages and voice calls. Because Twilio Studio doesn’t require that you know how to code. So truly, a big welcome to learners of all levels! 🙌
Getting Started
Let’s go over what we’re going to build together. First, make sure to try out the working version of Santa Bot if you haven’t already.
We’re going to build an SMS bot that users can text into. Santa Bot will then:
- Ask users a series of questions and collect their answers.
- Determine if they’re on the naughty or nice list.
- If they’ve been nice, Santa Bot will ask them what they want for the holidays.
- Save the list of requested gifts in a Google Sheet for 🎅 and his elves to see.
- And if they’ve been naughty, well…send them a grumpy message. 👺
| Time required to build this bot: |
|---|
| 10-20 minutes if you have programming experience. |
| 30–60 minutes if you’re new to programming and are good at following instructions. 🤗 |
What you’ll need to make this bot:
- A Twilio account.
- A phone number registered with Twilio.
- A Zapier account that we’ll use to store all the answers we get to Google Sheets.
Creating Your First Flow
Ok, you’ve gone dual or split screen, and now it’s time to start building!
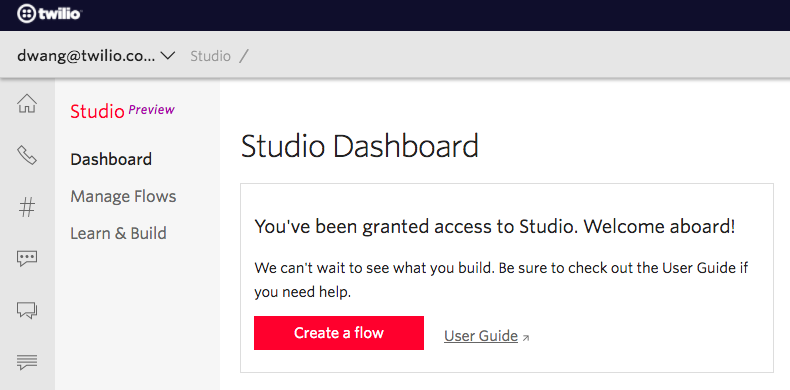
When you open the Studio Dashboard for the first time, it will greet you with the following screen:
From the dashboard, you can jump quickly into a blank flow by clicking on Create a Flow. Do that now and you’ll see a new screen popup:
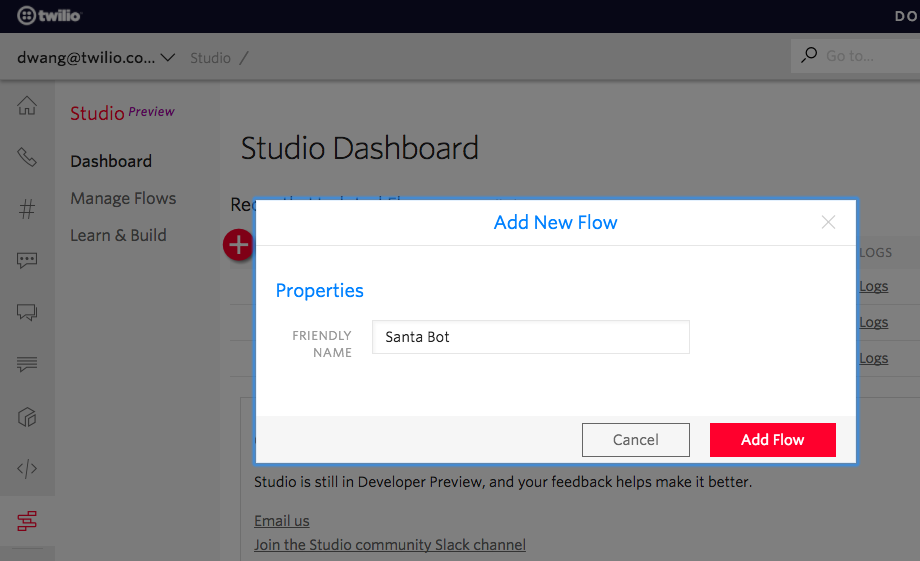
From here, you can name the flow anything you want. The name is merely cosmetic and for your own use. When you create flows, feel free to choose names that help you remember what they’re about.
Once you’ve chosen a name, click on Add Flow. Studio presents you with a canvas where we’ll design our bot and configure its logic, like so:
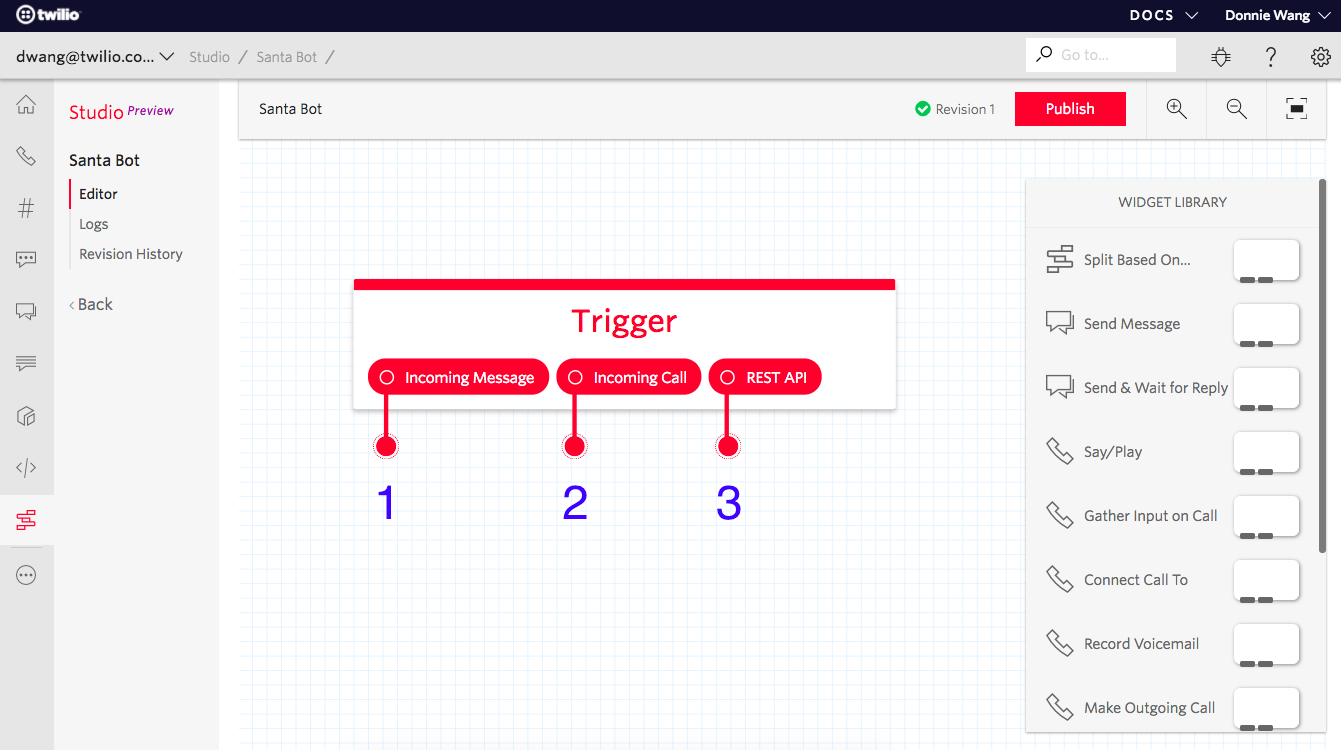
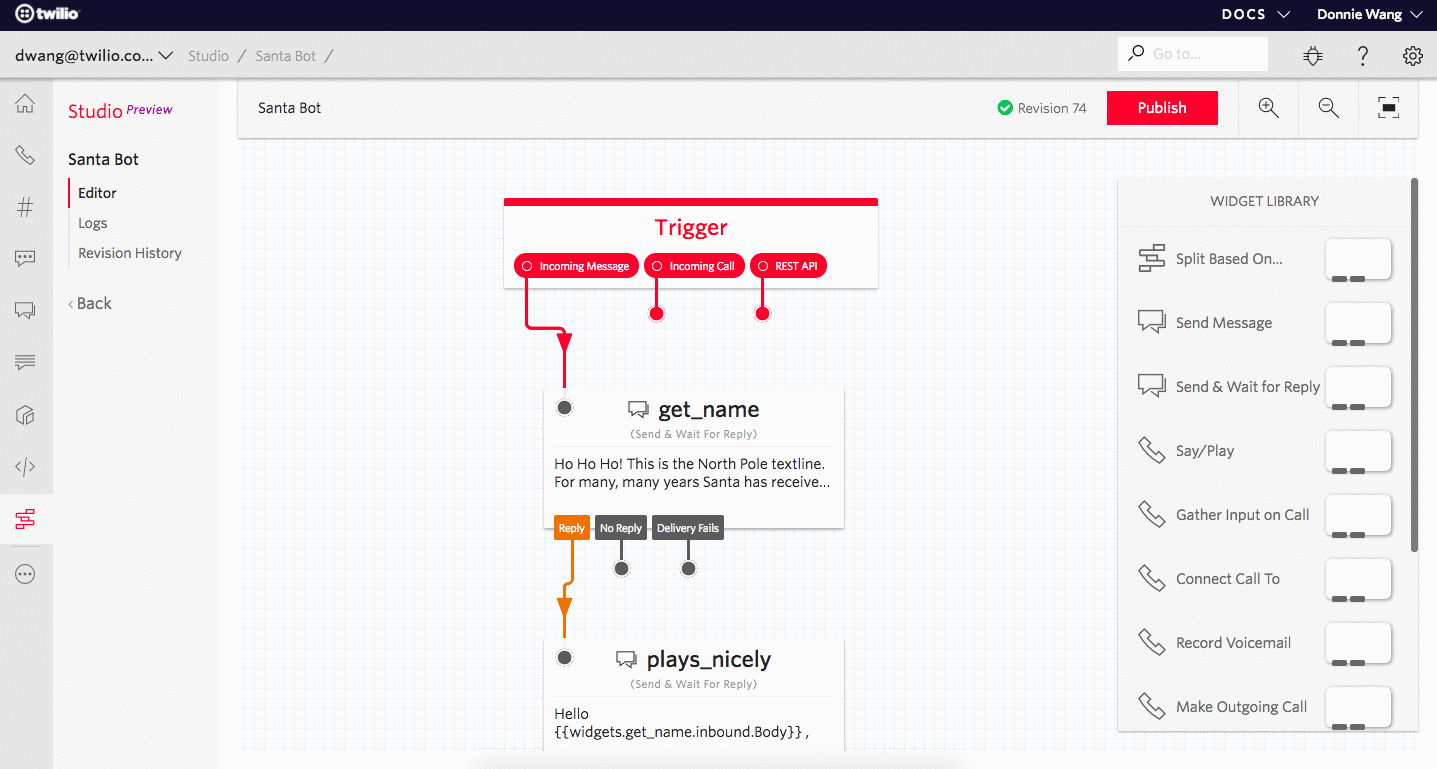
New flows don’t start entirely empty as you’ll see a box labeled Trigger. A trigger is what starts, or initiates, our flow. To understand this better, let’s take a look at the three different types of ways a flow can be started:
- Incoming Message: This means that once we hook up our flow to a phone number, and that number receives an inbound text message, our flow will go on to do something. This is the option we’ll be using since we’re building a bot that starts off with someone texting in.
- Incoming Call: When a phone number that our flow is hooked up to receives an inbound phone call, we can configure our flow to respond.
- REST API: For the devs out there, flows can also be triggered programmatically. We’ll save this for a future tutorial, but just know it’s available to you.
Once a flow is triggered by one of these events, it’ll begin to take the user through the steps we’ll add in next.
Sending Replies
| Part 1: Ask users a series of questions and collect their answers. |
In the Widget Library on the right side of the canvas, you’ll see a list of things that represent some type of action that our flow will take on our behalf.
In our case, the first action we want our bot to perform when it receives an incoming message is to reply back to the user (Ho Ho Ho!…) and prompt them to provide a response that we’ll use somehow (name?). Well, there’s a widget for that and it’s called Send & Wait for Reply.

Drag it onto the canvas now.
In order for this widget to send a reply, it needs to know what should trigger it, i.e. what event should it look out for that tells it when to send an SMS back. Let it know by connecting the dot directly under Incoming Message, to the dot in our new Send & Wait for Reply widget. To confirm you’ve made the connection, you should see a red line appear connecting the dots. 📈
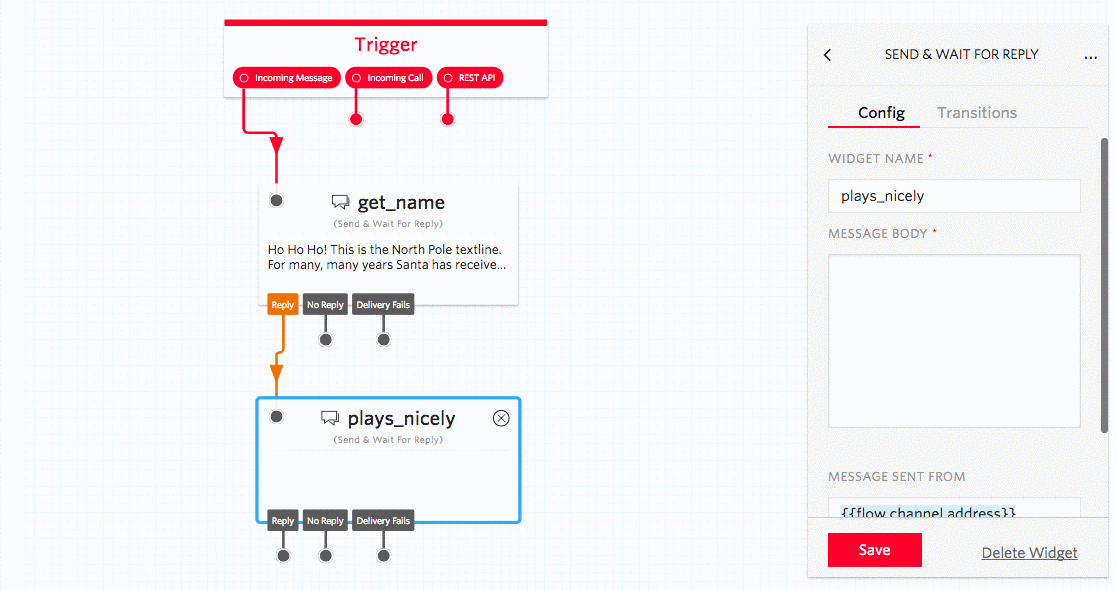
Next, our flow needs to know what to say. Give it something 🎅 would say in the Message Body field and ask them to reply back with their name.
I strongly recommend renaming your widgets to be descriptive of the main action they’re performing, i.e. its main purpose for existing. Since our send_and_reply_1 widget’s main purpose is to get the user’s name, let’s rename it get_name. This will help us refer back to it, as you’ll see in the next section.
Congrats! The first step of our flow is now setup.
Dynamic Text Using Variables
Next, we’ll continue asking questions and collecting answers. We’d like to find out if they’ve played nicely with others this year. So go ahead and add another Send & Wait for Reply widget onto the canvas and name it plays_nicely.
Similar to how we used an incoming message to trigger our get_name widget, we want the user’s reply to our question in get_name to trigger this plays_nicely widget (see, didn’t I tell you renaming widgets to something descriptive would be useful 😬).
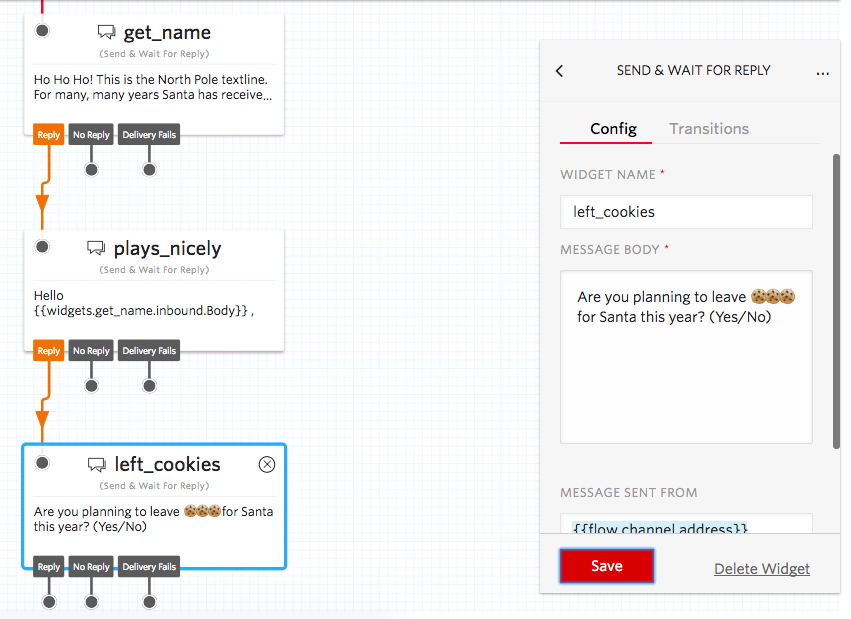
Connect get_name’s Reply dot to our new plays_nicely widget. Then fill in the message body. However, this time around let’s use the name they gave us in the last step to personalize a message. Therefore we need to do something slightly different when filling in the message body.
In the gif above, you’ll notice the use of two open curly braces to activate a dropdown list. Studio supports the Liquid template language, which is a fancy way of saying “a way to help you load dynamic content throughout your flow.” So by typing two open curly braces, we’re telling Studio that we’d like it to dynamically enter this text based on something.
More specifically, we want our flow to automatically fill in the name the user gave us. We can do this by adding in a variable that represents the reply (body of the message) we got back (inbound) from the previous step (get_name widget). Therefore the name of the variable we want is {{widgets.get_name.inbound.Body}}. Begin typing it and you’ll see the autocomplete options popup like magic!
Let’s now add the next question—if they’ll leave cookies for Santa. By now, you have some experience at this, so go ahead and recreate this:
In the next section, we’ll go over how to evaluate the yes/no answers and perform actions based on their responses.
If This, Then That
| Part 2: Determine if they’re on the naughty or nice list. |
We’re really starting to have some fun now. Our flow asks users a few questions, and next we need to take those answers and determine if they’re on the naughty or nice list.
The Split Based On widget lets you specify different paths for a user to be taken through depending on some kind of condition, ala choose your own adventure! 🤓
For Santa Bot, we want to take their yes/no answers to the previous two questions (Do they play nicely? Are they going to leave cookies?) to determine if they’re on the naughty or nice list. Here’s a simple scoring system that we’ll use:
| plays_nicely? | left_cookies? | Naughty / Nice List |
|---|---|---|
| Yes | Yes | Nice |
| Yes | No | ??? 🤔 |
| No | Yes | ??? 🤔 |
| No | No | Naughty |
Don’t worry, we’ll deal with the middle scenarios by asking a follow-up question. We’ll come back to that.
For now, go ahead and drag the Split Based On widget onto the canvas and trigger it when a reply is received in the left_cookies step.
Next we need to tell our widget which Variable to Test. Let’s evaluate the user’s reply about whether they play nicely with others—represented by the plays_nicely.inbound.Body variable. We’ll use this to test whether the user replied “yes” or “no” to plays_nicely:
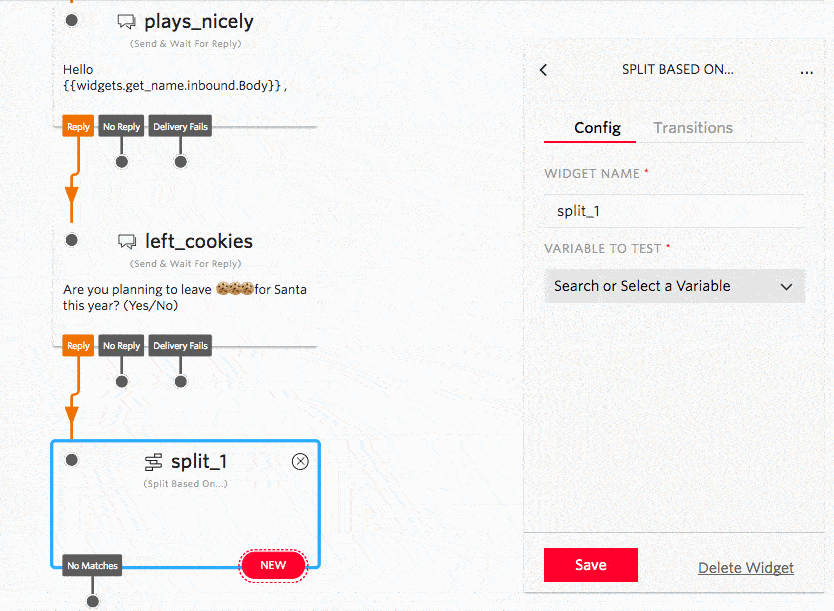
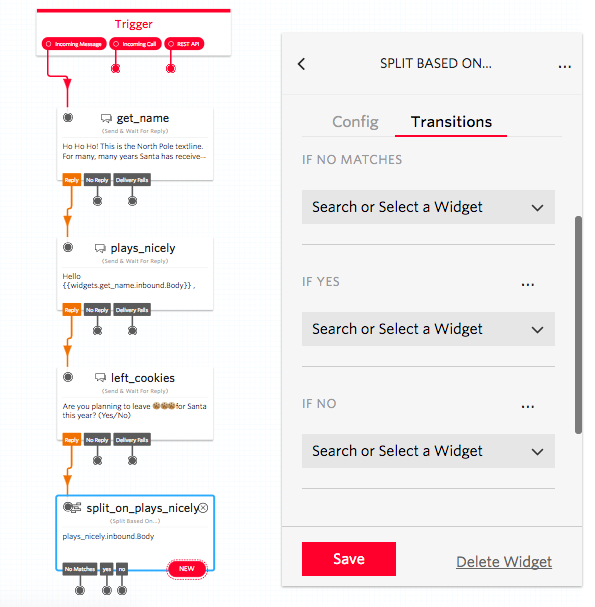
Remember that scoring table? Next let’s follow down the path when a user says “yes” to the plays_nicely question:
- Connect a new Split Based On widget to the “yes” condition of split_on_plays_nicely.
- Rename it something descriptive, like split_on_left_cookies_1.
- Since this widget is going to split the flow based on a user’s response to the left_cookies question, set Variable to Test to left_cookies.inbound.Body.
- Add “yes” and “no” as new conditions for our new split widget to transition on.
Repeat the same steps for a “no” answer to split_on_plays_nicely. Rename it split_on_left_cookies_2.
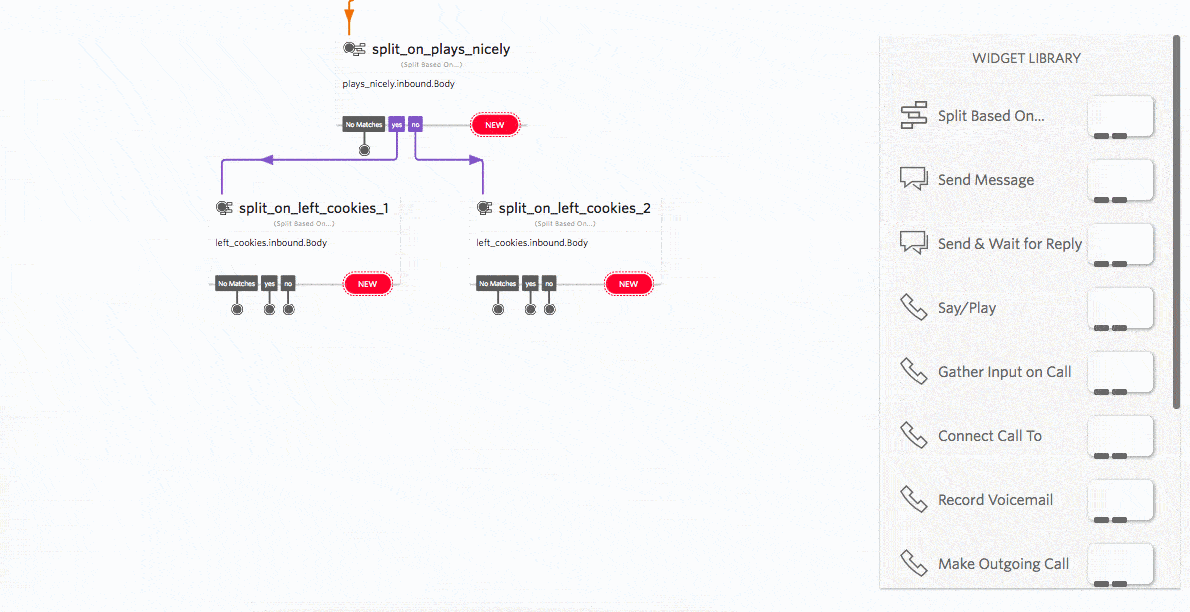
Nice work! Hopefully by now you’re starting to grasp the fundamentals behind Twilio Studio. Each widget represents a block of code. So rather than coding, we’re simply dragging and dropping blocks to configure our application’s logic. We’re programming without writing code. 😄
In the next section, we’re going to accelerate the pace as we’ll be using widget types that should be familiar with by now. Read on good learners, read on.
Using What You Already Know
Here are the next widgets to add:
- nice_list_message: When they answer “yes” to both questions, this widget sends a message to them that says they’re on the nice list.
- try_harder: Remember those two scenarios where we weren’t sure whether to put someone on the naughty or nice list? When someone answered “yes” to one question, but “no” to the other. Well, let’s give them one last chance by asking another question—if they’ll try harder next year. Their final answer will determine their fate, muahaha. 😈
- change_ways: In the spirit of the season, if they said “no” to both questions, then let’s ask them if they’ll change their ways next year.
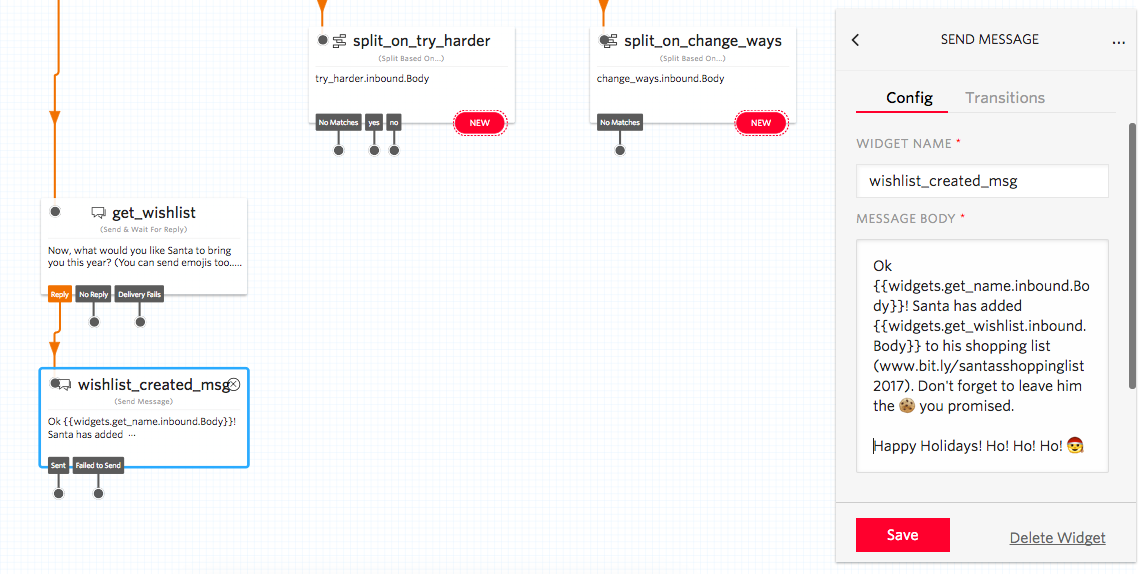
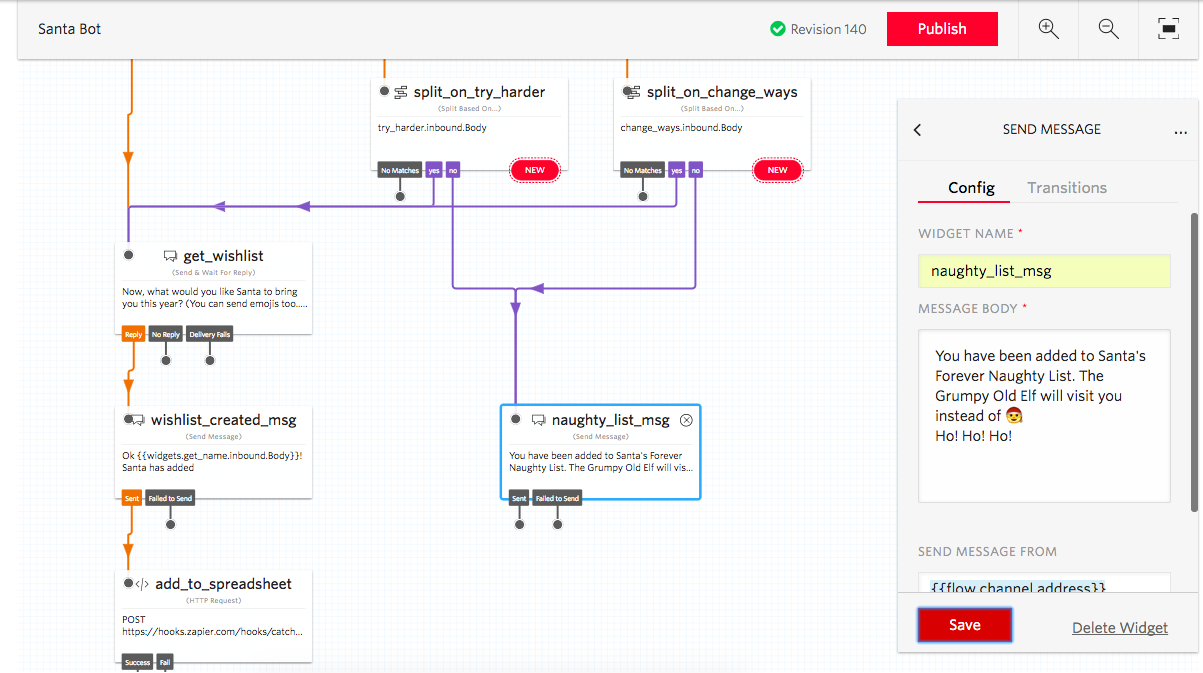
Once you’ve done this, the bottom half of your flow should look something like this:
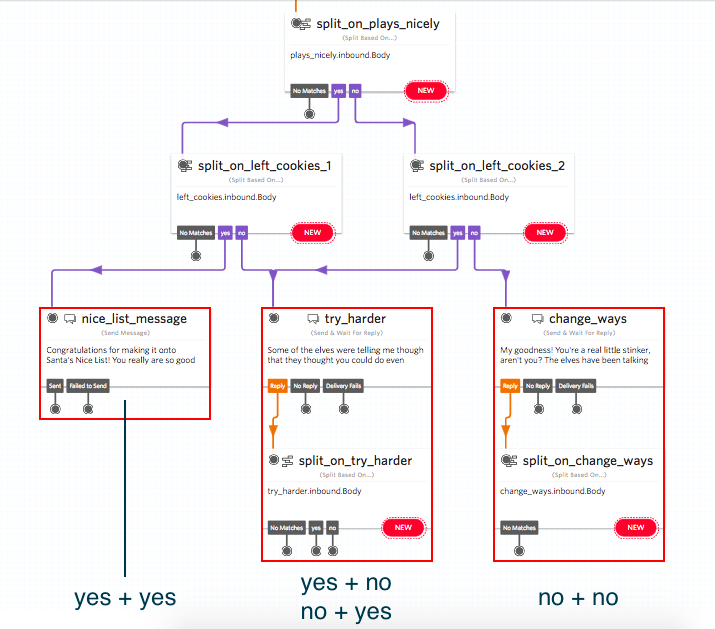
I’ve added red boxes to indicate the different paths a user can go through.
If you’re having any trouble recreating this, refer back to the previous sections. You can also join us in the Studio community Slack channel, or email us at studio-feedback@twilio.com.
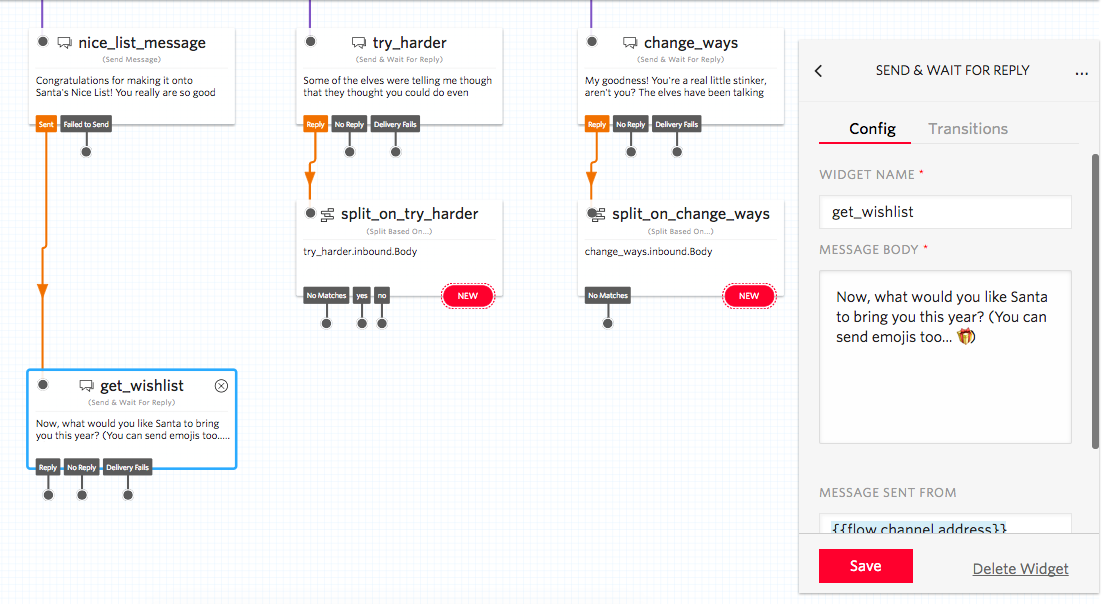
They’ve Been Nice
| Part 3: If they’ve been nice, Santa Bot will ask them what they want for the holidays. |
Santa Bot has determined the user is on the nice list, so they’ve earned a 🎁. Let’s find out what they want:
Next, we’ll save these gift requests in a convenient Google Sheet.
Connecting a Google Sheet
| Part 4: Save the list of requested gifts in a Google Sheet for 🎅 and his elves to see. |
In order to make the connection between our flow and a Google Sheet, we’re going to use two things:
- An HTTP Request (see widget of this name), otherwise known as a webhook. If you don’t already know what this is, don’t worry too much about it. It’s basically the connection that makes it possible for our app to talk with another app so that they can pass each other information. In our case, we want to take wishlists and pass/post them somewhere (a Google Sheet). This is what’s known as a POST request.
- Google Sheets via Zapier: The easiest way I’ve found to make a connection to Google Sheets is via app automation tool, Zapier. Setting up a simple Zap (Zapier’s lingo for automation) will manage the flow of information between our flow and a Google Sheet. Our Zap will basically say “When I get a new gift request from a Twilio Studio flow, create a new entry in Google Sheets.” And don’t worry, there’s no coding required in this step, either.
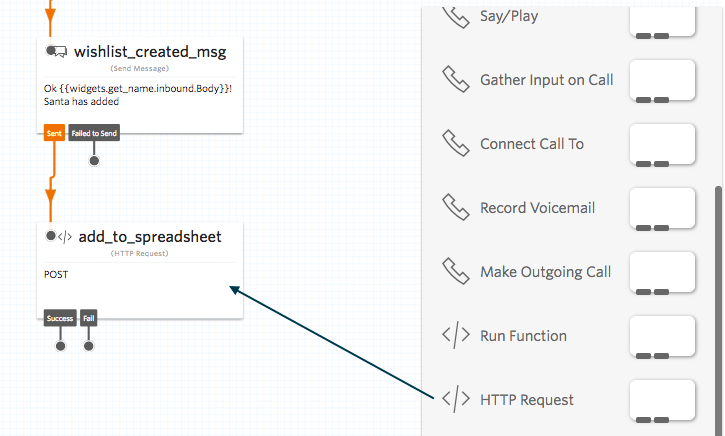
First, drag an HTTP Request widget onto the canvas and trigger it after the wishlist_created_msg is sent. Rename it add_to_spreadsheet:
Next, we need to equip the Zap we’ll setup some information—the name of the gift requestor, their phone number, and the gifts they asked for. To do this, we’ll give our add_to_spreadsheet widget the following HTTP Parameters:
| Field | Value |
|---|---|
| name | {{widgets.get_name.inbound.Body}} |
| number | {{trigger.message.From}} |
| wishlist | {{widgets.get_wishlist.inbound.Body}} |
Enter the parameters listed above like so:
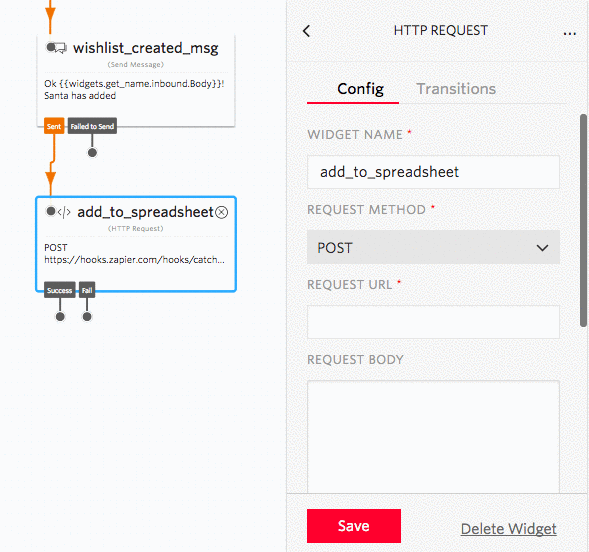
Our add_to_spreadsheet widget is almost all set. It’s just missing one piece of information—it needs to know who to send this data to.
So let’s get an address, or url, of a Zap (which will automatically connect us to a Google Sheet).
Click Use this Zap below for step-by-step help in setting up this automation:
When you get to Test Webhooks by Zapier, you’ll see a custom webhook URL. This is exactly what we need to give our add_to_spreadsheet widget:

We’ve now made the connection between our Studio flow and our new Zap.
IMPORTANT: Let’s now test our flow by hooking it up to one of our registered phone numbers and sending it a message. This will pass our Zap some test data that it needs to know if it’s doing its job correctly:
- Click on the Trigger widget at the top of your flow.
- In the right inspector panel, click on the link, Use your flow with a phone number.
- In the popup that appears, click on “Let’s do this now”.
- A page with all your active phone numbers will open. Click on a phone number to connect to our Santa Bot flow.
- Under Messaging, when a message comes in, configure your number to use a “Studio Flow” in the first dropdown, and select “Santa Bot” in the second dropdown.
- Save those changes.
- Try out your flow by texting your number! 🙌 Make sure to go through the step where you text in gift requests.

Now we’re ready to configure our Zap with Google Sheets.
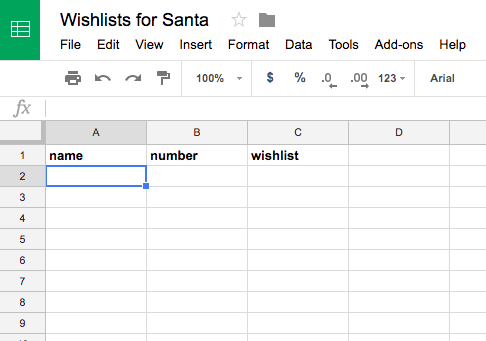
Create a new Google Sheet and fill in headers for the information we’re going to pass it:
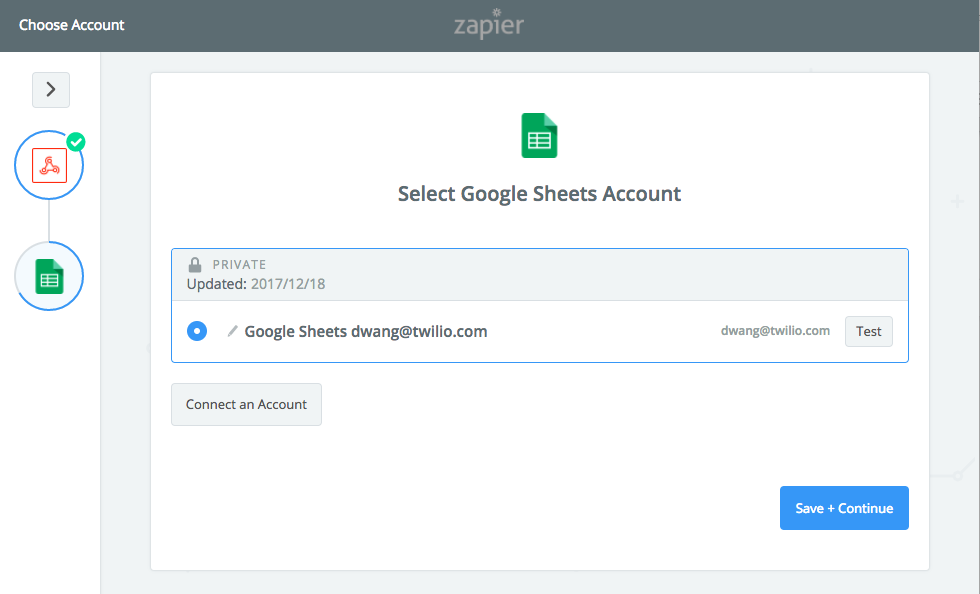
Then back in step 2 of our Zap, connect your Google Sheets Account:
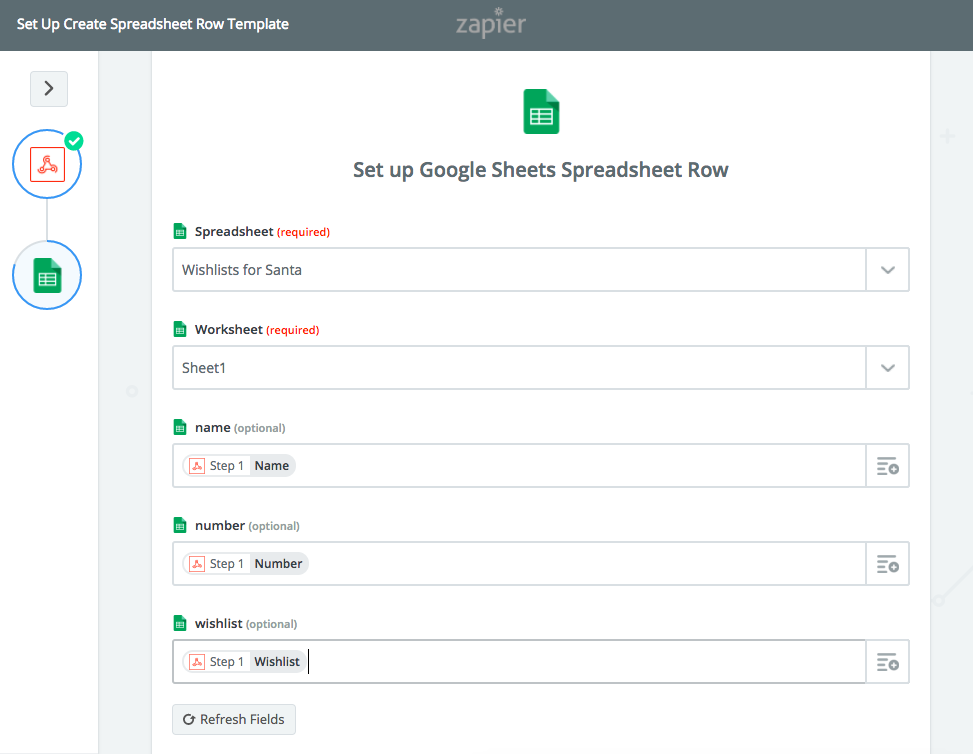
Once you get to Set Up Google Sheets Spreadsheet Row, find the name of the Google Sheet you created and the worksheet you want new data to be saved to.
Remember the name of the parameters we entered? Search for them in the dropdowns and your Spreadsheet Row Template should end up looking something like this:
Test your zap and if everything looks good, turn it on!
Any wish lists that get submitted to Santa Bot, should now show up in your Google Sheet.
They’ve Been Naughty
| Part 5: And if they’ve been naughty, well…maybe they need this. |
The last thing we need to do is to add a grumpy message to all those that end up on the naughty list:
That completes our Santa Bot. Congrats if you made it this far! 💪
Where to Go Next?
You can learn to build a New Year’s Resolution Bot in the second part of our getting started with SMS chatbots mini-series. This tutorial will show you how to schedule reminders to keep you on track with your resolutions, and even integrate HelloSign (via another Zap) to have users sign a certificate committing to their goals.
Send any feedback, or tell us what you’re building, by joining the Studio community Slack channel or emailing studio-feedback@twilio.com.
We can’t wait to see what you build with Twilio Studio!

Related Resources
Twilio Docs
From APIs to SDKs to sample apps
API reference documentation, SDKs, helper libraries, quickstarts, and tutorials for your language and platform.
Resource Center
The latest ebooks, industry reports, and webinars
Learn from customer engagement experts to improve your own communication.
Ahoy
Twilio's developer community hub
Best practices, code samples, and inspiration to build communications and digital engagement experiences.