Build a Live Traffic WhatsApp Chatbot with Python, Flask, Folium and Twilio
Time to read: 11 minutes
June 02, 2020
Written by

Like most people I am endlessly frustrated by sitting in slow-moving traffic and I often wonder if I just got unlucky or is it always like this? In this tutorial I’m going to show you how to answer that question by building a basic chatbot for WhatsApp using the Twilio API for WhatsApp and the Flask framework for Python.
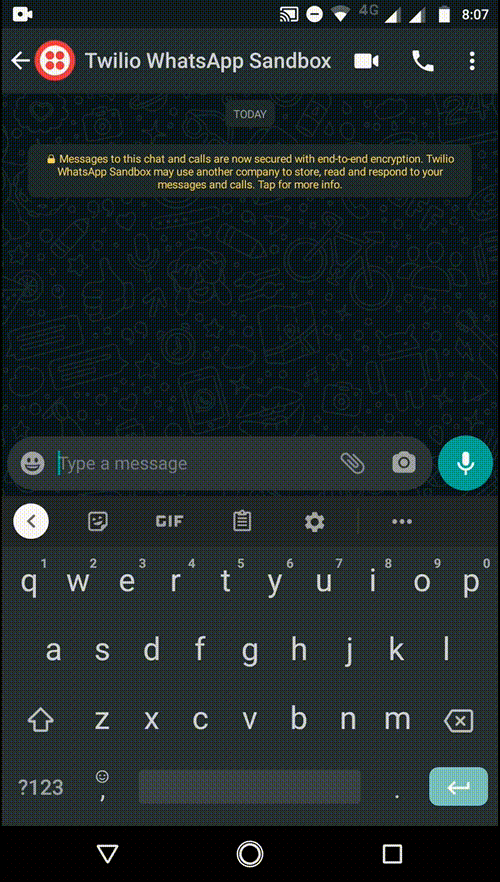
The chatbot will allow users to share their current location and get back a live traffic report and a link to an interactive map. Here’s an example showing how it works:
Tutorial requirements
To follow this tutorial you will need the following:
- Python 3.6 or newer. You can download an installer from python.org.
- ngrok. We will use this free utility to connect our Flask application running on our local system to a public URL that Twilio can connect to from the Internet. Installation instructions for your operating system can be found here.
- A smartphone with an active phone number and WhatsApp installed.
- A Twilio account. If you are a new user, you can create a free account here to get $10 credit when you upgrade. You can review the features and limitations of a free Twilio account. When you sign up, ensure you use the same phone number as the one you will use to test this application.
Configure the Twilio WhatsApp sandbox
Twilio provides a WhatsApp sandbox allowing you to easily develop and test your application. Once you are happy with your application and want to put it into production, you can request access for your Twilio phone number, which requires approval by WhatsApp.
Let’s start by connecting your smartphone to the sandbox. From your Twilio Console, open the Dock by clicking on the three dots on the left-hand side of the page. From there, select Programmable SMS and then click on WhatsApp on the left-hand menu. You should now see the sandbox phone number assigned to your account as below.
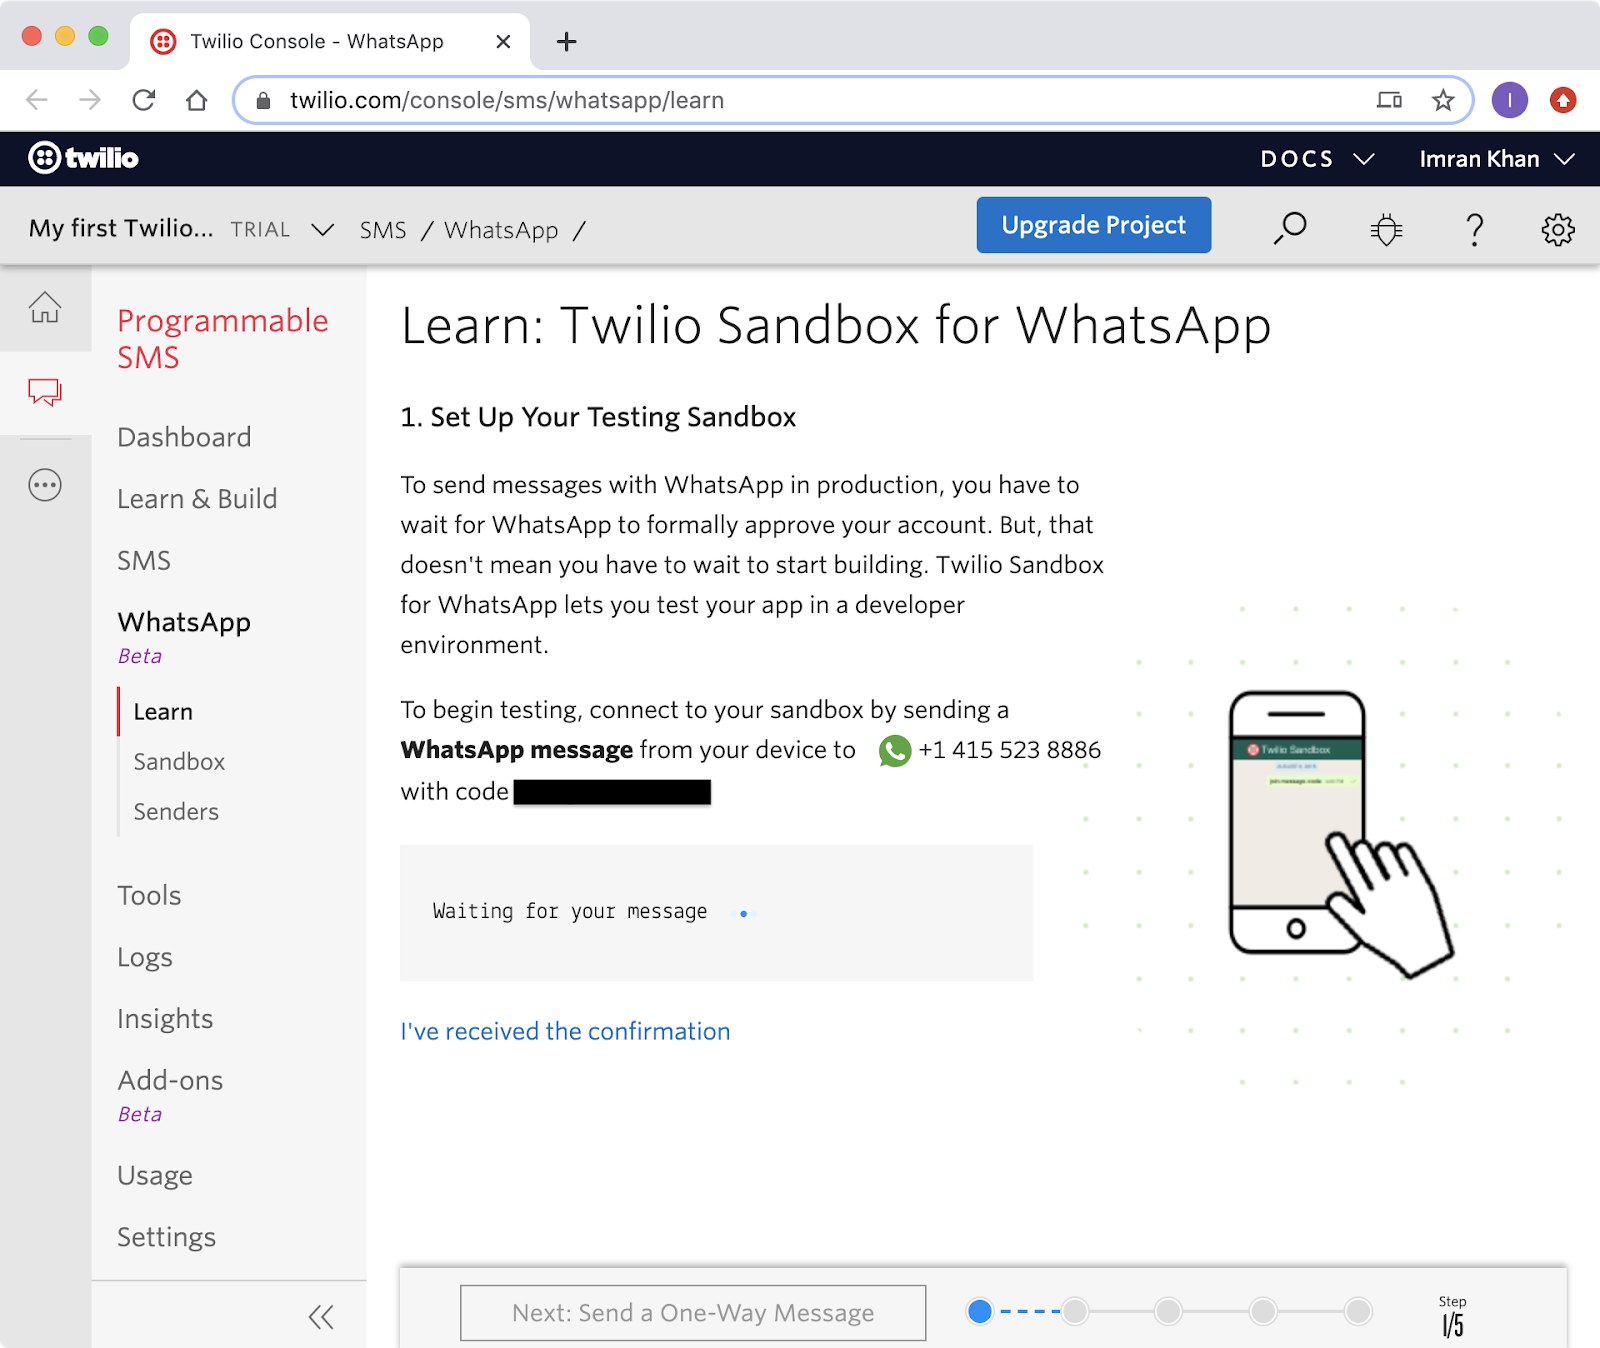
You will also see a code that starts with join followed by two random words. To enable the WhatsApp sandbox for your smartphone, send a WhatsApp message with this code to the number assigned to your account. After a moment, you should receive a reply from Twilio confirming your mobile number is connected and can start sending and receiving messages.
You can also connect additional phone numbers to this sandbox by repeating the same process.
Creating a Python virtual environment
We are now going to start developing our chatbot application. We will create a separate directory for this project and create a virtual environment using Python’s inbuilt venv module. We will then install the packages we require inside of it.
If you are using a Unix or Mac OS system, open a terminal and enter the following commands to do the tasks described above:
Seeing (traffic-bot-venv) prefixed at the start of every command in your terminal confirms you are inside of the virtual environment.
For those of you following the tutorial on Windows, enter the following commands in a command prompt window:
The last command uses pip, the Python package installer, to install the four packages that we are going to use in this project, which are:
- The Flask framework, to create the web application
- The Twilio Python Helper library, to work with the Twilio APIs
- The Requests package, to call and retrieve data from external API’s
- The Folium package, to create and display maps
For your reference, at the time this tutorial was released these were the versions of the above packages and their dependencies tested:
Create a Flask chatbot service
Now that we have set up our development environment, we can start building our chatbot.
For this tutorial the chatbot will be very simple. There will be two types of responses depending on the user input. When the bot receives a normal text-based message, it will reply with a standard greeting. If it receives a location message, the bot will process this location and reply with traffic information for this location. We will see later on how we recognise WhatsApp location messages in our application.
Webhook
The Twilio API for WhatsApp uses webhooks in order to interact with users. A webhook delivers data (in our application this includes the incoming message). Our application will configure a URL, also referred to as an endpoint, so that Twilio can communicate with this webhook.
The Flask framework makes it easy to define a webhook. Let’s create a file called app.py in the project directory and start writing some code in this file. I will go through and explain each section of the code first, then the final script will be available at the end for you to copy if required. You will be able to run the code snippets as we go along to give you an idea of how we develop the application.
What we’ve done here is instantiated our Flask application instance and defined a route at the /bot endpoint which supports POST requests. Directly under that, we’ve written a bot() function (can be named anything) which will process the message sent by the user via WhatsApp and return a response.
In your terminal run flask run, ensuring you are within the virtual environment. You should see something like this:
The application is currently running locally on your computer at http://127.0.0.1 (also known as localhost) on port 5000 by default.
In your browser go to http://127.0.0.1:5000/. You should see a “Not Found” message since we haven’t defined anything for the / route. If you go to http://127.0.0.1:5000/bot you will get a different error: “Method Not Allowed”. This is because your browser makes a GET request, but we’ve defined the /bot route to only accept POST requests. Press Ctrl-C to stop the Flask application.
More information on the Flask framework can be found in the quick start section of its documentation which should bring you up to speed quickly.
Messages and responses
How does our application recognize the message sent by the user? It’s included in the payload of the POST request with a key of Body. In Flask we can access it through the request object.
Once we have the user’s message and applied our logic to formulate a response, we need to send that response back to them. Twilio expects this response to be written in a particular format known as TwiML or Twilio Markup Language. This is an XML-based language but we’re not required to create XML directly. Instead Twilio provides a Python library to make it easy to create our response in the right format. Here’s an example of the library in use which you can put in the app.py file:
To test this out we can use the curl command to make a POST request to the /bot route (using the -X flag) along with some data as a key-value pair to simulate the incoming message (using the -d flag). Run the flask run command as before, and then in another terminal run:
The response to the curl command should be XML output, which is what will be sent to Twilio to tell it how to handle various events.
In the first terminal you should see the value for the Body key printed out as a string.
Data source
We will use the TomTom API as our source of live traffic data. You can register for an account here which grants you 2500 free API calls per day. This will be plenty for the purposes of testing our application.
After you sign up, you should be taken to the dashboard where you will see a random sequence of letters and numbers which represents your API key.

You should keep this secure otherwise this will allow anyone to make API requests under your account.
TomTom provides a whole suite of API’s but we will be using the Flow Segment Data endpoint of the Traffic Flow API for this tutorial - full documentation can be found here.
The URL for this endpoint is https://api.tomtom.com/traffic/services/4/flowSegmentData/absolute/10/json. The documentation states that there are two required parameters, key for the API key and point for the geographic coordinates, given as latitude and longitude separated by a comma. We can add these parameters in the query string of the URL, so for example, a query for traffic in London could be obtained by sending a request to https://api.tomtom.com/traffic/services/4/flowSegmentData/absolute/10/json?key=XXXXX&point=51.501084,-0.126459 (you’ll need to enter your own API key here for the key parameter).
You can navigate to this URL in a browser and it will return data in JSON format as a response. This shows that the key and point parameters are the minimum we need since the remaining parameters have default values. One of the optional parameters is unit, which defaults to kmph for kilometers per hour. If you prefer to receive data in miles per hour, add unit=mph to the query string of the URL.
Since the API key is sensitive we will refrain from hard-coding it, instead saving it as an environment variable and accessing it using os.environ. Run this command in the terminal:
We’ll use the requests library to access this data in our application. Let’s test this out by running the following lines in a Python shell (you can open a shell by running python in the terminal):
This makes a GET request to the API with the request parameters defined in a dictionary. The lat and lon variables hold the latitude and longitude values. f'{lat},{lon}' uses python string formatting to ensure the coordinates are comma-separated for the point parameter as is required by the API. Feel free to try out different values for lat, lon and the request parameters.
Here’s a sample version of the outputted JSON data which we’ll be using to construct a reply:
The Response Data section of the documentation explains what all the fields mean. All the relevant data is nested under the flowSegmentData key. For example, the frc field indicates the road type, which we can define in a dictionary to obtain a human-readable output. The coordinates field includes the coordinates to describe the shape of the road segment which we will use when creating a map later on. In the same Python shell, you can try running these lines of code which uses the same data variable as before:
In the code above we have taken advantage of the fact that the roadClosure field returns a boolean indicating whether the road is closed or not. If this is false, we construct a reply using the frc (via the road_type dictionary), currentSpeed, currentTravelTime, freeFlowSpeed and freeFlowTravelTime fields.
You may have noticed that the reply includes formatting symbols like asterisks and underscores to make some text bold or italic. This is an example of WhatsApp message formatting supported by Twilio.
This reply string will be included alongside a link to a map in the final response which we will learn how to create in the next section.
Creating a map
The folium package for Python makes it easy to create interactive maps with custom objects overlaid on top.
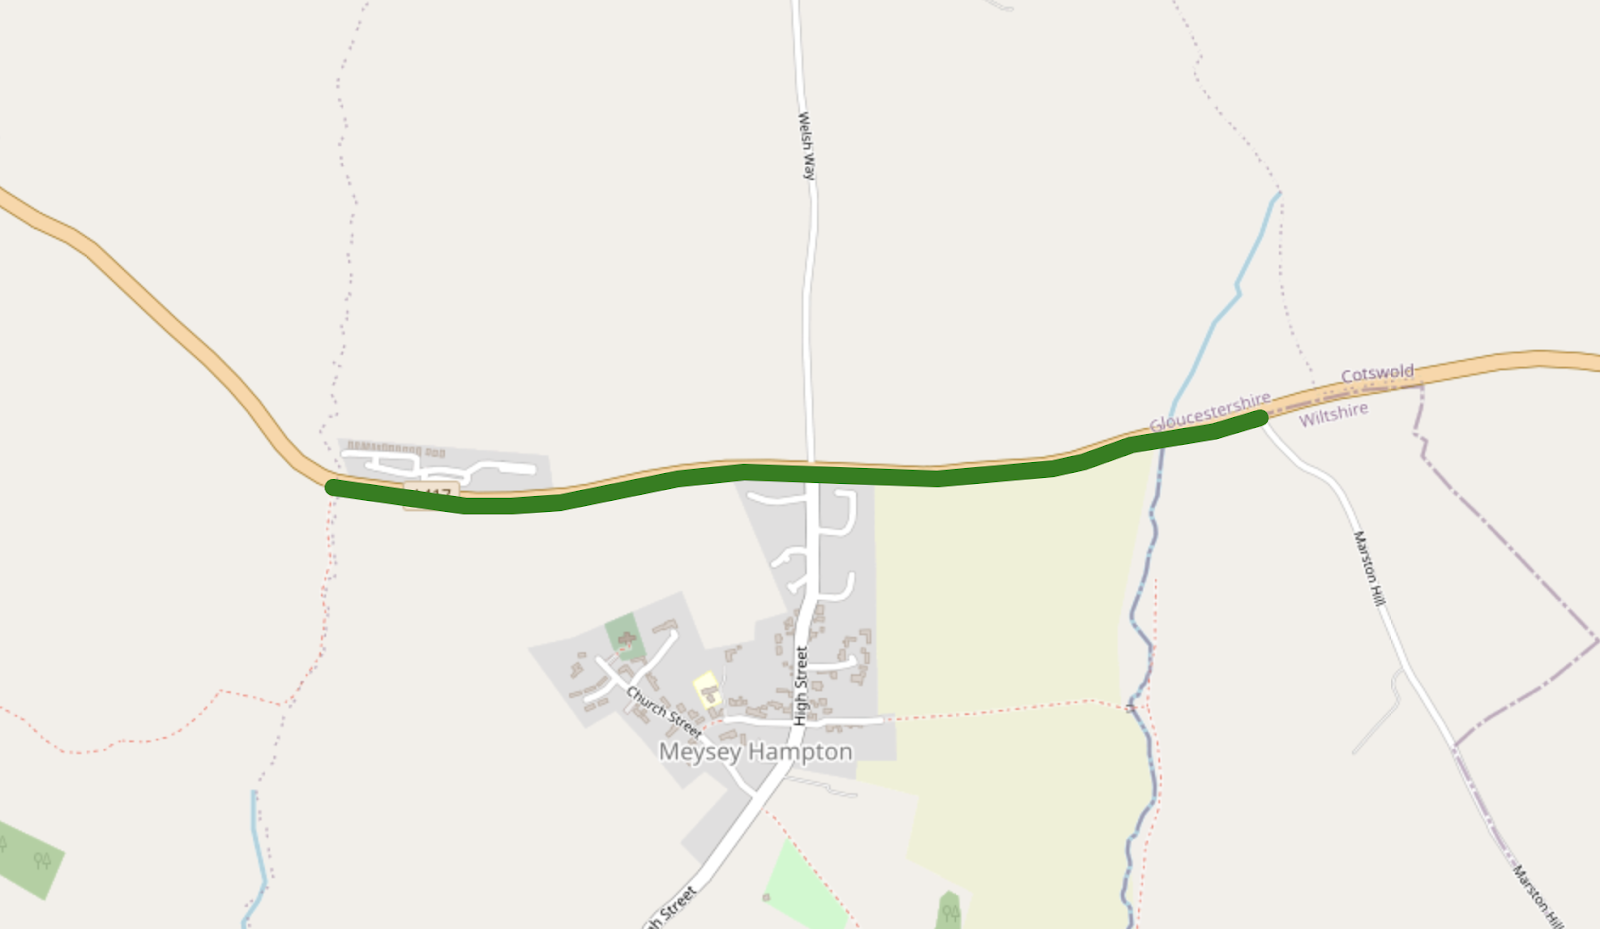
We will use the coordinates extracted from the user’s location message to center the map on this point using the location argument of the folium.Map function. As we saw from the JSON snippet above, the TomTom API returns a list of coordinates that define the outline of the road segment nearest to the input location. We will use the folium.PolyLine function to generate this shape and plot it on the map. We use a list comprehension to transform the coordinates section of the JSON data into a list of 2-element tuples required by this function as an argument. Below is an example output of the folium.PolyLine function overlaid on a map.
In the same Python shell as before, let’s run the following lines of code:
The code above shows that I’ve tweaked the zoom_start and weight arguments to change how the map looks - feel free to play around with these parameters. You can open the map.html file that was saved to the current directory in your browser to see the interactive map.
In the final application, we will output the map as a HTML file to serve to the user. This will be done under a separate /map route.
WhatsApp location messages
As a reminder, our simple chatbot will do one of two things: respond with a standard reply to any normal text-based message, otherwise it will generate a reply based on the user’s location.
Location-based messages sent through WhatsApp can be recognized by our application since they will contain ’Latitude’ and ’Longitude’ keys within the payload (in the same way text-based messages contain the ’Body’ key as explained earlier).
Let’s update the bot() function in our app.py file as follows:
The code above shows that we first check for the existence of these keys in the request payload. If they do exist we respond with the reply logic defined earlier, otherwise we provide a generic greeting.
We can test this out by using the curl command in the terminal as before. If flask run is still live then you need to stop and rerun it. In another terminal run:
This should return the following XML:
We can try sending a request without any coordinates:
This will return:
This tests the two possible types of responses that our chatbot will have.
Everything together
We’ve seen all aspects of our chatbot implementation and we are now ready to put it all together in our app.py file. I’ve created functions for the various sections of the application to make it easier to follow:
get_traffic_data- takes location coordinates as arguments (latandlon) and outputs the JSON data from the TomTom API.create_reply- also takeslatandlonas arguments, calls theget_traffic_datafunction and generates a reply string based on the data.create_map- this function defines our/maproute which outputs the map generated byfolium. The function has no arguments, instead gets the location coordinates from the URL parameters which can be obtained using Flask’srequest.argsdictionary. The URL will look something like this: http://127.0.0.1:5000/map?lat=50.84&lon=-1.72
Then, theget_traffic_datafunction will be called once again to get the points to draw the road segment as explained previously. Finally, the function will return the contents of the map file using Folium’s_repr_html_function. This allows the map to be displayed to the user interactively.bot- this function defines the/botroute which is the webhook used by the Twilio API as explained previously. If a location-based message is sent by the user, a reply is generated using thecreate_replyfunction and a URL for the map file is created to go alongside the reply. We use Flask’surl_rootfunction to obtain the relevant URL root e.g. http://127.0.0.1:5000/ when running locally on our computer or https://66d812ba.ngrok.io/ when we deploy our application to the Internet.
The full script is as follows:
Running the chatbot
We’re now in a position to run our chatbot! Remember to set your TomTom API key as an environment variable using export TOMTOM_API_KEY="XXXXX". Start the chatbot by running (or re-running) flask run in your terminal, ensuring your Python virtual environment is still activated.
The application is only running locally on your computer for now. We can use ngrok to make it reachable from the Internet. In a new terminal window, run ngrok http 5000 where 5000 corresponds to the default port number for Flask applications. In your terminal you should see something like this:
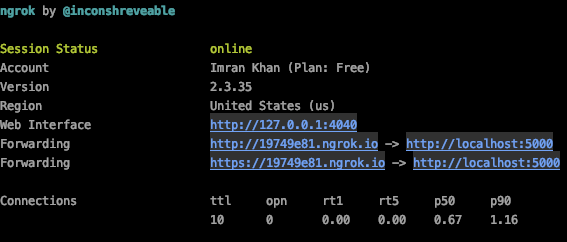
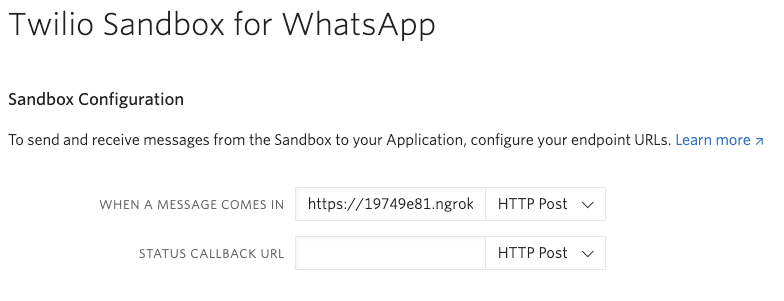
The URLs after “Forwarding” are what ngrok uses to redirect requests into our application. The https:// URL appended with /bot becomes the URL of our webhook which is what Twilio needs to know about. In my case this URL would be https://19749e81.ngrok.io/bot. The first part of the ngrok URL is different every time you run ngrok.
Let’s go back to the Twilio Sandbox for WhatsApp page on the Twilio Console and paste this URL on the “WHEN A MESSAGE COMES IN” field. Don’t forget to append /bot at the end of the ngrok URL and to click “Save” at the bottom of the page.
Let’s try our chatbot out by sending messages to it from our smartphone. We can provide different text-based and location-based messages to ensure our application logic works as intended. Here’s an example session I had with the chatbot:

Conclusion
In this tutorial we have created a simple but fairly powerful chatbot that returns information about live traffic and an interactive map based on a user’s location. This was implemented using Flask, Requests, Folium and the Twilio API for WhatsApp. Our data was obtained from a free traffic API and there is certainly scope to extend the capabilities of our chatbot further.
You could display traffic levels for a greater number of nearby roads by making more calls to the TomTom API for each map. You could customize the objects on the map by using different colours based on the traffic level or adding labels and icons. To make the chatbot more expressive, you could use TomTom’s other API’s to display traffic incidents, suggest routes between locations or search for nearby places.
All the code for this tutorial can be found on GitHub here.
I hope you learnt something from this tutorial and are inspired to build some chatbots of your own!
Imran Khan

Related Resources
Twilio Docs
From APIs to SDKs to sample apps
API reference documentation, SDKs, helper libraries, quickstarts, and tutorials for your language and platform.
Resource Center
The latest ebooks, industry reports, and webinars
Learn from customer engagement experts to improve your own communication.
Ahoy
Twilio's developer community hub
Best practices, code samples, and inspiration to build communications and digital engagement experiences.