Build Real-time Apps in PHP using WebSockets, Laravel and Twilio Sync
Time to read:
December 06, 2018
Written by

Twilio Sync is a powerful API which allows us at Momentum, an online travel agency, to keep our dashboards up to date with its WebSockets entities. Pairing it with Laravel’s Broadcasting feature, however, gave us the ability to efficiently dispatch, queue, serialize and log our Twilio Sync calls from Laravel. In this post, I will walk you through how you can extend Laravel’s framework to make use of Twilio Sync natively.
Additionally, from this tutorial we will:
- Learn about Twilio Sync Streams
- Implement Twilio as a Service Container within Laravel
- Creating a Driver for Laravel’s
- Create a REST API for Twilio callbacks
Require the Twilio SDK
First, we will need a Laravel project. Version 5 is recommended. For this walkthrough, I will be using the latest version available (at the time of writing, 5.7). If you're using Valet or are comfortable with command line installs, run the following command:
Next we need to include Twilio’s PHP SDK as a Composer dependency in order to make use of its RESTful Client wrapper in our project. In the terminal, navigate to your Laravel project and run the following command:
Enable Support for Laravel Broadcasting
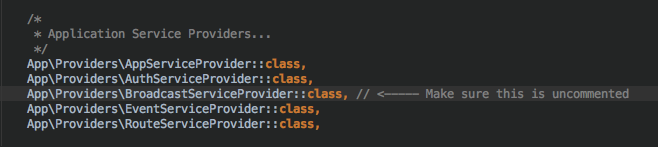
Laravel Broadcasting is a feature offered by the framework which gives you the ability to send events from your backend application to your WebSocket connections on the front end of your application. By default, broadcasting is disabled in Laravel, so if you've never used it before, or you are starting with a brand new project, make sure the Broadcaster service provider has been uncommented inside the config/app.php file.
Finally, we want to set up a queue that will listen to incoming broadcast events. Out of the box, that feature is supported synchronously, but if you were willing to use another queue connection, make sure to have php artisan queue:work running in the background to ensure events are being processed.
Twilio / Twilio Sync as a Service Container
Our primary goal is to allow our Laravel App to integrate Twilio Sync’s flexible entities, while making use of the Broadcasting’s serializable and dispatchable channel events. For Laravel to utilize Twilio Sync as a broadcaster, we need to provide its REST API as an injectable dependency. Therefore, it is necessary to bind Twilio Sync as a service container in order to make the class injectable and its configured instance reusable. Laravel offers more information on understanding service containers in their docs.
The first step in binding Twilio Sync is to execute the Artisan Command to create a Twilio service provider. In your command line run:
This will create a file in the app/Providers folder named TwilioServiceProvider.php.

Let’s navigate into that file and add the following namespaces:
You will notice that the register() function has already been generated for us. In that method I’ve decided to create a singleton, which will turn the constructor I provided it into an injectable dependency for the rest of our application. Update your register() function to include the following code:
The name of my singleton in this example is "sync", which means that whenever the app creates a service with that name, the constructor on the second argument will execute in order to return an instance of ServiceContext from Twilio Sync’s API Client SDK. For any subsequent calls, the application will refer to the same instance across the application’s runtime, allowing us to make use of the same configuration without declaring it again every subsequent time.
The parameters are configured using environment variables which are set in our .env file. Therefore, we will need to include these in order for our ServiceContext to return an appropriate REST object to work with.
You can get your Account SID and Auth Token from your Twilio Console. As for the Service SID, this can be set to “default”, or to the Service SID of your choice if you ever intend to manage multiple services. Finally, you can create yourself a Twilio API key from the Twilio Sync runtime configuration page. This will be used to sign the access token used by our frontend client that will receive the events we will publish.
Once that is done, we can proceed to register our new ServiceProvider inside your config/app.php file:
Creating the Broadcaster
Now that the base requirements have been fulfilled, we can start building the broadcasting engine. In order to make it compatible with Laravel, let’s use the existing drivers inside the project and created a new file named app/Broadcasters/SyncBroadcaster.php.
We’ll extend that class to Laravel’s Broadcaster’s abstract class in order to build a proper driver that will be extended in the framework.
The constructor directly makes use of a ServiceContext. This is set to a property in the class which I’ve named $sync. That property will be used in the following functions in order to connect to Twilio’s API internally.
Setting up the broadcast() function
The broadcast() function is the most important function to implement, as it is the core which publishes the information from the backend platform to the sockets subscribed on our front-facing application. For it to work, it requires us to make use of one of Sync’s many socket entities. I decided to use SyncStreams, due to their low-latency and high broadcast-rate, which I am a fan of!
From the definitions described by the Broadcasters, we need to make sure that the arguments provided by Laravel match those we’ll be sending to Twilio. Here is a rundown of how to map each of the definitions:
- $channels: Lists out the names of destination to which the message must be broadcasted. This would perfectly describe a list of SyncStream names.
- $event: Describes the event triggered. This should be passed on as an event type.
- $payload: Information of the message. This is the content of the stream message itself.
Let’s start by creating the API call to create a new StreamMessageInstance in SyncBroadcaster.php:
This code makes two important checks: First, that an instance of the StreamMessage class was sent correctly. Secondly, that the broadcasting script runtime continues its execution in the event that a stream does not exist in the Twilio namespace.
As a result, our code also filters out the 404 Exceptions from the code execution, only halting when a more critical error occurs. Lastly, we save the error code under a constant to which I have named TWILIO_EXCEPTION_NOT_FOUND, and attempt to match it once a TwilioException occurs.
Creating the auth() and validAuthenticationResponse() functions
Creating the auth() and validAuthenticationResponse() functions are straightforward in comparison to the default drivers offered by Laravel. This enables us to use Private and Presence Channel concepts in the future. We will need them to fulfill the requirements imposed by the Broadcaster interface. However, for this walkthrough, we will not be diving into their usage. In SyncBroadcaster.php add the following functions:
The broadcaster is almost ready to go! First we need to extend it to the framework, so that Laravel recognizes it as a useable driver. To do so, we will call the following code inside the boot function of the TwilioServiceProvider.php file we created earlier in the app/Providers folder:
The last requirement is to make sure the config/broadcasting.php file has the following entry inserted. As soon as the driver is set, Laravel will search for that configuration option in its connections. Note, this is essential for the application to work.
Once that is set, we can now set the broadcast driver in our environment file. Inside your .env, set the BROADCAST_DRIVER property to "sync" for it to be used:
Listening to the Events From the Front-End
To make use of our broadcaster, we need to create a test event from Laravel with the ShouldBroadcast interface. From your terminal, run the following command:

This will create an event object of the same name under the folder app/Events. Then, add the following code to include some information to that event’s payload for the frontend application to receive:
Then, for the backend, we want to initialize a $token variable that will be used to initialize our Twilio Sync SDK. Insert the following code in the HomeController.php file found under the directory app/Http/Controllers. If it does not exist, run the following command in your terminal:
Make sure that controller function is also declared properly in your routes/web.php file by overwriting the existing Route:get(‘/’) with:
For the front end, let’s set up a quick implementation of Twilio Sync. Inside resources/views/welcome.blade.php, include the following script before the end of your <body> tag.
The first line serves to include the Twilio Sync SDK for Javascript on our page. If you are familiar with NPM, you can obtain the package here. The second script tag initializes a Sync Client in our browser by using the $token variable we injected in our welcome view. It also initializes a stream connection with the same channel name that has been defined in the event we have previously created.
At this point, you can then run a function to broadcast the event. In my case, I ran Laravel’s Psy shell using php artisan tinker and ran the broadcast event below. In your terminal, run the following command:
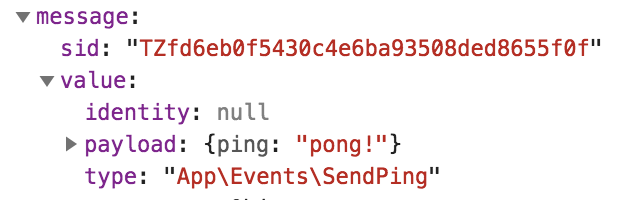
If you’ve got your queue running correctly, you should see it show up on your browser console!

Conclusion & Next Steps
At this point, our Laravel application can now broadcast events to our WebSocket application with the use of Laravel Events.
- I’ve made the service available as open-source, so feel free to look into it: https://github.com/lamungu/laravel-sync-broadcaster
- It is important to denote that Twilio Sync Streams are not the only way to make broadcasting available. Sync Maps, for example, can also be a viable choice, as they do not have the 4KB limitations from StreamMessages. They can also be interesting for the implementation of Presence and Private Channels, which we have not yet covered.
You can reach me, Benjamin Lofo via:
Instagram: @lamungu
Website: lamungu.com

Related Resources
Twilio Docs
From APIs to SDKs to sample apps
API reference documentation, SDKs, helper libraries, quickstarts, and tutorials for your language and platform.
Resource Center
The latest ebooks, industry reports, and webinars
Learn from customer engagement experts to improve your own communication.
Ahoy
Twilio's developer community hub
Best practices, code samples, and inspiration to build communications and digital engagement experiences.