Build a Simple Chat Room App in React with Laravel Breeze and Twilio's Conversations API

April 28, 2021
Written by
Lloyd MIller
Contributor
Opinions expressed by Twilio contributors are their own
Reviewed by

Build a Simple Chat Room App in React with Laravel Breeze and Twilio's Conversation API

2020 was a huge year for Laravel. It was the year that we saw this beloved framework take leaps and bounds over its competition and push the PHP ecosystem further. The Laravel team managed to make the framework even more powerful by adding new authentication and scaffolding features, which include Jetstream and Breeze.

Many developers know that full-stack apps with a Vue frontend can be quickly spun up with Laravel Jetstream. What many don’t know is that recently, the Laravel team made it easy to make an Inertia app with Laravel Breeze.

With this knowledge, let’s have some fun and make a very simple Discord-like app called “Twilcord” that will let multiple users join a room via a phone number or  username. Instead of the default Vue frontend, we’ll be using React. This article will show you that you don’t need to build separate backends and frontends anymore; Laravel monoliths are the future!

Prerequisites

In order to get started with this tutorial you will need the following:

I’ll assume that you have some experience with Laravel and it’s templating structure. If not, links will be available throughout for additional reading. It’s also helpful if you have some familiarity with JSX or JavaScript XML which makes it easier to write HTML in React.

Laravel App Setup

Install your Laravel application by going to your terminal, navigating to the folder where you store your projects and running:

$ laravel new twilcord && cd twilcord

Once our app is installed, we will install the Laravel Breeze package using Composer. You should now be inside of the twilcord directory:

$ composer require laravel/breeze --dev

Next, we’ll set up Breeze’s resources, routes, and views. Instead of Blade, we’ll be using the Inertia stack.

$ php artisan breeze:install --inertia
$ npm install

NOTE: We won’t do any migrations or set up any models for this project.

Scaffolding the Frontend

Laravel Breeze comes with a Vue frontend by default. Since we’re using React for this project, we’ll need to make a few adjustments. The first thing that we’ll need to do is install React and add some dependencies by running:

$ npm install react react-dom
$ npm install @inertiajs/inertia-react

Next, we’ll need to go to resources/js/app.js and make some changes so that it looks and functions like the entry-point of a React application:

import {InertiaApp} from '@inertiajs/inertia-react'
import React from 'react'
import {render} from 'react-dom'

const app = document.getElementById('app')

render (
    <InertiaApp
        initialPage={JSON.parse(app.dataset.page)}
        resolveComponent={name => import(`./Pages/${name}`).then(
  module => module.default
        )}
    />,
    app
)

We’ll then need to ensure that Babel (our JavaScript compiler) can understand the JSX code that we’ll be writing, so we’ll need to install a Babel preset by running npm install --save-dev @babel/preset-react.

This will install three plugins: @babel/plugin-syntax-jsx, @babel/plugin-transform-react-jsx, and @babel/plugin-transform-react-display-name.

We can then use this preset by creating a .babelrc file in the root with this code:

{
    "presets": ["@babel/preset-react"]
}

After this, we’ll configure TailwindCSS, which should already be installed. We want to easily make forms, so we’ll install the Tailwind Forms plugin by running: $ npm install @tailwindcss/forms. Next, add the plugin to the tailwind.config.js file like so:

module.exports = {
    plugins: [require('@tailwindcss/forms')],
}

Go to your webpack.mix.js file and ensure that Tailwind is added as a plugin for PostCSS. Also, if you see .vue() attached to mix, remove it or there will be errors.

mix.js('resources/js/app.js', 'public/js')
    .postCss('resources/css/app.css', 'public/css', [
        require('postcss-imports'),
require('tailwindcss'),
require('autoprefixer'),
    ])
...

Next, we’ll need to remove all Vue files from the frontend. You could simply delete the Components, Layouts, and Pages folders in resources/js, or you could rename them if you want to keep the files for reference or for some other use.

Create a new Pages folder and a Home.js file within. We’ll make a simple “Hello World” app to make sure that everything is working properly.

import React from 'react'

const Home = () => {
    return (
        <p>Hello World</p>
    )
}

export default Home

Let’s compile our assets by running $ npm run dev.

NOTE: If you get a Laravel Mix error, try to upgrade to the latest version of Laravel Mix by running npm install laravel-mix@latest --save-dev.

Finally, go to routes/web.php where you’ll see a bunch of routes already pre-defined by Breeze. Delete these routes and create a route for the home page. We’ll be using the Inertia package here, but we won’t be sending any data to the front page.

NOTE: For simplicity, we’ll be making an SPA (or single page application) of sorts without much routing. We want the user to sign in on the ‘Home’ route and we’ll let all the messages load on that same route when signed in. In the regular way, we would have a ‘Sign In’ route and load all the messages separately for our ‘Home’ route.

<?php

use Illuminate\Support\Facades\Route;
use Illuminate\Http\Request;
use Inertia\Inertia;

Route::get('/', function(){
    return Inertia::render('Home', []);
});

It’s time to get our app up and running. Run php artisan serve. By default, you should see your app by typing http://localhost:8000 in your browser.

Phew, that was a lot of set-up! Now, let’s start building our app.

Implementing Twilio’s Conversation API

With Twilio’s Conversation API, we’ll be able to create multi-party chats where participants can use chat, SMS, MMS, and WhatsApp to create messages. The possibilities are endless, but for this tutorial, we’ll only be building a chatroom with SMS and chat capabilities.

Remember to ensure that you create a Twilio account, and if you’re on a free trial, have at least one verified phone number so that you can send text messages to the Conversations API. Install the Twilio PHP SDK by running the following in a new terminal window:

$ composer require twilio/sdk

Add your Twilio Phone Number, Twilio Account SID, and Twilio Auth Token to your project’s .env file. You can locate the Account SID and Auth Token from the Console. It should look something like this:


TWILIO_PHONE_NUMBER=+19999999999
TWILIO_ACCOUNT_SID=AC***************
TWILIO_AUTH_TOKEN=6ee***************

Now we’re going to set up a Twilio service that will use these variables. Create a Services folder in the Laravel app/ folder and create a Twilio.php file. In this file, we’ll be making methods that create the conversation, add SMS participants, add chat participants, create messages, and fetch all messages.

<?php 

namespace App\Services;

use Twilio\Rest\Client;
use Carbon\Carbon;


class Twilio {
    protected $sid;
    protected $token;
    protected $twilio_number;
    protected $client;

   public function __construct(){
        $this->sid = getenv('TWILIO_ACCOUNT_SID');
        $this->token = getenv('TWILIO_AUTH_TOKEN');
        $this->twilio_number = getenv('TWILIO_PHONE_NUMBER');
        
        $this->client = new Client($this->sid, $this->token);
    }

    public function makeConversation(){
        $conversation = $this->client->conversations->v1
                                             ->conversations
                                            ->create([
                                                    "friendlyName" => "My Chat App"
                                            ]);

        return $conversation;
    }

    public function createSMSParticipant($sid, $number){
        $participant = $this->client->conversations->v1
                                       ->conversations($sid)
                                        ->participants
                                        ->create([
                                                'messagingBindingAddress' => $number,
                                                'messagingBindingProxyAddress' => $this->twilio_number
                                        ]);
        return $participant;
    }

    public function createChatParticipant($sid, $chat_id){
        $participant = $this->client->conversations->v1
                                        ->conversations($sid)
                                        ->participants
                                        ->create([
                                                'identity' => $chat_id
                                     ]);
        return $participant;
    }

    public function createMessage($sid, $author, $body){
        $message = $this->client->conversations->v1
                        ->conversations($sid)
                        ->messages
                        ->create([
                            'author' => $author,
                            'body' => $body
                        ]);
        return $message;
    }

    public function listMessages($sid){
        $messages = $this->client->conversations->v1
                                ->conversations($sid)
                                ->messages
                                ->read(20);
        $array = array();
        foreach($messages as $message){
            array_push($array, [
                $message->sid,
                $message->author,
                $message->body,
                $this->convertTime($message->dateCreated)
            ]);
        }
        return $array;
    }

    private function convertTime($date){
        $dt = Carbon::parse($date);
        $new = $dt->toDayDateTimeString();

        return $new;
    }
}

Testing Our Methods

We have a long way to go, but testing our backend now will ensure that we don’t encounter any surprises. Let’s go to our api.php route and set endpoints to create conversations, create SMS users, create chat users, send messages, and fetch messages. Your API routes should look something like this:

<?php

use Illuminate\Http\Request;
use Illuminate\Support\Facades\Route;
use App\Services\Twilio;

Route::group(['prefix' => 'convo'], function(){
    // Create conversation
    Route::post('/create', function(){
        $convo = new Twilio();
        $sid = $convo->makeConversation()->sid;
    
        return response()->json([
            'sid' => $sid
        ]);
    });

    // Add participant by phone number
    Route::post('/{id}/sms-participant/new', function(Request $request, $id){
        $convo = new Twilio;
        $number = $request->number;
        $participant = $convo->createSMSParticipant($id, $number);
        
        return response()->json([
            'participant' => $participant->sid
        ]);
    });
    
    // Add participant by username
    Route::post('/{id}/chat-participant/new', function(Request $request, $id){
        $convo = new Twilio;
        $name = $request->username;
        $participant = $convo->createChatParticipant($id, $name);
        
        return response()->json([
            'participant' => $participant->sid
        ]);
    });
    
    // Create a new message
    Route::post('/{id}/create-message', function(Request $request, $id){
        $convo = new Twilio;
        $message = $convo->createMessage($id, $request->username, $request->message);
    
        return response()->json([
            'message_id' => $message->sid
        ]);
    });
    
    // Get all messages
    Route::get('/{id}/messages', function($id){
        $convo = new Twilio;
        $messages = $convo->listMessages($id);
    
        return response()->json([
            'messages' => $messages
        ]);
    });
});

NOTE: You may realize that we’re not using Models or Controllers. We’re not doing any database work, so we’ll do route logic in Closures instead.

Awesome! With our routes created, let’s test them out in Postman. The first thing we’ll test is our endpoint for creating conversations. Make a POST request to http://localhost:8000/api/convo/create. The JSON response should return a key-value pair with sid as the index and a unique token as the value as seen in the following screenshot:

Postman example creating a new conversation

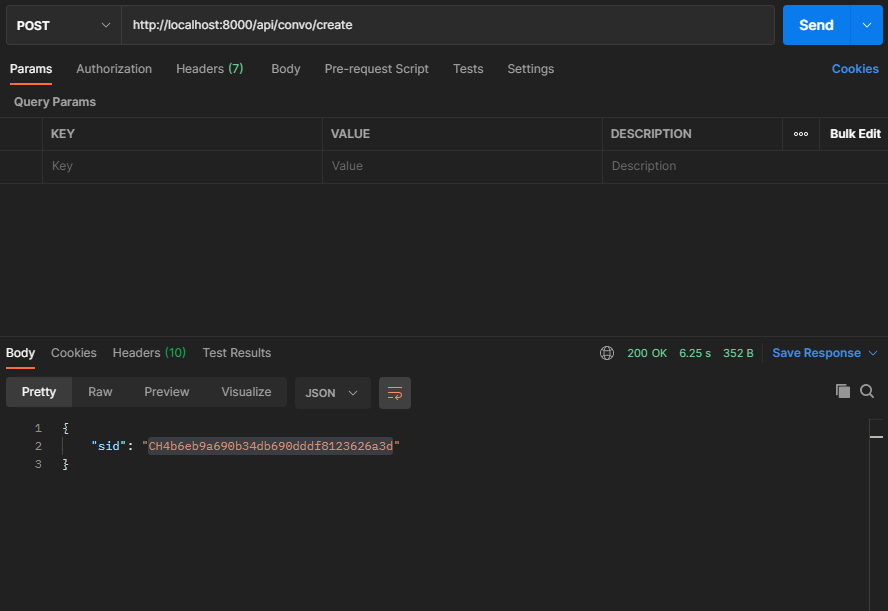
NOTE: Twilio can return many more properties than this. If you look at how my route is set up, you will see I chose to only return sid. If you want to see all the possibilities, look at Twilio’s Conversation Resource.

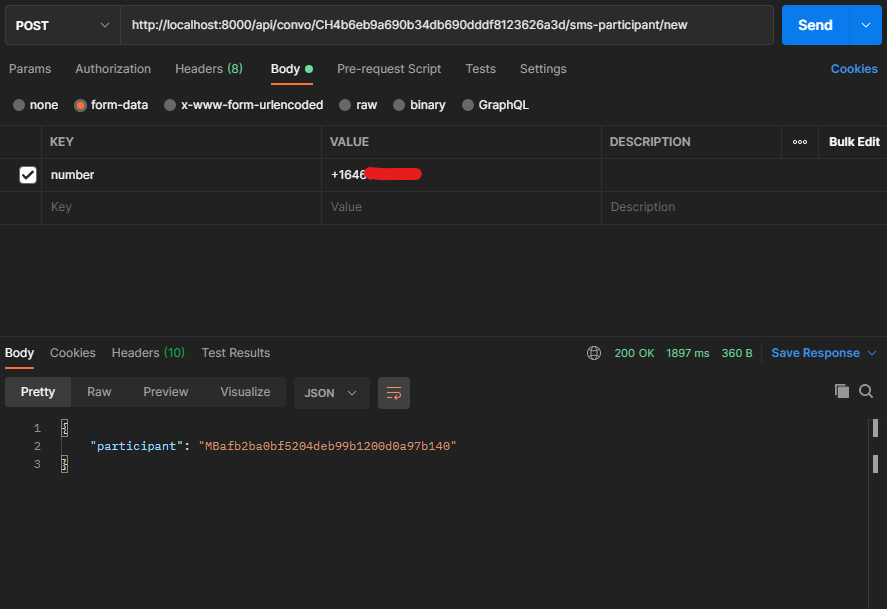
To create an SMS user, copy the sid, make a new tab, and place it into the endpoint like so: http://localhost:8000/api/convo/{id}/sms-participant-new. Click on the Body tab under the URL bar and select the form-data radio button. You can then enter the phone number that you’ll be using there. Make sure that you supply the phone number in E.164 format.

Postman example adding an SMS participant

You can then follow this pattern to create a new chat participant with a username using the http://localhost:8000/api/convo/{id}/chat-participant-new endpoint.

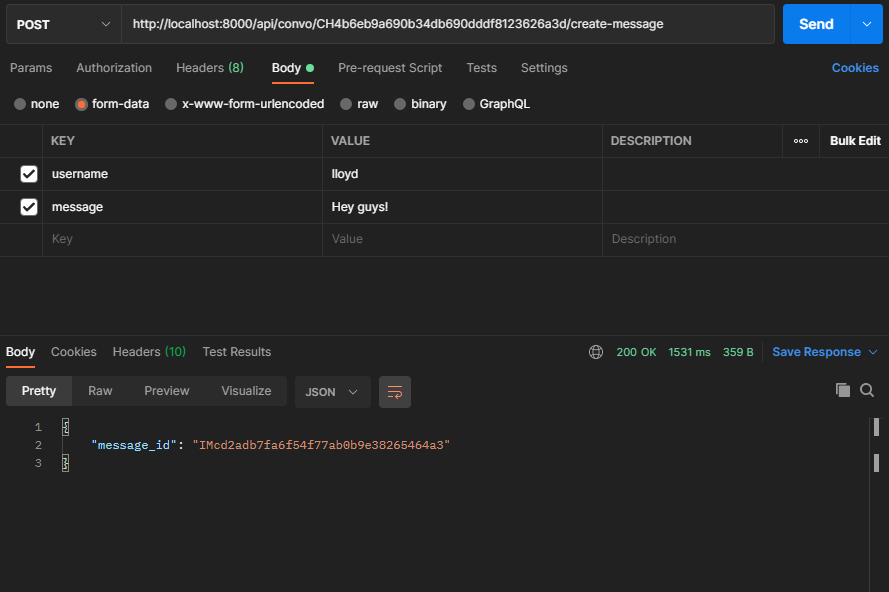
Now let’s create our first message with Postman! Pass a username and message to the http://localhost:8000/api/convo/{id}/create-message endpoint. Both values should be strings.

Postman example sending a new message

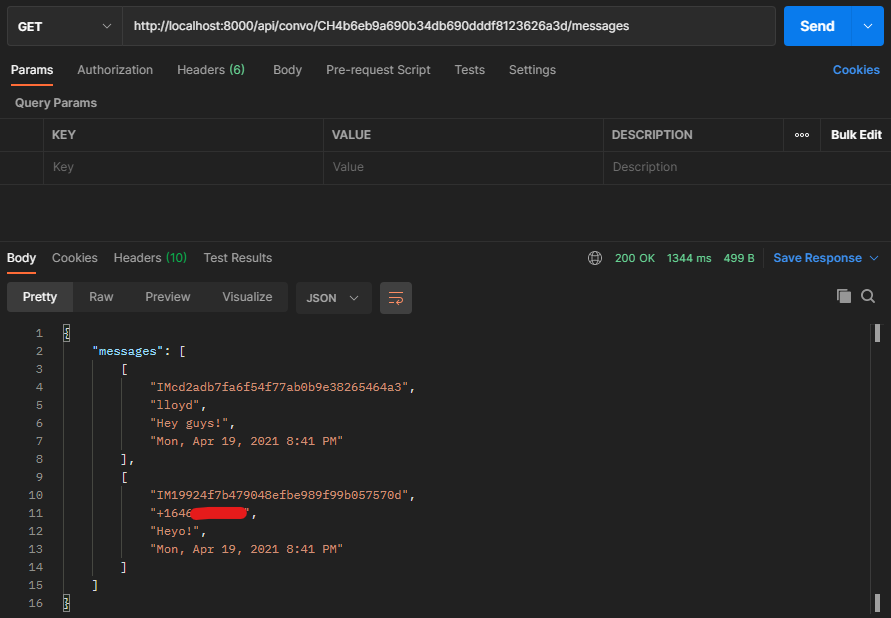
You should now realize that you’ve gotten a text message. You can respond to it right from your phone! When you’ve done so, you can then make a GET request to http://localhost:8000/api/convo/{id}/messages. When we fetch all our messages, it should look something like this:

Postman example to fetch all messages

Creating the Chat UI

Finally, we’re at the part you’ve been waiting for. A reminder: we are creating a very simple chat room app with some compromises. Our app will not be real-time, but will instead update every 3 seconds. In another article, we’ll go deeper into how we can make a real-time chat application using webhooks. Now let’s get down to details on how we’re going to create the Twilcord UI with React.

First, a little more backend stuff. We’ll need to copy over our API routes and make them applicable for web.php since Laravel uses this route for frontend traffic.

<?php

use Illuminate\Support\Facades\Route;
use Illuminate\Http\Request;
use App\Services\Twilio;
use Inertia\Inertia;

Route::get('/', function(){
    return Inertia::render('Home', []);
});

Route::group(['prefix' => 'convo'], function(){
    // Create conversation
    Route::post('/create', function(){
        $convo = new Twilio();
        $sid = $convo->makeConversation()->sid;        
    
        // Return to previous page/state
        return redirect()->back()->with('message', $sid);
    });

    // Add participant by phone number
    Route::post('/{id}/sms-participant/new', function(Request $request, $id){
        $convo = new Twilio;
        $number = $request->number;
        $participant = $convo->createSMSParticipant($id, $number);
        
        return redirect()->back()->with('message', $participant->sid);
    });
    
    // Add participant by username
    Route::post('/{id}/chat-participant/new', function(Request $request, $id){
        $convo = new Twilio;
        $name = $request->username;
        $participant = $convo->createChatParticipant($id, $name);
        
        return redirect()->back()->with('message', $participant->sid);
    });
    
    // Create a new message
    Route::post('/{id}/create-message', function(Request $request, $id){
        $convo = new Twilio;
        $message = $convo->createMessage($id, $request->username, $request->message);
    
        return redirect()->back()->with('message', $message->sid); 
    });
    
    // Get all messages
    Route::get('/{id}/messages', function($id){
        $convo = new Twilio;
        $messages = $convo->listMessages($id);
    
        return response()->json(['messages' => $messages]);
    });
});

Inertia::render() doesn’t work with POST requests, so we have to redirect back to the page with our data. This mechanism is Laravel’s and not Inertia’s, so we need a way for Inertia to share the data to the React frontend through props. Because message is flashed to the session, we can get Laravel to share that flashed message with Inertia. We do this through the boot() method of our Providers/AppServiceProvider.php file.

<?php

namespace App\Providers;

use Illuminate\Support\Facades\Session;
use Illuminate\Support\ServiceProvider;
use Inertia\Inertia;

class AppServiceProvider extends ServiceProvider
{
    ...

    public function boot()
    {
        Inertia::share('flash', function(){
            return [
                'message' => Session::get('message')
            ];
        });
    }
}

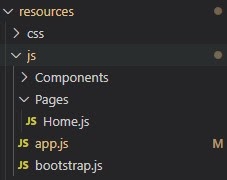
I always set up my React projects with pages in one folder, and components in a separate folder:

React project folder organization

I like to compartmentalize as much as possible, so Home.js will be pretty barebones. When a user visits Twilcord, they will be asked if they want to join an already established room or create a new one. They will be able to join via SMS or by supplying a username. To make things simple, the room displayed will be the last one that was made. Since there is no database, the best way to store this information is in a file. We’ll store the room information in this file and read from it with Laravel, since PHP comes with these features baked in.

We’ll create this file as a trait and access its methods statically. We’ll also give each chat a very random name with the Faker library. To do this, create a Traits/ folder in the Laravel app/ folder. Create a new file called FileHelpersTrait.php.

<?php

namespace App\Traits;

use Faker\Factory as Faker;

trait FileHelpersTrait {
    
    public static function handleJson($data){
        $randomString = str_replace(' ', '', Faker::create()->bs);

        if (!file_exists(base_path('public/sid.json'))){
            $json = json_encode([
                'sid' => $data, 'chat_name' => "#".$randomString
            ], JSON_PRETTY_PRINT);
            file_put_contents(base_path('public/sid.json'), stripslashes($json));
            return;
        }
        // Read file
        $json = file_get_contents(base_path('public/sid.json'));
        $file = json_decode($json, true);

        // Update file
        $file['sid'] = $data;
        $file['chat_name'] = "#".$randomString;

        // Write to file
        $json = json_encode($file, JSON_PRETTY_PRINT);
        file_put_contents(base_path('public/sid.json'), stripslashes($json));
        return;
    }
}

Now we need to call our trait in our routes.

...
use App\Traits\FileHelpersTrait;

Route::get('/', function(){
    return Inertia::render('Home', []);
});

Route::group(['prefix' => 'convo'], function(){
    // Create conversation
    Route::post('/create', function(){
        $convo = new Twilio();
        $sid = $convo->makeConversation()->sid;        

        // Write JSON file
        FileHelpersTrait::handleJson($sid);
    
        // Return to previous page/state
        return redirect()->back()->with('message', $sid);
    });
...

Now in our Home.js file, we’ll programmatically detect whether to display our component that allows people to sign in or the component that allows messages to be sent. Because we can’t simply just pass data up from child to parent, we need a way to tell Home that a submission was made in our SignUp component. We can accomplish this by passing the onChange prop to the Signup component. Then we can pass a state to the props in the child component that only changes when a submission is made. This is how Home is set up:

import React, {useState} from 'react'
import SignUp from '../Components/Signup'
import ChatForm from '../Components/Chatform'

const Home = () => {
    const [chat, setChat] = useState({
        chatStatus: false, sid: '', username: ''
    })
    
    function handleChange(value){
        setChat(value)
    }

    return (
        <>
            {chat.chatStatus ? (
                <ChatForm chat={chat} />
            ) : (
                <SignUp onChange={handleChange} />
            )}
        </>
    )
}

export default Home

In our SignUp component, we’ll give the user the option to sign in with a number or a username (which will hit two different endpoints), and decide if they want to join the most recent room. First, we’ll have a very simple layout with two buttons; an input, and a checkbox. The checkbox will set a value of true or false to denote whether the user will join the most recent room. We’ll load the name of this room from the JSON file we made earlier.

Create the SignUp component in resources/js/Components called SignUp.js. Add the following code:

import React, {useState, useEffect} from 'react'
import {Inertia} from '@inertiajs/inertia'

const SignUp = props => {
    const [username, setUsername] = useState('')
    const [userType, setUserType] = useState('username')
    const [convo, setConvo] = useState({sid: '', name: ''})
    const [chatExists, setChatExists] = useState(false)
    const [submitting, setSubmitting] = useState(false)

    function handleChange(e){
        setUsername(e.target.value)
    }

    // Fetch data from sid.json
    async function jsonFile(){
        const response = await fetch('./sid.json', {
            'Content-Type': 'application/json',
            'Accept': 'application/json'
        })
        const data = await response.json()
        setConvo({sid: data.sid, name: data.chat_name})
    }

    useEffect(() => {
        jsonFile()
    }, [])

    return (
        <div className="flex justify-center">
            <div className="align-middle mt-20">
                <form onSubmit={handleSubmit}>
                    {convo.name ? (
                        <div className="mt-2">
                            <div>
                                <label className="inline-flex items-center">
                                    <input 
                                        type="checkbox" 
                                        className="form-checkbox" 
                                        onChange={() => setChatExists(!chatExists)} 
                                    />
                                    <span className="ml-2">Join Chat "{convo.name}"</span>
                                </label>
                            </div>
                        </div>
                    ) : (
                        null
                    )}
                    <input 
                        id="username"
                        value={username}
                        onChange={handleChange}
                        className="my-6 p-3 block w-full rounded-md bg-gray-100 border-transparent focus:border-gray-500 focus:ring-0" 
                    />
                    <div className="flex">
                        <button 
                            className="bg-purple-500 text-white active:bg-purple-600 font-bold uppercase text-sm px-6 py-3 rounded-full shadow-inner outline-none focus:outline-none mr-1 mb-1" 
                            onClick={() => setUserType('username')}
                            disabled={submitting}
                        >
                            {submitting ? "Submitting..." : "Enter with Username"}
                        </button>
                        <button 
                            className="bg-purple-500 text-white active:bg-purple-600 font-bold uppercase text-sm px-6 py-3 rounded-full shadow-inner outline-none focus:outline-none mr-1 mb-1" 
                            onClick={() => setUserType('number')}
                            disabled={submitting}
                        >
                            {submitting ? "Submitting..." : "Enter with Number"}
                        </button>
                    </div>
                </form>
            </div>
        </div>
    )
}

export default SignUp

Awesome! Now that we have that, we’ll need to handle the submission of our code and the mechanism by which we’ll tell the parent component (Home) that we’ve made a submission. There are different ways to enter a chat room, hence, we’ll use some if statements. We’ll be doing it this way for clarity, but you’re free to rewrite these if statements in any way you choose. 

The two functions that we’ll be writing, changeChat() and handleSubmit(), can be placed wherever you like, but I suggest that you place them below the handleChange() function we made a while ago in SignUp.js. We’ll be using Inertia to submit our data. Usually, we would use Inertia Links that compile to HTML buttons, but to mimic Promises, we’ll handle these submissions manually.

    function changeChat(csid){
        chatExists === false ? 
            props.onChange({
                chatStatus: true, sid: csid, username: username
            }) : 
            props.onChange({
                chatStatus: true, sid: convo.sid, username: username
            })
    }

    function handleSubmit(e){
        e.preventDefault()
        
        // If user doesn't check the box to join existing room
        if (chatExists === false){
            Inertia.post('/convo/create', {}, {
                onSuccess: ({props}) => {

                    // If user joins by username
                    if (userType === 'username'){
                        Inertia.post(
                            `/convo/${props.flash.message}/chat-participant/new`,
                            {username: username},
                            {
                                onStart: () => {
                                    setSubmitting(true)
                                },
                                onSuccess: res => {
                                    console.log(res)
                                },
                                onFinish: () => {
                                    setSubmitting(false)
                                    changeChat(props.flash.message)
                                }
                            }
                        )
                    }
                    // If user joins by number
                    else {
                        Inertia.post(
                            `/convo/${props.flash.message}/sms-participant/new`,
                            {number: username},
                            {
                                onStart: () => {
                                    setSubmitting(true)
                                },
                                onSuccess: res => {
                                    console.log(res)
                                },
                                onFinish: () => {
                                    setSubmitting(false)
                                    changeChat(props.flash.message)
                                }
                            }
                        )
                    }
                }
            })
        }
        // If user checks the box to join existing room
        else {
            // If user joins by username
            if (userType === 'username'){
                Inertia.post(
                    `/convo/${convo.sid}/chat-participant/new`,
                    {username: username},
                    {
                        onStart: () => {
                            setSubmitting(true)
                        },
                        onSuccess: res => {
                            console.log(res)
                        },
                        onFinish: () => {
                            setSubmitting(false)
                            changeChat(convo.sid)
                        }
                    }
                )
            }
            // If user joins by number
            else {
                Inertia.post(
                    `/convo/${convo.sid}/sms-participant/new`,
                    {number: username},
                    {
                        onStart: () => {
                            setSubmitting(true)
                        },
                        onSuccess: res => {
                            console.log(res)
                        },
                        onFinish: () => {
                            setSubmitting(false)
                            changeChat(convo.sid)
                        }
                    }
                )
            }
        }
    }

Create the ChatForm component in resources/js/Components called ChatForm.js. We’ll leave it empty for now. Run npm run dev and you should see the SignUp form. If you sign in, you may see an error in a modal. We’ll discuss error handling when we do a deeper dive into Inertia apps at a later date. If you’d like to get ahead now, you could take a look at this old blog article discussing the topic. The frontend is in Vue, so you may need to make some adjustments.

Plugging and Playing the Chat UI

In our ChatForm component, we’ll have a box that contains all of the room’s messages and an input field at the bottom. When we create a message, we’ll send it to the Conversation API with the correct Conversation SID. Just like in our SignUp component, we’ll use Inertia Manual Visits that mimic Promises instead of Inertia Links.

Once we have submissions done, we need a way to load our messages automatically. We’ll use the useEffect React hook to achieve this. There is no way to achieve real-time message-loading with a REST architecture without technologies such as websockets or webhooks, so we’ll “cheat” by fetching our messages every three seconds. Also, we’ll be using async-await instead of Inertia to load our messages because of how our app is set up.

This is how our component will look when done:

import React, {useState, useEffect} from 'react'
import {Inertia} from '@inertiajs/inertia'
import Message from './message'

const ChatForm = ({chat}) => {
    const [thisText, setThisText] = useState('')
    const [submitting, setSubmitting] = useState(false)
    const [messages, setMessages] = useState([])
    const [arrLength, setArrLength] = useState(0)
    const [chatName, setChatName] = useState('')

    function handleChange(e){
        setThisText(e.target.value)
    }

    function handleSubmit(e){
        e.preventDefault()
        
        Inertia.post(`/convo/${chat.sid}/create-message`, {
            username: chat.username,
            message: thisText
        }, 
        {
            onStart: () => {
                setSubmitting(true)
            },
            onSuccess: ({props}) => {
                console.log(props)
            },
            onFinish: () => {
                clearField()
                setSubmitting(false)
            }
        })
    }

    function clearField(){
        setThisText('')
    }

    // Fetch data from sid.json
    async function jsonFile(){
        const response = await fetch('./sid.json', {
            'Content-Type': 'application/json',
            'Accept': 'application/json'
        })
        const data = await response.json()
        setChatName(data.chat_name)
    }

    useEffect(() => {
        jsonFile()
    }, [])

    // Fetch messages
    async function getMessages(){
        const response = await fetch(`/convo/${chat.sid}/messages`)
        const json = await response.json()

        if (json.messages.length > arrLength){
            setMessages(json.messages)
            setArrLength(json.messages.length)
        }
    }

    // Fetch messages every three seconds and clean up once component unmounts
    useEffect(() => {
        const interval = setInterval(() => {
            getMessages()
        }, 3000)

        return () => clearInterval(interval)
    }, [])

    
    return (
        <div className="h-screen mx-auto lg:w-1/2 md:w-4/6 w-full mt-2">
            <h1 className="font-mono font-semibold text-black text-4xl text-center my-6">TWILCORD</h1>
            <div className="flex justify-between">
                <p className="font-sans font-semibold text-lg text-black">{chatName}</p>
                <p className="font-sans font-semibold text-lg text-black">{chat.username}</p>
            </div>
            <div className="h-3/4 overflow-y-scroll px-6 py-4 mb-2 bg-gray-800 rounded-md">
                {messages.map((message, i) => (
                    <Message 
                        key={i} 
                        time={message[3]}
                        username={message[1] == chat.username ? "Me" : message[1]} 
                        text={message[2]} 
                    />
                ))}
            </div>
            <form onSubmit={handleSubmit}>
                <div className="flex flex-row">
                    <textarea 
                        className="flex-grow m-2 py-2 px-4 mr-1 rounded-full border border-gray-300 bg-gray-200 outline-none resize-none"
                        rows="1"
                        placeholder="Place your message here..."
                        value={thisText}
                        onChange={handleChange}
                    />
                    <button 
                        type="submit" 
                        className="bg-purple-500 text-white active:bg-purple-600 font-bold uppercase text-sm px-6 py-3 rounded-full shadow-inner outline-none focus:outline-none mr-1 mb-1"
                        disabled={submitting}
                    >
                        {submitting ? "Sending" : "Send"}
                    </button>
                </div>
            </form>
        </div>
    )
}

export default ChatForm

Look at our getMessages() function. Because we’re fetching messages every three seconds, we need a mechanism to only load messages when there is a new one. We do this by finding the length of our message collection, and comparing it with the previous length. Once the new length is greater than the previous length, we set our message collection and the new length in our state.

If you look at our last useEffect hook, you will see that we’re using the JavaScript function setInterval(). which accepts a function and a time period (in milliseconds) as parameters. We call the clearInterval() function afterwards to stop this function when the component unmounts or it will go on forever!

There’s one more thing we need to do in order for this chat room to work properly. You will see a Message component being called that takes three props (plus key). This component will house each message in the conversation. We need to define this component, so we’ll make a Message.js file in our Components/ folder.

import React from 'react'

const Message = ({text, time, username}) => (
    <div className="flex items-start mb-4 py-2">
        <img 
            src="https://picsum.photos/id/237/200/300.jpg" 
            className="w-10 h-10 rounded-full mr-3" 
        />
        <div className="flex-1 overflow-hidden">
            <div>
                <span className="text-2xl font-semibold text-blue-200 mr-4">{username}</span>
                <span className="text-gray-300 text-xs">{time}</span>
            </div>
            <p className="text-lg text-white leading-normal">{text}</p>
        </div>
    </div>
)

export default Message

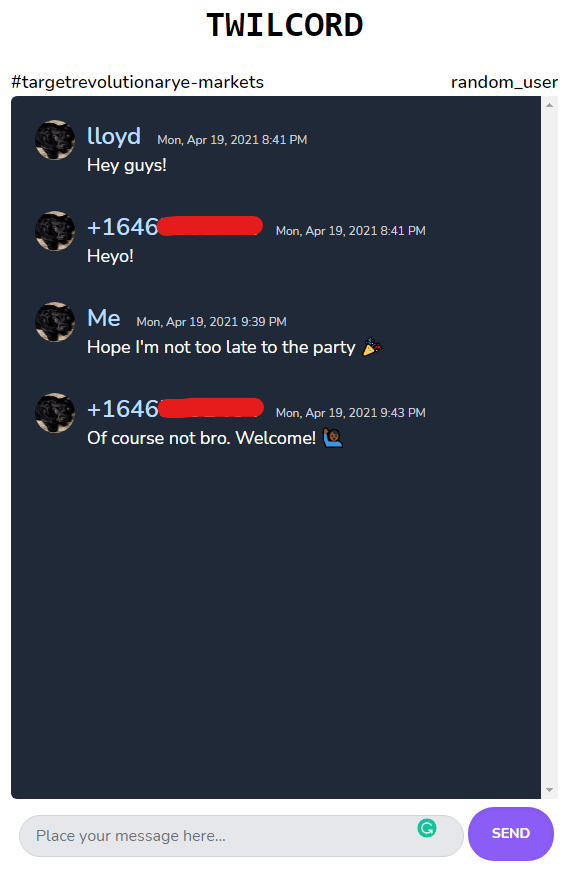
Amazing! Now we’re ready to try “Twilcord” out! Make sure that your server is running, run npm run dev, and go to http://localhost:8000. You’ll be asked to sign up again. Let’s start fresh, so if there’s a room already there, don’t check it. Enter a username, and once you’re in the room, send a message.

Open a new tab, go to http://localhost:8000, and check the room that you see. This time, we’ll enter our phone number so that we can send messages via text message. With your phone number that you added to the Twilio Dashboard, send a text message to your Twilio number (the one that you got from Twilio). You will now see a message from your own phone number in “Twilcord”!

Twilcord phone screenshot

Conclusion

Phew! That was a lot of work, but you did it. You made a chat room app with Laravel Breeze, React, and Twilio’s new Conversations API! It is good to learn this API now because soon it will replace the Programmable Chat API. In this tutorial we learned how to create a Laravel Breeze app with Inertia.js and React.js. This should still be useful information even if you decide to use the default Vue scaffolding instead. I believe that soon, we’ll be able to simply choose between React, Vue, and maybe even Svelte. I believe that building monoliths with Laravel and Inertia will be the hot new trend once this happens.

In a later article, we’ll discuss how we can build a real-time chat room app using the webhooks provided by Twilio’s Conversations API. We’ll also discuss a better way to route and authenticate our application, and how to send errors to our frontend the Inertia way. Until then, enjoy your new creation!

Lloyd Miller is a freelance full-stack web developer based in New York. He enjoys creating customer-facing products with Laravel, Gatsby, Next.js and Nuxt.js, and documenting his journey through blog posts at https://lloydmiller.dev