Build a Soccer Stats WhatsApp Chatbot with Python, Flask and Twilio
Time to read: 10 minutes
March 30, 2020
Written by

There isn’t much live sport to watch at the moment which gives us the perfect opportunity to analyze historical data about the sport instead! In this tutorial I’m going to show you how to build a basic chatbot for WhatsApp using the Twilio API for WhatsApp and the Flask framework for Python.
The chatbot will allow users to get information about soccer teams and match statistics. Here’s an example showing how it works:
Tutorial requirements
To follow this tutorial you will need the following:
- Python 3.6 or newer. You can download an installer from python.org.
- Flask. We will use this web framework to build an application that responds to incoming WhatsApp messages.
- ngrok. We will use this free utility to connect our Flask application running on our local system to a public URL that Twilio can connect to from the Internet. Installation instructions for your operating system can be found here.
- A smartphone with an active phone number and WhatsApp installed.
- A Twilio account. If you are a new user, you can create a free account. You can review the features and limitations of a free Twilio account. When you sign up, ensure you use the same phone number as the one you will use to test this application.
Configure the Twilio WhatsApp sandbox
Twilio provides a WhatsApp sandbox allowing you to easily develop and test your application. Once you are happy with your application and want to put it into production, you can request access for your Twilio phone number, which requires approval by WhatsApp.
Let’s start by connecting your smartphone to the sandbox. From your Twilio Console, open the Dock by clicking on the three dots on the left-hand side of the page. From there, select Programmable SMS and then click on WhatsApp on the left-hand menu. You should now see the sandbox phone number assigned to your account as below.
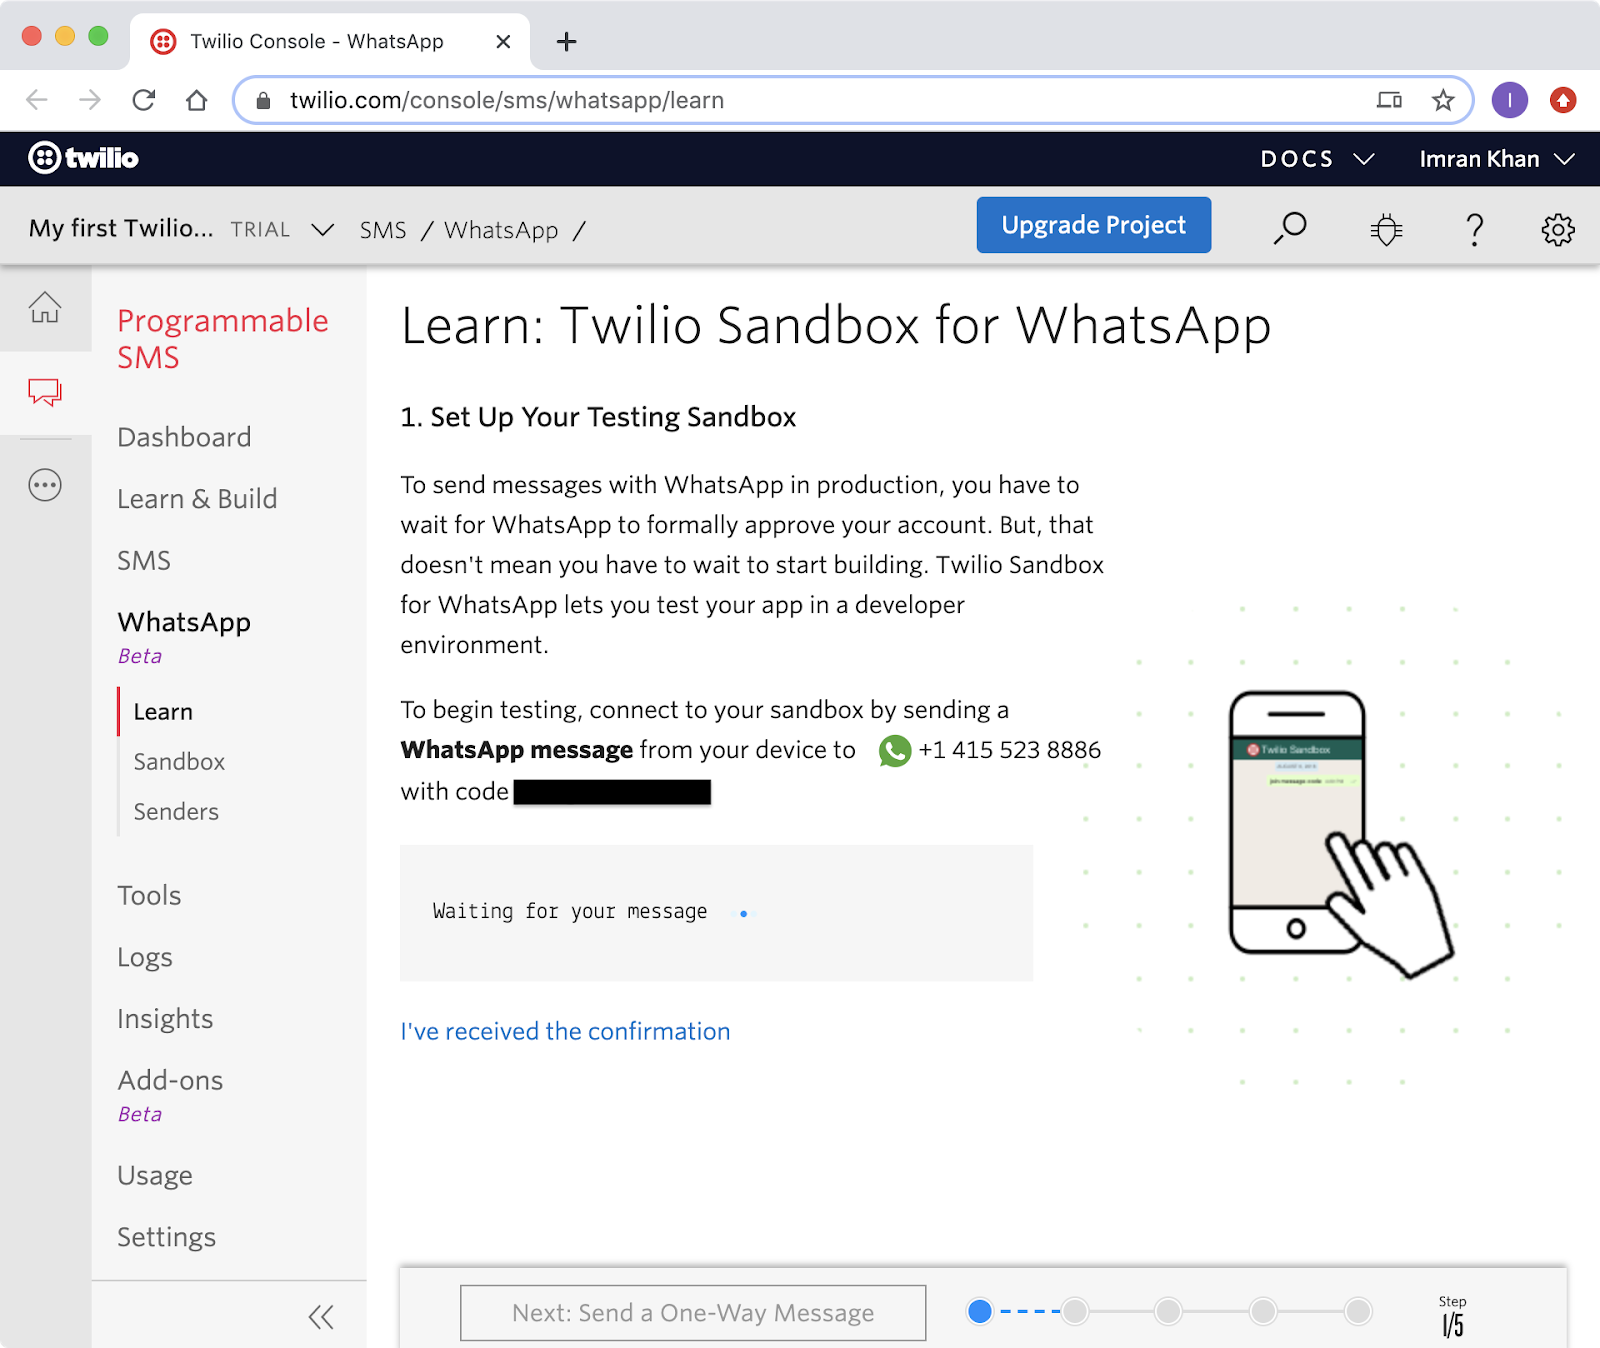
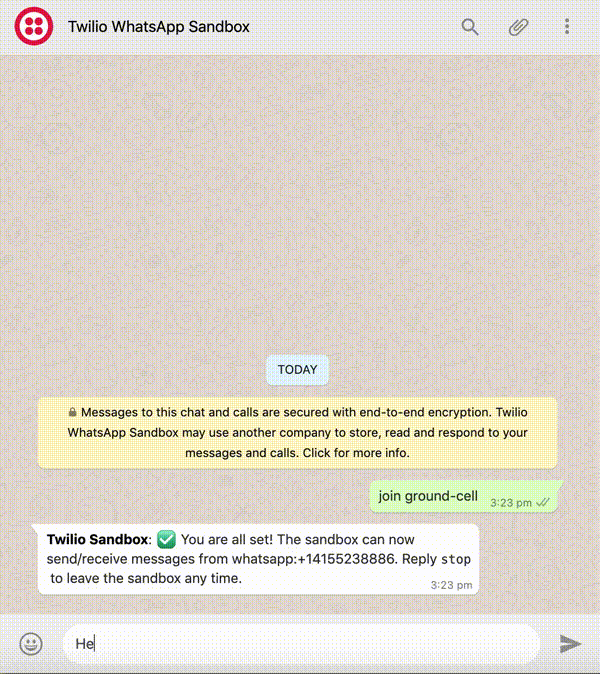
You will also see a code that starts with join followed by two random words. To enable the WhatsApp sandbox for your smartphone, send a WhatsApp message with this code to the number assigned to your account. After a moment, you should receive a reply from Twilio confirming your mobile number is connected and can start sending and receiving messages.
You can also connect additional phone numbers to this sandbox by repeating the same process.
Creating a Python virtual environment
We are now going to start developing our chatbot application. We will create a separate directory for this project and create a virtual environment using Python’s inbuilt venv module. We will then install the packages we require inside of it.
If you are using a Unix or Mac OS system, open a terminal and enter the following commands to do the tasks described above:
Seeing (soccer-bot-venv) prefixed at the start of every command in your terminal confirms you are inside of the virtual environment.
For those of you following the tutorial on Windows, enter the following commands in a command prompt window:
The last command uses pip, the Python package installer, to install the three packages that we are going to use in this project, which are:
- The Flask framework, to create the web application
- The Twilio Python Helper library, to work with the Twilio APIs
- The pandas package, to read in and analyze the data source
For your reference, at the time this tutorial was released these were the versions of the above packages and their dependencies tested:
Create a Flask chatbot service
Now that we have set up our development environment, we can start building our chatbot.
For this tutorial the chatbot will be very simple. It will look for particular keywords in the messages sent by the user and send back an appropriate response.
We will be using a data source which provides information about historical English Premier League soccer matches including team names, scores, shots, yellow/red cards and many other statistics. We want the user to ask our chatbot questions such as “how many goals did Arsenal score?”, “tell me about the Chelsea vs Everton match” etc. We will program our chatbot to pick out words such as “goals” and “matches” so that our data source can be queried accordingly.
Webhook
The Twilio API for WhatsApp uses webhooks in order to interact with users. A webhook delivers data (in our application this includes the incoming message). Our application will configure a URL, also referred to as an endpoint, so that Twilio can communicate with this webhook.
The Flask framework makes it easy to define a webhook. Let’s create a file called app.py in the current directory and start writing some code in this file. I will go through and explain each section of the code first, then the final script will be available at the end for you to copy if required.
What we’ve done here is instantiated our Flask app and defined a route at the /bot endpoint which supports POST requests. Directly under that, we’ve written a bot() function (can be named anything) which will process the message sent by the user via WhatsApp and return a response.
More information on the Flask framework can be found in the quick start section of its documentation which should bring you up to speed quickly.
Messages and responses
How does our application recognize the message sent by the user? It’s included in the payload of the POST request with a key of ’Body’. In Flask we can access it through the request object:
I’ve converted the value to lowercase and stripped out any whitespace to make the comparison to our list of keywords easier later on.
Once we have the user’s message and applied our logic to formulate a response, we need to send it back to them. Twilio expects this response to be written in a particular format known as TwiML or Twilio Markup Language. This is an XML-based language but we’re not required to create XML directly. Instead Twilio provides a Python library to make it easy to create our response in the right format. Here’s how it works:
The MessagingResponse class creates the root <Response> XML element. The message() method of this class then creates a <Message> element and the body() method creates a <Body> element enclosing the value shown. The final XML document that is generated looks like this:
Data source
Our source of English Premier League soccer matches and statistics is this website: https://www.football-data.co.uk/englandm.php. Here we can find links to comma-separated files (CSVs) containing the data we need. We are going to use pandas to read in this data directly from a URL.
Each row in the dataset contains information about a single match that occurred in a particular season, including the names of the home and away team, final result, and match statistics such as number of shots, corners, offsides, yellow/red cards etc. for each team.
The site also provides a data dictionary explaining what all the columns mean under Notes.txt.
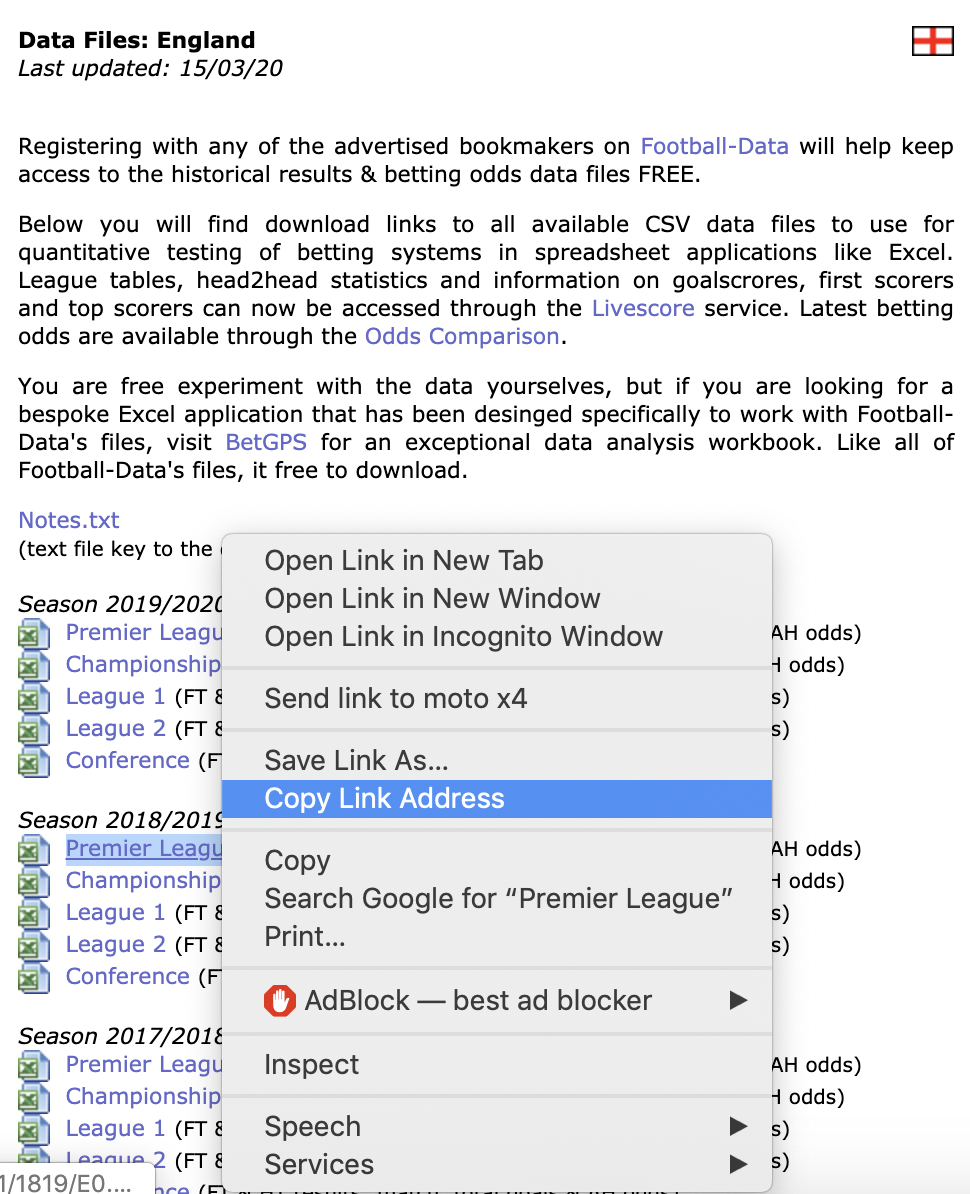
Under the “Season 2018/19” heading, right-click on “Premier League” and select “Copy Link Address” as below:
After we import pandas we can use the read_csv function to read in the data from this URL.
Chatbot logic
Since we’ve made the user’s incoming message lower-case we need to do the same to our data. The data dictionary tells us that the “HomeTeam” and “AwayTeam” columns contain the team names. We are going to use pandas string methods to convert these columns to lower-case. By assigning each column to the same name, we replace the original contents:
All of our user questions will be about a particular team. That means we need a way to extract that team from the question. There are 20 teams in the Premier League which we can get by considering all unique values in the “HomeTeam” column:
all_teams is a list which looks like this:
We are going to use regular expressions to search the user’s question for any of these strings. We can use Python’s standard library re module to do this:
The team variable will be a list of team names mentioned in the user’s question. It could be empty if the question matches none of the possible teams in all_teams.
We can use the team name to query our dataframe to obtain the relevant statistic according to the user’s question. Before we do that however, it’s a good idea for our chatbot to include a welcome message that introduces the bot and states what questions it is able to answer. If the user’s message contains the string “hello” anywhere, we will reply with this message. Inside of the bot() function we can include the following:
You can see that the reply variable contains our welcome message and is a multi-line string. This is passed to msg.body() and is returned as a response.
The rest of the chatbot logic will be implemented as a group of conditional statements that will account for all possible user inputs. We will aim to answer 4 types of questions:
- Number of matches a team has played - we will look for the “matches” string in the user’s question.
- Number of goals a team has scored (which could be broken down into home/away) - we will look for the “goals” string in the question (also “home” and “away” or neither).
- Number of shots a team has had or conceded - we will look for the “shots” keyword (and “concede” if the question is about shots conceded).
- The result and other statistics from a particular match - we will look for mentions of two team names.
Let’s go ahead and implement this logic. Firstly, every user question must mention at least one team name. We can know if a question doesn’t do so by checking the length of the team list:
The next conditional block concerns how many matches the team played. In this case the team variable will contain only one item which we can access with team[0]. A team can play at home or away so we need to filter on both conditions using the | operator. Finally, the number of matches is simply the length of this dataframe accessed via len().
We create the reply using f-string formatting. The team name is made more presentable using the title() method which makes the first letter of every word upper-case e.g. “man city” becomes “Man City”.
Next, let’s deal with the number of goals a team has scored. We include a nested conditional statement to account for questions asking about goals scored at home, away or both combined. “FTHG” and “FTAG” are the columns in the dataframe containing the number of home and away goals respectively. We use the pandas sum() aggregation method to get the total of the column after applying the filter on team name.
Note that the “away” string is considered first in the if statement since the user’s question could be something like “how many goals have Man City scored away from home?”. This string contains both “away” and “home” but we’re only interested in “away” in this case. If the question contains either string, we simply add up both totals for home and away.
Then, we consider questions about shots. This also contains a nested conditional statement to account for questions about conceding rather than attaining. The relevant columns now are “HS” and “AS” with the home and away team filters switching if the question is about conceding.
The final type of question concerns the result of a particular match. This response is triggered when the team list has exactly two elements. After applying the filter which will reduce the dataframe to one row, I use the pandas iloc method to convert it into a pandas Series object. This allows access to row values in the same way as a Python dictionary. The reply is outputted as a multi-line string. You can also see I’ve added asterisks around the first line which will make the text bold. This is an example of WhatsApp message formatting.
Finally, we need to account for user questions that don’t fit into any of our conditions using a closing else clause.
Everything together
We’ve seen all the aspects of our chatbot implementation and we are now ready to put it all together in our app.py file. Here is the final script and I’ve added some comments to make it easier to follow along:
One thing to note is that we’ve included the return str(resp) statement under the “hello” if statement since we want to exit the function at that point and not check the remaining conditional statements.
Running the chatbot
We’re now in a position to run our chatbot! Start the chatbot by running flask run in your terminal, ensuring your Python virtual environment is still activated. You should see something like this:
The application is only running locally on your computer for now. We can use ngrok to make it reachable from the Internet. In a new terminal window, run ngrok http 5000 where 5000 corresponds to the default port number for Flask applications. In your terminal you should see something like this:
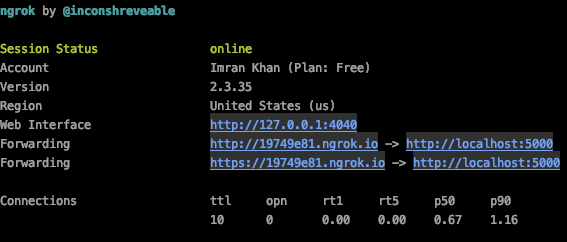
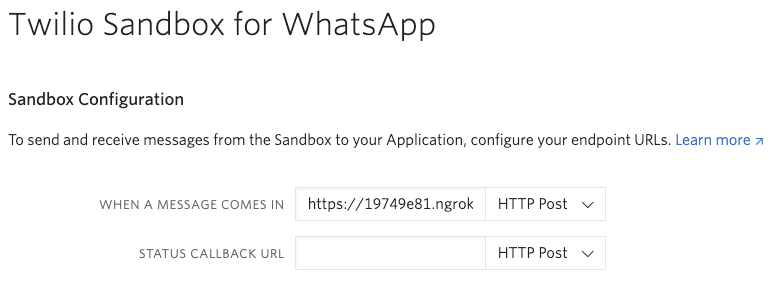
The URLs after “Forwarding” are what ngrok uses to redirect requests into our application. This URL appended with /bot becomes the URL of our webhook which is what Twilio needs to know about. In my case this URL would be https://19749e81.ngrok.io/bot. The first part of the ngrok URL is different every time.
Let’s go back to the Twilio Sandbox for WhatsApp page on the Twilio Console and paste this URL on the “WHEN A MESSAGE COMES IN” field. Don’t forget to append /bot at the end of the ngrok URL and to click “Save” at the bottom of the page.
Let’s try our chatbot out by sending messages to it from our smartphone. We can ask it different questions to ensure our application logic works as intended. Here’s an example session I had with the chatbot:

Conclusion
In this tutorial we have created a simple but fairly expressive chatbot that returns information about soccer matches and statistics based on keywords. This was implemented using Flask, pandas and the Twilio API for WhatsApp. Our data was obtained from a single CSV file and there is certainly scope to extend the capabilities of our chatbot further.
You could include questions about many of the other columns we didn’t use. You could store state so the chatbot remembers what teams the user has mentioned previously which would make the conversation more natural. To make the chatbot more powerful, you could combine various CSV’s available at the same site bringing in data on more seasons and more leagues around the world.
All the code for this tutorial can be found on GitHub here.
I hope you learnt something from this tutorial and are inspired to build some chatbots of your own!
Imran Khan
https://imrankhan17.github.io/

Related Resources
Twilio Docs
From APIs to SDKs to sample apps
API reference documentation, SDKs, helper libraries, quickstarts, and tutorials for your language and platform.
Resource Center
The latest ebooks, industry reports, and webinars
Learn from customer engagement experts to improve your own communication.
Ahoy
Twilio's developer community hub
Best practices, code samples, and inspiration to build communications and digital engagement experiences.