How to Build a TwilioQuest Extension and Add Your Own Content to the Game
Time to read: 12 minutes
August 18, 2021
Written by
Reviewed by

TwilioQuest enthusiasts, game developers, educators...rejoice! You can now build your own TwilioQuest (TQ) extensions. You can design new levels, write your own code challenges, and contribute to the TwilioQuest ecosystem.
In this article, you’ll learn the mechanics of developing a TwilioQuest extension. You’ll build a VR Training mission, whose goal is to teach the player how to send an SMS message with Twilio. As part of building the training mission, you’ll:
- Plan out learning objectives for the mission
- Design a level map used Tiled
- Validate players’ responses to each objective using JavaScript and Node.js
Prerequisites
To start, make sure you have the following prerequisites:
- Node.js installed on your machine, along with a package manager like
npmoryarn - A free Twilio account (sign up with this link and get $10 in free credit when you upgrade your account)
- A GitHub account
Set up your development environment
Before taking any steps inside the game, you’ll need to create a folder on your computer for all of your TQ extensions and download the template files you’ll need to get started.
Create your extensions folder
From your terminal window or command prompt, navigate to your preferred location and then run the following commands:
In your browser, navigate to the TwilioQuest Extension Template and follow the prompts to create your own repository from this template.
Once that’s done, head back to your terminal and run the following commands, taking care to replace the placeholders with your information:
This will create a new directory with all the basic files you need for your own TwilioQuest extension. Starting this way is not a requirement, but the template contains all of the imagery and tile information for the level map, which you’ll need to design your own map.
The next step is to navigate to the levels folder inside your new template folder and duplicate the example level directory that’s inside:
This will create a new level for you to edit and make your own. The next two sections of this tutorial will walk you through setting up TwilioQuest and installing your new extension.
Launch the game
The first thing you’ll need to do is download and install TwilioQuest. Once the game is installed, open the app. At the time of this publication, TQ extensions are only available when previewing the upcoming v3.2 release, which should be coming later in 2021. To load the preview version of v3.2, look toward the bottom of the launcher after you open the app:
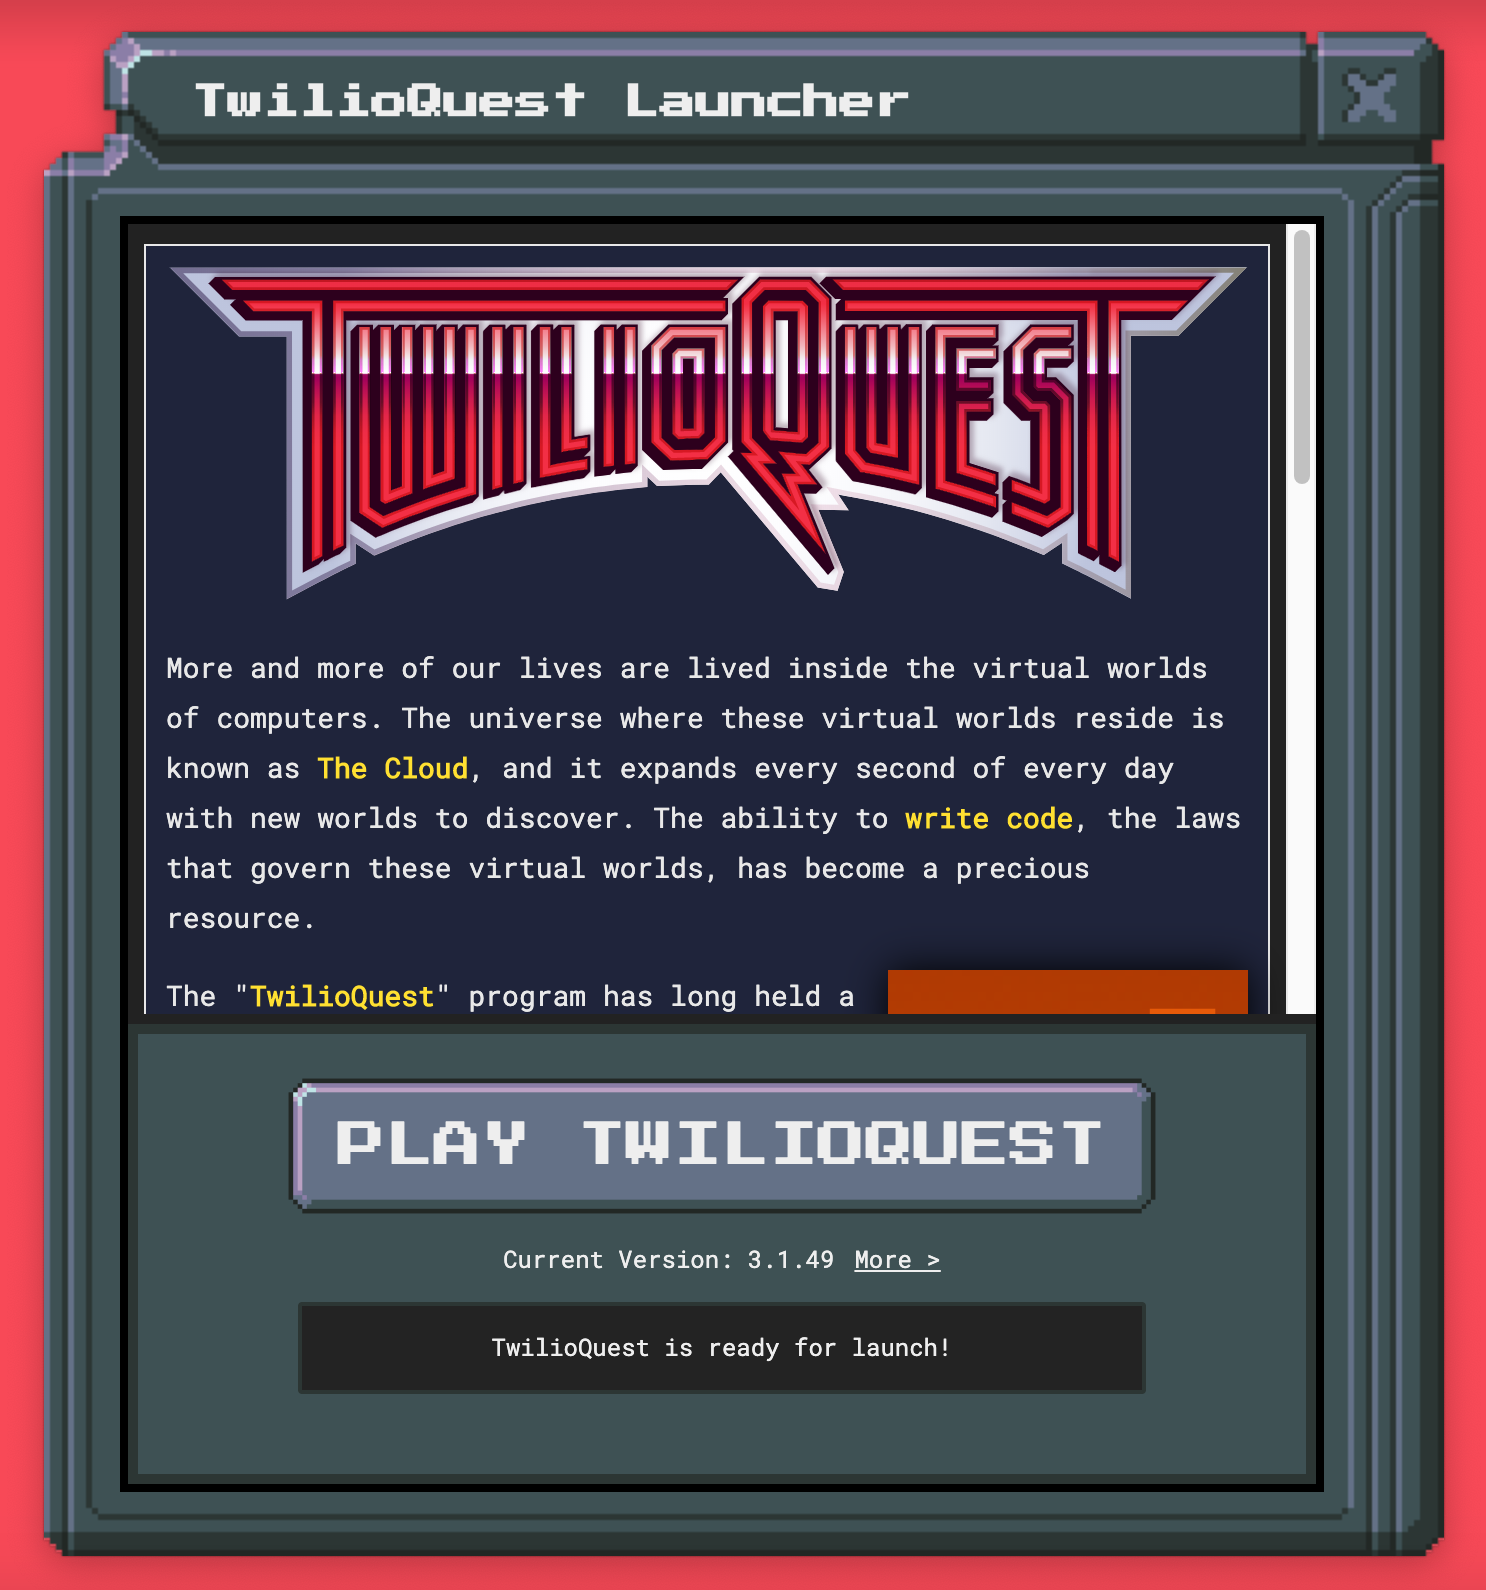
Click on the button that says More > after the current version number, then select TQ 3.2 Preview from the dropdown. After that, the app may need to spend a couple of moments downloading and extracting the game data. Once it’s ready, it will say “TwilioQuest is ready for launch!” at the bottom, and then you can click the PLAY TWILIOQUEST button.
Enable extensions in TwilioQuest
After clicking the PLAY TWILIOQUEST button you’ll see a loading screen that, after a few moments, will prompt you to press the spacebar. Pressing the spacebar will take you into the game. If it’s your first time downloading and playing TwilioQuest, you’ll first be presented with a prologue and a short mission to complete. While you can enable extensions prior to completing the intro mission, you won’t be able to get to the Fog Owl (and thus, test out your extension) until you’ve finished it.
Along the top of the game screen, in the center, you will see four icons. Click on the third icon from the left, or press the number 3 on your keyboard, to open the Settings menu.

Once the Settings menu is opened, look along the left-hand side for the Extensions option. Select this option to open the extensions settings panel.
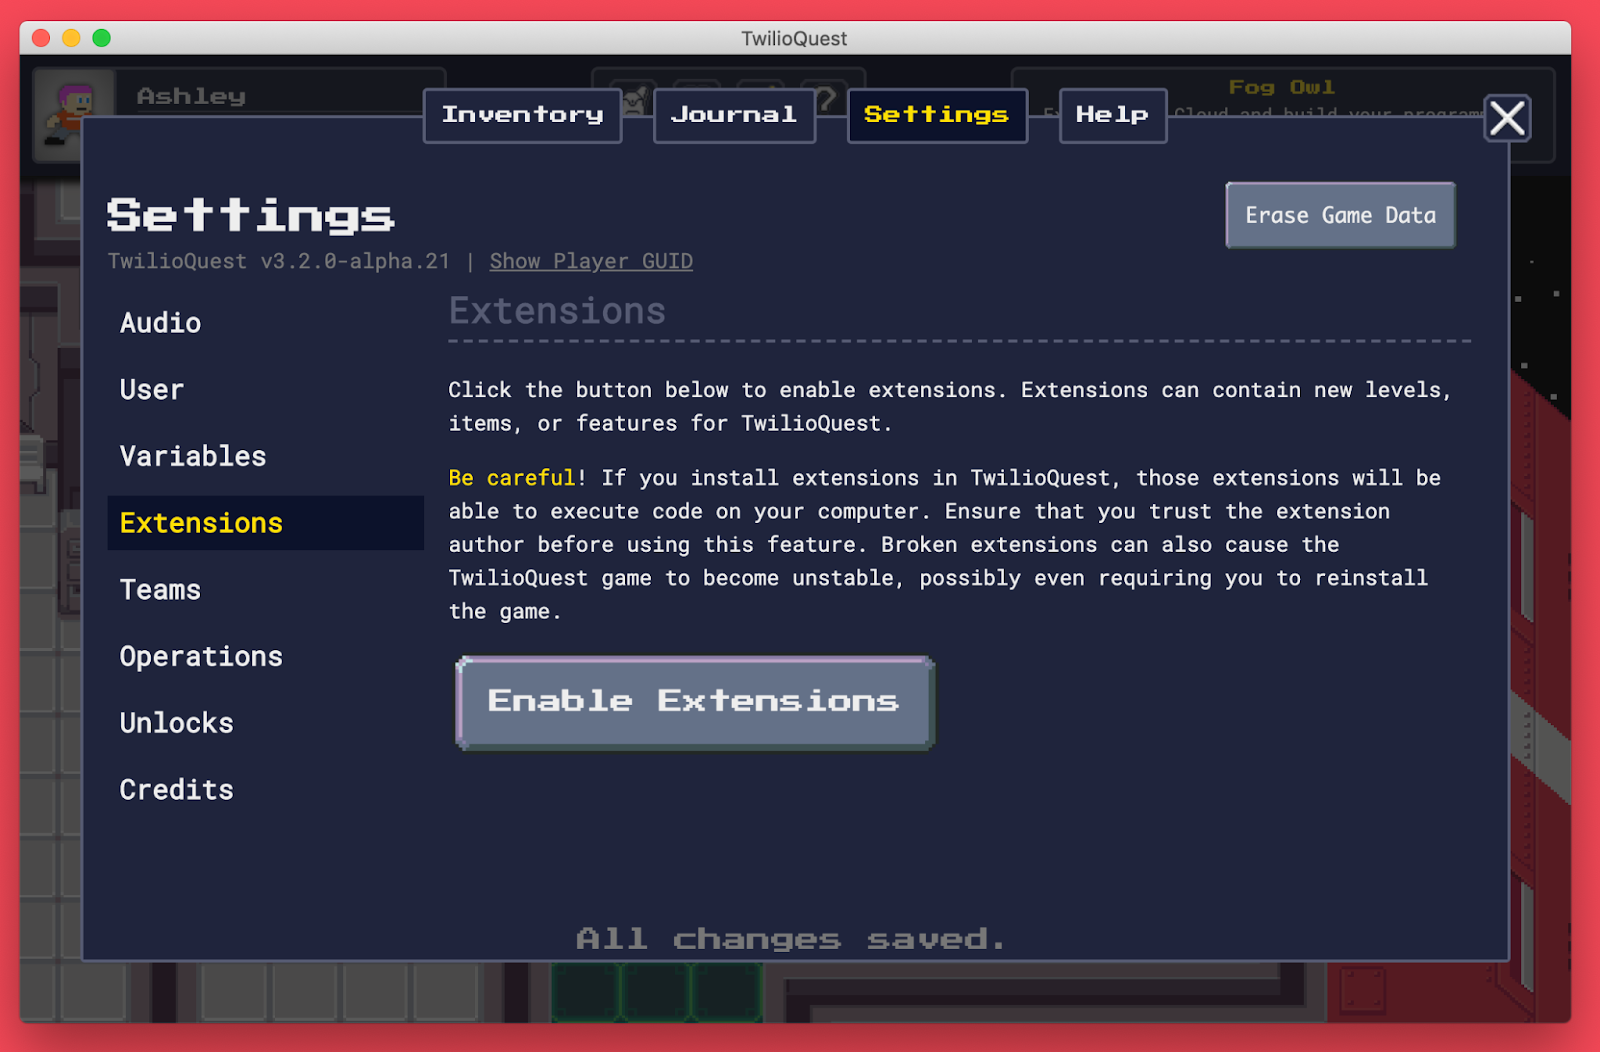
Click the button that says Enable Extensions.
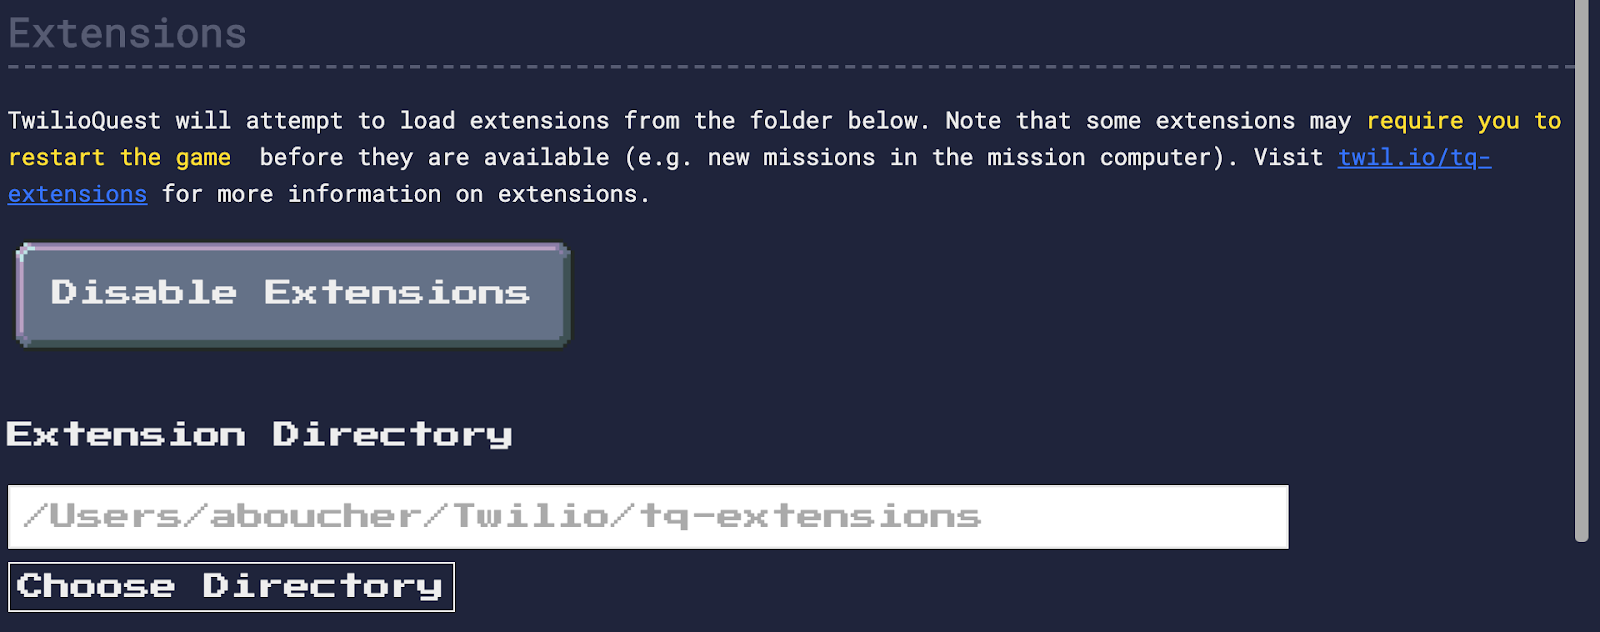
After enabling extensions, you’ll see a field for the Extension Directory with a button to Choose Directory. Click this button and find and select the folder you created earlier: tq-extensions.
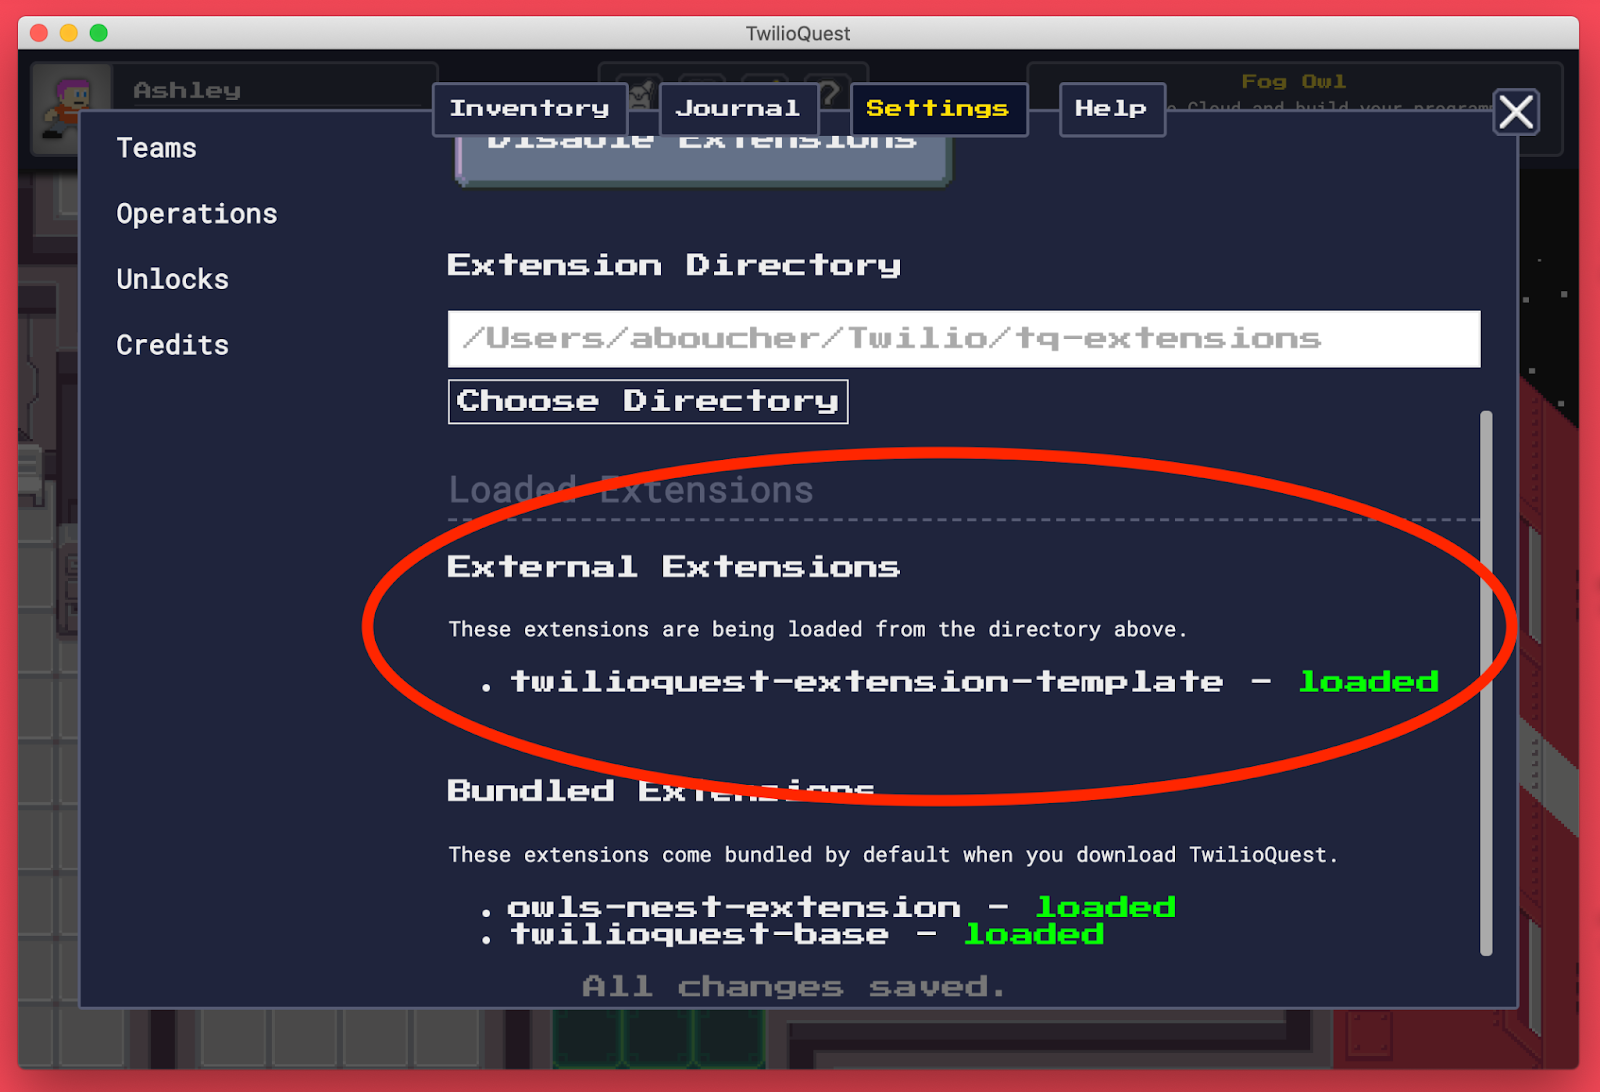
When you choose a directory, your changes will be automatically saved. After setting the extensions directory, restart TwilioQuest. When you launch it again, be sure to select the TQ 3.2 Preview version just like you did the first time you launched it. You’ll need to make this selection every time you restart TwilioQuest.
Once you’ve restarted, navigate back to the settings menu in TQ. You should now be able to see that your extension template has been loaded:
Organize your TwilioQuest VR mission
Now that TwilioQuest can find your extension, it’s time to start customizing and building out your level.
Plan out the level’s learning objectives
A TwilioQuest VR training mission requires players to complete objectives in order to complete the mission. An objective is where you will add the educational content for the mission. You can have multiple objectives per mission.
Planning out what learning objectives players should master on your mission ahead of time will inform how you design your map and give your level a cohesive feel.
In this tutorial, the level you’re building will give the player two objectives:
- First, the player must gather their account credentials (their Twilio Account SID and Twilio Auth Token).
- Second, the player must use these credentials to send an SMS. In order to get to the second objective, they must first pass the first objective.
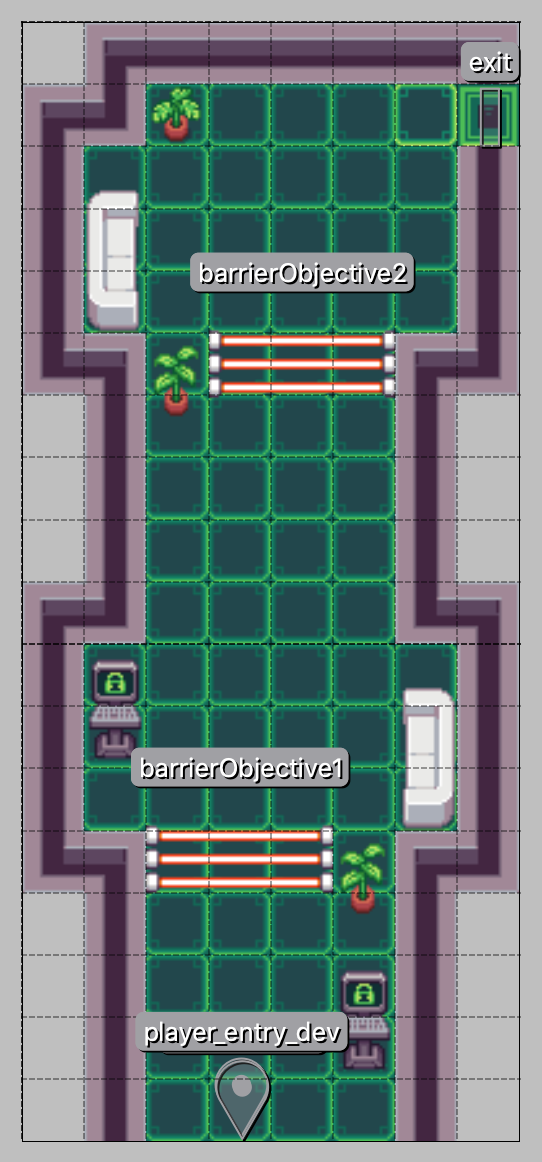
The player’s path in the game will be blocked by laser barriers. The first laser barrier will open when the player completes the first objective. The second laser barrier will open when the player completes the second objective. In later steps, you will learn how to validate the player’s responses to the objectives in order to determine if they’ve successfully completed them.
The following image depicts the level map for this project, showing the player’s entry and exit points, with both laser barriers closed. You’ll learn how to access this map in an upcoming section.
Customize the level metadata
Now that you’ve planned out your level, you can start to make changes to the code.
Open the file called my_first_mission/level.json. This is where the basic descriptive data of your level is stored.
Not all of the properties in this template .json file needed to be edited. Amend your file to reflect the highlighted lines below:
The changes you made in this .json file were to update the title and description of your level, along with updating the placeholder objective names to the correct names: get_credentials and send_sms.
Because you changed the objective names in the level.json file, you must also change their names in your file structure.
If you look in the my_vr_mission/objectives folder, you will see folders called example_objective and example_objective2:
- Change the name of the example_objective directory to get_credentials.
- Change the name of example_objective2 to send_sms.
Design and validate your level’s objectives
Your level has two objectives: get_credentials and send_sms. The data for each objective is stored in its own folder.
Each objective folder should have the following files:
- objective.json
- description.md
- walkthrough.md
- validator.js
In this section, you’ll start with the first objective: get_credentials.
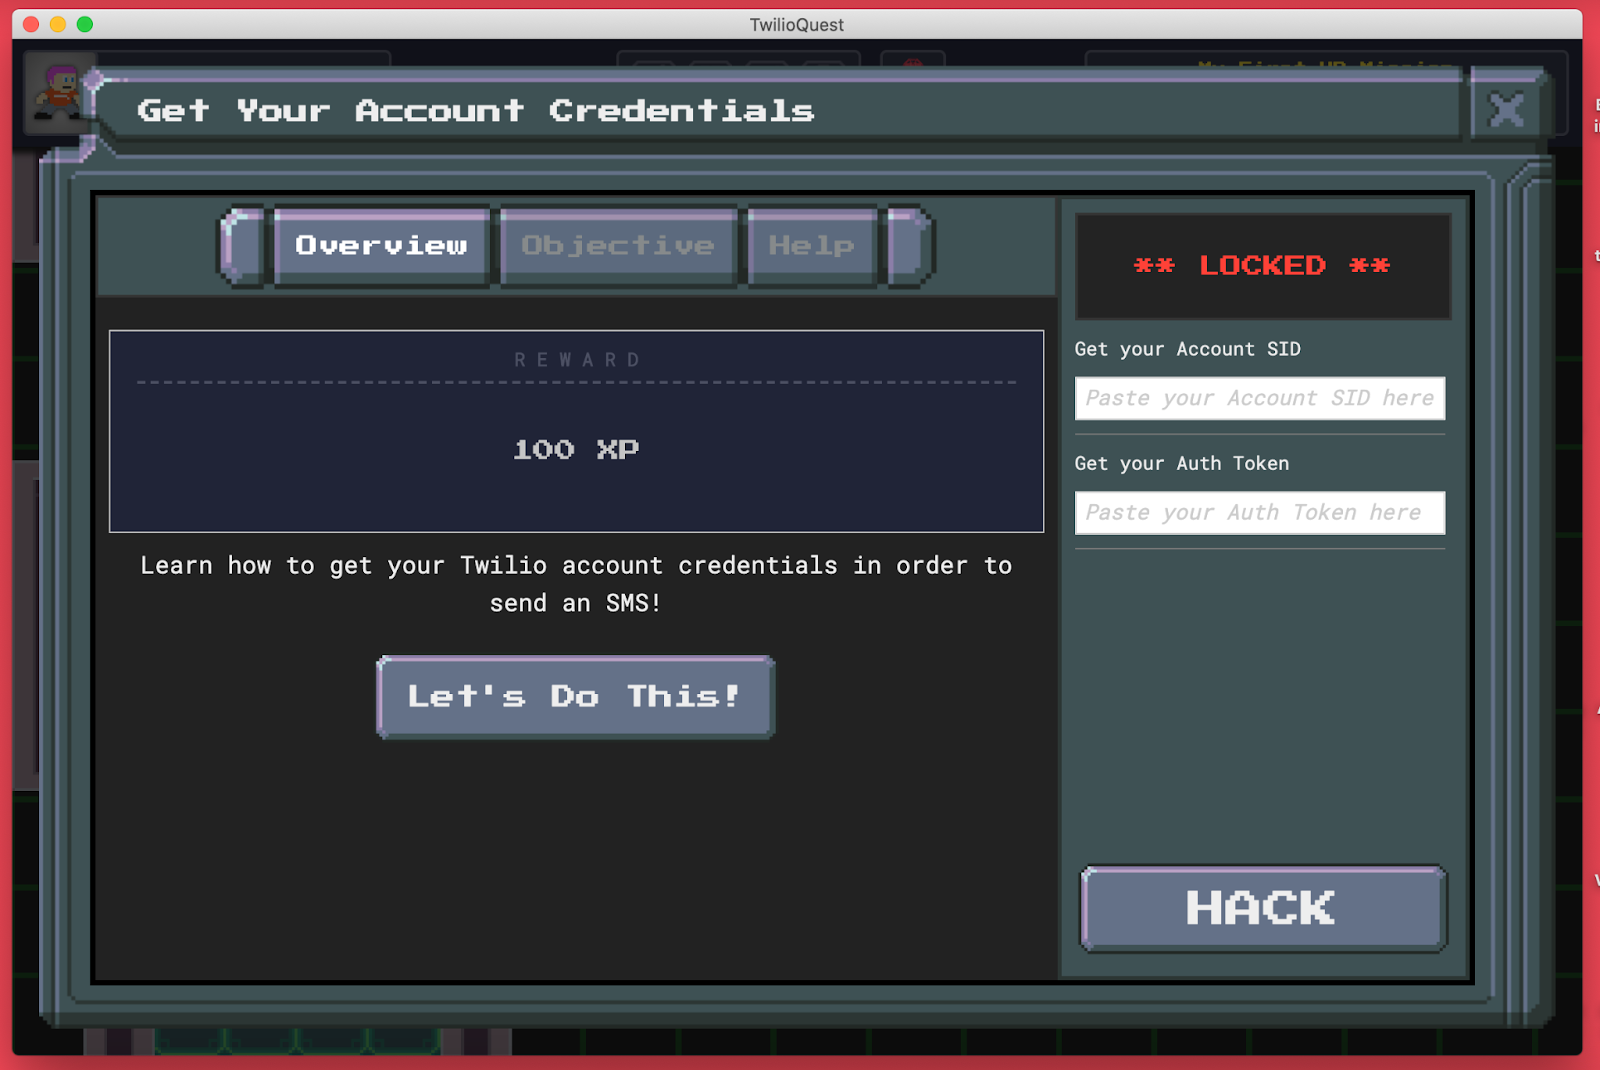
When a player opens an objective in TwilioQuest, they will see a modal with three tabs along the top: Overview, Objective, and Help. The contents of each of these tabs is generated from the files listed above. I’ll walk you through each of them now.
The objective.json file and the Overview tab
This is the first screen that the player will see. This screen shows the objective’s title, the XP reward that the player will get for completing the objective, and a brief description of the objective’s purpose. On the right hand side of the modal, you can see the two tasks/questions that are part of this objective: Get your Account SID and Get your Auth Token. This part of the modal will persist regardless of what tab the player is on.
All of this data is stored in the objective.json file.
Open the my_vr_mission/objectives/get_credentials/objective.json file in your text editor. Delete any contents inside and replace them with the following:
In the JSON above, you will see the top-level property keys: title, description, validation_fields, and rewards.
The title, description, and rewards properties correspond to the title, description, and rewards of the objective that the player can see on the Overview tab.
The validation_fields property holds an array of two objects: each one corresponding to one of the questions shown on the right side of the objective’s modal. You can add additional questions to this array, or even leave it empty. In addition to text, or string based, questions, you can also create questions with field type prompt, textarea, boolean, or any other HTML input type.
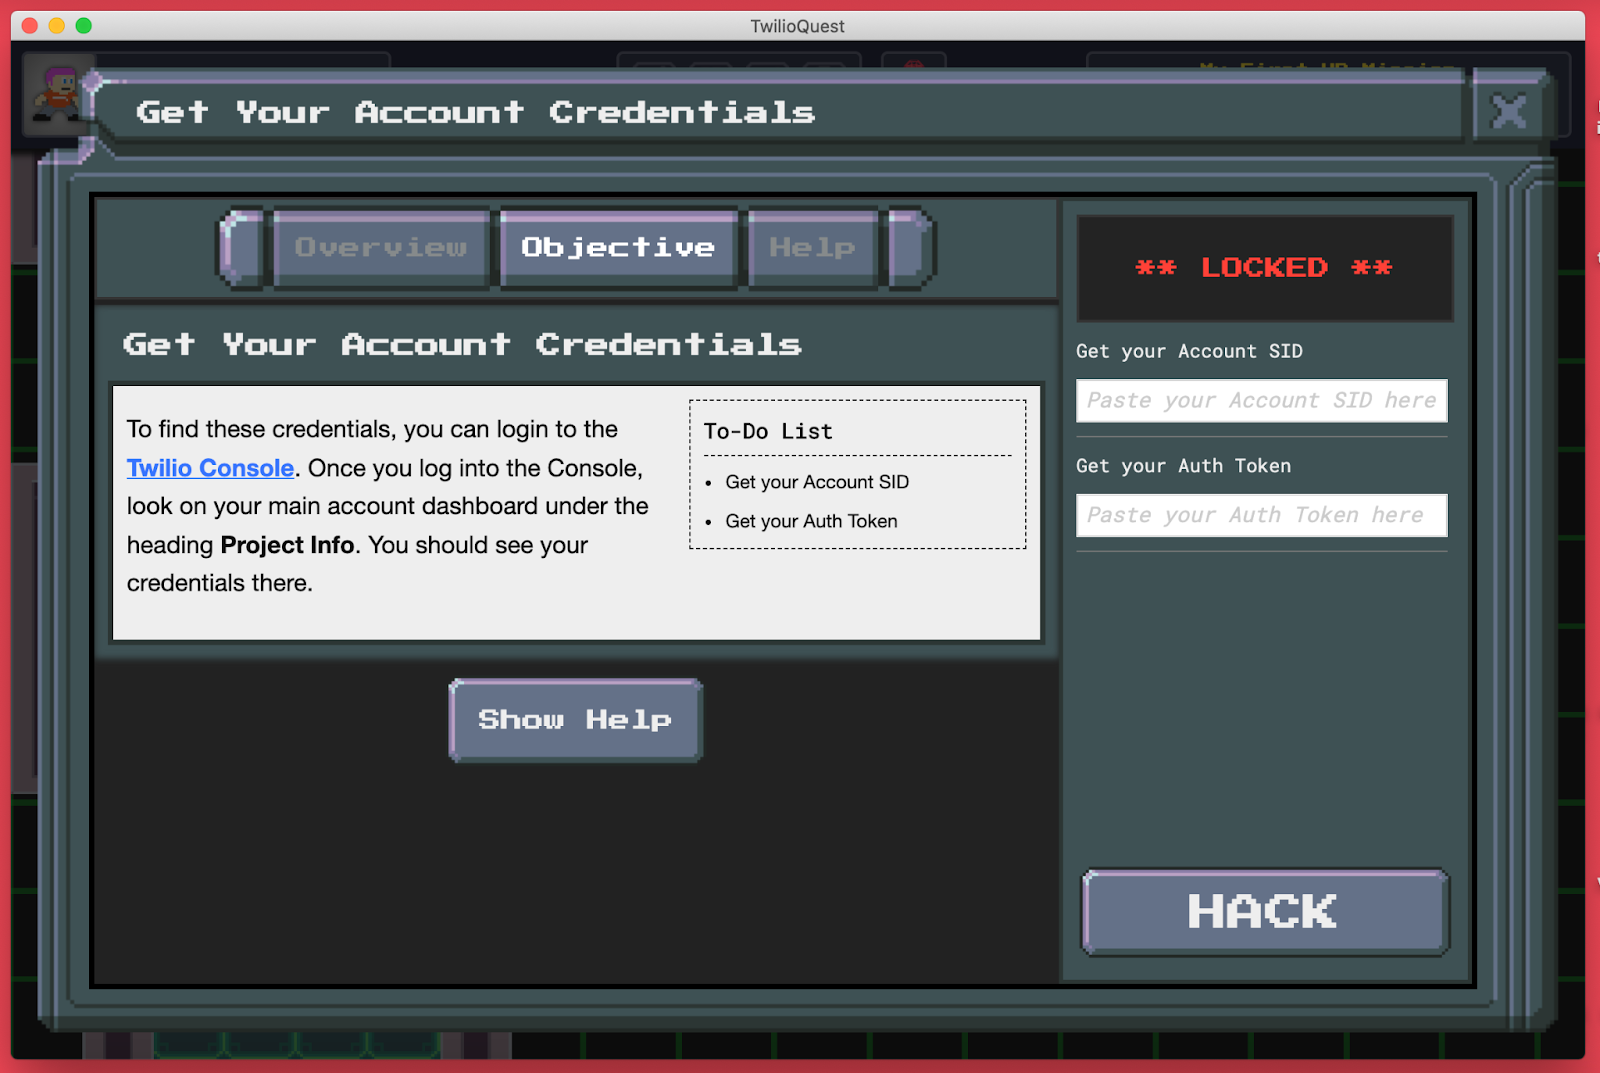
The description.md file and the Objective tab
Save and close the objective.json file. Open the description.md file, found in the same folder as the objective.json file you were just working with. This file is the place to describe to the player what you want them to do as part of this objective.
Delete any contents inside of this file and replace it with the following markdown:
The contents of this file will be rendered on the Objective tab of the objective’s modal:
The walkthrough.md file and the Help tab
The walkthrough.md file is where you can add detailed instructions or helpful information that would benefit a player who is struggling to complete the objective. This content will be rendered on the Help tab. You won’t edit the walkthrough.md file for this tutorial. Feel free to leave whatever placeholder content is inside.
Validate the get_credentials objective
Open the validator.js file in the get_credentials objective folder. Delete all the contents inside.
Every validator.js file is a Node.js module that can consume other Node.js modules if needed. Each validator.js file should export one function that receives a helper object. This helper object has important information from the game’s UI, including the responses to the objective’s question(s).
The helper object also has two callback functions: success() and fail(). Your validation code will call the fail() method as soon as it’s determined that the player missed something. The success() callback will only be called at the very end of the validation code. Basically, the code should only get to the success() callback if the player hasn’t failed.
That means, when you’re designing your validation code, you should check for all possible failures first. I’ll walk through this concept as you build out the validator.js file for this objective.
First, add the following code to validator.js:
This code is the shell for your exported validator function.
Inside the validator function, add the highlighted line:
The highlighted line in the code above is accessing the player’s responses to the two questions in the objective. If you take a look at the objective’s objective.json file again, you’ll see that the variable names used here match the names assigned to each question in the validation_fields array.
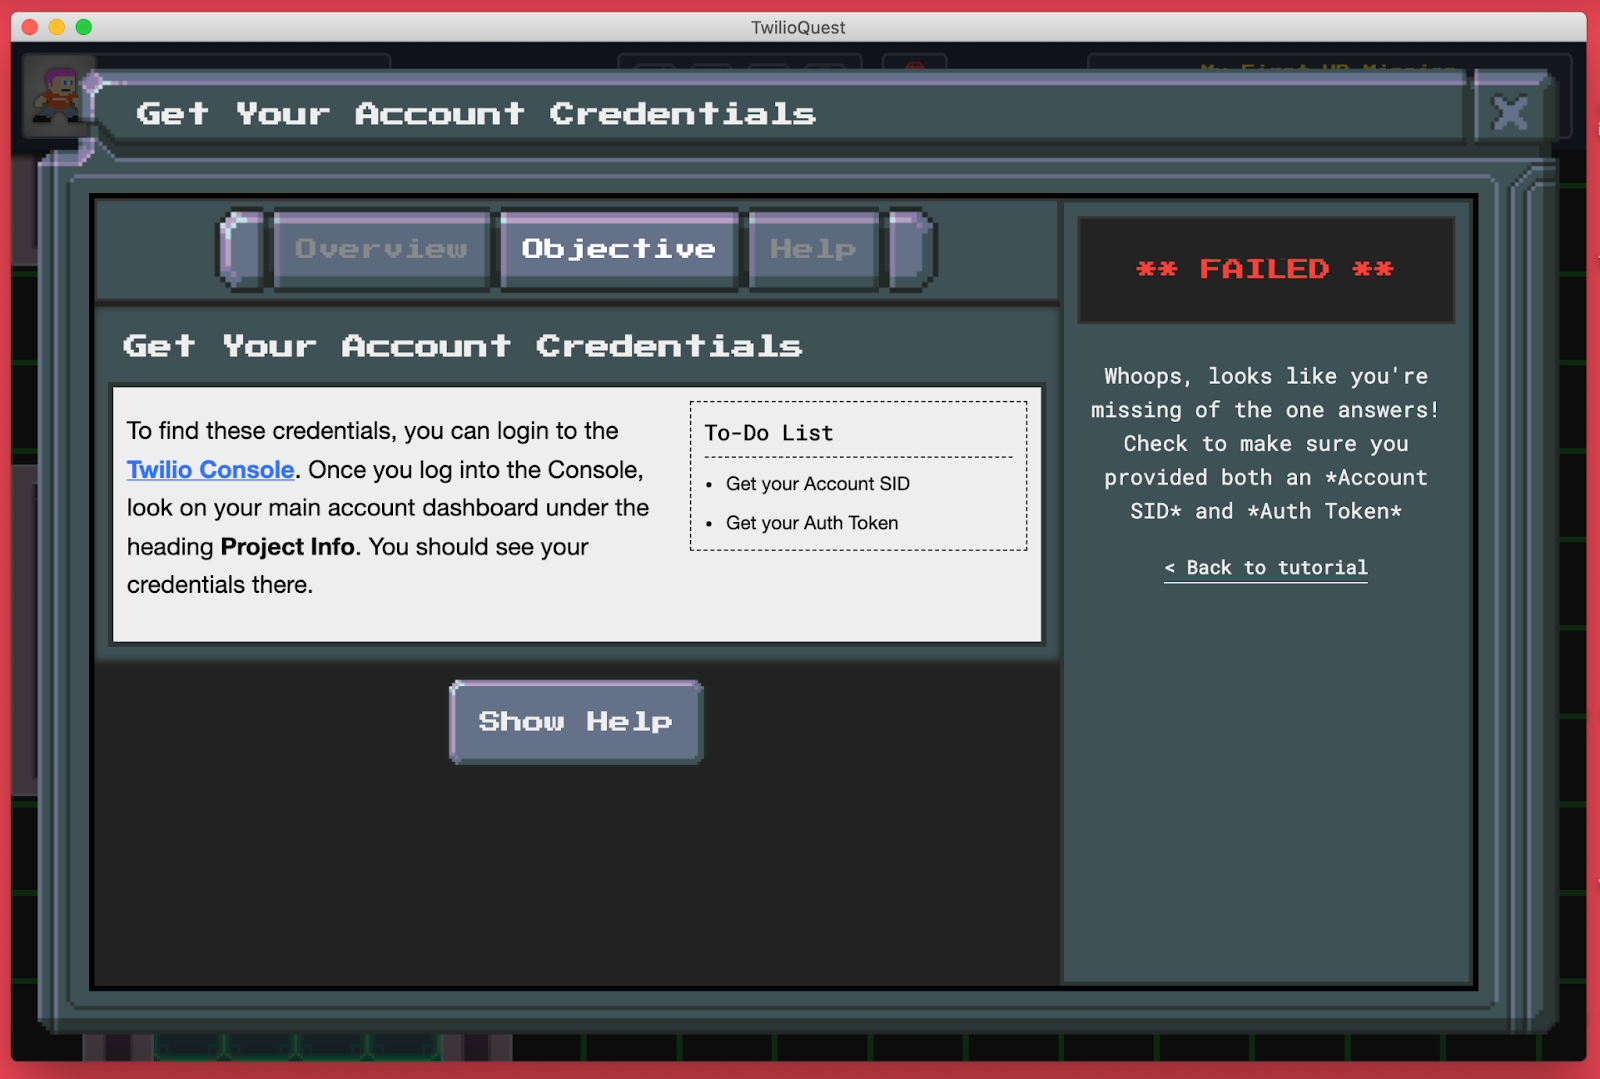
The next step is to check for the first potential failure: did the player leave either of these questions blank? If they did, there’s no point in continuing on with the validation. To see this in action, add the highlighted lines to your validator function:
If either of the fields were left blank by the player, then the helper.fail() callback will be returned and the validation will stop executing. The player will see whatever message is passed to the fail() callback method.
If the if-statement fails, the code will continue executing. After you’ve made sure that both the accountSid and authToken have values, the next step is to try and use the player’s credentials to connect to the Twilio API.
Below the if-statement, add the following try-catch block:
This code tries to connect to the Twilio API using the Twilio Node Helper Library. If anything goes wrong with this attempt, the code will move to the catch block and automatically return a failure message that includes the error.
In a real TwilioQuest level, instead of just returning the error message, you might want to make the failure message more user friendly or give an extra hint.
If the attempt to connect to the Twilio API is successful, then you know that the player entered valid, usable credentials. This means that they completed the objective!
Below the try-catch block, add the following code:
This code runs the helper.success() callback. It passes two things to the callback: a success message that the player will see, and an array. The array is optional, but in this case it’s very important.
Because the second objective of this level asks the player to send an SMS with the account credentials they entered in this first objective, you need to be able to access these credentials in the validation code for the second objective.
Otherwise, without access to the successful credentials the player entered in this first objective, there would be no way to test if their SMS was successful in the second. The only option would be to have them enter their credentials again, and that’s super annoying for the player!
Instead, whenever you call the success() callback, you can pass an array of objects as the second argument. The objects in this array will become environment variables that you will now have access to in the validation code for any other objective.
Complete your second objective
Congratulations, you finished the code for your first objective! Now it’s time to move on to the second objective: send_sms.
The objective.json file
Open the my_vr_mission/objectives/send_sms/objective.json file. Replace all the contents with the following:
Aside from the title and description, the main difference between this objective.json file and the one from the previous objective is the validation_fields array. This objective will only have one question: What’s the SID of the message you just sent?
When you write the validation code for this objective, you will use this SID and the player’s Twilio credentials to fetch the message and compare its body to the expected text you’ll outline in the objective’s description.md file.
The description.md file
Save and close your objective.json file and instead, open the my_vr_mission/objectives/send_sms/description.md file. Replace all the contents with the following:
Just like the previous objective, feel free to leave the walkthrough.md file as is.
Validate the objective
The next step is to validate the player’s response. Open the my_vr_mission/objectives/send_sms/validator.js file and delete everything inside.
Copy the following code and paste it into the file:
This code imports the assert npm package. Then, inside the validator function, it saves the two environment variables you created in the first objective to local variables. This is what’s happening on the highlighted line (line 4).
Notice how the environment variables have a prefix on them that didn’t exist when you created them: TQ_. Whenever you access environment variables created in the game, you’ll need to use this prefix.
With the player’s account credentials now accessible, this code attempts to connect to the API and fetch the message using the message SID that the player provided in this objective.
Assuming the message is successfully fetched, the code will compare the body of the message to the expected text: TwilioQuest rocks!.
If the message couldn’t be fetched, an error will be thrown and the fail() callback will be run from the catch block.
Likewise, if the assertion is false, the fail() callback will be run from the catch block.
If none of the above checks fail, then you know that the player completed the objective successfully, and the success() callback will run.
Create the level map
One of the extra fun parts about building TwilioQuest extensions is getting to design the level maps. The TQ team uses an app called Tiled to design and build the game’s map. You’ll use the same app for your levels, and the extension template you downloaded already contains all the tilesets you need to get started.
Designing a layer map can be complex, and there are a lot of nuances to the Tiled app. I won’t go into all of that in this post, but the TQ team has written some great documentation on map building. Also, stay tuned for an upcoming tutorial that will cover all of these concepts!
In the meantime, for this demo, I’ll be providing the map file for you.
In your mission’s folder, my_vr_mission, look for the maps subfolder. Inside this folder there will be a default.json file. This is a level map that the TQ team has made for you, and it’s very cool, but doesn’t align with the objectives you’ve created in this extension. So for this tutorial, replace the included default.json file with the one I’ve created, available at this gist.
Test out your extension
Save any open files, and then restart TQ, taking care to set the version to TQ 3.2 Preview.
Once the game is loaded, you’ll find your avatar inside the Fog Owl:
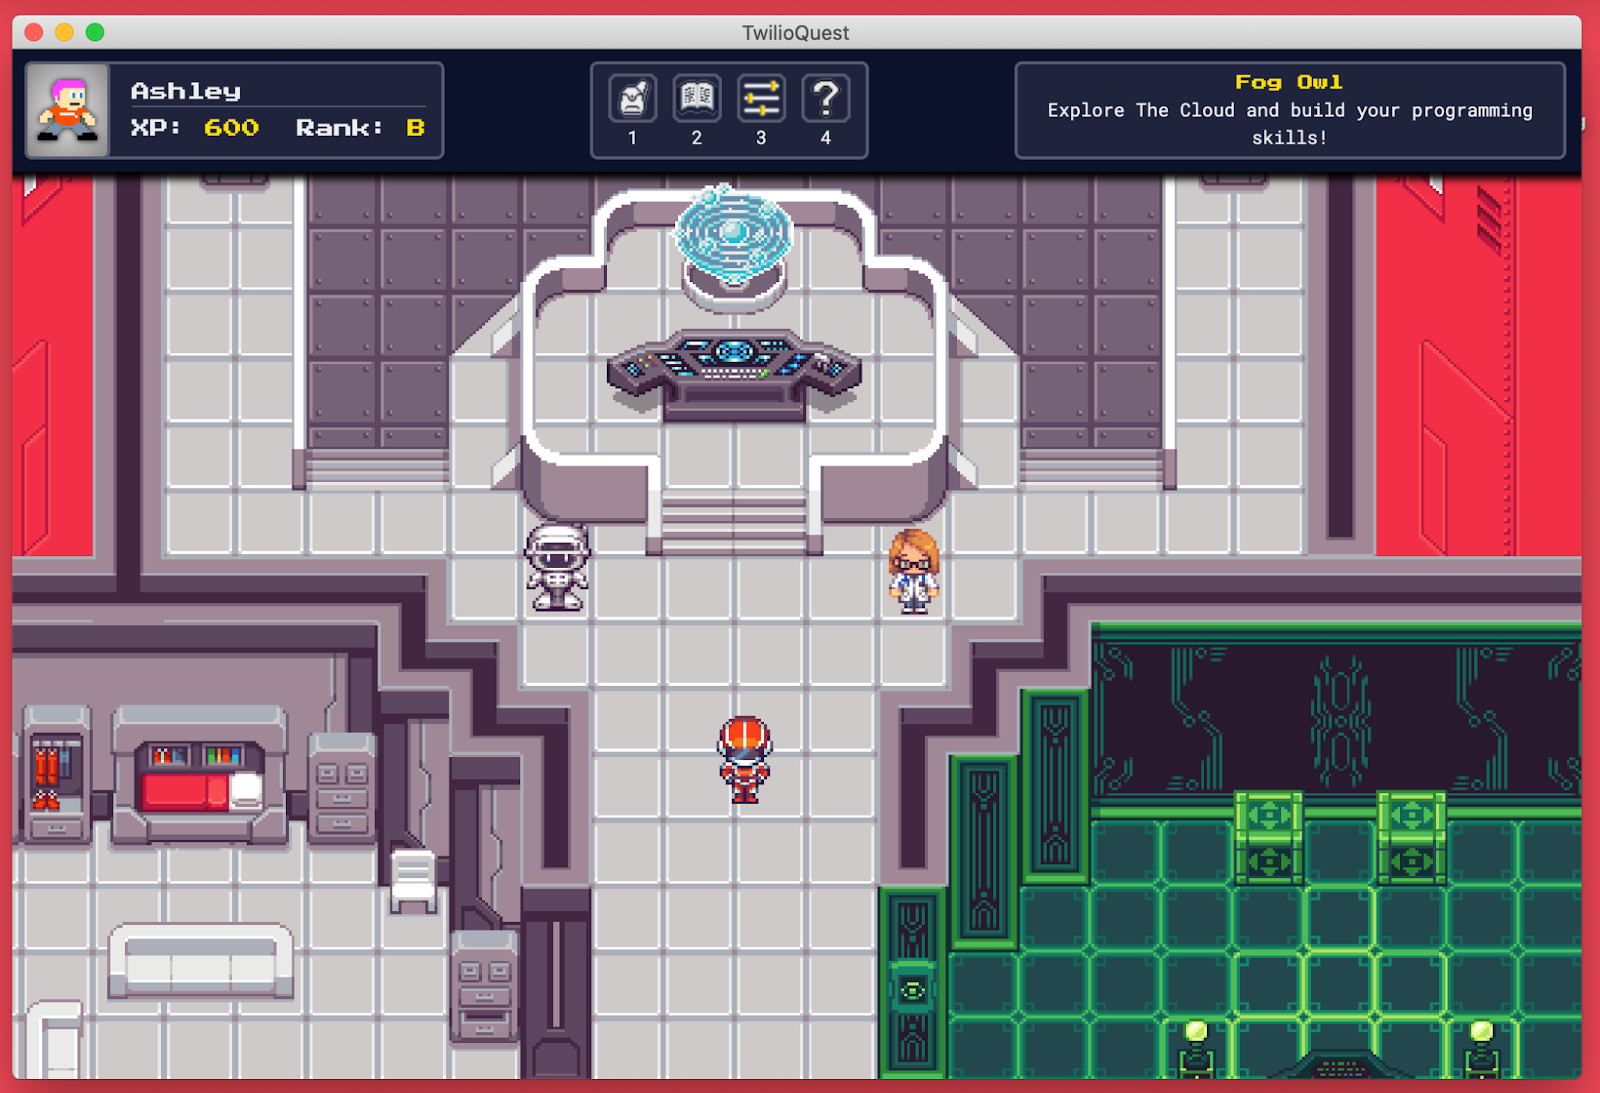
Use your arrow keys to move your avatar down and to the right, into the training room.
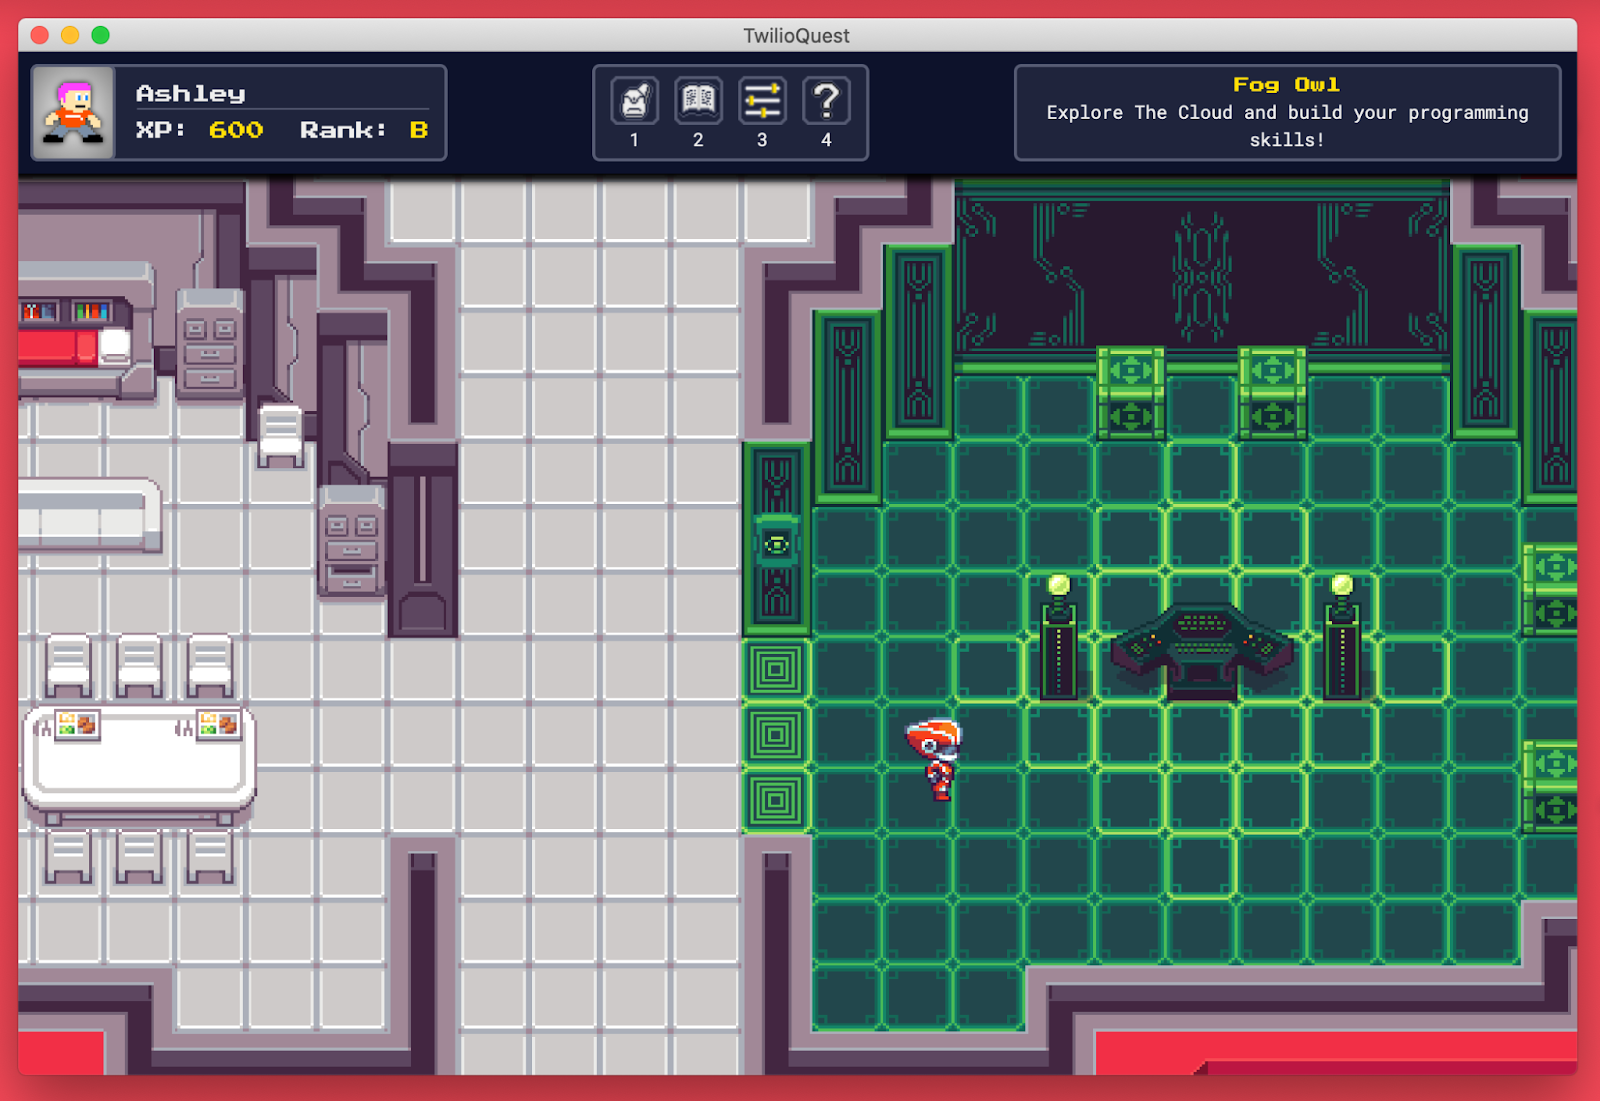
Approach the computer in the center of the room, and you’ll see an exclamation mark appear. In TQ, the exclamation mark indicates an object you can interact with. Press the spacebar to initiate the interaction.
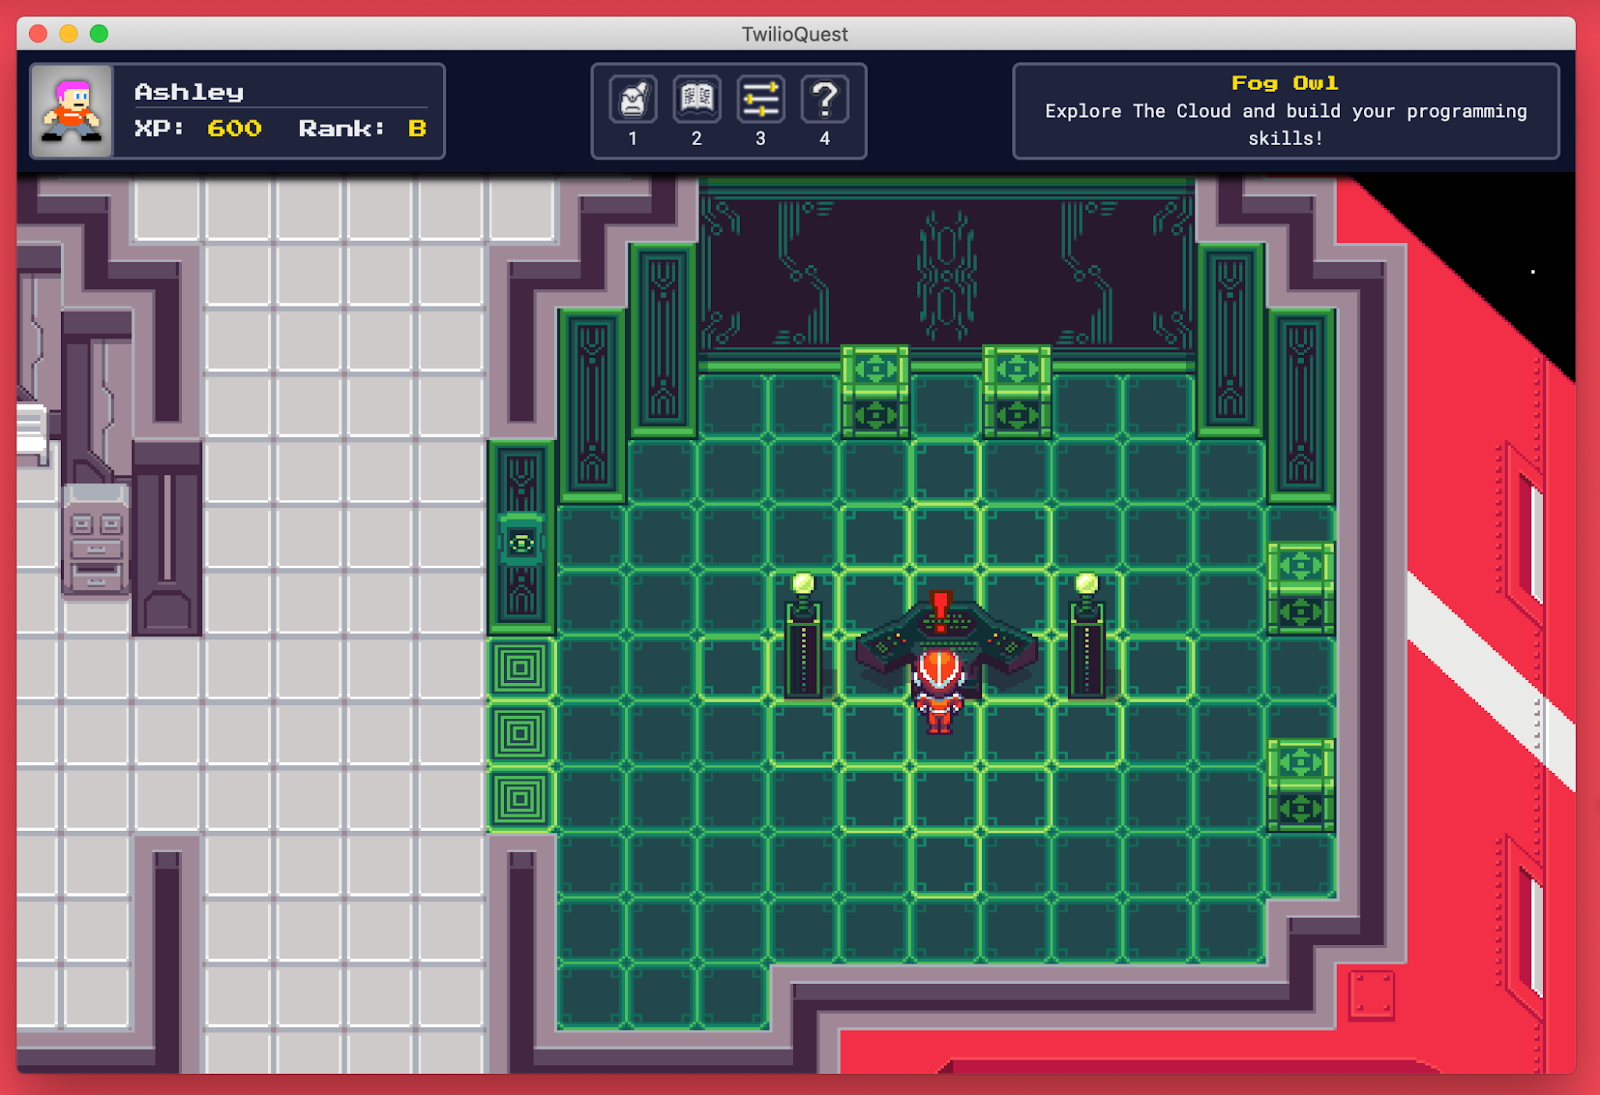
In this case, pressing the spacebar will open a modal with all of the available training missions, yours included.
Select your mission and then click the Launch Mission button. This will open your level.
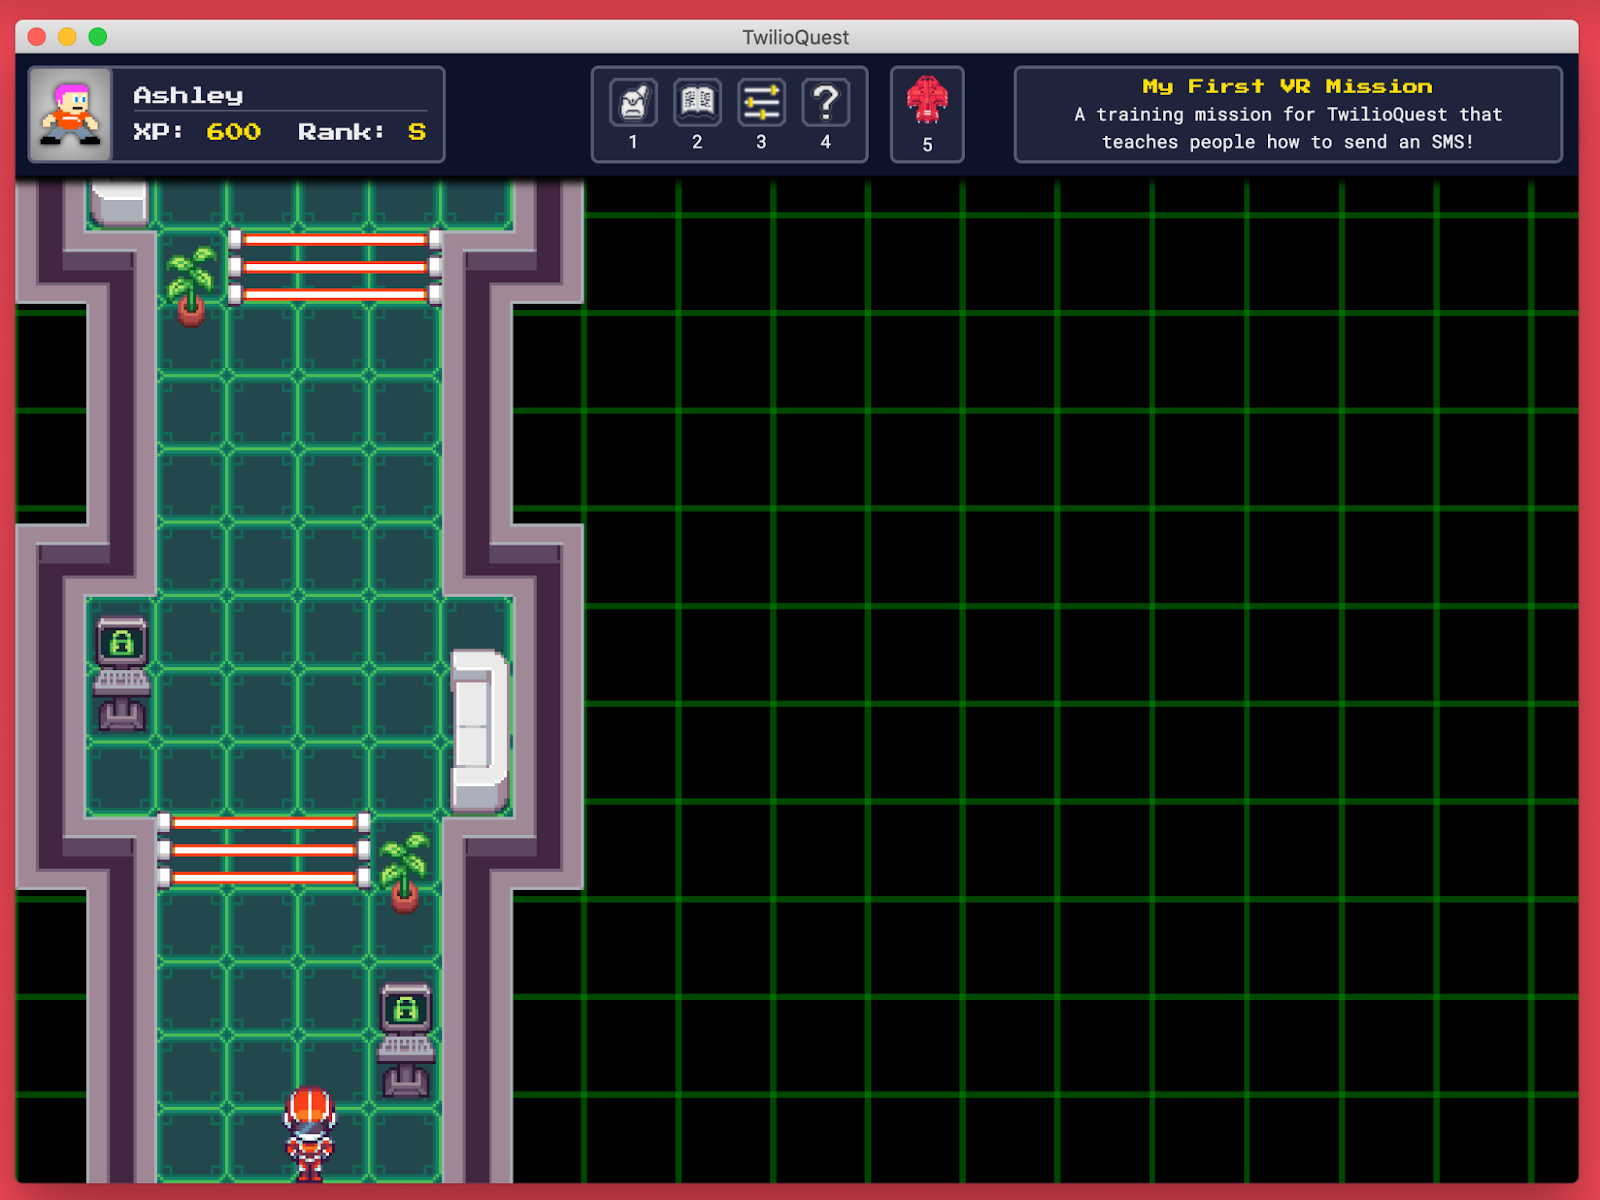
Using the arrow keys, navigate to the first terminal on the right and press the spacebar. This will open your first objective. Complete the objective and you’ll see a success screen. Once you exit the modal, the first laser barrier will open.
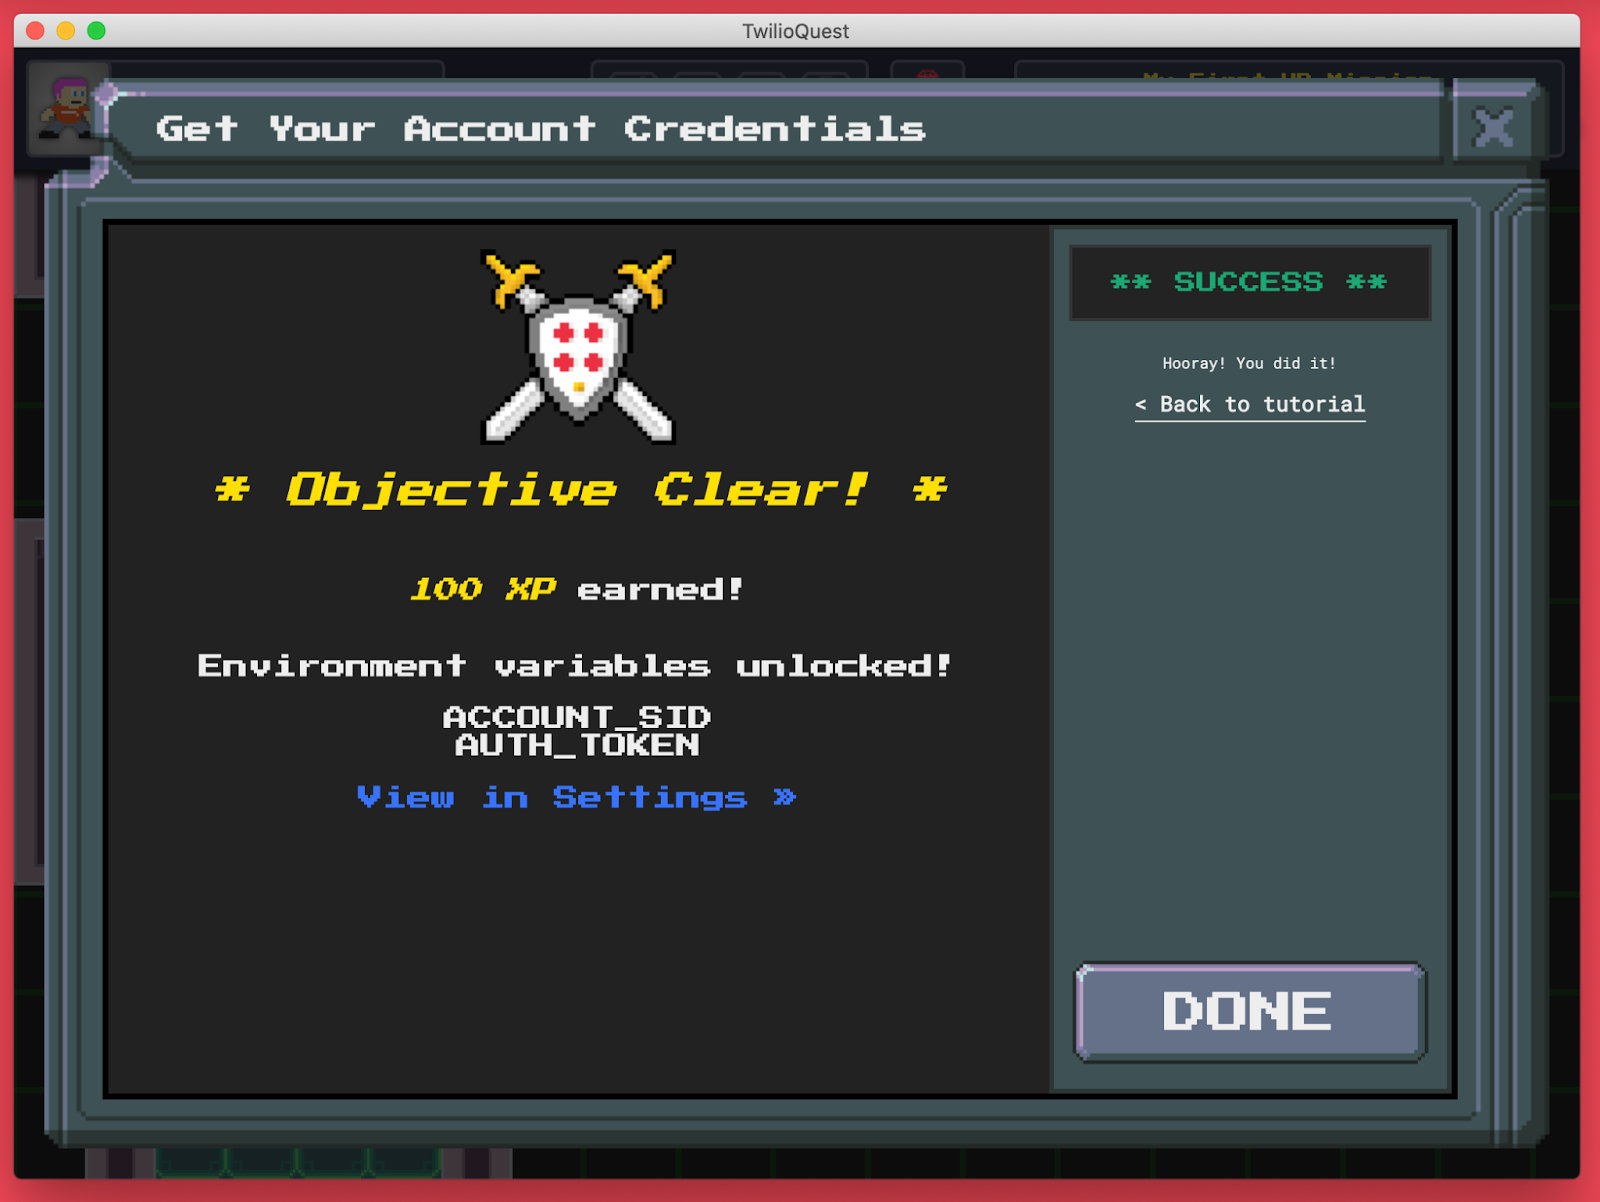

Keep going, and use the next terminal to complete the second objective and exit the level.
Congratulations, you did it!
Moving forward with TwilioQuest
I hope you enjoyed this article and got a high-level overview of how you could design levels and extensions for TwilioQuest. The content of this article is just the beginning - there are endless ways that you can bring fun, excitement, and education to TwilioQuest, and we can’t wait to see what you build!
Ashley is a JavaScript Editor for the Twilio blog. To work with her and bring your technical stories to Twilio, find her at @ahl389 on Twitter. If you can’t find her there, she’s probably on a patio somewhere having a cup of coffee (or glass of wine, depending on the time).


Related Resources
Twilio Docs
From APIs to SDKs to sample apps
API reference documentation, SDKs, helper libraries, quickstarts, and tutorials for your language and platform.
Resource Center
The latest ebooks, industry reports, and webinars
Learn from customer engagement experts to improve your own communication.
Ahoy
Twilio's developer community hub
Best practices, code samples, and inspiration to build communications and digital engagement experiences.