How we built a terminal interface for our conference using React
Time to read: 7 minutes
September 30, 2020
Written by

For this year's SIGNAL conference we decided we wanted to enable developers to build awesome things with Twilio while watching the conference. As a result we ended up building SIGNAL Developer Mode as an extension of the Twilio CLI.
In this blog post we'll talk about both some of the design decisions that went into building this as well as the underlying technology. We'll have some code snippets but the entire project is also on GitHub.
Why a CLI Experience?
When virtual conferences started ramping up this year and we attended some ourselves, we realized a few things were different than attending a conference in person.
One of the things we noticed that was different was the urge of wanting to learn more and build with the things that were mentioned in keynote sessions and throughout the conference.
When you are at a physical conference you try to keep track in your head of all the things you want to try, or maybe you take notes. But with conferences being virtual, you have everything right in front of you (or at least in reach). Your browser, your code editor and your terminal.
We wanted to allow every attendee at SIGNAL to be able to build and explore Twilio products as they are seeing them. We already have a Twilio CLI that provides a plugin model that we could leverage to build our experience on top of.
By building on top of the Twilio CLI we were able to provide a couple of functionalities such as configuring variables in the sample apps to set account credentials.
What should it do?
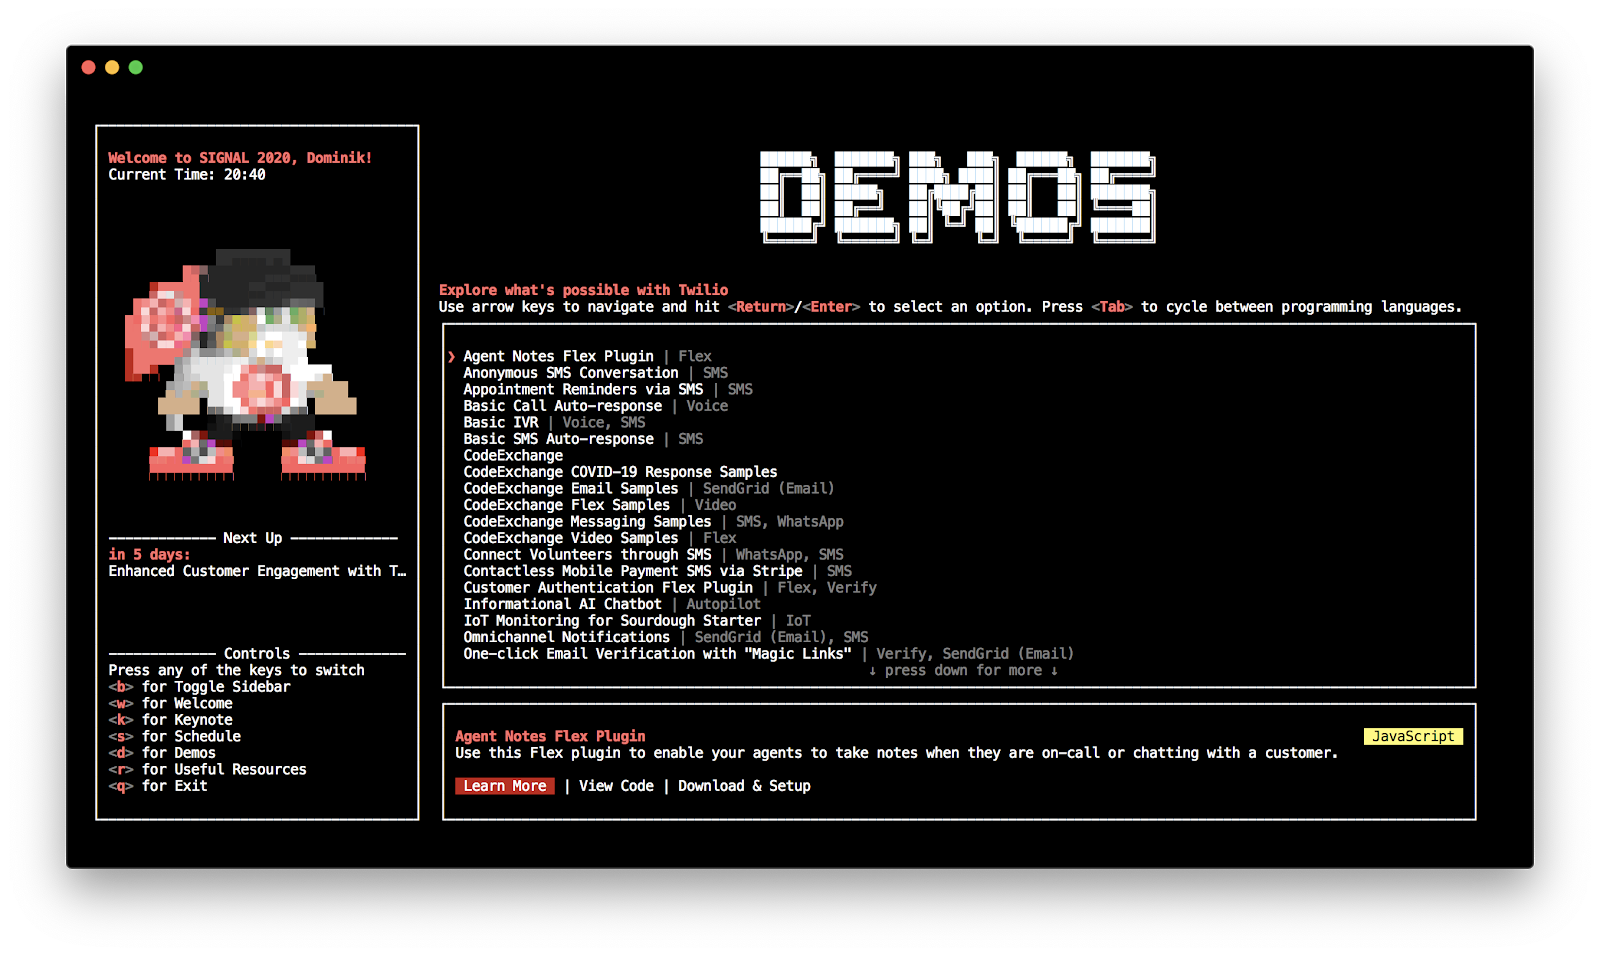
Since the main part for us was to assist attendees to start building, the main functionality we wanted to add was the ability to access a catalog of relevant sample apps that can be automatically downloaded and configured.
From there we thought about what else could be useful for an attendee. Aside from the obligatory resources section with useful links there was another thing we really wanted to add.
It goes back to our own experiences of attending virtual conferences. Providing you with a collection of samples to browse through is neat, but what if we can show you relevant demos and links in the right moment as you are watching the keynote in combination with the closed-captions of the keynote video.
Other than that, we thought adding the schedule will help you having it at hand at all times to browse, register for sessions or open the browser.
What technology to use?
Since we would build on top of the Twilio CLI, the foundation of our technology for this challenge was set. The Twilio CLI uses the Open CLI Framework (oclif) that is based on top of Node.js.
The Node.js ecosystem actually provides a huge variety of useful tools and libraries to build CLI experiences and can be a great entry point for people who want to build CLIs.
The Twilio CLI already had a library called inquirer included in it to handle prompts. For most CLIs, I'd use that library or any similar one such as prompts or enquirer.
But for this CLI we wanted to make it feel more like a regular graphical user interface to be more beginner friendly and also expose all of the functionality in one place.
For the Node.js ecosystem there were two options that I was aware of that we could use. The first one was blessed, a curses-like library that is ideal but unfortunately also unmaintained.
The alternative is a React-based CLI framework called ink. It's actually used by a couple of CLIs that you might have used such as Gatsby, Parcel or Yarn 2.
React in a CLI?
Running React in a CLI might sound odd at first, or maybe even after thinking about it for a while. The way it works is similar to React Native. React itself is actually not a browser-specific library. If you built something with React for the browser in the past you might have noticed that you use two dependencies, react and react-dom. The only point where you use react-dom is to call the render function to render your application to the DOM of the browser.
ink is basically react-dom but instead of being the glue between React and the browser it's the glue between React and the terminal. There were a couple of reasons why ink was ideal for our CLI experience.
At Twilio one of our values is "Draw the Owl", it refers to how there is no instruction book and that it's sometimes up to us to figure things out. This was one of those situations. Ink provides us with an interface that doesn't limit us with a set of components we can use. Quite the opposite, it only provided us with a limited but powerful set of components. A <Text> component that works like a <span/> in the browser and a <Box> component that is like a <div /> in the browser with display: flex set.
From there, there were no rules on how to build our UI. We were able to create our own reusable UI components and use them in various places. For example we created a <DemoEntry /> component that we could render in multiple places, from the demos section, over the interactive keynote mode to the installer screen.
Another reason this was ideal for us was that some of the functionality had to mimic the SIGNAL website that was built with a React framework called Next.js. That meant that collaborating was easier as we were able to re-use the same APIs and partially the same libraries.
The rest of the magic
Since we essentially built a "front-end" in Node.js we had the luxury of being able to leverage some front-end and back-end libraries to achieve our goals.
For example the CLI uses the Apollo Client and Apollo React libraries to interact with the GraphQL API that the SIGNAL website uses.
To keep track of more complex state situations, it uses the XState state machine framework, just like a browser-based front-end would do.
At the same time it uses Node.js specific libraries such as the Serverless Toolkit, pkg-install, configure-env and degit to handle the demo application setup and part of the hidden cheat mode.
Since one of the big things was to show relevant information at the right moment inside the CLI for the keynote experience, we had to synchronize the CLI and your browser session. For that we are using Twilio's Sync product, a web socket based tool that is designed to synchronize state between multiple clients and works both in the browser and in Node.js.
The challenges
Building a CLI, especially with a graphical user interface, brings similar but slightly different challenges than what you have with building a website.
One big part of building this experience was making sure that it worked for as many people as possible and that meant doing the equivalent of a cross-browser testing. Except that instead of Firefox, Chrome, Edge, Safar and co, it was Hyper, iTerm, Windows Terminal, Terminal.app, cmder, Command Prompt, Powershell, VS Code and more.
And instead of light and dark mode, we got color schemes, different color support modes and limited character sets. Luckily libraries like chalk (that ships with ink) and figures have got your back with at least some parts of this challenge.
The other problem comes with different terminal sizes. If you just build a basic text based CLI you probably don't really care about the size of the user's terminal. And in fact ink can even handle text wrapping for you if your output is bigger than the terminal. But since we built a UI that took over your entire terminal, we were confined by that. You can imagine this like building a website where any overflow on the window was hidden. Except that in this case it wasn't. It would render over each other creating unrecognizable content.
Since ink uses Yoga Layout to ship flex box, making responsive interfaces is mostly pretty easy. Except that there is no equivalent overflow: hidden or overflow: scroll option. Which means if our content doesn't fit, we have to hide it. We ended up building a collection of components that would help us do that job either based on the total window size or the size of a component.
Since you can listen to key presses we were able to also build some scrollable components that would only render as much as there was space for and then adapt that based on key events. You can find the full collection of our components in the GitHub repository.
The last big challenge is largely out of our control. Every terminal renders text differently and differently efficient. The result is that some terminals flicker and some flicker quite hard when the content is being updated. To mitigate that we tried to reduce the amount of re-renders to a minimum on the terminals that we know suffered from flickering. For example our loading indicator would only render a spinner if we felt confident that the terminal was fine with it.
What I learned
We are super excited about SIGNAL Developer Mode and personally it was interesting for me to explore some of the boundaries of what's possible in the terminal using React and ink. Building something that can leverage both front-end and back-end concepts in the same tool can be incredibly powerful.
When it came to prototyping the experience, I relied on starting with writing vanilla Node.js code and using the import-jsx module to pull in any JSX files. But as the project was growing, I needed more confidence in the changes that I was making and ended up transitioning the project step by step over to TypeScript. If you are interested in knowing more about that, check out my blog post on how I'm transitioning existing projects from JavaScript to TypeScript.
While I certainly hit some occasional roadblocks and limits on what's possible, it also sparked my ideas for some future things I want to try to build with this stack. This also drove my decision on investing a bit more time in creating more flexible and reusable components.
If you are interested in the entire code and would like to check out the set of components and hooks that were created for this project, check out the GitHub repository and let me know if you'd like to see us move them into a separate library.
Lastly a huge shout out and thank you to Vadim Demendes and Sindre Sorhus for maintaining all the amazing tools and libraries that built the foundation of this experience.
If you have any questions, or want to show off your own CLI experiences you built with ink or other tools, feel free to hit me up:
- Email: dkundel@twilio.com
- Twitter: @dkundel
- GitHub: dkundel
- dkundel.com


Related Resources
Twilio Docs
From APIs to SDKs to sample apps
API reference documentation, SDKs, helper libraries, quickstarts, and tutorials for your language and platform.
Resource Center
The latest ebooks, industry reports, and webinars
Learn from customer engagement experts to improve your own communication.
Ahoy
Twilio's developer community hub
Best practices, code samples, and inspiration to build communications and digital engagement experiences.